I am so excited to share this recipe with you because honestly, this Texas cobbler changed my dessert game overnight! When I first started baking, anything that required careful folding or making a homemade crust felt like a monumental task. I’d end up with sad, sunken fruit crisps more often than not. But this dessert? It’s the absolute definition of foolproof.
This particular Texas cobbler is famous for being colorful, packed with three different kinds of sweet fruit, and topped with the most incredible, crunchy almond layer. It’s what I whip up when company shows up unexpectedly or when I just need a serious sugar fix without spending hours in the kitchen. I promise, if you can open a can, you can master this dessert. It’s pure magic!

Gathering What You Need for Texas Cobbler
The best part about this recipe is that gathering the ingredients takes maybe ten minutes tops. Seriously, that’s it! Mostly, you’re just opening cans, which is a great workout for your can opener. For this amazing Texas cobbler, we need three different fruit components to get that beautiful, colorful swirl. Don’t try to substitute here; the mix of canned fillings is what makes this dessert so easy and reliably delicious.
We’re keeping things simple, but precision matters when you’re layering, so have your measuring cups ready!
Essential Ingredients for Your Fruit Base
For the fruit bottom of your Texas cobbler, you need to grab three specific canned fillings. Yes, canned! They cook down perfectly and give you that deep, syrupy sweetness. You’ll need one large can of crushed pineapple, making sure you use all the juice—that juice is crucial for moisture.
Then, grab one can each of cherry pie filling and blueberry pie filling. When you spoon these in, just gently swirl them once or twice. We aren’t making a uniform mash; we want distinct pockets of color. Trust me on this one; the slightly tart cherry next to the sweet blueberry makes the whole thing sing!
Creating the Buttery Almond Topping
This topping is where the real texture comes from! You’ll need that box of yellow cake mix—don’t worry about making the cake itself, we just want the dry mix. Over that dry mix, you’re going to sprinkle half a cup of shredded coconut and half a cup of sliced almonds. Make sure those almonds are sliced, not slivered, for the best crunch.
Finally, the lifeblood of the topping: one cup of unsalted butter, melted. This butter gets drizzled over everything in the end. It soaks right into that dry cake mix and turns into the crispiest, butteriest crust you’ve ever had on a cobbler.
Equipment Checklist for Making Texas Cobbler
You won’t need your fancy stand mixer for this one, thank goodness! This dessert is happy with the basics. Have these few items ready before you start opening cans, and you’ll be golden.
- A standard 9×13-inch baking dish.
- A large bowl for mixing any topping elements if you want to keep things tidy.
- Measuring cups for the butter and for checking the cake mix volume.
- A small saucepan or microwave-safe bowl for melting that beautiful butter.
- A spoon or spatula for gently swirling the fruit.
Step-by-Step Instructions for Texas Cobbler Success
Alright, let’s get this beautiful fruit masterpiece assembled! This whole process moves fast—I think you can have it in the oven in under fifteen minutes if you’re organized. Remember, the goal here is simple layering, not complicated folding. We want texture and color contrast in our Texas cobbler.
Preparing the Pan and Fruit Layers
First things first: get that oven preheated to 350 degrees Fahrenheit. While it’s warming up, lightly grease your 9×13 baking dish. I usually just use a little bit of cooking spray or a swipe of butter around the edges. Don’t make it too heavy, we don’t want a greasy bottom!
Now for the fruit. Spread that crushed pineapple, juice and all, right across the bottom of the prepared dish. This forms our sweet, tropical base layer. Next, grab your cherry and blueberry fillings. Spoon them gently over the pineapple. Here’s the trick: take your spatula and gently swirl the fruit together just once or twice. I mean it—just a little motion. If you mix it too much, you lose that gorgeous visual separation.
Building the Cake Mix and Butter Topping
Once the fruit is settled, it’s time for the crunch factor. Sprinkle that dry yellow cake mix evenly over the top of the fruit. Don’t pat it down! You want it loose so the butter can penetrate. Next, sprinkle on your shredded coconut and those sliced almonds. Try to get an even distribution so every serving gets some of that nutty crunch.
The most important step for the topping is the butter. Melt a full cup of unsalted butter—it needs to be totally liquid. Slowly drizzle that melted butter all over the top of the dry cake mix. Try to cover as much surface area as possible. Don’t worry if you see little dry patches; the butter will spread as it bakes and soak into those spots. This is the secret sauce of every great Texas cobbler.
Baking Time and Visual Cues
Slide that dish into the preheated oven. It needs a good 40 to 50 minutes in there. You’ll know it’s done when the topping is beautifully golden brown—not burnt, but nicely tanned. Also, look for the fruit bubbling up around the edges. If you see thick, syrupy bubbles, that fruit layer is hot and ready!
When you pull it out, resist the urge to dig in immediately! Let this Texas cobbler cool for at least ten minutes after it comes out of the oven. That short cooling time lets the butter settle and the fruit set up just enough so it doesn’t run everywhere when you scoop it out. Then, serve it warm, maybe with a big scoop of vanilla ice cream!

Tips for Making Expert-Level Texas Cobbler
Even though this recipe is famously easy, a couple of little tricks can take your Texas cobbler from good to absolutely legendary. The main thing I learned over time is that you cannot rush the butter drizzle. Seriously, take your time melting it, and then slowly pour it over the dry cake mix. If you dump it all in one spot, that section of the topping will turn into a dense, buttery brick instead of getting light and crispy.
Also, don’t be afraid to use the full baking time if your oven runs a little cool. I always check it right at the 40-minute mark, but if the top still looks pale, just let it ride until you see that deep golden color. That color equals crunch! Another pro tip for this Texas cobbler: If you want extra nutty flavor, lightly toast your sliced almonds in a dry skillet for about three minutes before sprinkling them on. It makes a huge difference in the overall aroma.
Finally, when serving this amazing dessert, make sure you get a bit of every layer in your scoop—that perfect balance of crisp topping, sweet fruit, and that buttery cake base is what this recipe is all about!
Ingredient Notes and Simple Swaps
I get so many questions about swapping things out in this recipe, and usually, I tell people to stick to the script because it’s so good as is! However, there are a few little adjustments you can make if you’re missing something. If you don’t have shredded coconut on hand, don’t panic! You can skip it altogether, or if you want that texture back, you can substitute it with roughly chopped pecans. They won’t taste the same as coconut, but they add a nice bite to your Texas cobbler topping.
When it comes to the cake mix, yellow or butter cake mix works best because they have that lovely buttery flavor profile. You absolutely should avoid chocolate or spice cake mixes here; they clash with the cherry and pineapple beautifully. Also, if you don’t have sliced almonds, slivered almonds will work in a pinch, though the slices offer a slightly better surface area for crisping up under that melted butter drizzle.
Storing and Reheating Your Leftover Texas Cobbler
Now, the real test: what do you do when you have leftovers of this glorious Texas cobbler? Honestly, it rarely lasts more than a day in my house, but I always cover it just in case! Because we don’t use a traditional pastry crust, this dessert is pretty resilient.
You should store any leftovers in an airtight container. If your kitchen is very warm, I’d recommend the fridge, but room temperature is fine for about 24 hours if you plan on finishing it quickly. When it’s time to reheat, you have two great options depending on how much time you have. For the best results, I always suggest the oven to crisp up that topping again, but the microwave is perfect for a quick fix.
Here is the quick guide I follow:
| Storage Duration | Storage Method | Reheating Suggestion |
|---|---|---|
| Up to 3 days | Airtight container at room temperature or refrigerated | Brief time in the oven (300°F) or microwave |
If you use the oven, pop a small serving on a baking sheet at 300 degrees Fahrenheit for about 8 to 10 minutes. That low heat warms the fruit through without burning the edges. If you’re using the microwave, just zap a slice for 30 seconds or so until it’s warm for that perfect ice cream pairing.
Addressing Common Questions About Texas Cobbler
I always love hearing what you all are trying to figure out when you bake my recipes! Since this is such a simple dessert, people often wonder if they can upgrade the ingredients or if the name means something special. Here are the three questions I get asked most often about making the perfect Texas cobbler.
Can I use fresh fruit instead of pie filling in this Texas Cobbler?
That’s the million-dollar question! Yes, you absolutely can use fresh blueberries, cherries, and pineapple chunks, but you have to treat them like you’re making a pie from scratch. Fresh fruit won’t give you the syrup needed to soak the cake mix properly. If you use fresh fruit, you must mix it with about a half cup of sugar and two tablespoons of cornstarch or flour before layering it. Then, you’re no longer making my easy dump cake version, but it will still taste great!
What makes this particular dessert a “Texas Cobbler”?
It’s all about simplicity, my friend! In Texas, we love desserts that are big, impressive, and require minimal fuss—we’re often busy with cookouts or family gatherings. This style, often called a “dump cake” style cobbler, lets you just layer ingredients right into the dish. It’s less about traditional pastry work and more about getting that sweet, buttery, crunchy top over warm fruit. That’s what makes it a true Texas cobbler!
How far in advance can I assemble this dessert?
I strongly advise against assembling this dessert more than an hour before you plan to bake it. Because the fruit fillings are so moist and the topping is dry cake mix, the moisture starts wicking up really fast. If you assemble it the night before, you’ll end up with a dense, gummy layer instead of that light, crisp topping we love. Bake it fresh!
Sharing Your Delicious Texas Cobbler Results
I poured my heart into making this recipe as foolproof as possible for you! Now that you’ve made your beautiful, bubbling Texas cobbler, I truly want to see it. Head over to the comments section below and let me know how it turned out. You can also follow our latest recipe updates on Facebook.
Did you serve it with ice cream? Did your family devour it in five minutes flat? Snap a picture and tag me on social media! Your feedback helps other bakers feel confident trying this easy dessert. You can also find more inspiration on our Pinterest page.
Print
Amazing Texas cobbler in 15 minutes
- Total Time: 55 minutes
- Yield: 12 servings
- Diet: N/A
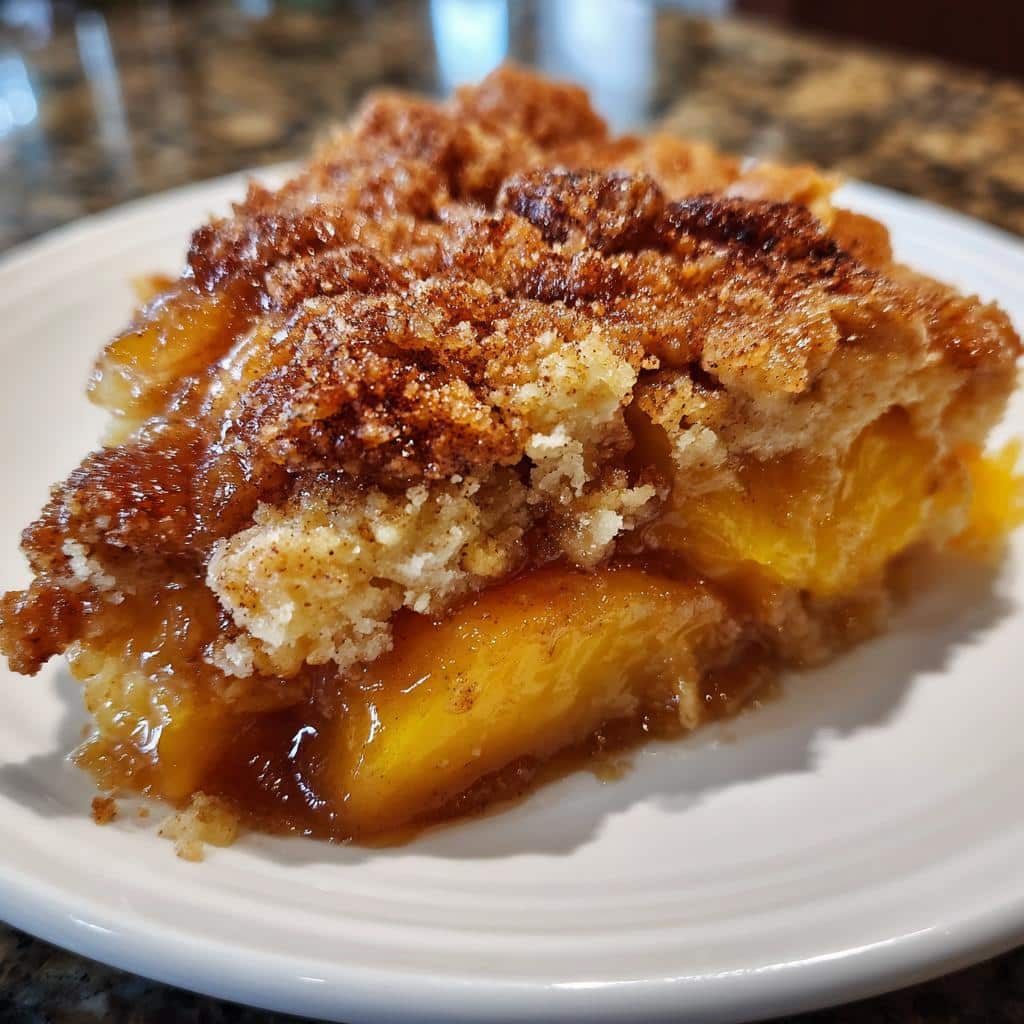
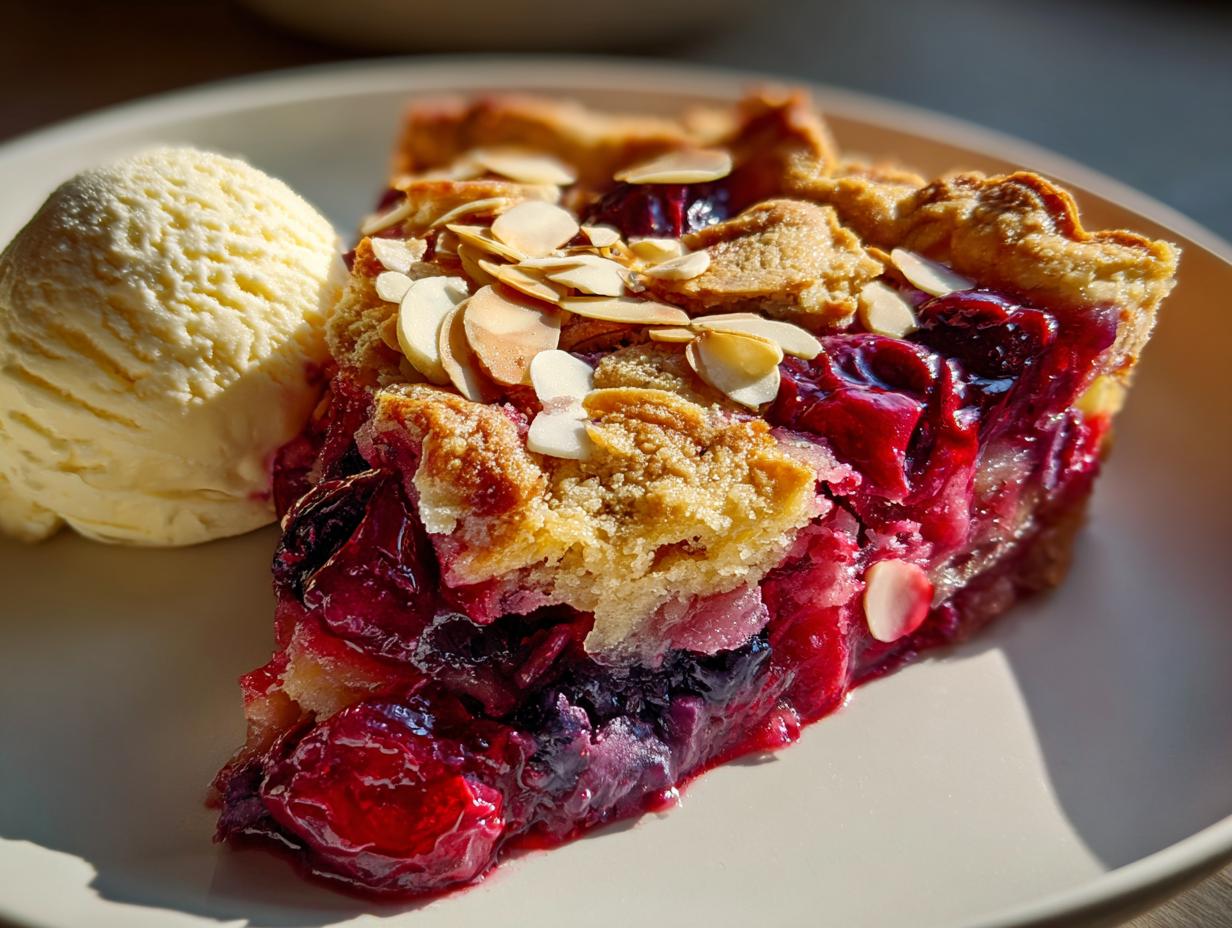
Description
This easy Texas cobbler combines cherries, blueberries, and pineapple with a buttery almond topping. It is a colorful, crowd-pleasing dessert for any season.
Ingredients
- 1 can (20 ounces) crushed pineapple with juice
- 1 can (21 ounces) cherry pie filling
- 1 can (21 ounces) blueberry pie filling
- ½ cup unsweetened shredded coconut
- ½ cup sliced almonds
- 1 box (15.25 ounces) yellow or butter cake mix
- 1 cup unsalted butter, melted
- Optional for Serving: Vanilla ice cream or whipped topping
Instructions
- Preheat the oven to 350°F and lightly grease a 9×13-inch baking dish.
- In the prepared dish, spread the crushed pineapple evenly (including juice).
- Spoon cherry and blueberry pie fillings over the pineapple and gently swirl together without fully mixing.
- Sprinkle coconut and almonds evenly across the top of the fruit mixture.
- Pour the dry cake mix evenly over the entire surface.
- Drizzle melted butter over the cake mix, covering as much of the surface as possible.
- Bake for 40–50 minutes, or until the topping is golden and the fruit is bubbling around the edges.
- Cool slightly before serving. Serve warm with a scoop of ice cream or a dollop of whipped cream.
Notes
- Serve warm with vanilla ice cream or whipped topping for added enjoyment.
- Prep Time: 10 minutes
- Cook Time: 45 minutes
- Category: Dessert
- Method: Baking
- Cuisine: American