Get ready to fall in love with making your own Spicy Tuna Onigiri! Seriously, these little rice balls are such a blast to whip up, and I promise, they’re way easier than you might think. My kitchen motto is all about keeping things fun and totally stress-free, and this recipe is the perfect example. Even if you’ve never made sushi or anything remotely like it before, you’ll be shaping these delicious Japanese snacks like a pro in no time. They’re packed with flavor, super satisfying, and just plain fun to eat.
Discover the Joy of Making Spicy Tuna Onigiri
Seriously, if you’re looking for fun and easy Popular Japanese Snack Ideas, you’ve hit the jackpot with Spicy Tuna Onigiri! They’re the ultimate Finger Food – perfect for grabbing on the go or sharing with friends. I love making these for Picnic Food because they hold up so well and are a total crowd-pleaser. Plus, they’re genuinely a Budget-friendly Sushi Meal Idea, making that delicious Japanese flavor accessible without breaking the bank. You get that amazing sushi experience right in your own kitchen, and the best part is how simple it all is. Trust me, you’ll be adding these to your regular rotation!
Why You’ll Love This Spicy Tuna Onigiri Recipe
You’ll absolutely adore making these Spicy Tuna Onigiri because they’re:
- Super Quick: We’re talking about a delicious snack ready in about 20 minutes total! Perfect for when you need something tasty *now*.
- So Easy: The steps are straightforward, and there’s no complicated cooking involved for the filling. Shaping them is honestly the most fun part!
- Incredibly Flavorful: That creamy, spicy tuna filling mixed with perfectly seasoned rice is just *chef’s kiss*.
- Versatile: Enjoy them as a snack, a light lunch, or part of a bigger Japanese meal. They’re fantastic warm or at room temperature.
Gathering Your Ingredients for Spicy Tuna Onigiri
Alright, let’s get our kitchen prepped! To make these amazing Spicy Tuna Onigiri, you’ll need a few key players. First up, we need about 3 cups of cooked short-grain rice. Make sure it’s cooled just a bit so it’s easy to handle, but still a little warm so it’s sticky. Then, grab a can of tuna – the 5.29 oz size packed in oil works perfectly. You’ll want to drain that really, really well. For that creamy, spicy kick, we’ll mix it with 2 tablespoons of Japanese mayonnaise and about 1 tablespoon of Sriracha sauce. You can totally add more Sriracha if you like it spicier! We’ll also need half a sheet of nori, cut into thin strips for that classic look, and half a teaspoon of salt to season the rice. Oh, and keep a little bowl of water handy – it’s our secret weapon for shaping!

Essential Ingredients for Spicy Tuna Onigiri
Here’s the exact rundown of what you’ll need:
- 3 cups cooked short-grain rice, cooled slightly
- 1 (5.29 oz) can tuna packed in oil, thoroughly drained
- 2 tablespoons Japanese mayonnaise
- 1 tablespoon Sriracha sauce, or to taste
- ½ sheet nori, cut into thin strips
- ½ teaspoon salt
- Water, for hands
- ½ teaspoon black sesame seeds, for garnish (optional)
Ingredient Notes and Smart Substitutions
The short-grain rice is super important here because it gets nice and sticky, which is exactly what we want for shaping our onigiri. If you can’t find Japanese mayonnaise, regular mayo will work in a pinch, but the Japanese kind has a richer flavor that’s really lovely. Don’t have Sriracha? A little bit of chili garlic sauce or even some gochujang could work, but adjust the amount as they can be quite potent! For the nori, if you prefer more seaweed, feel free to use a whole sheet cut into strips. And if black sesame seeds aren’t your thing, regular toasted sesame seeds are totally fine for that little bit of crunch and nutty flavor. It’s all about making this a delicious Japanese Snack Idea that works for you!
Step-by-Step Guide to Making Spicy Tuna Onigiri
Okay, let’s get down to business and make these awesome Spicy Tuna Onigiri! It’s really not complicated at all, and the process is actually pretty fun. We’ll break it down into a few easy steps, and before you know it, you’ll have a plate full of deliciousness.
Preparing the Flavorful Spicy Tuna Filling
First things first, let’s make that yummy filling. Grab your drained can of tuna – seriously, get as much oil or water out as you can, it makes a big difference! Dump that tuna into a small bowl. Now, add in your Japanese mayonnaise and your Sriracha sauce. Start with one tablespoon of Sriracha, and if you’re feeling brave or just love a good kick, you can always add a little more later. Gently mix it all together with a fork until it’s nicely combined and looks like a creamy, orangey-pink paste. You don’t want to mash it too much, just get everything incorporated. Set this aside for a moment; it’s going to be the heart of our onigiri!

Shaping Your Perfect Spicy Tuna Onigiri
This is where the magic happens, and it’s way easier than it looks! Lay out a piece of plastic wrap on your clean counter or cutting board. Take about three-quarters of a cup of your seasoned rice – it should still be a little warm and sticky, which is perfect for shaping. Plop that rice right in the center of the plastic wrap. Now, gently flatten the rice into a circle, maybe about 3-4 inches wide. You can use your fingers or the bottom of a small cup. Make a little well in the middle of the rice circle. Spoon a good dollop of your spicy tuna mixture right into that well. Be generous, but don’t overfill it, or it’ll be hard to close. Now, carefully lift the edges of the plastic wrap and twist them together, like you’re making a little pouch. Gently squeeze from the top to push the filling down and compact the rice around it. Once it’s all tucked in, carefully open the plastic wrap just enough to reveal your rice ball. Now, gently flatten the ball into a triangle shape. You can use your fingers to guide it, or even use the side of the plastic wrap to help create those nice, sharp edges of a triangle. If the rice starts sticking to your hands, just dip your fingers in a little water and try again – it’s a lifesaver!
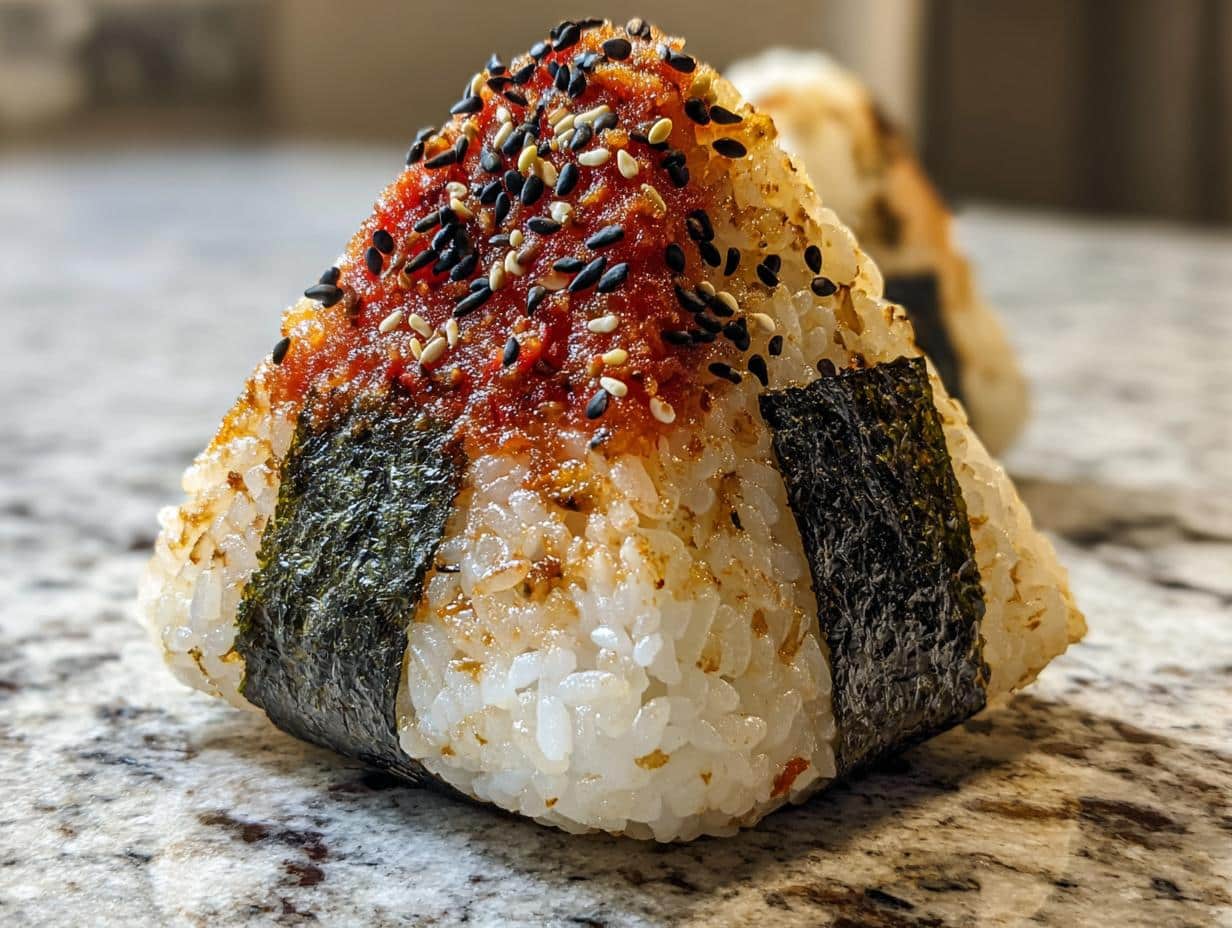
Adding the Finishing Touches to Your Spicy Tuna Onigiri
We’re almost there! Now for the cute little details that make them instantly recognizable as onigiri. Take one of those thin strips of nori that we cut earlier. You can dab a tiny bit of water on the back of the nori strip if it’s not sticking easily, then gently press it onto the base of your triangle-shaped rice ball. It just gives it that classic look and a nice little crunch. If you’re using black sesame seeds, now’s the time! Sprinkle a few on top for a bit of visual appeal and a subtle nutty flavor. And voilà! You’ve just made your very own Spicy Tuna Onigiri. How cool is that?

Tips for Perfect Spicy Tuna Onigiri Every Time
Want to make sure your Spicy Tuna Onigiri turn out absolutely perfect every single time? It’s all about a few little tricks! First, the rice temperature is key. While you want it warm enough to be sticky, if it’s too hot, it’ll be impossible to handle and might even melt the plastic wrap. Let it cool just enough so you can touch it comfortably. When you’re adding the spicy tuna filling, don’t go overboard! A good spoonful is usually perfect. If you add too much, it’ll squish out when you shape it, making a mess and potentially causing your onigiri to fall apart. Speaking of shaping, don’t be afraid to use a little water on your hands if the rice starts sticking. It really helps keep things smooth and prevents frustration. And for those nori strips, a tiny dab of water or even a grain of rice can help them stick perfectly. These little tips make a huge difference when you’re creating these delicious Japanese Food Recipes Sushi delights!
Frequently Asked Questions about Spicy Tuna Onigiri
Got questions about making these tasty little guys? I totally get it! It’s always good to have a little extra info, especially when you’re trying something new. Here are some things people often ask me about making Spicy Tuna Onigiri.
Can I Make Spicy Tuna Onigiri Ahead of Time?
Oh yeah, you totally can! These are pretty forgiving. I usually make them the morning of, but they’re often still great the next day. The best way to keep them fresh is to wrap each one tightly in plastic wrap, just like we did when shaping them. Store them in an airtight container in the refrigerator. If you’re planning to eat them later in the day, you can keep them at room temperature, but if it’s going to be more than a few hours, the fridge is a better bet. Just a heads-up, the nori might get a little softer when refrigerated, but they’ll still taste delicious!
What Kind of Rice is Best for Spicy Tuna Onigiri?
This is super important, so listen up! You really, really want to use short-grain Japanese rice, often labeled as “sushi rice.” Why? Because it has a higher starch content, which makes it wonderfully sticky. That stickiness is exactly what we need to hold the onigiri together and make shaping them easy-peasy. Long-grain rice, like basmati or jasmine, just won’t give you that same lovely cling, and your onigiri might end up falling apart. Trust me, the right rice makes all the difference for this popular Japanese Snack Idea!
How Spicy Should My Spicy Tuna Onigiri Be?
This is totally up to you! The recipe calls for 1 tablespoon of Sriracha, which gives it a nice, noticeable warmth without being overwhelming for most people. But if you’re sensitive to spice, I’d say start with just half a tablespoon, mix it in, and then taste the tuna filling. You can always add more if you want to turn up the heat! Conversely, if you love things super spicy, feel free to add a little extra Sriracha or even a pinch of cayenne pepper to the mix. It’s your snack, so make it taste just how you like it!
Can I Use Fresh Tuna Instead of Canned Tuna for Spicy Tuna Onigiri?
For this particular recipe, I really recommend sticking with canned tuna. The texture of canned tuna, especially when mixed with mayo and Sriracha, is perfect for the filling. Using raw, fresh tuna isn’t ideal here because it needs to be cooked, and the texture wouldn’t be quite right for shaping into the center of the onigiri. Plus, canned tuna is super convenient and budget-friendly! If you absolutely can’t find canned tuna, you could try using cooked flaked chicken or even mashed-up hard-boiled eggs mixed with the mayo and Sriracha, but the classic spicy tuna filling is hard to beat!
Serving and Storing Your Delicious Spicy Tuna Onigiri
Once your Spicy Tuna Onigiri are all shaped and looking fabulous, they’re ready to be enjoyed! They’re honestly delicious just as they are, maybe with a little extra soy sauce for dipping if you like. They make a fantastic light lunch, a satisfying snack, or are perfect for packing in your lunchbox or picnic basket. Since they’re finger food, they’re super easy to eat anywhere! If you happen to have any leftovers (which I doubt!), just wrap each onigiri tightly in plastic wrap again, just like we did during shaping. Pop them into an airtight container and store them in the refrigerator for up to a day. While the nori might get a little softer from the moisture, they’ll still be tasty!

Estimated Nutritional Information for Spicy Tuna Onigiri
While I don’t have exact nutritional values for every single brand of tuna or mayonnaise out there, I can give you a pretty good ballpark estimate for one of these yummy Spicy Tuna Onigiri. Generally, one serving (which is usually one onigiri) is going to be somewhere around 200-250 calories. You’ll get a decent amount of protein from the tuna, probably around 10-15 grams, and a good bit of carbohydrates from the rice, maybe 30-40 grams. The fat content will mostly come from the tuna and mayo, likely around 8-12 grams. Keep in mind that these numbers can change a bit depending on whether you drain your tuna extra well, the specific kind of mayo you use, or if you add any extra seasonings. It’s always just an estimate, but it gives you a good idea of what you’re munching on!
Print
Spicy Tuna Onigiri: Fun, 1-Minute Treat
- Total Time: 20 minutes
- Yield: 4 servings
- Diet: Vegetarian
Description
Learn how to make quick and easy Spicy Tuna Onigiri, a popular Japanese snack perfect for picnics or a light meal. This recipe is designed for beginners, making it fun and stress-free to create delicious, homemade Japanese sushi.
Ingredients
- 3 cups cooked short grain rice
- ½ sheet nori
- ½ teaspoon salt
- ½ teaspoon black sesame seeds (optional)
- Water
- 5.29 oz canned tuna in oil
- 2 tablespoon mayonnaise
- 1 tablespoon sriracha sauce
Instructions
- Season cooked rice with salt and mix well. Keep warm.
- Drain canned tuna and mix with mayonnaise and sriracha sauce.
- Spread plastic wrap on a clean surface.
- Place 3/4 cup of rice in the center of the plastic wrap and flatten into a circle.
- Spoon a portion of the spicy tuna mixture into the center of the rice.
- Lift and twist the plastic wrap to form a ball, pushing the filling inward.
- Gently flatten the ball and shape it into a triangle.
- Cut nori into strips.
- Stick a nori strip on the base of the rice ball.
- Garnish with black sesame seeds and serve.
Notes
- If preparing fresh rice, start with approximately 1.5 cups of uncooked short grain rice.
- You can use 2 sheets of nori if you prefer more seaweed.
- Regular toasted sesame seeds can be used instead of black sesame seeds.
- Prep Time: 15 minutes
- Cook Time: 5 minutes
- Category: Snack
- Method: No-cook filling, Rice shaping
- Cuisine: Japanese