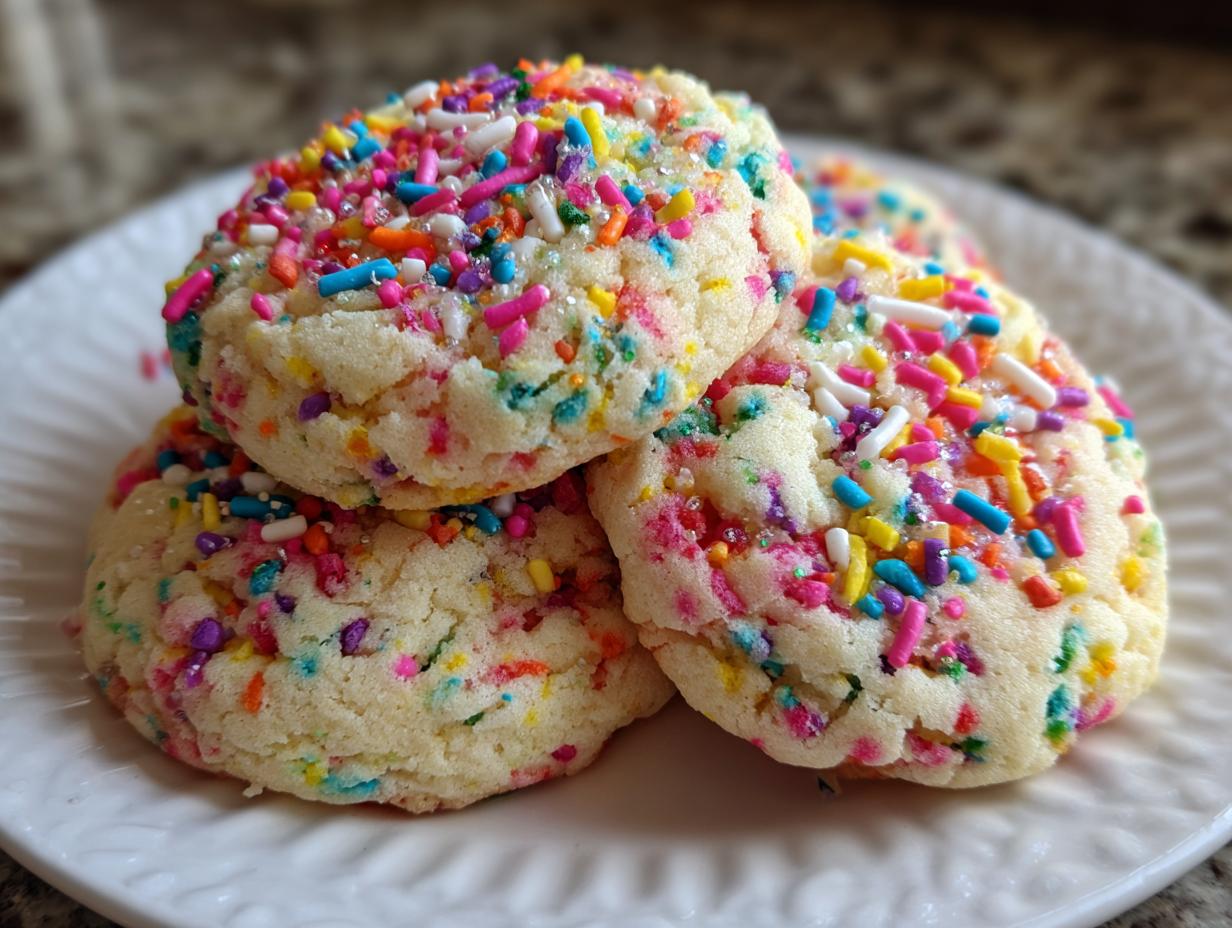
Oh my goodness, you are going to absolutely fall in love with these funfetti cookies! Seriously, forget those dry, sad little sprinkle cookies you might have tried making before. These are bakery-style, soft, chewy wonders packed with rainbow goodness, and the best part? There’s absolutely zero chilling required. I know, I know, it sounds like magic, but trust me on this one.
When I first started baking, I always messed up cookies because I got impatient waiting for dough to chill. That’s why this recipe became my absolute go-to for quick celebrations or just a Tuesday afternoon craving. Funfetti has always felt like pure joy in dessert form, right? It reminds me of those cheap little box mixes we used to make as kids, but we’ve taken that spirit and elevated it into something truly special.
We’re talking about cookies that look impressive but come together faster than ordering takeout. This no-chill dough is a game-changer. You mix it, scoop it, and bake it! Get ready for the best funfetti cookies you’ve ever made at home.

Essential Ingredients for Perfect funfetti cookies
To get these incredible funfetti cookies to turn out soft and chewy every single time, we have to be a little particular about what goes into the bowl. Don’t panic, though! Most of this stuff is probably already in your pantry. The success of this recipe really hinges on a few key details regarding the butter and the egg, so pay close attention to those sections below. We need the right balance of structure and softness for that perfect bite.
Wet Ingredients for funfetti cookies
Your butter needs to be softened, not melted—that’s a huge difference in texture! I always leave mine out on the counter for about an hour before I start mixing. For the egg, make absolutely certain it’s at room temperature. A cold egg shocks the creamed butter and makes everything seize up a bit. If you forget, just put the shelled egg in a bowl of warm water for five minutes! And don’t skimp on the vanilla; it really helps bring out the sweetness.
Dry Components and Rainbow Sprinkles
When measuring your flour, please, please, please use the spoon and level method. If you just scoop straight from the bag, you end up with way too much flour, and that’s how you get dry, cakey cookies instead of chewy ones. We’re using a mix of baking powder, baking soda, cream of tartar, and salt to get that perfect spread and lift. And for the color? You need a full half cup of rainbow sprinkles mixed right in, plus a few extra for rolling on top!

Equipment Needed for Your funfetti cookies
You don’t need a giant stand mixer for this recipe, which is why I love it for quick baking sessions! Having the right tools just makes the process smoother and cleaner. We’re aiming for efficiency here since this is a no-chill dough recipe. Keep your measuring cups handy, especially for getting that flour right.
Key Tools for Mixing and Baking
- Large mixing bowl and a separate medium bowl for dry ingredients.
- An electric hand mixer works perfectly, but a sturdy whisk and elbow grease will also do the trick.
- Rubber spatula for folding in those colorful sprinkles gently.
- Cookie scoop (about 1.5 tablespoons size) for uniform cookies.
- Two large baking sheets lined with parchment paper—this is non-negotiable for easy cleanup!
- A wire cooling rack so the bottoms don’t steam and get soggy.
Step-by-Step Guide to Making funfetti cookies
Okay, let’s get baking! Since we aren’t chilling this dough, the order of operations is super important to make sure we don’t overmix things and end up with tough cookies. Remember to have your oven preheated to 350\u00b0F before you even touch the mixer. Lining those sheets with parchment paper makes the whole process ten times better!
Mixing the Dough for Soft funfetti cookies
This is where that softened butter and sugar come in. Put them in your big bowl and use your electric mixer on medium speed. You need to cream them together until they look genuinely light and fluffy—I mean, pale yellow, almost white, and visibly airy. This takes about three solid minutes, so don’t rush it! That fluffiness is trapping the air that makes your funfetti cookies tender later on. Once it’s fluffy, beat in your room-temperature egg and the vanilla until it’s just combined. Don’t let it run too long after the egg goes in.
Now, in your separate bowl, you already whisked your dry ingredients together. With the mixer on the absolute lowest speed—and I mean low—gradually add the dry mixture to the wet. Add about a third, mix until just incorporated, then stop and scrape down the sides. Repeat this process until all the flour mixture is added. Stop the mixer the moment you don’t see any more white streaks. Seriously, stop! We are making cookies here, not bread.
Folding and Shaping the funfetti cookies
This part is the funnest! Take your spatula and gently fold in the half-cup of rainbow sprinkles. You want them distributed evenly, but you don’t want to beat the air out of the dough we just worked so hard to incorporate. Treat those sprinkles kindly! Once they are mixed in, grab a cookie scoop—I use a standard 1.5 tablespoon size. Roll the dough into neat little balls between your palms.
Here’s the bakery trick: take those dough balls and gently press the tops into a little extra bowl of sprinkles you set aside. This makes sure every single one of these funfetti cookies has that beautiful, colorful crust when they bake. Place them about two inches apart on your prepared baking sheets because they are going to spread just a little bit.

Baking and Cooling for Chewy Texture
Slide those trays into your preheated 350\u00b0F oven. They only need about 9 to 10 minutes. This is the most crucial part for chewiness! You are looking for the edges to be just barely lightly golden brown. The center of the cookie should still look soft, maybe even a little pale or underdone. If you wait until the center looks baked through, you’ve gone too far, and you’ll end up with crunchy cookies instead of the soft treats we want.
When the timer goes off, pull them out immediately. Let them sit right there on the hot baking sheet for a critical five minutes. They continue to set up during this time, which prevents them from collapsing when you move them. After those five minutes, carefully transfer them to a wire rack to cool completely. If you try to move them sooner, they might tear apart.
Tips for Achieving Bakery-Style funfetti cookies
Getting that perfect, vibrant, soft texture in homemade funfetti cookies takes just a couple of small tweaks that the professional bakers swear by. It’s not just about the ingredients; it’s about how you treat them! I’ve learned through many batches—some great, some slightly flat—that paying attention to temperature and timing makes all the difference between a good cookie and a truly show-stopping one.
Ingredient Temperature Matters
I mentioned this before, but it bears repeating: room temperature ingredients are your best friends here. If your butter is too cold, it won’t cream properly with the sugar, meaning you won’t trap enough air. That trapped air is what gives these cookies their structure and their melt-in-your-mouth quality. Likewise, a cold egg can deflate all that lovely air you just whipped into the butter. Take the time to let your egg warm up; it only takes a few minutes, and it pays off hugely in the final texture of your funfetti cookies.
Avoiding Overbaking Your Cookies
If you want chewy funfetti cookies, you absolutely cannot overbake them. I know it’s scary to pull something out of the oven when the middle still looks a little gooey, but trust the process! They firm up significantly during that crucial five-minute rest on the hot baking sheet. If you wait until the centers look dry in the oven, they will be hard as rocks on the cooling rack. Aim for those edges to be just lightly kissed with gold, and pull them immediately!
Storage and Reheating funfetti cookies
The best part about these funfetti cookies is that they stay soft for days, which is rare for a homemade sprinkle cookie! Since this recipe uses a no-chill dough, they are meant to be eaten quickly, but if you happen to have leftovers—which I doubt you will—storage is easy. The key is keeping air away from them so they don’t dry out. I always try to store them the same day I bake them for maximum freshness, but they hold up well.
Storing Leftover Cookies Properly
You need an airtight container for your leftover funfetti cookies. If you stack them, put a small piece of parchment or wax paper between the layers so the sprinkles don’t stick together or transfer color. If you plan to keep them for more than three days, I highly recommend popping them into the freezer. They freeze beautifully! Just make sure they are fully cooled before sealing them up tightly in a freezer bag. You can reheat them straight from frozen—just give them about 10 seconds in the microwave if you want that fresh-from-the-oven softness back.
Frequently Asked Questions About funfetti cookies
I get so many questions about these rainbow treats! Since this recipe is designed for speed with its no-chill dough, some people wonder if they can change things up. I’ve gathered the most common queries I hear about making the best funfetti cookies.
Can I Chill the Dough for funfetti cookies?
You certainly can, but honestly, why would you want to wait? The beauty of this recipe is that it skips that step entirely! If you do decide to chill the dough for some reason—maybe you made too much—just know that you’ll need to let it sit on the counter for about 30 minutes before scooping. Chilled dough spreads less, so your sprinkle cookies might bake up a little thicker.
What is the Best Type of Sprinkles to Use?
This is a fun one! You need “jimmies,” which are the long, rod-shaped sprinkles, not the tiny, hard balls called nonpareils. Nonpareils often bleed color all over your beautiful dough when mixed in, turning everything a murky blue or green. The jimmies hold their color much better during mixing and baking, giving you those vibrant specks of color in your final funfetti cookies.
Estimated Nutritional Breakdown for funfetti cookies
I always feel a little guilty sharing how delicious these funfetti cookies are, but since we know exactly what goes into them, we can get a rough idea of what we’re eating! This breakdown is based on making 24 cookies, which means each one is a perfectly sized treat. Of course, the exact numbers will shift depending on your specific brands of flour and sugar, but this gives you a good ballpark figure for enjoying your homemade sprinkle cookies.
Here is the estimated data based on one cookie serving size:
| Component | Amount |
|---|---|
| Serving Size | 1 cookie |
| Calories | 140 |
| Fat | 6g |
| Carbohydrates | 19g |
| Protein | 1g |
Share Your Amazing funfetti cookies
I truly hope these soft, chewy cookies bring as much happiness to your kitchen as they bring to mine! Now it’s your turn. When you bake these, please come back and leave a rating right below this section—it helps other bakers know these no-chill dough recipes are the real deal. I’d also love to see your pictures! Tag me on social media or just drop a comment telling me how they turned out. You can also follow along for more quick recipes on our Facebook page.
Print
Guaranteed 24 soft funfetti cookies
- Total Time: 25 minutes
- Yield: 24 cookies
- Diet: Omnivore
Description
Make soft and chewy funfetti cookies bursting with rainbow sprinkles. Easy no-chill dough for colorful, bakery-style cookies at home.
Ingredients
- 1/2 cup unsalted butter, softened
- 3/4 cup granulated sugar
- 1 large egg, room temperature
- 1 1/2 teaspoons vanilla extract
- 1 1/2 cups all-purpose flour, spooned and leveled
- 1 1/2 teaspoons baking powder
- 1/2 teaspoon baking soda
- 1/2 teaspoon cream of tartar
- 1/4 teaspoon salt
- 1/2 cup rainbow sprinkles, plus extra for topping
Instructions
- Preheat oven to 350°F and line two baking sheets with parchment paper.
- In a large bowl, cream together butter and sugar using an electric mixer on medium speed until light and fluffy, about 3 minutes.
- Add the egg and vanilla extract, mixing until fully combined.
- In a separate bowl, whisk together flour, baking powder, baking soda, cream of tartar, and salt.
- Gradually mix the dry ingredients into the wet until a soft dough forms.
- Fold in the sprinkles until evenly distributed.
- Scoop 1 1/2 tablespoons of dough per cookie, roll into balls, and dip tops into extra sprinkles.
- Place on baking sheets about 2 inches apart.
- Bake for 9–10 minutes, until the edges are lightly golden but centers still look soft.
- Let cookies cool on the pan for 5 minutes before transferring to a wire rack to cool completely.
Notes
- Use room temperature egg for better incorporation.
- Spoon and level flour for accurate measurement.
- Do not overbake; centers should appear soft when removed from the oven.
- Prep Time: 15 minutes
- Cook Time: 10 minutes
- Category: Dessert
- Method: Baking
- Cuisine: American