When the 3 PM slump hits, I don’t mess around with complicated recipes. Seriously, who has the time? That’s why I’m obsessed with this Quick Fruit and Nut Snack Plate with Chocolate. It’s my absolute lifeline when I need something beautiful, satisfying, and ready faster than I can boil water. This isn’t just food; it’s instant gratification served on a nice piece of wood!
I remember when I first started cooking—the pressure to make things look fancy was huge, but my skills were… well, let’s just say I burned toast a lot. This assembly recipe was the first thing I made that looked impressive but required zero actual cooking skill. It proves you don’t need a culinary degree to create something that tastes incredible and looks like you spent an hour prepping. It’s all about knowing how to group the right flavors together.
My Go-To 5-Minute Fix: The Quick Fruit and Nut Snack Plate with Chocolate
If you’re new to putting together snack boards or just exhausted from dinner prep, this is your moment. The beauty of the Quick Fruit and Nut Snack Plate with Chocolate is its flexibility. You don’t need precise measurements for everything; you just need to balance sweet, crunchy, and rich. It’s the perfect framework for building confidence in the kitchen because the hardest step is just slicing an apple!

Gathering Supplies for Your Quick Fruit and Nut Snack Plate with Chocolate
Before you even think about washing fruit, you need your staging area ready. Remember, the entire point of this Quick Fruit and Nut Snack Plate with Chocolate is speed. If you have to hunt for a decent knife, you’ve already lost precious minutes! Lay out everything you need near your prep area so you can move swiftly from washing to arranging.
This isn’t a baked good, so thankfully the equipment list is short, focusing mostly on presentation. You don’t need fancy gadgets, just the basics that most kitchens already have tucked away.
Essential Tools for Presentation
- A good sharp knife: You need one that can handle slicing apples and pears without fighting you.
- A sturdy cutting board: Preferably one you don’t mind getting a little juice on.
- Your serving platter or wooden board: This is your canvas! A large one works best so you can spread things out nicely.
- Small bowls or ramekins (Optional): These are fantastic for corralling the nuts and seeds so they don’t roll all over the board.
Ingredient Clarity for the Quick Fruit and Nut Snack Plate with Chocolate
Okay, let’s talk ingredients for the Quick Fruit and Nut Snack Plate with Chocolate. Because this is an assembly job, the quality and the preparation state of what you buy matter a ton. We aren’t cooking anything, so we need to make sure everything is ready to be beautiful right out of the gate. Don’t just toss things on the board; know exactly what you’re working with!
I always measure things out roughly first, just so I know I have enough variety to go around four people, but honestly, if you’re just making it for yourself, eyeball it! The key is having that perfect blend of sweet fruit, crunch from the nuts, and that deep bitterness from the chocolate.
Fresh Produce Requirements
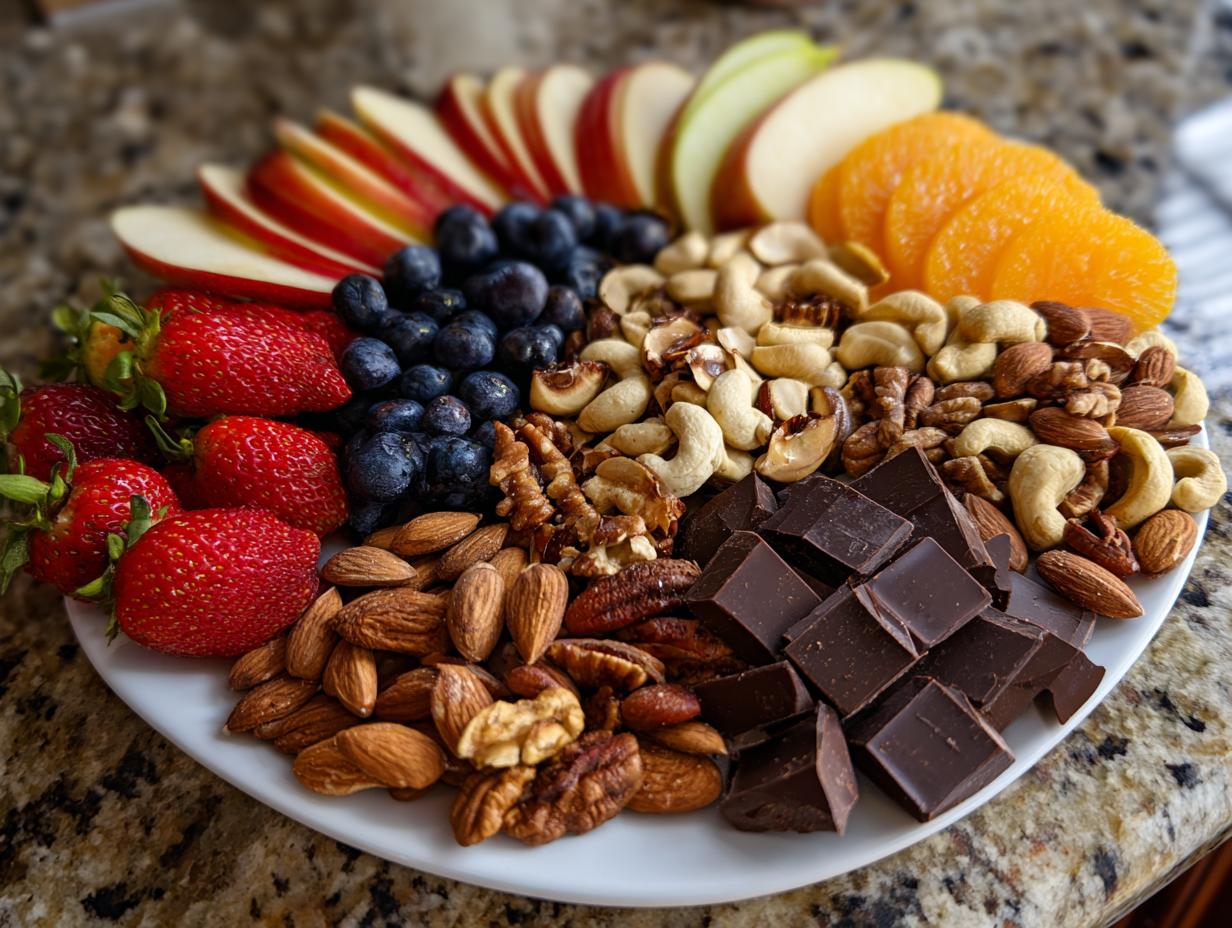
For the fruit, we need structure and color. You must have one large apple and one large pear—and listen carefully: they need to be cored and sliced thinly. Leaving the skin on adds great color, so don’t peel them! You’ll need a cup of fresh strawberries, halved lengthwise so they look nice, and a half-cup of blueberries, which you leave whole. Finally, segment one small orange; make sure you take the time to get rid of that white pith, or it tastes bitter!
Nut and Seed Components
This is where the crunch comes from, so don’t use raw nuts if you can help it. For this board, we rely on roasted almonds and roasted cashews—a half-cup of each. Then, add a quarter-cup of walnut halves and a quarter-cup of pumpkin seeds. The roasting brings out their natural oils and makes them taste so much richer. If your nuts aren’t roasted, they just taste flat!
The Chocolate Element and Optional Additions
You absolutely need two ounces of dark chocolate, and I insist on at least 70% cocoa content. Break it into rustic, uneven squares; that looks way better than uniform chips. If you’re feeling adventurous, grab four ounces of a firm cheese, cubed, and about a quarter-cup of dried cranberries to toss on for extra chewy sweetness.
Step-by-Step Assembly Instructions
Now for the fun part! This is where we turn our piles of ingredients into the stunning Quick Fruit and Nut Snack Plate with Chocolate. Remember what I said about speed? We need to move efficiently, but we’re not rushing the important parts, like washing.
Fruit Preparation and Arrangement
First things first: washing. Get all that beautiful produce under cold water and then use paper towels to pat everything completely dry. Moisture is the enemy of a good snack board—it makes things look soggy later! Once dry, get to slicing. Core and slice your apple and pear into nice, thin wedges. Keep the skin on; it’s pretty! Halve those strawberries lengthwise, but the blueberries stay plump and whole. Peel your orange and separate those segments, making sure you pull off any of that bitter white pith clinging to them.
Time to lay the foundation! Grab your serving platter. I like to start by placing the fruit first because it takes up the most real estate. Arrange the apple, pear, berries, and orange segments in separate, distinct sections across the board. Think of it like painting with food—you want blocks of color next to each other.
Placing Nuts, Seeds, and Chocolate
Next up are the crunchy bits. You can use tiny bowls if you want super clean lines, but I usually just make little piles directly on the board for a more rustic look. Take your roasted almonds, cashews, walnuts, and pumpkin seeds and place them in small, separate mounds near the fruit sections. Don’t let them touch the fruit too much yet; we want defined areas.
The star of the show comes next: the dark chocolate. Break your two ounces into uneven, appealing squares. Scatter these squares into a small, dedicated section of the board. They look so rich next to the bright fruit! Be careful not to let the chocolate melt if your kitchen is warm; it gets messy fast.
Final Touches and Serving Readiness
If you decided to include the optional items, this is when they get integrated. Cube your cheese and scatter those cubes around the board—maybe near the nuts for a savory pairing. Toss those dried cranberries around the edges where they can catch the light. They add a fantastic chewiness to the whole Quick Fruit and Nut Snack Plate with Chocolate experience.

That’s it! The whole process should feel fast and intuitive. Because this is an assembly plate, it needs to be served right away while the fruit is crisp and everything is at room temperature. Don’t let it sit out for hours; enjoy it within two hours max!
Pro Tips for an Attractive Quick Fruit and Nut Snack Plate with Chocolate
Putting together a gorgeous Quick Fruit and Nut Snack Plate with Chocolate isn’t just about throwing food down; it’s about composition! Even though this takes five minutes, a little attention to visual detail makes it feel gourmet. People eat with their eyes first, right? Use that to your advantage! Check out our Pinterest for more visual inspiration.
My biggest rule for any platter is to avoid straight lines. Everything looks better when it’s a little disorganized in a charming way. You want people to feel invited to dig in, not intimidated by perfect rows.
Presentation Secrets for Visual Appeal
Always aim to arrange your items in odd numbers—three piles of nuts, five clusters of strawberries—it’s just more pleasing to the eye. Also, try to vary the heights! If you put your nuts in a small ramekin, it lifts them up slightly, which breaks the flat plane of the board. Place the taller items, like apple slices, near the middle and let the smaller items, like blueberries, fill the gaps.
Flavor Boosts Beyond the Basics
If you have an extra 30 seconds, you can seriously elevate this! I love taking a tiny pinch of cinnamon and just dusting it lightly over the apple and pear slices. It smells amazing. Another simple trick is a very light drizzle of honey over the strawberries right before serving. It just makes the fruit taste sweeter and richer. Don’t overdo it, though; we still want this to be a quick snack!
Ingredient Substitutions for Your Fruit and Nut Plate
The beauty of this method is that you can completely customize it based on what you have or what’s in season, and it still stays lightning fast! If you don’t have apples or pears today, grab some fresh figs or slice up a kiwi—anything that offers a nice solid base works perfectly. The goal is to keep that five-minute assembly time, so avoid anything that requires peeling and pitting for ages! If you are looking for more quick snack ideas, check out our section on snacks.
When it comes to the crunch, swap out the almonds and cashews for pecans or hazelnuts if that’s what you have on hand. Do you hate dark chocolate? No problem! Milk chocolate or even some good quality white chocolate chunks will work just fine, though you might want to add a savory cheese cube to balance the extra sweetness.
Storing Leftovers of Your Quick Fruit and Nut Snack Plate with Chocolate
Let’s be real, sometimes you make too much! If you have leftovers from your amazing Quick Fruit and Nut Snack Plate with Chocolate, you absolutely must break the board down. You cannot store the whole thing together; the fruit juice will make the nuts soggy overnight, and nobody wants that.
Reheating and Freshness Guidance
Separate everything! Put the fruit in one airtight container, the nuts and seeds in another, and the cheese (if you used it) in a third. Stored correctly in the fridge, the fruit components should stay fresh for up to two days. The nuts will last even longer, of course. Just keep them cool, dry, and separate!
Frequently Asked Questions About This Snack Plate
Q1. Can I prepare the fruit ahead of time?
You totally can, but if you slice apples and pears more than an hour before serving, you need a trick! Brush those slices lightly with fresh lemon juice. It sounds counterintuitive, but that little bit of acid stops the fruit from browning and keeps your platter looking fresh for longer.
Q2. What if I do not like dark chocolate?
That’s fine! This is your board. If dark chocolate is too intense for you or your guests, swap it out for milk chocolate or even some white chocolate chunks. If you use sweeter chocolate, though, I highly recommend adding those optional cheese cubes because you’ll need that salty contrast.
Q3. Is this really a vegetarian recipe?
Yes, absolutely! All the core ingredients—fruit, nuts, seeds, and chocolate—are vegetarian. If you add cheese, just make sure the cheese you select uses vegetarian rennet, which most grocery store brands do these days.
Q4. Can I use pecans instead of walnuts?
Yes! Feel free to mix up the nuts. Pecans, hazelnuts, or even some chopped pistachios would make a fantastic addition to your Easy Fruit Platter.
Share Your Quick Fruit and Nut Snack Plate with Chocolate
I hope this quick assembly saved your afternoon! Seriously, I want to see your creations. If you put together your own Quick Fruit and Nut Snack Plate with Chocolate, snap a picture and let me know what incredible twists you added. Rate this recipe below so other busy cooks know how easy it is! You can also share your photos with us on Facebook.
Pro Tips for an Attractive Quick Fruit and Nut Snack Plate with Chocolate
Putting together a gorgeous Quick Fruit and Nut Snack Plate with Chocolate isn’t just about throwing food down; it’s about composition! Even though this takes five minutes, a little attention to visual detail makes it feel gourmet. People eat with their eyes first, right? Use that to your advantage!
My biggest rule for any platter is to avoid straight lines. Everything looks better when it’s a little disorganized in a charming way. You want people to feel invited to dig in, not intimidated by perfect rows.
Presentation Secrets for Visual Appeal
Always aim to arrange your items in odd numbers—three piles of nuts, five clusters of strawberries—it’s just more pleasing to the eye. Also, try to vary the heights! If you put your nuts in a small ramekin, it lifts them up slightly, which breaks the flat plane of the board. Place the taller items, like apple slices, near the middle and let the smaller items, like blueberries, fill the gaps.
Flavor Boosts Beyond the Basics
If you have an extra 30 seconds, you can seriously elevate this! I love taking a tiny pinch of cinnamon and just dusting it lightly over the apple and pear slices. It smells amazing. Another simple trick is a very light drizzle of honey over the strawberries right before serving. It just makes the fruit taste sweeter and richer. Don’t overdo it, though; we still want this to be a quick snack!
Ingredient Substitutions for Your Fruit and Nut Plate
The beauty of this method is that you can completely customize it based on what you have or what’s in season, and it still stays lightning fast! If you don’t have apples or pears today, grab some fresh figs or slice up a kiwi—anything that offers a nice solid base works perfectly. The goal is to keep that five-minute assembly time, so avoid anything that requires peeling and pitting for ages!
When it comes to the crunch, swap out the almonds and cashews for pecans or hazelnuts if that’s what you have on hand. Do you hate dark chocolate? No problem! Milk chocolate or even some good quality white chocolate chunks will work just fine, though you might want to add a savory cheese cube to balance the extra sweetness.
Storing Leftovers of Your Quick Fruit and Nut Snack Plate with Chocolate
Let’s be real, sometimes you make too much! If you have leftovers from your amazing Quick Fruit and Nut Snack Plate with Chocolate, you absolutely must break the board down. You cannot store the whole thing together; the fruit juice will make the nuts soggy overnight, and nobody wants that.
Reheating and Freshness Guidance
Separate everything! Put the fruit in one airtight container, the nuts and seeds in another, and the cheese (if you used it) in a third. Stored correctly in the fridge, the fruit components should stay fresh for up to two days. The nuts will last even longer, of course. Just keep them cool, dry, and separate!
Frequently Asked Questions About This Snack Plate
It’s funny how often people ask the same things, even when I think I covered everything! This is a super flexible recipe, so naturally, people have questions about making swaps. Don’t worry if you see something missing from my list; chances are, you can substitute it easily. This is supposed to be a stress-free snack!
I’ve pulled together the top questions I get about assembling this platter. If you’re looking for an Easy Fruit Platter that always works, reading these little tips might just save you time later! For more recipe ideas, see what we are posting on Medium.
Can I prepare the fruit ahead of time?
Yes, you can, but you have to be smart about it! If you slice your apples and pears more than an hour before you plan to serve, they are going to turn brown, and nobody wants that sad, oxidized look on their beautiful board. The secret is to brush those sliced apples and pears with a little bit of fresh lemon juice. It sounds weird, I know, but that tiny bit of acid stops the browning process dead in its tracks. Keep that fruit covered in the fridge until you’re ready to arrange everything.
What if I do not like dark chocolate?
Then ditch it! You’re the chef here! If dark chocolate isn’t your thing, you can absolutely swap it out for milk chocolate or even some nice white chocolate squares. Just remember that if you go sweeter with the chocolate, you might want to lean into the savory side a bit more. That means adding those optional cheese cubes or maybe some plain crackers to give your mouth a break from all the sugar.
How long will this snack plate last once assembled?
Honestly? Not long, because it’s so good! But for safety and texture, you should aim to consume the entire thing within two hours if it’s sitting out at room temperature. If you have leftovers, see my section below on how to store things separately, but an assembled board just doesn’t keep well.
Share Your Quick Fruit and Nut Snack Plate with Chocolate
Whew! That’s everything you need to know to pull off this gorgeous, speedy treat. I truly hope this Quick Fruit and Nut Snack Plate with Chocolate becomes your new favorite go-to when you need something fast and fabulous. Once you try it, please come back and leave me a rating or a comment. Tell me what fruit you used or if you added honey!
Pro Tips for an Attractive Quick Fruit and Nut Snack Plate with Chocolate
Putting together a gorgeous Quick Fruit and Nut Snack Plate with Chocolate isn’t just about throwing food down; it’s about composition! Even though this takes five minutes, a little attention to visual detail makes it feel gourmet. People eat with their eyes first, right? Use that to your advantage!
My biggest rule for any platter is to avoid straight lines. Everything looks better when it’s a little disorganized in a charming way. You want people to feel invited to dig in, not intimidated by perfect rows.
Presentation Secrets for Visual Appeal
Always aim to arrange your items in odd numbers—three piles of nuts, five clusters of strawberries—it’s just more pleasing to the eye. Also, try to vary the heights! If you put your nuts in a small ramekin, it lifts them up slightly, which breaks the flat plane of the board. Place the taller items, like apple slices, near the middle and let the smaller items, like blueberries, fill the gaps.
Flavor Boosts Beyond the Basics
If you have an extra 30 seconds, you can seriously elevate this! I love taking a tiny pinch of cinnamon and just dusting it lightly over the apple and pear slices. It smells amazing. Another simple trick is a very light drizzle of honey over the strawberries right before serving. It just makes the fruit taste sweeter and richer. Don’t overdo it, though; we still want this to be a quick snack!
Ingredient Substitutions for Your Fruit and Nut Plate
The beauty of this method is that you can completely customize it based on what you have or what’s in season, and it still stays lightning fast! If you don’t have apples or pears today, grab some fresh figs or slice up a kiwi—anything that offers a nice solid base works perfectly. The goal is to keep that five-minute assembly time, so avoid anything that requires peeling and pitting for ages!
When it comes to the crunch, swap out the almonds and cashews for pecans or hazelnuts if that’s what you have on hand. Do you hate dark chocolate? No problem! Milk chocolate or even some good quality white chocolate chunks will work just fine, though you might want to add a savory cheese cube to balance the extra sweetness.
Storing Leftovers of Your Quick Fruit and Nut Snack Plate with Chocolate
Let’s be real, sometimes you make too much! If you have leftovers from your amazing Quick Fruit and Nut Snack Plate with Chocolate, you absolutely must break the board down. You cannot store the whole thing together; the fruit juice will make the nuts soggy overnight, and nobody wants that.
Reheating and Freshness Guidance
Separate everything! Put the fruit in one airtight container, the nuts and seeds in another, and the cheese (if you used it) in a third. Stored correctly in the fridge, the fruit components should stay fresh for up to two days. The nuts will last even longer, of course. Just keep them cool, dry, and separate!
Frequently Asked Questions About This Snack Plate
It’s funny how often people ask the same things, even when I think I covered everything! This is a super flexible recipe, so naturally, people have questions about making swaps. Don’t worry if you see something missing from my list; chances are, you can substitute it easily. This is supposed to be a stress-free snack!
I’ve pulled together the top questions I get about assembling this platter. If you’re looking for an Easy Fruit Platter that always works, reading these little tips might just save you time later! If you need more quick meal ideas, check out our Dinner & Lunch category.
Can I prepare the fruit ahead of time?
Yes, you can, but you have to be smart about it! If you slice your apples and pears more than an hour before you plan to serve, they are going to turn brown, and nobody wants that sad, oxidized look on their beautiful board. The secret is to brush those sliced apples and pears with a little bit of fresh lemon juice. It sounds weird, I know, but that tiny bit of acid stops the browning process dead in its tracks. Keep that fruit covered in the fridge until you’re ready to arrange everything.
What if I do not like dark chocolate?
Then ditch it! You’re the chef here! If dark chocolate isn’t your thing, you can absolutely swap it out for milk chocolate or even some nice white chocolate squares. Just remember that if you go sweeter with the chocolate, you might want to lean into the savory side a bit more. That means adding those optional cheese cubes or maybe some plain crackers to give your mouth a break from all the sugar.
How long will this snack plate last once assembled?
Honestly? Not long, because it’s so good! But for safety and texture, you should aim to consume the entire thing within two hours if it’s sitting out at room temperature. If you have leftovers, see my section below on how to store things separately, but an assembled board just doesn’t keep well.
Share Your Quick Fruit and Nut Snack Plate with Chocolate
Whew! That’s everything you need to know to pull off this gorgeous, speedy treat. I truly hope this Quick Fruit and Nut Snack Plate with Chocolate becomes your new favorite go-to when you need something fast and fabulous. Once you try it, please come back and leave me a rating or a comment. Tell me what fruit you used or if you added honey!
Print
Amazing 5-Minute Quick Fruit and Nut Snack Plate with Chocolate
- Total Time: 5 minutes
- Yield: 4 servings
- Diet: Vegetarian
Description
Assemble a fruit and nut snack plate in 5 minutes with sliced fruit, mixed nuts, and dark chocolate. Perfect for afternoon cravings.
Ingredients
- 1 large apple, cored and sliced
- 1 large pear, cored and sliced
- 1 cup fresh strawberries, halved
- ½ cup fresh blueberries
- 1 small orange, peeled and segmented
- ½ cup roasted almonds
- ½ cup roasted cashews
- ¼ cup walnuts halves
- ¼ cup pumpkin seeds
- 2 ounces dark chocolate (70% cocoa), broken into squares
- 4 ounces cubed cheese (Optional)
- ¼ cup dried cranberries (Optional)
Instructions
- Wash all fresh fruit thoroughly under cold water and pat dry with paper towels.
- Core and slice the apple and pear into thin wedges, leaving the skin on.
- Halve strawberries lengthwise and leave blueberries whole.
- Peel the orange and separate into individual segments, removing any white pith.
- Arrange fruit in separate sections on a large serving platter or wooden board.
- Place roasted almonds, cashews, walnuts, and pumpkin seeds in small piles or bowls on the platter.
- Break dark chocolate into individual squares and arrange in a small section of the platter.
- If using cheese, cut into small cubes and add to the board along with dried cranberries.
- Serve immediately at room temperature, consuming within 2 hours.
Notes
- Replace apples and pears with sliced kiwi, grapes, or fresh figs based on preference.
- Use pecans, hazelnuts, or mixed nuts instead of almonds and cashews.
- Swap dark chocolate for milk chocolate or white chocolate if preferred.
- Add sliced cheese, crackers, or whole grain pretzels for savory balance.
- Drizzle fruit with honey or sprinkle with cinnamon for enhanced flavor.
- Brush apple and pear slices with lemon juice if preparing ahead to prevent browning.
- Arrange items in odd numbers and varied heights for an attractive presentation.
- Serve with small plates, napkins, and toothpicks for easy portioning.
- Store leftover components separately in airtight containers in the refrigerator for up to 2 days.
- Prep Time: 5 minutes
- Cook Time: 0 minutes
- Category: Snack
- Method: Assembly
- Cuisine: American