Oh my gosh, are you tired of waiting for your toaster to slowly brown one slice at a time? Me too! That’s why I want to share my absolute favorite kitchen shortcut: the no oven bread toast. Seriously, this stovetop method is lightning fast and gives you the best texture—crispy on the outside, almost fluffy in the middle. I learned this trick back when I was first learning to cook, and it saved me every morning before school.
I used to burn everything on the stove before I figured out the secret to low and slow heat here. This isn’t just toast; it’s *better* toast, made without ever turning on that big hot box in the kitchen! It’s the ultimate quick breakfast hack, and honestly, it feels a little bit like cheating because it’s so easy. Trust me, once you try this no oven bread toast technique, you’ll never look at your toaster slot the same way again.

Gathering Your Ingredients for No Oven Bread Toast
The beauty of this no oven bread toast recipe is that it relies on pantry staples. We aren’t messing around with fancy flours or exotic spices here; we are aiming for speed and perfect texture using what you already have. Precision matters, though, even with simple things like butter, because we want that perfect golden-brown crust.
Don’t try to substitute anything too drastically, or you’ll end up with dry bread. Everything needs to be measured out exactly as listed for the best results. This is an exact science when you’re working on the stovetop!
Essential Components for Stovetop Toast
Here is exactly what you need sitting on your counter before you turn on the heat. Make sure everything is measured out—this process moves quickly once we get started!
- Four slices of sandwich bread—and make sure they are about half an inch thick. Too thin, and it burns instantly!
- Two tablespoons of good quality unsalted butter.
- One tablespoon of whole milk. Yes, whole milk!
- Just a tiny pinch of salt, about 1/8 teaspoon.
Ingredient Notes and Substitutions for No Oven Bread Toast
Let’s talk about the key players here for your no oven bread toast. The butter is crucial because it carries the flavor and helps create that protective, crispy layer. If you absolutely must swap it, use a neutral oil like canola, but you lose that rich, nutty flavor the butter provides.
Now, the milk! This is the secret weapon that browns the top surface gently while keeping the inside soft. If you don’t have whole milk, 2% will work fine, but skip skim milk if you can. We need that little bit of fat content to help the top brown nicely without drying out while the bottom crisps up perfectly. It’s the key to making this no oven bread toast so satisfying!
Expert Steps for Making No Oven Bread Toast
Getting this no oven bread toast just right is all about managing the heat before you even introduce the bread. Remember, we are coaxing the bread to perfection, not blasting it into charcoal! Patience in the preheating phase pays off huge in the final texture.
I always grab my favorite heavy-bottomed nonstick skillet for this. It distributes heat so much more evenly than a thin pan, which is vital when you are working with low heat for several minutes. Lay out your bread slices so you can move fast once the butter is melted.
Preparation and Initial Toasting
First things first: set your burner to medium-low. I repeat, medium-low! If you walk away for a second and smell burning butter, you’ve gone too high. Place your skillet on the burner and let it warm up for about two minutes. You want it warm, not smoking hot.
Next, drop in your two tablespoons of unsalted butter. Let it melt completely, swirling the pan gently so the entire nonstick surface gets a thin, shimmering coat. You don’t want puddles of butter, just a nice film. While that’s happening, take your four slices of bread. Use a pastry brush or even the back of a spoon to lightly brush the top surface of each slice with the whole milk. Don’t soak it—just a light, even coating. This is the step people skip, and it makes the top surface bake instead of just dry out.
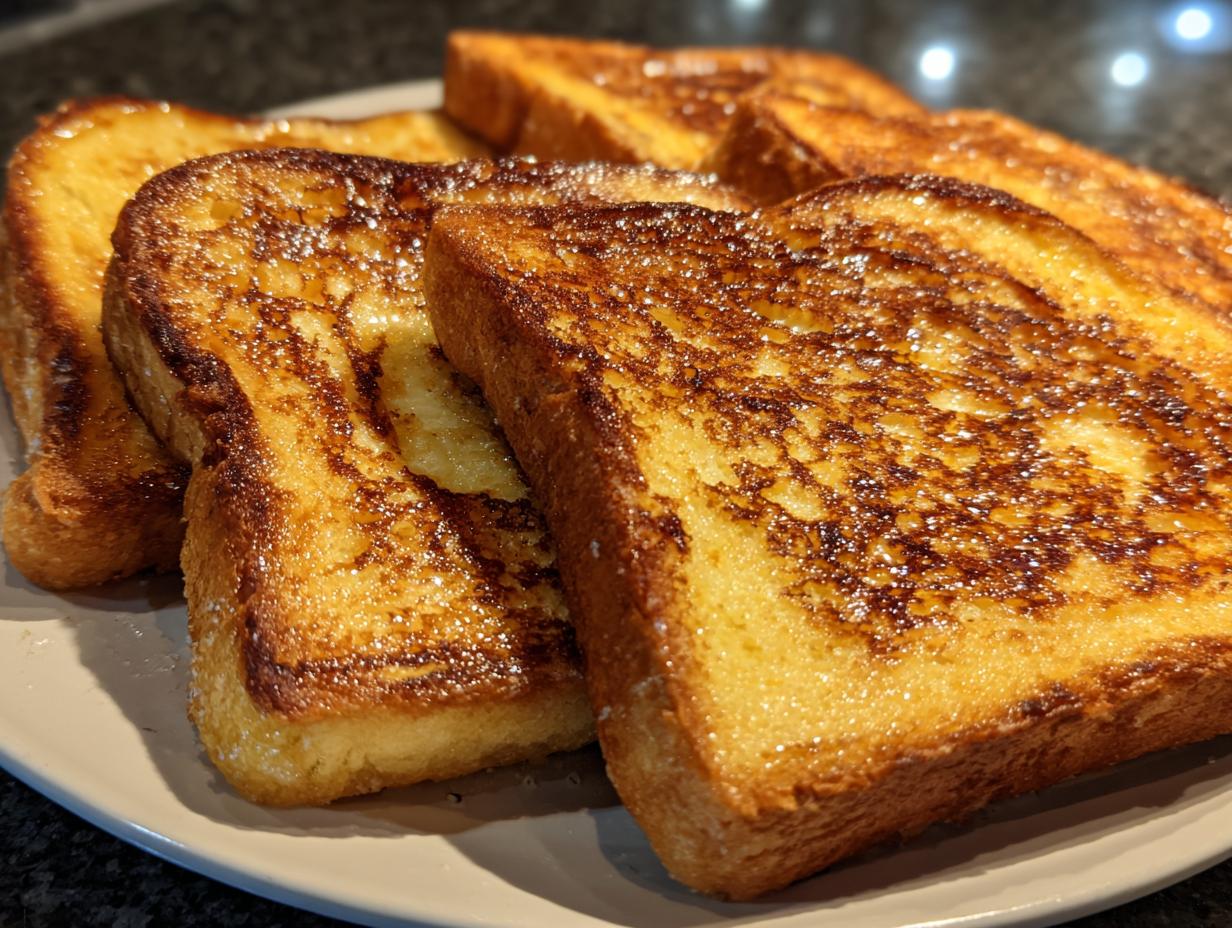
Now, carefully place the bread slices into the skillet with the milk-side UP. We want the dry side hitting that melted butter first. Let them cook undisturbed for a good two to three minutes. You are looking for the bottom edges to turn a beautiful, deep golden color. Peek underneath one slice to check!

Achieving the Golden Crisp: Flipping and Finishing
Once the bottoms look perfectly toasted, it’s time for the quick seasoning. Right before you flip, sprinkle the top (the milk-side) lightly with your salt. This ensures the salt hits the softer side and seasons the whole slice evenly.
Now, flip them over! This is where the magic of the no oven bread toast really comes together. The bottom should be textbook golden brown and crisp. Now that the buttered side is down, the cooking time shortens considerably because the pan is already hot. Cook the second side for only one to two minutes. This second phase is just about warming the milk-coated top through and giving it a slight kiss of color.
When you see the milk layer start to dry and maybe look slightly opaque, they are done. Immediately slide them out of the pan onto a plate. If you leave them in the hot pan, they will continue to cook and get hard. Serve this amazing no oven bread toast straight away while it’s piping hot!
Why This No Oven Bread Toast Recipe Works for You
If you’re anything like me, sometimes you need something delicious right now, and opening the oven door feels like too much commitment. That’s why this no oven bread toast recipe is a game-changer! It takes less than ten minutes from start to finish, making it faster than waiting for most toasters to cycle through twice.
The texture is the real selling point. You get that satisfying crunch when you bite through the buttered bottom crust. But because we use the milk trick on top, the interior stays surprisingly tender. It’s not dry and cracker-like; it’s substantial!
And cleanup? It’s a breeze. One nonstick skillet is all you dirty. No crumbs falling into the bottom of the oven, and no waiting around for things to cool down. This no oven bread toast is the perfect solution for busy mornings or late-night snack cravings when you want maximum flavor with zero fuss. It’s simple, reliable, and always comes out perfectly golden.
Tips for Perfect No Oven Bread Toast Texture
We all want that perfect contrast: a super crisp exterior hugging a slightly soft, warm center. Achieving this consistency with no oven bread toast relies almost entirely on temperature management. This isn’t a recipe where you can just crank the heat up and hope for the best; you have to work with the pan.
I learned the hard way that anything higher than medium-low heat results in burnt butter and pale, floppy bread. We are aiming for a slow, steady release of crispness. This method respects the bread and allows the butter to gently toast the starches without scorching them before the inside warms up.
Controlling the Heat for Ideal Browning
Seriously, make friends with your medium-low setting. When you melt the butter, watch it. If it starts to foam aggressively and turn brown almost immediately, the heat is too high! Take the pan off the burner for 30 seconds, let it cool slightly, and then put it back on. That initial two to three minutes on the first side is crucial—it builds the structure. If you rush this stage, the final no oven bread toast will be tough, not crisp.
Bread Thickness Matters for Your No Oven Bread Toast
When you are making no oven bread toast on the stovetop, the thickness of your bread is your secret weapon for that soft center. If your bread is super thin, like standard sliced white bread, it will turn into a cracker before the milk on top even dries. I insist on using bread that is at least a half-inch thick.
Thicker bread gives the heat time to penetrate and warm the interior gently while the butter works its magic on the outside layer. It creates a buffer against the heat, ensuring you get that satisfying, substantial bite every single time you make this quick breakfast. If you are looking for other quick breakfast ideas, check out our easy breakfast roll ups recipe.
Stovetop Toast Storage and Reheating
Honestly, this no oven bread toast is best eaten the second it comes out of the skillet. That perfect texture—crisp bottom, soft top—starts to fade quickly as it cools down and absorbs moisture from the air. But hey, sometimes you make too much, or you want a piece saved for later! If you are interested in other bread-based recipes, you might enjoy our blueberry lemon sourdough bread.
If you have leftovers, you need to treat them right. Don’t just toss them in a plastic bag; they’ll get soggy fast. We need to protect that hard-earned crispness. The goal for reheating is to bring back that initial crunch without burning the milk solids on top.
Storing Leftover Stovetop Toast
The key is keeping air out, but not trapping too much moisture. You want to wrap the slices tightly in plastic wrap first to block humidity, and then place them in a zip-top bag or an airtight container. This keeps them fresh for a day or two, max. For more savory ideas, see our caramelized onion grilled cheese recipe.
When you are ready to eat the leftovers, DO NOT use the microwave! That will turn your perfect no oven bread toast into a rubbery mess. Pop the slices back into a dry, nonstick skillet over low heat for about a minute per side, or pop them in a toaster oven if you have one. That low heat brings the crisp right back!
Here’s a quick guide:
| Storage Method | Duration | Best Reheat Method |
|---|---|---|
| Airtight Container/Bag | 1-2 Days | Dry Skillet (Low Heat) |
Frequently Asked Questions About No Oven Bread Toast
I get so many questions about this simple recipe because everyone is shocked at how good stovetop toast can be! People always ask if they can skip steps or change ingredients, but I try to explain why these specific components make for the best no oven bread toast experience possible.
Here are some of the most common things folks ask me when they first try this recipe. Hope this helps you get started!
Can I use a different type of fat instead of butter for my No Oven Bread Toast?
You sure can, but butter adds flavor that nothing else quite matches! If you need a swap, use a neutral oil like canola or vegetable oil. Margarine will work in a pinch, but again, the flavor won’t be as rich. Just make sure whatever fat you use lightly coats the bottom of the pan. Oil tends to brown faster than butter, so watch your heat even more carefully!
How long does it take to make this quick breakfast toast?
This is why I love it! It’s truly a lightning-fast quick breakfast. The prep time is only about three minutes—just melting the butter and brushing the milk on. The total cooking time is usually five minutes, sometimes six if your bread is extra thick. So, less than ten minutes total, and you have fantastic no oven bread toast ready to go!
What is the best way to get a very crisp No Oven Bread Toast?
The secret to that perfect, crisp bottom on your no oven bread toast is twofold: medium-low heat and a good quality nonstick skillet. You need the skillet to be evenly heated before the bread goes in, but the temperature has to stay moderate. If the heat is too high, the butter burns before the bread has time to crisp up nicely. Low and slow building that crust is the key to success!
Sharing Your Experience with No Oven Bread Toast
Now that you know the absolute easiest way to get amazing results, I want to hear from you! Did this no oven bread toast save your morning? Did you try it with cinnamon sugar instead of salt? Don’t keep your successes to yourself! You can always share your results with us on Facebook.
Drop a comment below and let me know how your stovetop toast turned out. A quick rating helps other busy cooks find this simple recipe, too. Happy toasting! You can also find more quick tips on our Medium page, or save this recipe on Pinterest.
Print
Amazing 5-Minute No Oven Bread Toast
- Total Time: 8 minutes
- Yield: 2 servings
- Diet: Omnivore
Description
Easy no-oven bread toast made on the stovetop with a crisp outside and soft center. A fast method using basic pantry ingredients.
Ingredients
- 4 slices sandwich bread (about 1/2 inch thick)
- 2 tablespoons unsalted butter
- 1 tablespoon whole milk
- 1/8 teaspoon salt
Instructions
- Heat a nonstick skillet over medium low heat.
- Melt the butter in the skillet and swirl to coat the surface.
- Lightly brush the tops of the bread slices with milk.
- Place the bread milk side up into the skillet.
- Cook for 2 to 3 minutes until the bottoms are golden and crisp.
- Sprinkle lightly with salt.
- Flip and cook for 1 to 2 minutes until warmed through and lightly toasted.
- Remove from the skillet and serve immediately.
Notes
- Use medium low heat to prevent the butter from burning before the bread toasts evenly.
- The milk helps the top surface brown slightly while protecting the interior from drying out too much.
- Prep Time: 3 minutes
- Cook Time: 5 minutes
- Category: Breakfast
- Method: Stovetop
- Cuisine: American