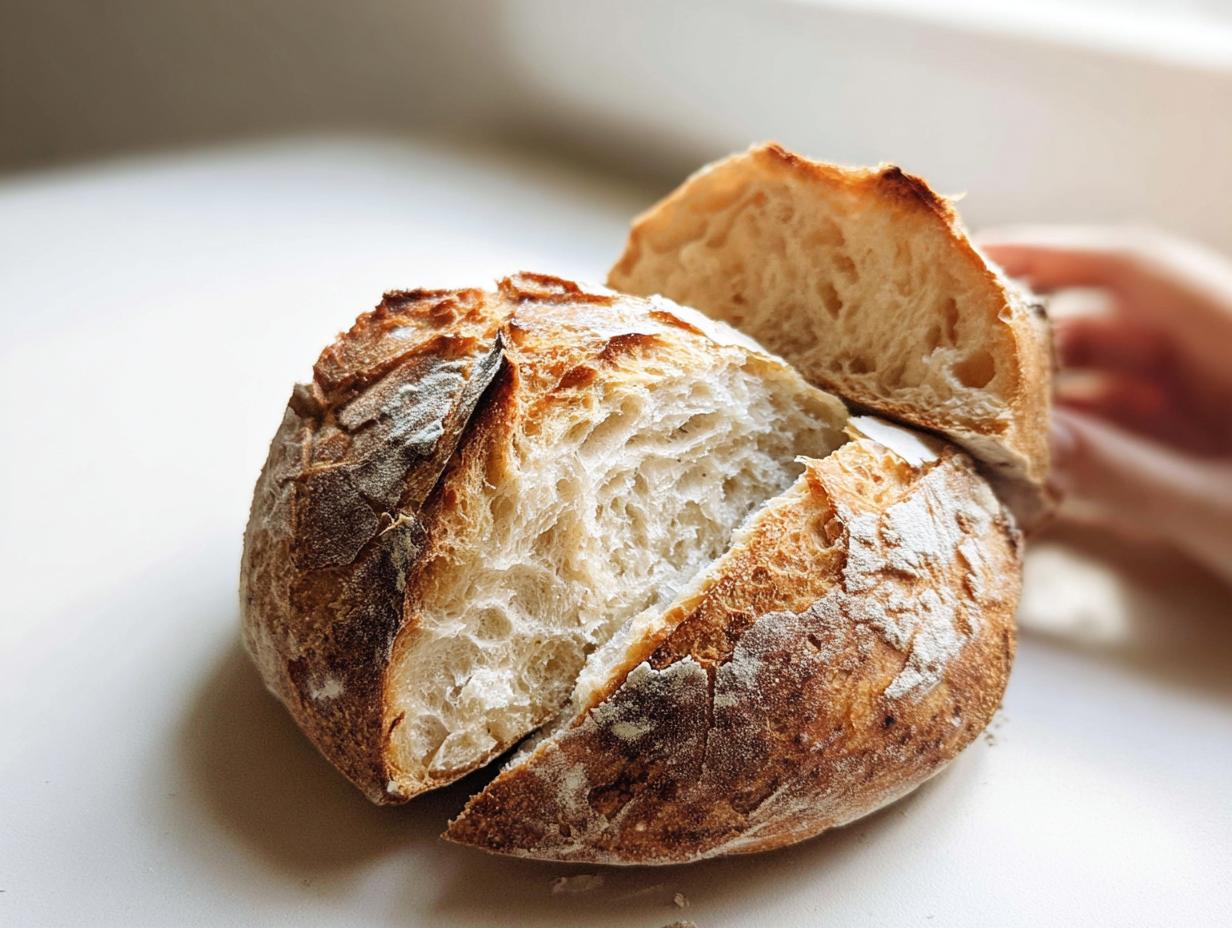
Oh, you are going to absolutely adore this recipe! Forget those tough, tangy sourdough loaves you sometimes have to wrestle with. We’re talking about a loaf that is shockingly tender, lightly sweet, and perfect for everything from your morning toast to the best sandwich you’ve ever made. Seriously, this **honey vanilla sourdough bread** is my secret weapon when I want that beautiful sourdough tang without sacrificing softness. I’ve spent ages tweaking this one because I wanted something genuinely approachable for every baker, no matter your sourdough experience level.
I promise you, the smell alone when this bakes up is enough to make you weep happy tears. This recipe uses simple techniques to achieve that incredible, fine crumb you usually only see in professional bakeries. It’s all about balancing that natural sourdough fermentation with just the right amount of sweetness. Trust me on this one; you need this loaf in your life right now.

Why This Honey Vanilla Sourdough Bread is Your Next Favorite Loaf
What sets this loaf apart from every other sourdough out there is that gentle, almost cake-like texture. Most sourdoughs are chewy, which I love, but sometimes you just want something that melts in your mouth, right? That’s where the honey and that secret splash of vanilla come into play!
This **honey vanilla sourdough bread** achieves that beautiful, soft crumb because the honey locks in moisture beautifully during the long bake. It’s sweet enough to feel like a treat but mild enough that it doesn’t overpower your peanut butter. This recipe is designed to be incredibly beginner-friendly too. If you’ve been scared to try sourdough because it seems too complicated, this sweet version is the perfect, confidence-building loaf to start with. I want everyone to experience the joy of pulling a perfectly risen, fragrant loaf from their own oven!
Gathering Ingredients for Honey Vanilla Sourdough Bread
Okay, let’s get our ingredients lined up. When you’re baking sourdough, especially a slightly sweeter one like this **honey vanilla sourdough bread**, precision really matters. We aren’t improvising much here because we want that tender, beautiful crumb we talked about. Don’t stand there staring at your pantry; just grab everything and line it up neatly on the counter. It makes the mixing process so much smoother, trust me!
You need one main thing to verify before you even start: your starter has to be active. We’re not using sleepy starter here; we need that bubbly, hungry yeast ready to work hard with the honey! Gather these items, and we are halfway to that amazing sweet aroma filling your kitchen.
Precise Ingredient Measurements
I always measure everything out twice before I start the initial mix. It’s such a simple habit that saves you from that terrible moment when you realize you grabbed the wrong cup! Here are the exact items you’ll need to make sure this loaf comes out tall and soft.
Sourdough Starter and Liquids
You absolutely must start with 1 cup of active sourdough starter. That means it should have doubled in size since you fed it within the last 4 to 6 hours! For the liquid, use 1 cup of warm water—not hot, not cold. We want it warm to encourage that yeast. Then, for the fat, grab 3 tablespoons of a neutral oil, like canola or sunflower. We don’t want any strong flavors fighting the vanilla in this recipe!
Flour, Sweetener, and Flavorings
For the flour, we are sticking strictly to 4 cups of bread flour. Bread flour has the extra protein we need to support the structure that the honey adds. Then comes the sweetness: 1 1/4 cup of honey. If you use white sugar, you lose that wonderful depth! And for the secret flavor punch, you need 1 teaspoon of vanilla powder. Powder is better than extract here because it avoids adding extra liquid, which can throw off the dough balance.
Equipment Needed for Baking
You don’t need a fancy stand mixer for this loaf, though it certainly helps if you have one! The most important thing is having the right vessel for the dough to rise in and bake in. Remember, we are aiming for a tall, beautiful sandwich loaf, so make sure your pan is ready to go.
You’ll want a large mixing bowl—seriously big, because this dough expands! Grab your kitchen scale if you have one, but don’t worry if you don’t; measuring cups will work fine. Most importantly, have a standard 9 by 5 inch loaf pan ready. Give it a good oiling before we even start mixing the wet ingredients!
Step-by-Step Instructions for Soft Honey Vanilla Sourdough Bread
Alright, time to get our hands dirty! This process is straightforward, but you have to respect the fermentation times—that’s where the magic of sourdough happens. Don’t rush the rises; that’s the secret to keeping this **honey vanilla sourdough bread** soft and airy rather than dense.
Mixing the Dough Base
First things first, take that 9 by 5 loaf pan and give it a generous coating of oil. We don’t want any sticking drama later! In your big bowl, start by whisking together your active starter, the warm water, the honey, the 3 tablespoons of neutral oil, and that beautiful vanilla powder. Whisk it until it looks like a slightly cloudy, sweet liquid. Now, dump in the 4 cups of bread flour and the fine sea salt. Just mix it all together with a big spoon or your hands until you have a shaggy, soft dough. It won’t look pretty yet, but that’s okay!
Kneading and Bulk Fermentation
Now we need to develop the gluten so the dough can hold all that sweet air. Knead this dough for about 8 minutes. If you’re using a mixer with a dough hook, that’s fine, but I actually love doing this by hand; it connects you to the dough! You’re looking for it to become smooth and elastic. Once it passes the stretch test, form it into a nice tight ball, cover the bowl with plastic wrap or a damp tea towel, and let it sit at room temperature. We need this dough to double in size. Depending on how warm your kitchen is, this usually takes 4 to 5 hours. Be patient!
Shaping and Final Proofing
Once it’s doubled, gently turn the dough out onto a lightly floured surface. Don’t punch it down aggressively! Gently press it out into a rectangle that’s about the same width as your loaf pan. Now, roll it up tightly, like you’re rolling a jelly roll, making sure the final seam is pinched shut securely. Place it seam-side down into that oiled pan. Cover it again, and this is critical: let it rise until it crowns about 1 inch over the rim. This second rise takes about 2 to 3 hours. If it doesn’t crown high enough, the loaf might sink slightly in the oven.
Baking the Honey Vanilla Sourdough Bread
About 20 minutes before that final rise is done, crank your oven up to 375°F. We need it hot! Once the dough looks perfectly crowned, slide it carefully into the preheated oven. Bake for 35 minutes total. You’re looking for a deep golden top. If you have an instant-read thermometer, pull the loaf out briefly and check the center; it needs to hit 190°F for this **honey vanilla sourdough bread** to be perfectly cooked through.
Cooling for Perfect Slicing
Resist the urge to slice this immediately! That steam needs to escape gently. Let the loaf cool in the pan for 10 minutes exactly. Then, carefully turn it out onto a wire cooling rack. It has to cool completely—and I mean completely! If you slice it warm, all that beautiful soft structure will collapse and turn gummy. Give it at least two hours before you even think about cutting that first perfect slice.

Baking Tips for Perfect Honey Vanilla Sourdough Bread
Listen, this dough behaves a little differently than a standard, plain sourdough, and that’s mostly thanks to the honey. Don’t panic when you see it! Because honey is a sugar, it tends to brown much faster than regular flour doughs. Keep an eye on that oven, especially after the 25-minute mark. If it looks like it’s getting too dark too quickly, just loosely tent a piece of aluminum foil over the top. This protects that beautiful golden crust while the inside finishes cooking to that required 190°F. This little trick is key for getting that sweet **honey vanilla sourdough bread** just right.
Managing the Sweet Dough
Because honey is hygroscopic—meaning it loves moisture—it can sometimes make the dough feel a little stickier than you expect during the initial mix. Don’t be tempted to dump in extra flour! You need that moisture to keep the final crumb soft. Just trust the kneading time. The oil we added also helps manage that stickiness. If you over-flour it now, you’ll end up with a dry loaf later, and we absolutely do not want that sad result!
Achieving the Ideal Final Proof
I cannot stress this enough: the final proof is where this loaf gets its height. Since we have added sugar and oil, the dough can sometimes feel lighter than a plain sourdough, making it harder to judge when it’s ready. You must watch for that 1-inch crown over the rim of your pan. If you bake it too soon—say, it’s only half an inch over—the oven spring will pull the top apart unevenly, or it might deflate slightly in the center. We want that perfect dome for the best looking **honey vanilla sourdough bread**!
Storing and Reheating Your Loaf
This sweet sourdough is so good, you might actually have leftovers, which is a miracle in my house! Since this **honey vanilla sourdough bread** is softer than a typical crusty artisan loaf, it doesn’t stay perfectly fresh quite as long. The best place for it is usually on the counter, but you have to be smart about how you wrap it. I never put soft bread in the fridge right away because it turns stale so fast!
If you know you’ll eat the whole loaf within two to three days, just wrap it tightly in plastic wrap or put it in a sealed bread bag. If you think it’s going to take longer than that, you need to slice it first and freeze the extra slices. Freezing locks in that beautiful soft texture!
Best Practices for Storing Soft Sourdough
When you pull those frozen slices out later, just pop them straight into the toaster or a warm oven for a few minutes. They taste almost brand new! Never store this bread in the refrigerator unless it’s already sliced and you are trying to buy an extra day or two. Here’s a quick reference for keeping your loaf at its best:
| Storage Method | Duration |
|---|---|
| Room Temperature (Wrapped tightly) | 2 to 3 days |
| Freezer (Sliced and bagged) | Up to 3 months |
| Refrigerator | Avoid if possible |
Frequently Asked Questions About Sweet Sourdough
I know you might have questions, especially if this is your first time making a sweet sourdough loaf! It’s totally normal. Sourdough has its own little quirks, and I’m happy to clear up anything that might be holding you back from baking this perfect loaf.
Can I use granulated sugar instead of honey in this recipe?
You technically *can*, but I really wouldn’t recommend it for this specific recipe. Honey does so much more than just add sweetness; it traps moisture, which is why this bread is so soft. Granulated sugar doesn’t provide that same level of moisture retention, and it changes the way the yeast feeds, too. If you swap it out, your final **honey vanilla sourdough bread** might end up slightly drier or chewier than intended. Stick with the honey for that melt-in-your-mouth texture!
What kind of oil works best for this bread?
We use oil instead of butter here because we want to keep the crumb tender and light—butter can sometimes make a sweet loaf feel too heavy or dense. You need a neutral oil. Think canola, sunflower, or maybe a light vegetable oil. The goal is zero flavor interference. We want the honey and vanilla to shine, not compete with a strong olive oil flavor, for example.
How do I know if my sourdough starter is active enough for this Honey Vanilla Sourdough Bread?
This is the make-or-break moment for any sourdough! You need a starter that is truly awake and ready to work hard. When I say ‘active,’ I mean it should have been fed recently and should have at least doubled in size within 4 to 6 hours. When you stir it, it should be full of bubbles and smell pleasantly tangy, not overwhelmingly sour. If your starter is sluggish or hasn’t doubled, don’t use it! Wait another hour or feed it again; we need that energy to lift this sweet dough into the perfect **honey vanilla sourdough bread** loaf.
Estimated Nutritional Breakdown
I always try to give you guys a heads-up on what you’re eating, but remember, baking sourdough at home means the exact numbers can swing a bit based on how much honey your starter actually ate! These figures are just a general guide for one slice of this sweet loaf. Don’t stress too much about the exact count; just stress about how delicious it is!
Disclaimer on Nutritional Estimates
Please take these numbers as estimates only. Since this recipe uses homemade starter and honey quantities can vary slightly based on density, your final nutritional panel might look a little different. I’m providing what I know, and the rest is based on standard ingredient averages. It’s homemade goodness, after all!
| Component | Value (Per Slice) |
|---|---|
| Calories | 195 |
| Fat | 4 g |
| Carbohydrates | 34 g |
| Protein | 6 g |
| Sodium | Unknown (Estimate needed) |
Share Your Baking Journey
Now that you’ve pulled that gorgeous, soft loaf out of the oven, I absolutely need to hear about it! Did the honey vanilla aroma fill your whole house? Did you manage that perfect 1-inch crown? Snap a picture of your beautiful sandwich slices and tag me online so I can see your success! I love seeing how this recipe works in kitchens all over the place. Happy baking, friends! You can also follow along for more baking inspiration on our Facebook page.
Print
Amazing 195 calorie Honey vanilla sourdough bread
- Total Time: 55 minutes
- Yield: 1 loaf, about 12 slices
- Diet: Vegetarian
Description
Soft honey vanilla sourdough bread with a tender crumb and gentle sweetness. Perfect for toast and everyday sandwiches.
Ingredients
- 1 cup active sourdough starter
- 1 cup warm water
- 1 1/4 cup honey
- 3 tablespoons neutral oil
- 4 cups bread flour
- 1 1/2 teaspoons fine sea salt
- 1 teaspoon vanilla powder
- 1 tablespoon neutral oil (for the pan)
Instructions
- Lightly oil a standard 9 by 5 inch loaf pan and set aside.
- In a large bowl, whisk together the sourdough starter, warm water, honey, oil, and vanilla powder until smooth.
- Add the bread flour and salt. Mix until a soft dough forms.
- Knead until smooth and elastic, about 8 minutes by hand or mixer.
- Shape the dough into a ball, cover, and let rise at room temperature until doubled, about 4 to 5 hours.
- Turn the dough out and gently press into a rectangle the width of the loaf pan.
- Roll tightly into a loaf and pinch the seam closed.
- Place seam side down in the prepared pan. Cover and let rise until the dough crowns about 1 inch over the rim, about 2 to 3 hours.
- Heat the oven to 375°F during the final rise.
- Bake for 35 minutes until golden and the center reaches 190°F.
- Cool in the pan for 10 minutes, then transfer to a rack and cool completely before slicing.
Notes
- This bread bakes up tall with a fine crumb.
- The dough should rise until it crowns about 1 inch over the rim before baking.
- Prep Time: 20 minutes
- Cook Time: 35 minutes
- Category: Bread
- Method: Baking
- Cuisine: American