Halloween Dirt Cups are seriously one of my favorite things to whip up when the spooky season rolls around. Back when I first started NoobRecipes, I was still figuring out that “healthy-ish” homemade food could actually be *fun*, and these little cups were a game-changer. They proved to me that you don’t need a culinary degree or a million fancy ingredients to make something impressive and delicious. My personal goal with this blog is to show *anyone* can cook, and these dirt cups are the perfect example. They’re ridiculously easy, look super cool with minimal effort, and honestly, they taste amazing without being loaded down with sugar. Trust me, even if you think you can’t bake, you can totally nail these!

Why You’ll Love These Halloween Dirt Cups
Seriously, these Halloween Dirt Cups are a total win, and here’s why you’ll be making them year after year:
- They’re SO Easy to Make: This is a no-bake wonder! If you can stir and layer, you can make these. It’s perfect for beginner cooks or when you just need a quick, impressive treat.
- Party Perfect: Planning a Halloween bash? These are your secret weapon. They look festive, they’re portioned out perfectly for guests, and kids absolutely devour them. Plus, they’re a fantastic easy Halloween dessert that looks way more complicated than it is.
- Kid-Friendly Fun: Get the little ones involved! They’ll love crushing the cookies and, of course, decorating the tops. It’s a great way to get them excited about helping in the kitchen.
- Homemade Goodness: You know exactly what’s going into them. Making them at home means you can control the ingredients better than store-bought sweets, making them a slightly healthier, guilt-free indulgence for your trick-or-treaters (or yourself!).
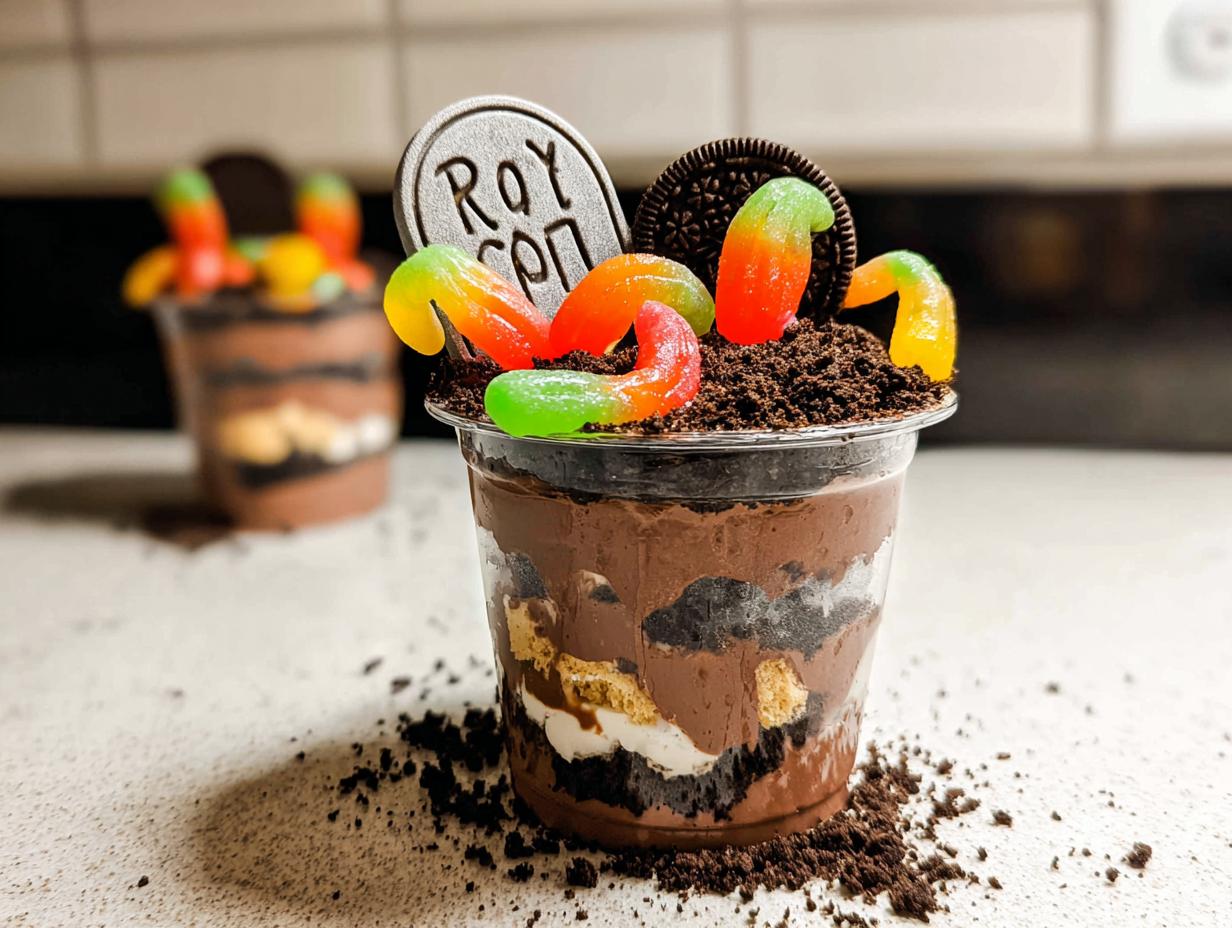
- Spooky & Delicious: That classic combo of chocolate pudding and crushed Oreos is a winner every time, and the Halloween candy toppings just take it over the top. They’re a crowd-pleaser for sure!
Gathering Your Halloween Dirt Cups Ingredients
Alright, let’s get down to business and gather everything we need for these awesome Halloween Dirt Cups! Don’t worry, it’s all super simple stuff you can probably find at any grocery store. Getting the right ingredients is key to making these taste amazing, even for us beginners!
| Ingredient | Amount & Prep | Notes |
|---|---|---|
| Instant Chocolate Pudding Mix | 3.9 oz box | Make sure it’s instant, not the cook-and-serve kind! |
| Cold Milk | 2 cups | Any kind works, but cold is important for the pudding to set right. |
| Frozen Whipped Topping | 8 oz | Thawed. This makes it light and fluffy. |
| Oreo Cookies | 24 cookies | Crushed into fine crumbs. Leave the cream filling in for extra flavor! |
| Gummy Worms | As needed | For that classic “dirt” look sticking out. |
| Pumpkin Candy Corns | As needed | Adds a fun pop of color and classic Halloween flavor. |
| Mint M&Ms | As needed | These are perfect for making little tombstones. |
| Black Frosting | Small amount | For writing on the M&Ms to make them look like tombstones. A tube with a fine tip is easiest! |
Ingredient Notes and Substitutions for Halloween Dirt Cups
Now, about these ingredients – a few little tweaks can make these Halloween Dirt Cups work for almost anyone! For the milk, if you’re trying to keep it dairy-free, almond milk, soy milk, or oat milk work just fine. Just make sure it’s cold! The whipped topping is what gives it that airy texture, but if you need a dairy-free option, there are some great coconut-based whipped toppings out there now. For the Oreos, if you’re going gluten-free, there are some really tasty gluten-free chocolate sandwich cookies that will totally do the trick. And for the candy decorations, feel free to get creative! If you can’t find Mint M&Ms, regular M&Ms can work, or even little chocolate candies you can write on. The goal is to have fun and make these your own, so don’t be afraid to experiment a little!
How to Prepare Your Spooky Halloween Dirt Cups
Alright, let’s get these spooky Halloween Dirt Cups made! It’s honestly super straightforward, even for us beginners. Just follow these steps and you’ll have a delicious, creepy dessert in no time. Remember, the goal here is fun and ease, so don’t stress too much!
- Start with the Pudding: Grab a big bowl. Pour in your instant chocolate pudding mix and then add the cold milk. Whisk it all together for about 2 minutes. You’ll see it start to thicken up. Let it sit for about 5 minutes to get nice and set.
- Add the Fluffiness: Now, gently fold in the thawed whipped topping. You don’t want to beat it to death; just mix it in until it’s all combined and the pudding looks light and airy. This is what makes it so yummy and not too dense.
- Get Your Cups Ready: Grab your clear plastic cups or little jars. These are great because you can see the layers! Spoon about 1-2 tablespoons of those crushed Oreo crumbs into the bottom of each cup. This is our “dirt” layer.
- Layer Up! Now, spoon some of that chocolate pudding mixture over the crumbs. Then, add another layer of those yummy Oreo crumbs on top of the pudding. Follow that with another generous layer of pudding.
- The Grand Finale (of Layers): Finish it all off with one last layer of Oreo crumbs on top of the pudding. Try to make the layers look nice and distinct – it makes them look way cooler when you’re done!
- Chill Out: This is important! Pop those cups into the refrigerator for at least 1 hour. This lets the pudding fully set and makes the flavors meld together. Trust me, it’s worth the wait.
- Time to Get Spooky: Once they’re chilled, it’s decorating time! This is where the magic happens. Stick gummy worms in so they look like they’re crawling out of the dirt. Add your candy corn pumpkins for a pop of color. And for those awesome tombstones, carefully write little spooky messages or names on the Mint M&Ms with your black frosting.
- Serve and Enjoy: Serve them up cold! These Halloween Dirt Cups are best enjoyed right out of the fridge.
Tips for Perfect Halloween Dirt Cups Every Time
Want to make your Halloween Dirt Cups absolutely perfect? Here are a few little tricks I’ve picked up. First, when crushing your Oreos, leave the cream filling in! It adds extra flavor and makes the “dirt” richer. If you’re using a food processor, pulse it a few times until you have crumbs, but don’t go completely powder – a little texture is good! For those neat layers, try using a piping bag or even a sturdy zip-top bag with the corner snipped off to add the pudding. It gives you way more control than a spoon. And for decorating, don’t be afraid to get creative! Little candy pumpkins, spider rings, or even edible glitter can add an extra touch of Halloween fun. The key is to have fun with it!
Creative Ways to Decorate Your Halloween Dirt Cups
Okay, this is where the real fun begins with your Halloween Dirt Cups! Making them look spooky and amazing is half the battle, and luckily, it’s the super easy part. You’ve already got those great layers of chocolatey goodness and crushed cookie “dirt,” so let’s make them sing! The classic gummy worms popping out of the top are a must – they just scream “Halloween treat!” Don’t forget those Mint M&Ms; writing little epitaphs like “R.I.P.” or “Boo!” on them with black frosting turns them into perfect little tombstones. You can even stick them in at a jaunty angle like they’re about to fall over. Beyond that, let your imagination run wild! Sprinkle on some candy pumpkins, maybe a few candy eyeballs, or even those little candy ghosts. If you have any edible glitter, a tiny dusting can add a magical shimmer. The goal is to make your Halloween Dirt Cups look as fun and festive as they taste!
Frequently Asked Questions About Halloween Dirt Cups
- Q1. Can I make these Halloween Dirt Cups ahead of time?
- Absolutely! These are perfect for making a day in advance. Just assemble them up to the chilling step, refrigerate, and then add your decorations right before serving. This is a lifesaver for parties!
- Q2. How should I store leftover Halloween Dirt Cups?
- Keep any leftovers covered tightly with plastic wrap and store them in the refrigerator. They’ll stay good for about 2-3 days, though the cookie crumbs might get a little softer over time, which honestly isn’t too bad!
- Q3. Can I use regular chocolate pudding instead of instant?
- While you *can* use cook-and-serve pudding, it’s not ideal for this recipe. Instant pudding is designed to thicken quickly without cooking, which is exactly what we need for this no-bake dessert. Stick with instant for the best results!
- Q4. My pudding isn’t setting up. What did I do wrong?
- The most common reason for pudding not setting is not using cold enough milk or not letting it sit for the full 5 minutes after whisking. Make sure your milk is super cold and resist the urge to skip that resting time!
- Q5. Can I make these healthier?
- You can try using a sugar-free chocolate pudding mix and a lighter whipped topping alternative. For a slightly healthier “dirt,” you could also try finely crushing some whole wheat chocolate graham crackers, though Oreos are pretty classic for a reason!
Storing and Reheating Your Halloween Dirt Cups
Leftover Halloween Dirt Cups are a delicious bonus, but knowing how to store them properly is key! Since these are no-bake and have pudding, refrigeration is a must. The best way to store them is in individual airtight containers or tightly covered with plastic wrap directly over the cups. This prevents them from drying out and keeps them from absorbing any other smells in the fridge.
Honestly, reheating isn’t really a thing for these. They’re meant to be served cold and chilled, so just keep them in the fridge until you’re ready to enjoy them again. They’ll stay yummy for about 2-3 days. Just a heads-up, the cookie crumbs might get a little softer the longer they sit, but that just makes them more like, well, actual dirt!
| Storage Method | Shelf Life | Notes |
|---|---|---|
| Airtight containers in refrigerator | 2-3 days | Cookie crumbs may soften over time. |
| Covered tightly with plastic wrap | 2-3 days | Ensures freshness and prevents drying out. |
Estimated Nutritional Information for Halloween Dirt Cups
Just a heads-up, the nutritional info for these Halloween Dirt Cups is an estimate, okay? It can totally change depending on the brands you use and even how much candy you pile on top! But, for a typical serving, here’s what you’re generally looking at:
| Nutrient | Amount (per serving) |
|---|---|
| Calories | 450 |
| Fat | 25g |
| Saturated Fat | 15g |
| Sodium | 300mg |
| Carbohydrates | 55g |
| Sugar | 40g |
| Protein | 4g |

Spooky 3-Layer Halloween Dirt Cups
- Total Time: 1 hour 15 minutes
- Yield: 6-8 servings
- Diet: Vegetarian
Description
Easy Halloween Dirt Cups are a fun and simple dessert perfect for parties. They feature layers of chocolate pudding and crushed Oreos, topped with spooky Halloween candy.
Ingredients
- 3.9 oz instant chocolate pudding mix
- 2 cups cold milk
- 8 oz frozen whipped topping, thawed
- 24 Oreo cookies, crushed into crumbs (about 2 1/2 cups)
- Gummy worms
- Pumpkin candy corns
- Mint M&Ms (for tombstones)
- Black frosting (for writing on tombstones)
Instructions
- In a large bowl, whisk the instant pudding mix and cold milk for 2 minutes. Let the pudding sit for 5 minutes.
- Fold in the thawed whipped topping until combined.
- In plastic cups or jars, add 1-2 tablespoons of crushed Oreo crumbs to the bottom.
- Layer with chocolate pudding, then add another layer of Oreo crumbs, followed by more pudding.
- Finish with a final layer of Oreo crumbs.
- Refrigerate for at least 1 hour.
- Decorate the tops with gummy worms, tombstones, and other festive treats.
- Serve cold.
Notes
- Crush Oreo cookies in a food processor or by placing them in a zip-top bag and crushing with a rolling pin.
- Leave the filling in the Oreos for a richer flavor and texture.
- Use black frosting to write epitaphs on the Mint M&Ms to create tombstones.
- Get creative with other Halloween candies for decoration.
- Prep Time: 15 minutes
- Cook Time: 0 minutes
- Category: Dessert
- Method: No-Bake
- Cuisine: American