If you’ve ever stared down a bag of gluten-free flour and thought, “I should just give up now,” then I have news for you! This recipe is the absolute game-changer you’ve been waiting for. Forget the rock-hard, crumbly messes of the past. We are making soft, slightly chewy, genuinely delicious gluten-free protein bagels right here, right now.
The best part? It’s shockingly simple. We aren’t dealing with yeast or complicated kneading methods that leave your kitchen looking like a flour bomb went off. It’s just yogurt, eggs, cheese, and your favorite GF blend. Trust me, if you can stir ingredients together, you can nail these bagels on your very first try.

Why These Gluten-free protein bagels Are a Game Changer
What makes these stand out from every other sad, store-bought option? It’s the protein punch, honestly. We get that incredible texture and structure from Greek yogurt and mozzarella cheese, which means you get a breakfast that actually keeps you full until lunch. These gluten-free protein bagels are perfect for meal prep because they hold up so well.
I wanted a breakfast that fit my busy schedule and my dietary needs, and nothing on the market really delivered. That’s why I kept messing around until I landed on this combination. It’s high protein, low fuss, and uses ingredients you probably already have in the fridge. You won’t believe they’re gluten-free!
My Journey to Perfecting Gluten-free protein bagels
Oh, the early days! I used to dread baking anything gluten-free. I spent countless weekends trying to coax yeast into working with alternative flours, only to end up with dense hockey pucks that I couldn’t even slice through. I was ready to throw in the towel on homemade bread entirely.
Then I found the secret weapon: Greek yogurt. When I swapped out the traditional liquid for thick yogurt and added mozzarella for fat and structure, everything changed. My first successful batch of gluten-free protein bagels was such a huge win because it required zero rise time and minimal mixing. I finally felt like a real baker, not just someone following confusing instructions. These are proof that you don’t need complicated techniques to get amazing results when you have the right base formula.
Essential Ingredients for Gluten-free protein bagels
Okay, listen up, because the ingredient list for these gluten-free protein bagels is short and sweet, but every single item plays a huge role in making them work. Seriously, don’t try to swap out the cheese for something else—it’s key for texture!
We’re keeping the prep time down by using simple measuring cups and spoons. No fancy scales needed here, which is great for beginners!
Ingredient Breakdown and Preparation Clarity
I always use a simple table for my ingredients so I can check things off as I pull them out of the pantry. It keeps me from accidentally forgetting the baking powder, which would be disastrous!
Here is exactly what you need to gather before you even think about turning on the oven:
{Table format for ingredients goes here}
Ingredient Notes and Substitutions Guidance
There are just two things I need you to pay close attention to. First, the flour blend. You MUST use a gluten-free all-purpose blend that already has xanthan gum mixed in. If yours doesn’t, you’ll need to add about a teaspoon of it, or these bagels will just crumble apart on you.
Second, use plain, nonfat Greek yogurt. Don’t grab the vanilla or sweetened kind—we need the plain stuff for the right acidity and protein structure. And make sure that mozzarella is part-skim; the full-fat version melts too much and changes the structure of our beautiful dough.
Step-by-Step Guide to Baking Gluten-free protein bagels
The actual making of these gluten-free protein bagels is faster than waiting for water to boil! We skip the long proofing times that yeast demands, so you can go from craving a bagel to eating one in under an hour. Just follow these steps closely, and you’ll have four perfect rings ready for the oven.
Dough Mixing and Shaping Techniques
First thing, get that oven preheating to 375°F—don’t wait until the dough is ready! When mixing the wet and dry ingredients, don’t panic when it looks sticky. That’s exactly what we want. The secret here is oiling your hands before you divide the dough into four portions. Seriously, oil your hands, not the dough, to keep things manageable.
Roll each portion into a little rope, about seven inches long, and gently bring the ends together to form a ring shape. They don’t have to be perfectly round; that’s part of their charm!
Baking Times and Visual Cues for Success
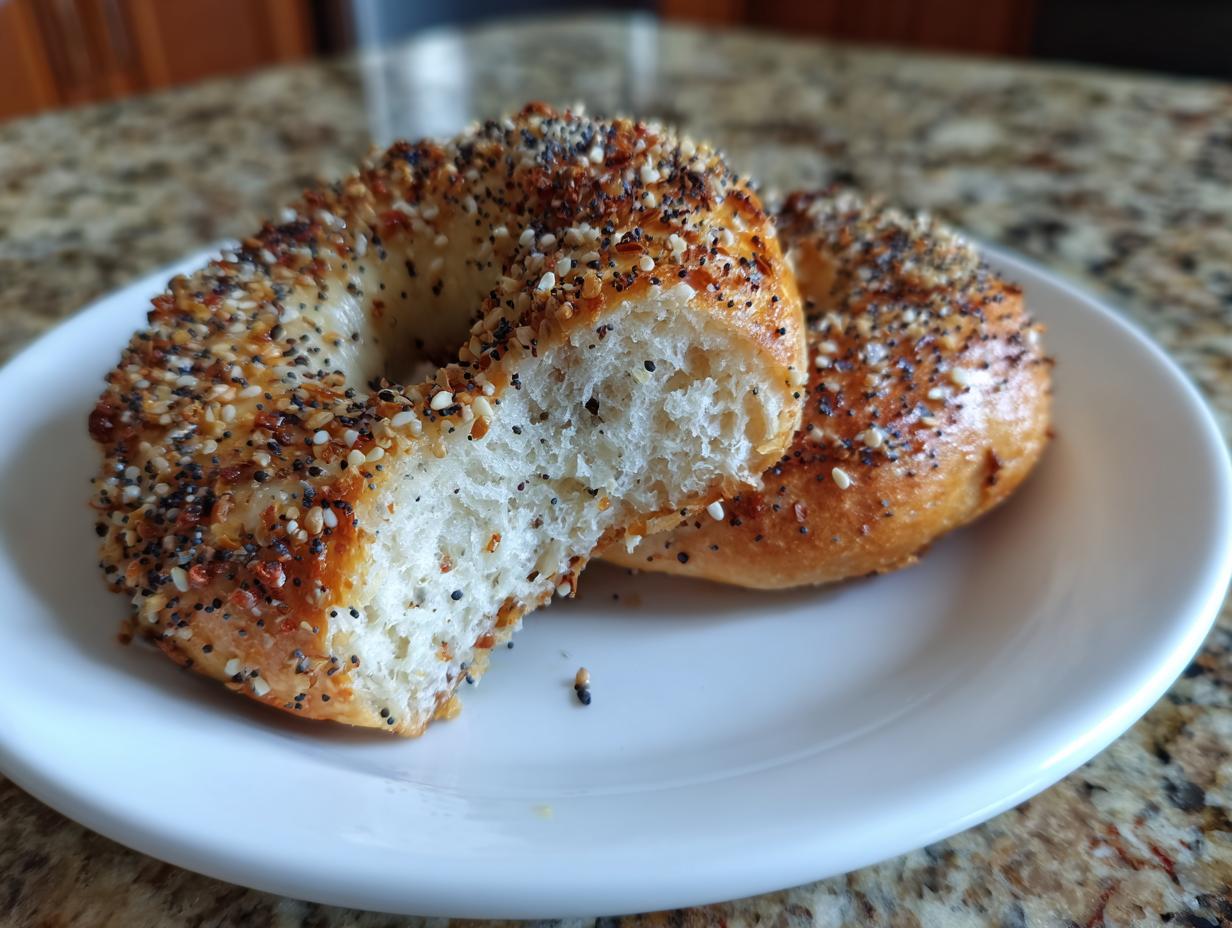
Once you brush them with that egg wash and sprinkle on the everything seasoning, they go straight onto the parchment-lined sheet and into the hot oven. Bake them for about 22 to 25 minutes until they look golden brown and feel firm when you give them a little poke. For safety, especially since we are using eggs, I always confirm the internal temperature hits 165°F when I test one. Let them cool for five minutes before slicing!
Tips for Achieving Perfect Gluten-free protein bagels Texture
Getting that perfect, slightly chewy texture on our gluten-free protein bagels comes down to managing the dough just right—it’s sticky, folks, and that’s okay! Don’t be tempted to add extra flour just because it feels messy at first. That extra moisture is what keeps the final product tender instead of dry.
Handling Sticky Dough Successfully
When you stir the yogurt and cheese in, the dough will look like a wet mess, and you might think you messed up. You didn’t! When it’s time to divide and shape, you absolutely must oil your hands. A light coating of olive oil or vegetable oil works wonders. It stops the dough from sticking to your skin so you can actually roll it into those ropes.
Roll them gently—don’t press too hard! If you oil your hands well, you can shape those four portions into rings without tearing them or adding too much extra dry stuff. Remember, a little stickiness during prep equals a lot of tenderness when baked!
Serving Suggestions for Your Gluten-free protein bagels
These bagels are so versatile once they come out of the oven golden brown. Because they are already packed with protein from the yogurt and cheese, they make an amazing base for a quick, healthy meal. Honestly, I love them hot, right out of the oven after they’ve cooled just a touch!
If you’re looking for a savory breakfast, a simple smear of avocado and a sprinkle of sea salt is fantastic. They toast up beautifully, so don’t skip that step if you like a little crispness on the outside.
For lunch, try slicing one open and loading it up with turkey breast and sharp cheddar cheese. Since they are so hearty, you don’t need many fixings. If you’re feeling a little sweet, a thin layer of almond butter and some sliced banana works perfectly too. They are sturdy enough to handle whatever you throw at them!

Storing and Reheating Your Gluten-free protein bagels
Don’t worry if you can’t eat all four bagels right away! These gluten-free protein bagels are fantastic for making ahead of time, but you need to store them correctly so they don’t get tough. Since they don’t have any preservatives like store-bought bread, freshness matters.
For short-term storage, keep them in an airtight container at room temperature for up to two days. If you know you won’t get to them by then, the freezer is your best friend. I always slice mine before freezing them—it makes reheating so much faster!
When you are ready to eat a frozen bagel, just pop it straight into the toaster or a toaster oven. They get that wonderful crisp exterior back again. If you prefer them softer, microwave one for about 10 to 15 seconds. Here is a quick guide on how long they should last:
| Storage Method | Duration | Tip |
|---|---|---|
| Room Temperature (Airtight) | 1-2 Days | Keep them away from heat sources. |
| Refrigerator | Up to 5 Days | Wrap tightly in plastic wrap first. |
| Freezer (Airtight bag) | Up to 2 Months | Slice before freezing for easy reheating. |
Frequently Asked Questions About Gluten-free protein bagels
I get so many questions about these bagels once people try them, and honestly, that’s a sign they’re doing something right! Most people worry about the texture, since gluten-free baking can be tricky, but these are surprisingly forgiving. Here are a few things I hear most often from bakers trying this recipe for the first time.
Q1. Can I skip the mozzarella cheese? I don’t keep it on hand.
Oh, I really wouldn’t recommend it! The mozzarella cheese melts during baking and helps bind the dough together when mixed with the yogurt. If you skip it, you’ll likely end up with a dough that’s too wet and won’t hold its shape well. It’s essential for the structure of these gluten-free protein bagels.
Q2. My dough felt way too sticky to roll into ropes. What did I do wrong?
You didn’t do anything wrong, promise! This dough is naturally sticky because of the yogurt and cheese, which is actually a good thing for moisture. The key is to lightly oil your hands before you touch the dough. Don’t add flour to the dough itself; just oil your palms, and you’ll find you can handle it enough to shape the rings.
Q3. Are these bagels safe to eat if they don’t rise?
Yes, absolutely! Since these don’t use yeast, they aren’t supposed to rise like traditional wheat bagels. They get their lift from the baking powder and the structure from the eggs and cheese. They will puff up slightly in the oven, but don’t expect them to double in size!
Q4. Can I make these dairy-free?
That’s a tough one, I’m afraid. The Greek yogurt and mozzarella are crucial for the protein content and the texture that keeps these from crumbling. I haven’t tested dairy-free alternatives yet, so I can’t guarantee success if you swap those key ingredients out!
Sharing Your Gluten-free protein bagels Success
I truly hope you loved making these easy gluten-free protein bagels as much as I love eating them! Once you’ve toasted yours up and found your favorite topping, please come back and tell me all about it. Drop a rating below or share a picture of your beautiful batch! Like us on Facebook for more updates!
Print
Shocking 4 Ingredient Gluten-free protein bagels
- Total Time: 40 minutes
- Yield: 4 bagels
- Diet: Gluten Free
Description
Soft, high-protein, gluten-free bagels made simply with Greek yogurt and eggs. These bagels offer a tender interior and a slightly crisp crust, ideal for quick breakfasts and meal preparation.
Ingredients
- 1 1/2 cups gluten-free all-purpose flour with xanthan gum
- 1 tablespoon baking powder
- 1/2 teaspoon fine sea salt
- 1 cup plain nonfat Greek yogurt
- 2 large eggs
- 1 cup shredded part-skim mozzarella cheese
- 1 egg, beaten (for topping)
- 1 tablespoon everything bagel seasoning
Instructions
- Heat your oven to 375°F. Line a baking sheet with parchment paper.
- Whisk the gluten-free flour, baking powder, and salt in a large bowl.
- Stir in the Greek yogurt, 2 large eggs, and mozzarella until a sticky dough forms.
- Divide the dough into 4 equal portions.
- With lightly oiled hands, roll each portion into a rope about 7 inches long and shape it into a ring.
- Place the bagels on the prepared baking sheet.
- Brush the tops with the beaten egg.
- Sprinkle evenly with everything bagel seasoning.
- Bake for 22 to 25 minutes until the bagels are golden and firm when touched.
- Cool the bagels for 5 minutes before slicing. Confirm eggs reach an internal temperature of 165°F for safety.
Notes
- Use a gluten-free flour blend that already includes xanthan gum.
- Oiling your hands helps manage the sticky dough.
- These bagels are excellent toasted.
- Prep Time: 15 minutes
- Cook Time: 25 minutes
- Category: Breakfast
- Method: Baking
- Cuisine: American