If you’ve ever wanted to bring that incredible flavor of a juicy cheeseburger to a party but skip the messy grilling and the stack of napkins, then you are in the absolute right place! Trust me, I used to struggle with even making decent cookies, but these Garlic Parmesan Cheeseburger Bombs? These are foolproof. They are my go-to recipe when I need something impressive without spending the whole afternoon in the kitchen.
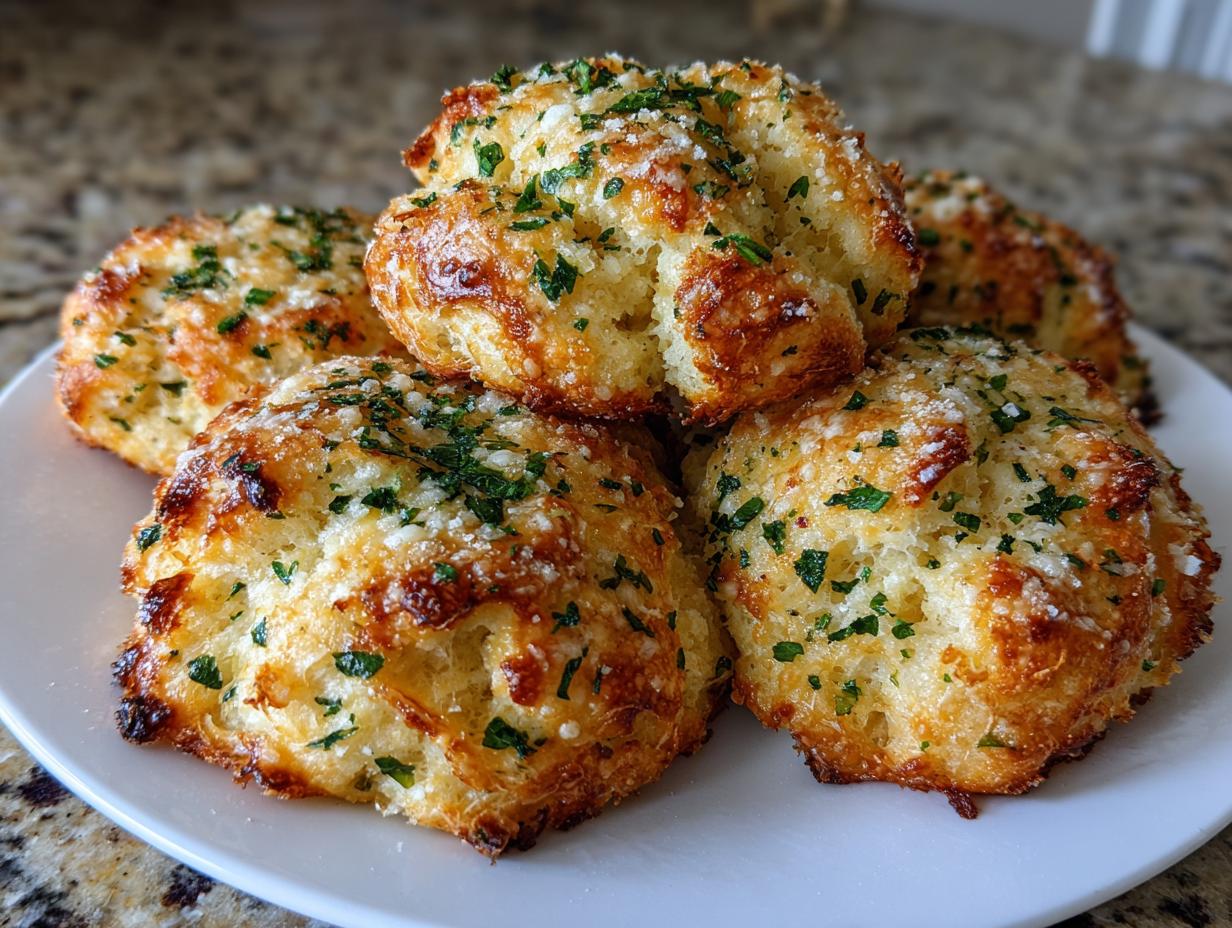
Honestly, turning simple ground beef and cheddar into these golden, garlicky pockets of joy is shockingly easy. The magic is really in that buttery, cheesy topping we put on right before they go into the oven. They come out tasting like the best comfort food you’ve ever had, but totally bite-sized. You can whip up the meat mixture while the oven preheats, and before you know it, you have eight perfect snacks ready to go. They disappear instantly at every gathering, I promise you that!

Gathering Your Ingredients for Garlic Parmesan Cheeseburger Bombs
Okay, getting ready for these Garlic Parmesan Cheeseburger Bombs is half the fun! Since this recipe is so fast, make sure everything is measured out before you start cooking the meat. That way, when the beef is ready for seasoning, you won’t panic looking for the garlic powder.
Don’t substitute the basics here, especially the dough. Getting the right texture depends on using the refrigerated tubes. You want everything prepped and ready to go so we can move fast when we start assembling!
Essential Components for Flavorful Garlic Parmesan Cheeseburger Bombs
Here’s what you need to make these incredible Garlic Parmesan Cheeseburger Bombs. I always lay everything out on the counter first:
- One pound of ground beef—I stick to 85% lean. We drain the fat later, so it’s perfect.
- Kosher salt, black pepper, garlic powder, and onion powder for that classic burger seasoning blend.
- A splash of Worcestershire sauce; don’t skip this, it adds so much depth!
- One cup of shredded sharp cheddar cheese. Sharp is important for flavor!
- One tube of refrigerated biscuit dough. Make sure they are the standard size, usually 8 biscuits total.
- For the topping, you need three tablespoons of unsalted butter, melted, two tablespoons of fresh, finely minced garlic—the fresh stuff really makes a difference here—and one-third cup of grated Parmesan cheese.
- Finally, a little fresh parsley for color at the end.
Preparing the Flavorful Beef Filling
This is where we capture that amazing, savory core flavor before we wrap it all up. If you rush this part, the whole bomb suffers, so take your time making sure the meat is cooked perfectly. Remember, these are going to be handheld, so we need that filling to be firm enough to hold its shape once it cools down just a touch.
We’re turning simple ground beef into the star of our Garlic Parmesan Cheeseburger Bombs. It’s all about technique here, not fancy ingredients! If you enjoy savory handhelds, you might also like our recipe for garlic parmesan chicken skewers recipe.
Cooking the Ground Beef Base
First things first, get your skillet ripping hot over medium-high heat. You want that beef to brown nicely. Toss in the pound of beef and just let it cook for about eight minutes. Your job here is to break it up constantly with a wooden spoon until there is absolutely no pink left and it hits that safe 160 degrees Fahrenheit. I know it seems like a lot of fat, but don’t worry!
Once it’s cooked through, carefully drain off every bit of excess grease. Seriously, pour it out! We want flavor, not soggy bombs. Return the cooked, drained beef back to the pan, but turn the heat down to low. We don’t want it sticking while we season.
Seasoning and Melting the Cheese for Garlic Parmesan Cheeseburger Bombs
Now for the flavor boost! Reduce that heat to low. Toss in the kosher salt, black pepper, garlic powder, and onion powder—those are your classic burger spices. Stir it all around so the meat gets coated evenly. Then, add in that cup of sharp cheddar cheese and stir until it’s completely melted and everything looks gooey and combined. This is the binder!
Once the cheese is fully incorporated into the seasoned beef mixture—and I mean fully combined—take the skillet right off the burner. This is important: let the filling cool for about five minutes. If it’s too hot when you try to wrap it in the biscuit dough, it’ll melt the dough right through. We want it warm, not scorching, for the next step of making our Garlic Parmesan Cheeseburger Bombs.
Assembling Your Cheeseburger Bombs
This is the fun part, where everything comes together! We’re taking those soft, pillowy biscuits and turning them into little treasure chests for our savory meat filling. The key here is speed and making sure you don’t overwork the dough, or they get tough. Have your cooled beef mixture ready to go right by your workspace!
If you’ve ever made homemade dumplings or pierogies, the technique is similar. We need a good seal so that glorious cheese and beef stay locked inside while they bake up into perfect Garlic Parmesan Cheeseburger Bombs.
Flattening and Filling the Biscuit Dough
Carefully separate your eight refrigerated biscuits. Don’t let them sit out too long; keep them cool! Take one biscuit round and lay it on a lightly floured surface. Now, gently flatten it out using just your hands—no rolling pin if you can help it! You’re aiming for a disk about four inches across and not much thicker than a quarter of an inch. If you make them too thin, they tear easily.
Once you have your dough disk, scoop about two tablespoons of that cooled beef and cheese mixture right into the very center. Don’t go overboard! Too much filling and you’ll never get the edges to meet up properly.
Sealing the Garlic Parmesan Cheeseburger Bombs Properly
This step is non-negotiable for great Garlic Parmesan Cheeseburger Bombs! You need to bring all the edges of the dough up and over the filling, meeting them right at the top center. Pinch those seams together with your fingers—really press them! I mean, really pinch them tight. If you leave any holes, the cheese will leak out, and you’ll end up with cheesy puddles instead of bombs.
Once you are absolutely certain they are sealed, gently roll each one between your palms just to smooth out the lumps. Then, place them seam-side down on your parchment-lined baking sheet. Make sure you space them about two inches apart because they are going to puff up beautifully while they bake!
Baking and Finishing Touches
Now that we have these perfectly sealed little packages, it’s time to give them the golden, savory crust that makes them legendary. This topping is what elevates them from good to absolutely must-have party food. Seriously, the smell that fills your house when these start baking is unbelievable!
Don’t try to sneak one before they are done, though! They need that full baking time to cook the dough all the way through.
Applying the Garlic Butter and Parmesan Topping
You need to get the oven preheated to 375 degrees Fahrenheit while you prepare the topping. In a small bowl, whisk together your three tablespoons of melted butter and the two tablespoons of minced fresh garlic. Don’t be shy with that garlic; it mixes right into the butter and soaks into the dough! If you are looking for other great appetizer ideas, check out our stuffed bread recipes collection.
Take a pastry brush and generously coat the top and sides of every single sealed bomb with that garlic butter. Make sure every surface gets some love. Immediately after the butter, sprinkle that grated Parmesan cheese evenly over the top of each one. Press it down gently with your fingers so it sticks really well. This Parmesan is what turns golden brown and crispy!
Baking Time and Final Presentation for Garlic Parmesan Cheeseburger Bombs
Once they are brushed and coated, they are ready for their big moment! Pop them onto the middle rack of your 375°F oven. They only need about 15 minutes. You are looking for them to be beautifully golden brown all over and for the dough to look completely cooked through—no pale spots!

When they come out, they are piping hot, so let them rest on the baking sheet for just three minutes. This short cooling period is crucial. Right before you serve your incredible Garlic Parmesan Cheeseburger Bombs, sprinkle them lightly with that fresh, chopped parsley for a pop of color. They are best served warm!
Tips for Baking Success
If you’re new to wrapping dough around fillings, don’t stress! The biggest hurdle with these is making sure they don’t explode in the oven. The secret is twofold: temperature and sealing. Keep that refrigerated biscuit dough as cold as you possibly can while you work. If it gets too warm, it gets sticky and tears easily when you try to stretch it.
When you are pinching the seams closed, pretend you are closing a treasure chest! Press hard and make sure there are absolutely no gaps or thin spots where the cheese can escape. If you see a tiny hole, just pinch a tiny piece of excess dough from somewhere less visible and patch it up. A tight seal means beautiful, intact bombs that stay perfectly juicy inside!
Storing and Reheating Leftover Garlic Parmesan Cheeseburger Bombs
I rarely have leftovers because everyone devours these so fast, but when I do, I want them to taste almost as good the next day! The key to keeping these Garlic Parmesan Cheeseburger Bombs fresh is protecting that crispy Parmesan crust from getting soggy in the fridge. Don’t just toss them in a plastic bag! If you want to save this recipe for later, feel free to pin it on Pinterest.
If you manage to save any, you need a plan to bring back that fresh-baked texture. Trust me, microwaving these is a disaster; you end up with sad, dense dough.
Storage Guidelines
Wait until the bombs have cooled completely to room temperature before you store them. If you seal them up warm, the condensation will make the crust soggy instantly. Place the cooled bombs in a single layer inside an airtight container. You can put a paper towel on the bottom if you want to absorb any residual moisture. They stay perfectly good in the refrigerator for up to three days.
Reheating Instructions
To bring back that amazing texture, you need dry heat. Skip the microwave entirely! The best way to reheat these is in a toaster oven or a regular oven set to about 350 degrees Fahrenheit for about five to seven minutes. If you have an air fryer, that’s even better—set it to 325 degrees for four minutes. That short blast of dry heat crisps up the dough and melts the cheese just enough without drying out the beef filling inside your Garlic Parmesan Cheeseburger Bombs.
Frequently Asked Questions About These Appetizers
I get so many messages asking for little tweaks and make-ahead tips for these, so I thought I’d answer the most common questions right here. Since these are such a fantastic party food, people always want to know how to prep them in advance! You can also follow us on Facebook for more quick updates.
Can I make the beef filling ahead of time?
Yes, absolutely! Making the seasoned beef and cheese filling ahead of time is a huge time saver. Once the filling is completely cooked and cooled down, store it in an airtight container in the fridge for up to two days. Just remember, you must let it cool completely before you try to wrap it in the biscuit dough, or you’ll end up with a melted mess instead of a perfectly sealed bomb!
What cheese works best instead of cheddar?
Sharp cheddar is my favorite because it melts beautifully and has a strong flavor to stand up to the garlic butter, but you can definitely switch it up! Monterey Jack melts incredibly smooth, or if you want a little bite, try Pepper Jack. Just make sure whatever you use is shredded well so it incorporates nicely into the beef mixture.
Are these Garlic Parmesan Cheeseburger Bombs suitable for game day?
Oh my goodness, yes! These Garlic Parmesan Cheeseburger Bombs were practically invented for game day or any kind of casual party food situation. They are easy to make ahead of time, they hold their heat well on a platter, and since they are totally self-contained, nobody needs a fork or a plate. They are the ultimate handheld crowd-pleaser!
Sharing Your Delicious Creations
I truly hope you loved making these as much as I love eating them! Once you pull these golden bites out of the oven, I’d love to hear all about it. Did they disappear instantly? Snap a picture and tag me! Don’t forget to leave a star rating right here on the blog so other folks know how much success you had with this recipe. Happy eating! You can also read more of my thoughts on food over on Medium.
Print
8 Amazing Garlic Parmesan Cheeseburger Bombs
- Total Time: 38 minutes
- Yield: 8 bombs
- Diet: Omnivore
Description
These cheeseburger bombs wrap seasoned ground beef and melted cheddar in soft biscuit dough, then bake with garlic butter and Parmesan for an irresistible party appetizer. They turn classic burger flavors into bite-sized snacks perfect for gatherings.
Ingredients
- 1 pound ground beef, 85% lean
- 1 teaspoon kosher salt
- 3/4 teaspoon black pepper
- 1 teaspoon garlic powder
- 1/2 teaspoon onion powder
- 1 tablespoon Worcestershire sauce
- 1 cup shredded sharp cheddar cheese
- 1 tube refrigerated biscuit dough, 8 biscuits
- 3 tablespoons unsalted butter, melted
- 2 tablespoons minced fresh garlic
- 1/3 cup grated Parmesan cheese
- 2 tablespoons chopped fresh parsley
Instructions
- Preheat oven to 375°F and line a rimmed baking sheet with parchment paper.
- Heat a large skillet over medium-high heat. Add ground beef and cook for 8 minutes, breaking into small crumbles with a wooden spoon, until beef reaches 160°F and no pink remains. Drain excess fat and return to skillet.
- Reduce heat to low. Add salt, black pepper, garlic powder, onion powder, and Worcestershire sauce to beef. Stir in cheddar cheese until melted and mixture is well combined. Remove from heat and let cool for 5 minutes.
- Separate biscuit dough into 8 portions. Flatten each biscuit with your hands into a 4-inch round disk about one-quarter inch thick.
- Place 2 tablespoons beef mixture in center of each dough round. Gather edges up and around filling, pinching seams tightly to seal. Place seam-side down on prepared baking sheet, spacing 2 inches apart.
- Combine melted butter and minced garlic in a small bowl. Brush garlic butter generously over top and sides of each bomb.
- Sprinkle Parmesan cheese evenly over each bomb, pressing gently to adhere.
- Bake for 15 minutes until golden brown and dough is cooked through. Remove from oven, sprinkle with fresh parsley, and let cool for 3 minutes before serving.
Notes
- Cook ground beef to proper internal temperature to ensure safe consumption.
- Prep Time: 15 minutes
- Cook Time: 23 minutes
- Category: Appetizer
- Method: Baking
- Cuisine: American