If you’ve ever been intimidated by making a big, beautiful roast that actually tastes like something special, stop worrying right now! I’ve cooked this dish more times than I can count—for huge family dinners and just for a quiet Tuesday night when I needed serious comfort food. I promise, this Dutch Oven Pot Roast is the recipe you’ve been searching for.
The secret isn’t some fancy spice blend; it’s the heavy, even heat of the Dutch oven itself. That cast iron magic sears the beef to a deep, rich brown and then locks in all those savory juices while it braises slowly. You get melt-in-your-mouth tender beef and perfectly cooked root vegetables all in one pot. Seriously, even if you’re new to the kitchen, this roast is foolproof. It practically cooks itself!

We’re talking about a classic dinner that delivers incredible flavor without needing you hovering over the stove for hours. It’s the kind of meal that makes the whole house smell amazing.
Why This Dutch Oven Pot Roast Recipe Works for Everyone
I know what you’re thinking: a big roast sounds like a lot of work and a big mess. But honestly, this Dutch Oven Pot Roast simplifies everything! It’s designed so that even if you’re just learning how to cook a big cut of meat, you’ll end up with something spectacular. It’s all about layering flavor and letting the oven do the heavy lifting.
The beauty of using your Dutch oven is that it handles every stage—from searing to slow cooking to gravy making—in one heavy piece of cookware. That means less stress for you and fantastic results for your family.
Quick Benefits of Making Your Dutch Oven Pot Roast
- It requires minimal hands-on time once the searing is done. You just put the lid on and walk away!
- The searing step builds a massive depth of flavor that you just can’t get from slow cooking alone.
- Cleanup is surprisingly easy since everything cooks right in the same pot.
- The combination of balsamic vinegar and beef broth creates a naturally rich, silky gravy without complicated additions.
- The beef becomes so tender it literally falls apart with just a fork.
Gathering Your Ingredients for Perfect Dutch Oven Pot Roast
Okay, now that you’re excited about the process, let’s talk about what you need for this perfect Dutch Oven Pot Roast. Trust me, using quality ingredients here makes a massive difference because there aren’t a million things masking the flavor. We are focusing on simple, hearty components that shine when braised low and slow.
I’ve listed everything out below, but pay close attention to the preparation notes! We need specific cuts and sizes for everything to cook evenly over those almost four hours. Don’t worry; I’ve made the list super clear so you don’t miss a thing before you start.
Essential Components List
This list has everything from the star of the show—the beef—to the final flavor boosters. I always lay everything out on the counter before I even turn on the stove; it’s called mise en place, but I just call it “not forgetting the garlic.” We’ll get to the exact measurements and preparation details right here. After you see the list, I’ll give you a few pointers on the ingredients themselves.
Ingredient Preparation Notes and Substitutions
Let’s talk beef first. You absolutely must get a boneless chuck roast. That marbling is what melts down and keeps the meat juicy. Do not try to substitute this with a leaner cut; it will just dry out, and we can’t have that in our perfect pot roast!
For the liquid, I use low-sodium beef broth because we are adding salt ourselves, plus that splash of balsamic vinegar really brightens up the heavy beef flavor. If you don’t have balsamic, red wine vinegar works in a pinch, but you might need a tiny pinch of sugar to balance it out. Also, make sure your herbs are fresh—thyme and rosemary are non-negotiable for that classic, cozy aroma!
- 4 pounds boneless beef chuck roast
- 1 tablespoon kosher salt
- 1 teaspoon ground black pepper
- 2 tablespoons vegetable oil
- 1 large yellow onion chopped into wedges
- 3 stalks celery chopped into large pieces
- 2 tablespoons tomato paste
- 4 cloves garlic minced
- 3 cups beef broth
- 2 tablespoons balsamic vinegar
- 1 pound carrots peeled and cut into chunks
- 1 1/2 pounds Yukon Gold potatoes cut into halves
- 4 sprigs fresh thyme
- 2 sprigs fresh rosemary
- 2 tablespoons cornstarch
- 2 tablespoons cold water
- 1 tablespoon chopped fresh parsley
Necessary Tools for Your Dutch Oven Pot Roast
You don’t need a ton of fancy gadgets for this meal, which is part of why I love it so much! The star of the show, obviously, is the heavy-duty pot itself. Having the right gear makes cooking a successful Dutch Oven Pot Roast so much easier. Make sure your equipment is ready to go before you even turn on the stove!
- A large, heavy-bottomed Dutch oven with a tight-fitting lid (this is key for even braising!).
- A large plate or bowl to hold the seared beef temporarily.
- A sturdy wooden spoon for scraping up all those tasty browned bits off the bottom.
- Paper towels for thoroughly drying the meat before seasoning.
- A sharp knife and cutting board for prepping your vegetables.
Step-by-Step Instructions for Your Dutch Oven Pot Roast
Alright, let’s get cooking! This is where the magic happens. Remember, the entire cooking process takes a good chunk of time, but most of it is hands-off baking time. Preheat your oven to 325°F first, and make sure that rack is sitting in the lower middle spot so the heavy pot doesn’t sit too close to the top heating element.
The success of this Dutch Oven Pot Roast hinges on the very first steps, so don’t rush the sear! We want maximum flavor development right off the bat.
Phase 1: Seasoning and Searing the Beef
First things first: pat that beautiful chuck roast completely dry with paper towels. I mean bone dry! Any moisture left on the surface will steam the meat instead of searing it, and we need that deep brown crust. Once it’s dry, rub it down generously with the kosher salt and black pepper—don’t be shy with the seasoning!
Heat your vegetable oil in the Dutch oven over medium-high heat until it shimmers—it needs to be hot! Carefully place the seasoned beef in the pot. Let it sit there, undisturbed, for about five minutes until you see a dark, beautiful crust forming. Flip it and do the same thing on the other side. Sear all the sides if you can! Once it’s gorgeous and brown, pull that roast out onto a clean plate. We’re saving all those crispy bits stuck to the bottom!
Phase 2: Building the Flavor Base
Keep the heat on medium now. Toss in your onion wedges and celery pieces. Sauté them for about five minutes, stirring occasionally, until they start to soften up and get a little color themselves. This brings out their sweetness.
Next, stir in the tomato paste and the minced garlic. Cook this mixture for just one minute until you can really smell that garlic getting fragrant—don’t let it burn! Now for the deglazing step, which is crucial for flavor! Pour in the beef broth and the balsamic vinegar. Take your wooden spoon and really scrape the bottom of that hot pot to release every single browned bit stuck there. That dark, sticky stuff is pure flavor gold!
Phase 3: The First Braise
Gently place that seared roast right back into the pot, nestling it down into the liquid. Tuck those fresh thyme and rosemary sprigs right down alongside the meat. Put the heavy lid on nice and tight. Cover it up and move the whole thing into that preheated 325°F oven. Now, let it hang out back there for a full two hours. This is the slow cooking phase where the tough chuck starts to break down.
Phase 4: Adding Root Vegetables
After those two hours are up, carefully pull the Dutch oven out. The liquid will be bubbling, so use oven mitts! Arrange your prepped carrots and potatoes all around the beef—try not to submerge them completely, you want them nestled in there but exposed to the moist heat. Put the lid back on securely and return it to the oven for another hour and 30 minutes. You’ll know it’s done when the vegetables are soft and the meat is fork-tender, which should happen around the time the internal temperature hits 145°F, though it’ll be even better closer to 195°F.
Phase 5: Creating the Thickened Gravy
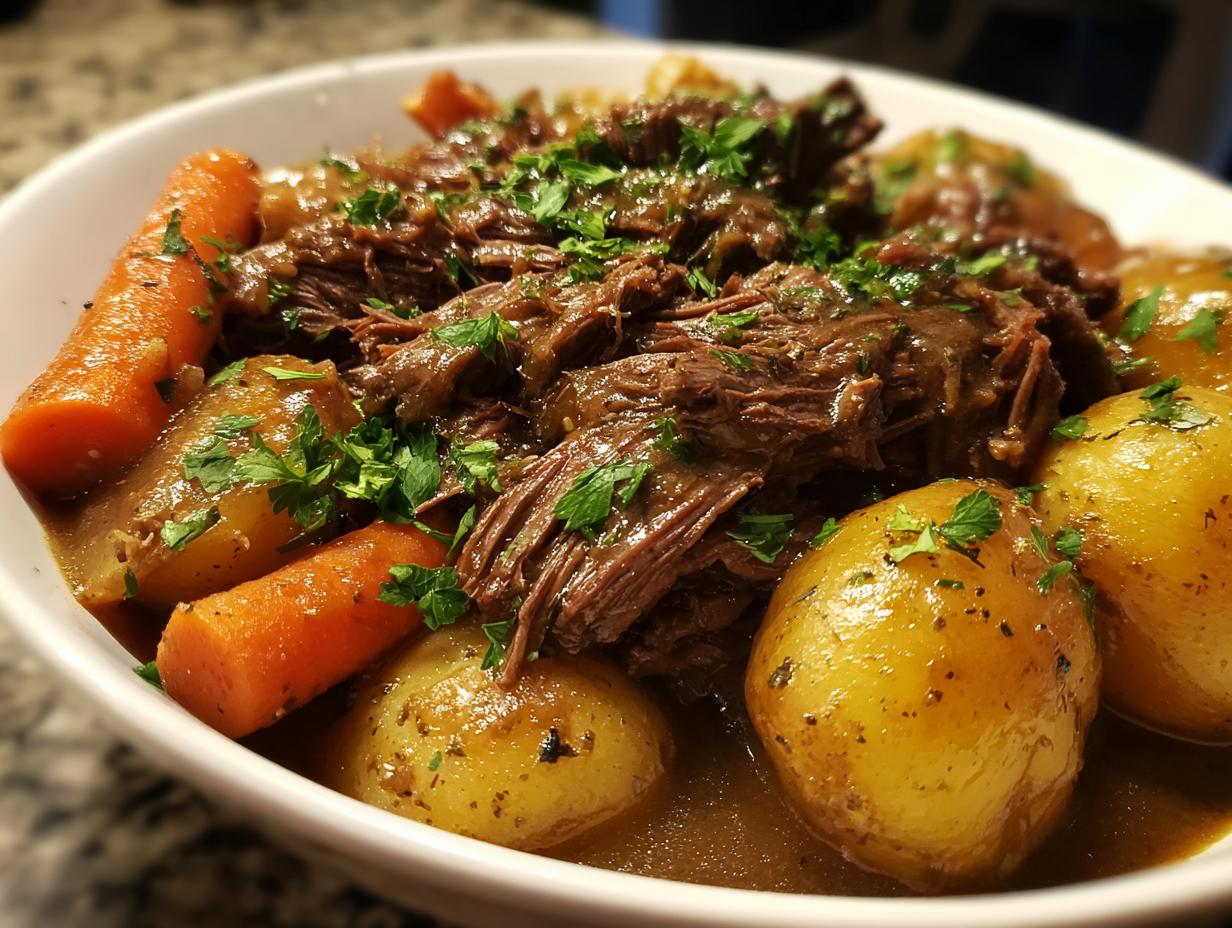
Once the roast is done, use tongs and a slotted spoon to move the beef and all those lovely vegetables onto a big serving platter. Tent them loosely with foil to rest. Now, put the pot—just the pot with the remaining juices—back onto the stovetop over medium heat. In a small bowl, whisk together your cornstarch and cold water until it’s totally smooth—that’s called a slurry. Whisk this slurry slowly into the simmering liquid. Let it cook and bubble gently for about three minutes until it thickens up into a beautiful gravy.
Fish out those woody thyme and rosemary stems! Ladle that rich gravy all over the meat and vegetables, sprinkle with fresh parsley, and serve immediately!

Storing and Enjoying Leftover Dutch Oven Pot Roast
The best part about making a big, comforting meal like this Dutch Oven Pot Roast is having leftovers! This dish actually tastes even better the next day once those flavors have really settled into the meat and veggies. You can store everything together in the Dutch oven (if you have space in your fridge!) or transfer the meat and veggies to an airtight container. If you want more great dinner ideas, check out our sheet pan chicken parmesan.
It keeps beautifully for about three to four days. Just make sure you keep that leftover gravy separate or pour a little bit over the meat before sealing it up, as that moisture is what keeps everything perfect.
Reheating Tips for Maximum Tenderness
When you’re ready to eat it again, you want to treat the roast gently. Reheating it too fast or too high will dry out the beef we worked so hard to make tender. My favorite way is to put the leftovers back into the Dutch oven, add a splash more broth or water if it looks dry, cover it tightly, and warm it slowly on the stovetop over low heat. If you’re using the oven, keep the temperature low—around 300°F—and keep it covered with foil until it’s warmed through.
Frequently Asked Questions About Your Dutch Oven Pot Roast
I get so many questions after people try this recipe for the first time, and honestly, that just means you’re all loving it! Most of the confusion usually circles back to timing or what happens if you don’t have the perfect setup. Don’t sweat it; we can troubleshoot anything! For more quick tips, follow us on Pinterest.
This recipe is designed to be very forgiving, but knowing a few key details about temperature will make sure your Dutch Oven Pot Roast is perfect every single time.
Common Queries Answered
Q1. What internal temperature should the beef reach before I add the vegetables?
You want the internal temperature to hit about 160°F after that first two-hour braise, but don’t worry too much about pulling out the thermometer yet! The most important temperature check is when you think the vegetables are done. The meat should be fork-tender, which usually happens when it reaches at least 195°F. If it’s still tough, give it another 30 minutes covered.
Q2. Can I skip the searing step? I’m in a huge rush!
Oh, please don’t! I know it adds time, but searing is non-negotiable for flavor. Searing creates the Maillard reaction, which develops those deep, savory, browned flavors that make this dish what it is. If you skip it, you’ll end up with pale, slightly bland meat. Trust me, those extra 15 minutes of searing are worth the incredible payoff. You can see more of our cooking adventures on Medium.
Q3. Can I cook this entire Dutch Oven Pot Roast recipe solely on the stovetop instead of the oven?
You can, yes, but it requires much more attention. If you cook it on the stovetop, you need to maintain the lowest possible simmer—just a tiny bubble—for the entire 3.5 hours. The oven provides much more even, ambient heat, which is better for braising large cuts of meat without scorching the bottom. If you must use the stovetop, check the bottom every 45 minutes to ensure the liquid isn’t evaporating too quickly or sticking.
Q4. What if I don’t have Yukon Gold potatoes?
Yukon Golds are great because they hold their shape well, but Russets work fine too! Just cut them a little bigger, maybe into quarters instead of halves, because they tend to break down more easily during that long cooking time. If you are looking for other easy dinner ideas, check out our Italian chicken skillet recipe.
Quick Reference Table
Sometimes you just need the facts fast, right? I get it! Especially when you’re trying to squeeze dinner into a busy weeknight schedule. Here’s the snapshot of what you’re committing to for this amazing meal:
| Detail | Time/Amount |
|---|---|
| Prep Time | 20 minutes |
| Cook Time | 3 hours 45 minutes |
| Total Time | 4 hours 5 minutes |
| Yield | 8 servings |
It looks like a long cook time, but remember, most of that is just the pot hanging out in the oven doing all the hard work for you! Feel free to connect with us on Facebook for more updates.
Print
Amazing 1 Dutch Oven Pot Roast Secret
- Total Time: 4 hours 5 minutes
- Yield: 8 servings
- Diet: Omnivore
Description
Cook a tender, melt-in-your-mouth pot roast in a Dutch oven. Savory beef, carrots, and potatoes create the perfect family dinner. Sear the beef for depth of flavor, then braise until it falls apart.
Ingredients
- 4 pounds boneless beef chuck roast
- 1 tablespoon kosher salt
- 1 teaspoon ground black pepper
- 2 tablespoons vegetable oil
- 1 large yellow onion chopped into wedges
- 3 stalks celery chopped into large pieces
- 2 tablespoons tomato paste
- 4 cloves garlic minced
- 3 cups beef broth
- 2 tablespoons balsamic vinegar
- 1 pound carrots peeled and cut into chunks
- 1 1/2 pounds Yukon Gold potatoes cut into halves
- 4 sprigs fresh thyme
- 2 sprigs fresh rosemary
- 2 tablespoons cornstarch
- 2 tablespoons cold water
- 1 tablespoon chopped fresh parsley
Instructions
- Preheat your oven to 325°F and set a rack in the lower middle position.
- Pat the beef chuck roast completely dry with paper towels and rub the kosher salt and ground black pepper over every side of the meat.
- Heat the vegetable oil in a large Dutch oven over medium-high heat and sear the beef until a dark brown crust forms, about 5 minutes per side.
- Transfer the seared beef to a large plate and reduce the stove heat to medium.
- Add the onion wedges and celery pieces to the pot and sauté for 5 minutes until they begin to soften and brown slightly.
- Stir in the tomato paste and minced garlic and cook for 1 minute until the garlic is fragrant.
- Pour in the beef broth and balsamic vinegar while scraping the bottom of the pot with a wooden spoon to release any browned bits.
- Return the beef roast to the pot, nestle the thyme and rosemary sprigs into the liquid, cover with the heavy lid, and bake for 2 hours.
- Remove the pot from the oven, arrange the carrots and potatoes around the beef, cover the pot again, and bake for 1 hour and 30 minutes until the vegetables are tender.
- Verify the meat has reached a safe internal temperature of at least 145°F.
- Move the beef and vegetables to a serving platter to rest.
- Place the pot with the juices on the stove over medium heat and whisk in the cornstarch and cold water to simmer for 3 minutes until thickened.
- Remove the herb stems, ladle the gravy over the meat and vegetables, and garnish with chopped fresh parsley to serve.
Notes
- The meat will be fork-tender and shreddable at roughly 195°F.
- Prep Time: 20 minutes
- Cook Time: 3 hours 45 minutes
- Category: Main Dish
- Method: Braising
- Cuisine: American