Crispy Potato Skins used to feel like something only restaurant chefs could master, right? When I first tried making them for a game day party, I ended up with sad, floppy shells that tasted more like boiled potatoes than crunchy appetizers. That failure is exactly why I started NoobRecipes! I promised myself I’d crack the code so beginners like us don’t have to suffer through soggy snacks.

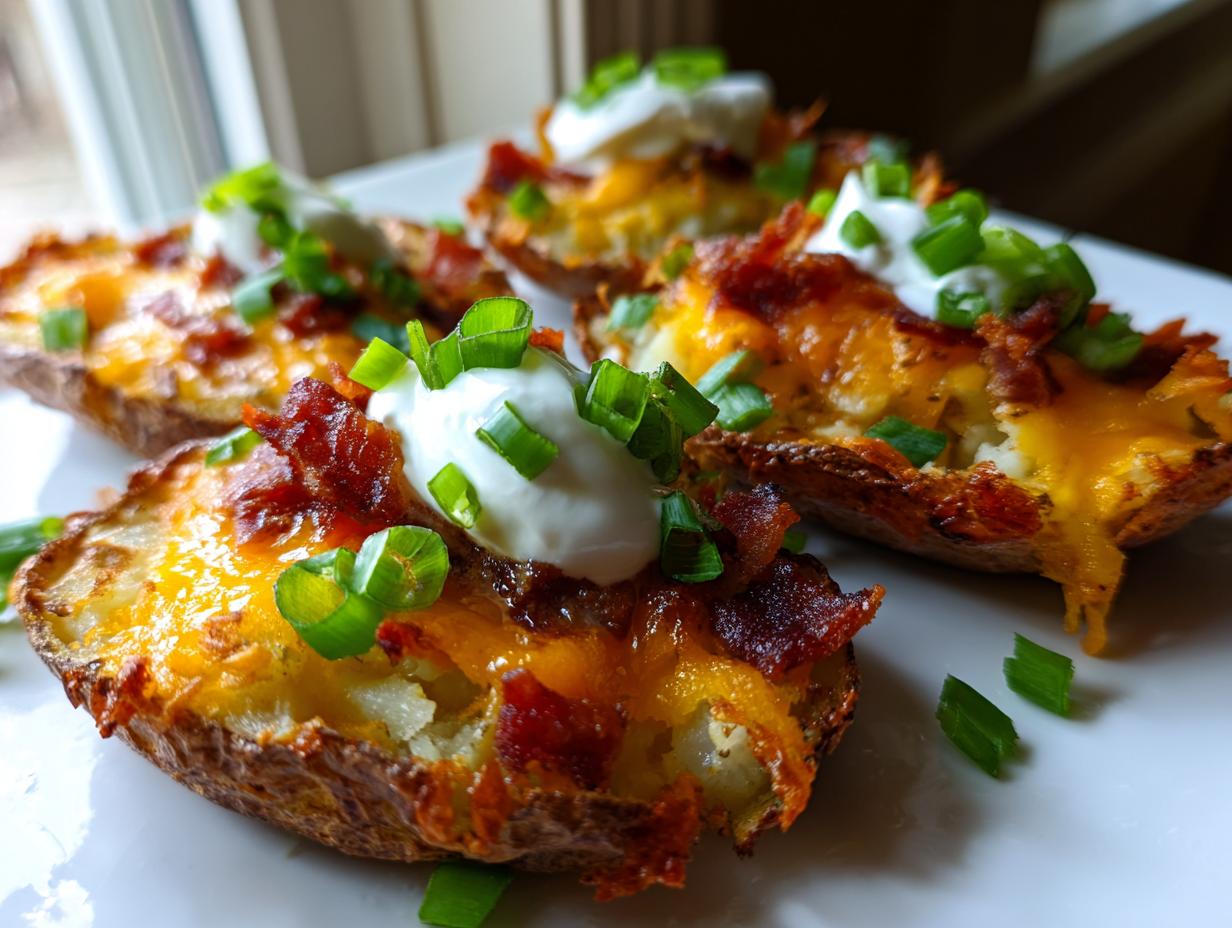
These baked potato skins? They are the real deal. We’re talking sturdy, gloriously crisp russet shells loaded with gooey cheddar and topped with cool sour cream. The secret isn’t fancy equipment; it’s just a couple of simple baking tricks I figured out through trial and error. Trust me, if I can get these perfectly crunchy, you definitely can. They come together in under an hour, making them the ultimate easy party food.
You won’t need to deep fry anything, either. We’re keeping it simple, baking everything until it snaps. Get ready to wow your friends!
Essential Ingredients for Perfect Crispy Potato Skins
The magic behind truly great Crispy Potato Skins really begins right here, with what you put in your basket. Since we aren’t deep-frying these, we rely on these specific ingredients to deliver that satisfying crunch and flavor. Don’t skip the sharp cheddar; it melts so much better than mild cheese!
Selecting and Preparing the Potatoes
You absolutely must use Russet potatoes for this recipe. They have that drier, fluffier interior that turns into the sturdy shell we are looking for. If you use waxy potatoes, you’ll end up with a chewy skin instead of that glorious crunch we want in our Crispy Potato Skins. Scrub them until they are spotless and make sure they are totally dry before piercing them several times with a fork. This lets the steam escape so they bake up beautifully firm.
The Flavor Coating for Crispy Potato Skins
This coating is non-negotiable for achieving that golden exterior on your Crispy Potato Skins. We whisk together melted butter and olive oil—this combination helps the skin crisp up nicely while adding depth. Then, we add the seasonings: kosher salt, pepper, garlic powder, and my favorite, smoked paprika. That paprika gives the shells a subtle warmth that makes people ask for the recipe immediately!
Step-by-Step Guide to Making Crispy Potato Skins
Okay, deep breath. This is where the magic happens, but don’t panic! We are going to take these humble baked potatoes and transform them into appetizer gold. It takes a couple of steps, but each one is super easy, I promise. Just follow along, and you’ll have the best Crispy Potato Skins ever.
Initial Bake and Shell Preparation
First things first, get that oven warming up to 400°F. Pierce your scrubbed potatoes all over with a fork—this is super important so they don’t explode, which is definitely not beginner-friendly! Pop them right onto the rack and let them bake for about 45 to 55 minutes. You’ll know they are done when the skin feels firm, almost tough, and you can slide a knife in without much struggle. Let them cool down just enough so you can handle them without burning yourself, maybe 10 minutes.
Once they are cool enough, slice them right down the middle lengthwise. Now, this is key: scoop out all that fluffy interior, but you have to be gentle! Leave about a quarter-inch of potato stuck to the skin. If you scrape too much, the shell collapses, and then they aren’t sturdy enough to hold all that glorious cheese later. Save that scooped-out potato for mashed potatoes tomorrow!
Achieving Maximum Crunch: The Second Bake for Crispy Potato Skins
Remember that buttery, flavorful mixture we made? Now it’s time to use it! Brush that melted butter, oil, and spice blend generously both inside *and* outside every single potato shell. Don’t be shy with the coating; this is what guarantees those beautiful, golden, Crispy Potato Skins.
Place the shells cut-side down on your baking sheet and send them back into that 400°F oven for about 10 minutes. This first blast of heat dries out the outside. Then, flip them over and bake for another 8 to 10 minutes. You want the edges to look deep golden brown and feel really stiff when you tap them. This double-baking technique is the secret weapon against sogginess!

Melting the Cheese and Final Assembly
Once those shells are perfectly crisp, pull them out. Sprinkle that sharp cheddar cheese generously inside each one. Back into the oven they go for just 4 to 6 minutes. Watch them closely! You want the cheese to be fully melted and maybe just starting to bubble around the edges—that gooey texture works perfectly against the crisp shell.
When they come out the second time, work fast! These are best served immediately. Top each hot, cheesy skin with a nice dollop of cool sour cream and a sprinkle of those bright green onions. If you’re feeling fancy, throw on those optional sautéed mushrooms now too. Seriously, grab one right away before they cool down!
Pro Tips for the Best Crispy Potato Skins Results
I’ve learned a few things over the years trying to perfect these appetizers for my friends. These aren’t just little hints; these are the rules I follow every time to make sure my Crispy Potato Skins actually live up to the name. If you’re a beginner, paying attention to these details makes all the difference between good and amazing!
- Remember to use Russet potatoes, seriously. They are the backbone of a sturdy, non-collapsing shell. If you use anything else, you’re fighting an uphill battle against sogginess.
- When you scoop out the potato centers, stop at that 1/4-inch thickness. It feels like you should scrape more out, but that remaining layer acts like structural support for the cheese and toppings later on.
- Always brush both the inside *and* the outside of the skins with that butter mixture before the second bake. The outside needs protection from drying out too fast, and the inside needs flavor and crispness.
- These are a hot-and-fast kind of appetizer. They lose their crunch pretty quickly once they start sitting around. If you need to prep ahead, just do the re-crisping bake right before your guests arrive and then top them.
Ingredient Notes and Simple Substitutions
I know sometimes we open the pantry and realize we are missing one tiny thing. Don’t let that stop you from making these! Since NoobRecipes is all about making things work, let’s talk about swapping some of these ingredients.
If you don’t have sharp cheddar, Monterey Jack or even a good smoked Gouda works wonderfully. You might need to bake it a minute or two longer depending on how fast it melts. The main goal is that gooey texture, so any cheese that melts well is a good substitute.
For the topping, sour cream is classic, but a plain Greek yogurt swap works great if you want something a little tangier and lighter. Also, if you’re out of green onions, a tiny sprinkle of dried chives works in a pinch, although the fresh ones really pop against the hot potato. If you want to add some heat, skip the red pepper flakes and use a dash of your favorite hot sauce right before serving. Keep it simple; the potato is the star here!
Storing and Reheating Crispy Potato Skins
I hate wasting food, especially when something turns out this good! The great news is that these baked potato skins actually store pretty well, but you have to handle the filled and unfilled versions differently if you want maximum crispness when you reheat them. If you prep ahead, make sure you keep the toppings separate until serving time.
If you need to save them for later, check out this quick guide on how to keep your Crispy Potato Skins tasting almost as good as fresh. You can find more helpful tips on our Pinterest page!
Storage Table
| State of Skins | Storage Method | Max Storage Time | Reheating Temp & Time |
|---|---|---|---|
| Unfilled, Crisped Shells | Airtight container in the freezer | Up to 2 months | Bake at 350°F until hot |
| Filled Skins (Cheese/Toppings) | Airtight container in the refrigerator | Up to 3 days | Bake at 350°F for 10–12 minutes |
Common Questions About Crispy Potato Skins (FAQ)
I get so many messages from folks trying this recipe for the first time, and that’s what I love! Usually, questions revolve around making sure that signature crunch holds up. Here are the top things I hear about making the best Crispy Potato Skins.
Q1. Why didn’t my potato skins get crispy?
This is almost always because you didn’t pierce them enough initially, or you didn’t do the second bake! The initial bake lets the steam out, and the second bake, after brushing with oil, is what dries out the shell walls. Make sure you are using Russets, too—they are drier potatoes perfect for this job.
Q2. Can I use sweet potatoes instead of russets for these skins?
You can, but they won’t be the same! Sweet potatoes have much more moisture, so you won’t achieve that hard, sturdy, classic crunch that makes these appetizers famous. They’ll be softer. Stick to Russets for these specific Crispy Potato Skins. For other potato ideas, check out our guide on crispy smashed potatoes.
Q3. How far ahead of time can I scoop out the insides?
You can scoop out the insides after the first bake and store the empty shells in the fridge overnight if you cover them well. Just make sure you brush them with the butter mixture and do the full double-bake right before you plan to add the cheese and serve them. That way, they come out hot and fresh!
Q4. What’s the best cheese besides cheddar?
If you want a little more flavor punch, try mixing half sharp cheddar with half Pepper Jack for a little kick! As long as it melts nicely, you’re good to go!
Sharing Your Delicious Crispy Potato Skins
Honestly, seeing photos of your finished appetizers is the best part of running this blog. I love seeing how you customize these easy recipes. When you make these Crispy Potato Skins for your next party or game day gathering, please snap a picture and tag me! You can follow our updates on Facebook.
I want to hear if you tried my smoked paprika trick or if you added sautéed mushrooms to the mix. Did your family notice the difference between these baked skins and the greasy ones you get out? Let me know how they held up on the snack table!
If you have any other questions that weren’t covered in the FAQ, drop them in the comments below. Happy baking, and don’t forget to give yourself a pat on the back for mastering a truly crispy appetizer!
Sharing Your Delicious Crispy Potato Skins
Honestly, seeing photos of your finished appetizers is the best part of running this blog. I love seeing how you customize these easy recipes. When you make these Crispy Potato Skins for your next party or game day gathering, please snap a picture and tag me! For more recipe inspiration, check out our Medium page.
I want to hear if you tried my smoked paprika trick or if you added sautéed mushrooms to the mix. Did your family notice the difference between these baked skins and the greasy ones you get out? Let me know how they held up on the snack table!
If you have any other questions that weren’t covered in the FAQ, drop them in the comments below. Don’t forget to leave this recipe a star rating! It really helps other beginners feel confident trying something new. Happy baking, and don’t forget to give yourself a pat on the back for mastering a truly crispy appetizer!
Print
Surefire 3-Step Crispy Potato Skins
- Total Time: 65–75 minutes
- Yield: 12 potato skins
- Diet: Omnivore
Description
These baked Potato Skins turn ultra crispy with gooey cheddar and cool sour cream. They are perfect for parties and game day, ready in under an hour. Russet potatoes create sturdy, crunchy shells that are simple to prepare.
Ingredients
- 6 small to medium russet potatoes, scrubbed and dried
- 2 tablespoons unsalted butter, melted
- 1 tablespoon olive oil
- 1/2 teaspoon kosher salt
- 1/4 teaspoon black pepper
- 1/4 teaspoon garlic powder
- 1/4 teaspoon smoked paprika
- 1 1/2 cups shredded sharp cheddar cheese
- 1/3 cup thinly sliced green onions
- 1/2 cup sour cream
- Optional: 1 cup finely chopped sautéed mushrooms
- Optional: 1/2 cup diced bell peppers, sautéed
- Optional: 1/4 teaspoon red pepper flakes
Instructions
- Heat your oven to 400°F. Pierce each potato several times with a fork. Bake the potatoes directly on the oven rack for 45–55 minutes until the skins feel crisp and a knife enters easily. Let them cool for 10 minutes.
- Cut the cooled potatoes in half lengthwise. Carefully scoop out the centers, leaving about a 1/4-inch thick shell. Set the reserved potato aside for another meal.
- Whisk together the melted butter, olive oil, salt, pepper, garlic powder, and smoked paprika. Brush this mixture generously inside and outside each potato shell.
- Place the shells cut-side down on a baking sheet. Bake for 10 minutes. Flip them over and bake for another 8–10 minutes until the edges look deep golden and crunchy.
- Sprinkle the shredded cheddar cheese evenly into the crispy shells. Return the baking sheet to the oven and bake for 4–6 minutes until the cheese melts and bubbles.
- Top the hot skins with sliced green onions and a dollop of sour cream. Serve them immediately while they remain hot and crisp.
Notes
- Use russet potatoes for the sturdiest and crispest shells.
- Leave a thin 1/4-inch layer of potato inside the shell to prevent collapsing during baking.
- Brush both the inside and outside of the shells for even browning and crunch.
- These skins are best served hot; they lose crispness quickly as they cool down.
- You can re-crisp empty shells ahead of time and fill them right before serving.
- For storage, refrigerate filled skins up to 3 days. Freeze unfilled, crisped shells up to 2 months. Reheat filled skins at 350°F for 10–12 minutes.
- Prep Time: 10 minutes
- Cook Time: 55–65 minutes
- Category: Appetizer
- Method: Baking
- Cuisine: American