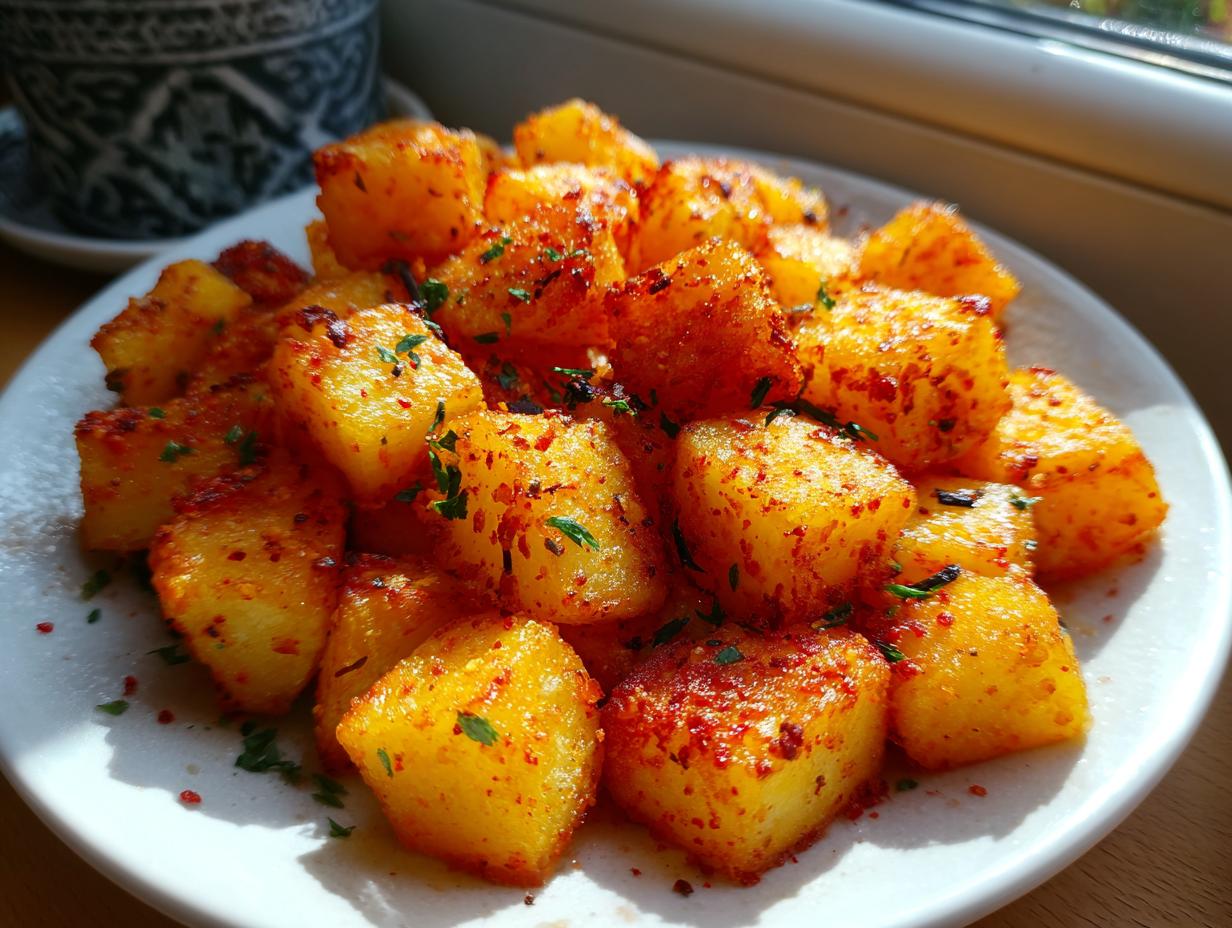
Forget those sad, soggy potatoes you sometimes get at diners. Seriously, I spent years trying every trick in the book to get that perfect crunch at home without deep-frying everything. And folks, I finally cracked the code! These crispy breakfast potatoes are my absolute go-to because they use the oven and a secret little broil trick to get that golden, crackly exterior we all crave. It’s all about technique, not complicated ingredients.
I’ve made countless batches of breakfast sides over the years—trust me, I’ve burned my fair share of hash browns! But this oven-baked method is my champion. It requires almost no active work from you after the initial toss. You just let the high heat do the heavy lifting. If you want potatoes that are tender on the inside and shatteringly crisp on the outside, you’re in the right place. These are the ultimate crispy breakfast potatoes for any weekend brunch!

Essential Ingredients for Perfect Crispy Breakfast Potatoes
You don’t need a ton of fancy stuff for these potatoes, which is why I love them so much for a busy morning. The magic really comes down to using the right amount of oil and spices. Seriously, don’t skimp on the oil; that’s what guarantees that beautiful crust on your crispy breakfast potatoes.
Ingredient List Clarity
We are using 2 and a half pounds of red potatoes—make sure they are scrubbed clean! You need to cut them into nice, uniform half-inch cubes. This keeps them cooking evenly. For the seasoning, we mix a third of a cup of olive oil with kosher salt, garlic powder, smoked paprika, onion powder, and pepper. Don’t forget that fresh parsley at the very end; it wakes everything up!
Ingredient Notes and Substitutions for Your Crispy Breakfast Potatoes
Red potatoes are my favorite here because they hold their shape so well and don’t get mushy. If you use Russets, you might need to adjust the cooking time a bit; they tend to break apart more easily. Also, that smoked paprika? It’s non-negotiable for that subtle smoky depth that makes these crispy breakfast potatoes taste like they came off a grill. Use sweet paprika if you must, but you’ll miss that flavor!
Step-by-Step Guide to Crispy Breakfast Potatoes
Okay, listen up, because this is where we turn humble potatoes into something truly spectacular. The entire process is straightforward, but timing is everything if you want those truly amazing crispy breakfast potatoes. Remember, we aren’t just roasting them; we are setting them up for a final crunch session under the broiler. Don’t rush the tossing, and definitely don’t walk away when that broiler turns on!
Preheating and Seasoning Preparation
First things first: get that oven screaming hot! Preheat it to 450 degrees Fahrenheit. While it’s heating up, grab a large rimmed baking sheet—the rim helps keep everything contained—and give it a quick spray with oil. Now, dump those cubed potatoes right in the middle. Don’t worry about spreading them yet.
Pour that olive oil right over the pile. Then, hit them with the salt, garlic powder, smoked paprika, onion powder, and pepper. Now for the fun part: tossing! Use your hands—it’s the best way! Make sure every single cut edge of every single potato cube is coated in oil and spice. This coating is crucial; it’s what protects them and helps them brown beautifully. Once they’re all slicked up, spread them out in a single layer. I mean it, a single layer! If they are piled up, they steam instead of crisping. Make sure the cut sides, which have the most surface area, are facing down on the pan.
The Baking and Broiling Technique for Crispy Breakfast Potatoes
Slide that sheet pan into the center of the hot oven for 15 minutes. This is the first bake, designed to cook the potato through until it’s tender. When the timer goes off, pull them out—carefully! Use a spatula to flip and toss them all around. You want those soft, cooked sides to get a chance to brown up now.
Put them back in for another 15 minutes. They should be looking nice and golden now, but we need that extra *oomph*. This is the game-changer for achieving the best crispy breakfast potatoes. Move your oven rack up high—about five inches from the broiler element. Turn the broiler on high. This part needs your full attention! Broil them for just 2 to 3 minutes. Watch them like a hawk! They can go from perfect brown to burnt black in about 30 seconds flat. Once they look deeply browned and super crispy, pull them out immediately. Toss with fresh parsley, and get them on the table before they cool down!

Why You Will Love These Crispy Breakfast Potatoes
Honestly, these are the easiest, most satisfying side dish you can make on a weekend morning. I keep coming back to this recipe because it just delivers every single time without messing around with frying oil. They are dependable, delicious, and perfect for feeding a crowd or just grabbing leftovers the next day. You’ll be so proud when you pull these beauties out of the oven!
- Super quick prep time—seriously, 10 minutes tops before they hit the heat.
- The texture is unbeatable: tender inside, deeply browned and crunchy outside.
- The seasoning is simple but flavorful; that paprika really shines through.
- They are naturally vegetarian, so everyone at the table can enjoy these amazing crispy breakfast potatoes.
Tips for Achieving Maximum Crispiness
I’ve learned a few secrets over the years about making sure these potatoes don’t just steam themselves into mush. It all comes down to surface area and dry potatoes. When I first started making these, I used way too big a pan, and I ended up with soft potatoes because they were overcrowded. That’s a rookie mistake! If you are looking for other crispy side dishes, check out our guide on crispy baked chicken wings.
My number one rule for guaranteed crispy breakfast potatoes? Do not crowd the pan! If your potatoes are touching each other, they release steam, and steam equals sogginess. If you have to use two pans, use two pans! You want every cube sitting on that hot metal surface, cut-side down if possible, so it can really sear and crisp up during that first bake.
Also, make sure your potatoes aren’t soaking wet when you toss them with oil. If you just washed them, pat them down with a paper towel first. Excess surface moisture turns to steam, and you guessed it—steam fights crispiness. Trust your instincts and use a high heat setting. That initial blast at 450°F starts the dehydration process needed for truly stellar crispy breakfast potatoes. For more potato inspiration, see our guide on oven roasted potatoes.
Serving Suggestions for Your Breakfast Spread
Now that you have these gorgeous, perfectly seasoned potatoes, the fun part is deciding what to eat them with! These aren’t just for Sunday brunch, either. They make a fantastic side dish for a quick weekday breakfast when you have an extra five minutes. I usually pair them with eggs cooked any style—over easy is my favorite so the yolk can mix with the spices. If you need a great drink pairing, check out our recipe for a cranberry sparkling mocktail.
They are absolutely amazing stuffed into a breakfast burrito. Just load them up with scrambled eggs, some cheese, maybe a little hot sauce, and wrap it tight. They also go perfectly alongside avocado toast if you want something a little lighter. Seriously, you can’t go wrong. Just make sure you have enough because they disappear fast!
Storing and Reheating Leftover Crispy Breakfast Potatoes
Look, I get it—sometimes you make a giant batch because they are just too good to stop eating. The good news is these potatoes keep okay, but you have to be smart about reheating them if you want to save that crispiness. Don’t even think about using the microwave unless you enjoy mushy potatoes; that heat ruins the texture we worked so hard for!
The best way to bring these back to life is the same way they started: high, dry heat. Pop them right back onto a clean baking sheet. If you have an air fryer, that’s even better for a quick revival! Just give them about 5 to 8 minutes at 400°F, or use the toaster oven if you only have a few left. This dries out any moisture they absorbed while sitting in the fridge.
Here’s my quick guide for keeping them around:
| Storage Method | Duration | Best Reheating Method |
|---|---|---|
| Airtight Container (Fridge) | 3 to 4 days | Toaster Oven or Air Fryer |
| Freezer (Sealed Bag) | Up to 2 months | Bake directly from frozen at 425°F |
Frequently Asked Questions About Oven Baked Potatoes
I get so many questions about these potatoes because everyone wants that perfect crunch! Don’t worry if you’re new to home roasting; these little tips should help clear things up so you can serve the best breakfast side dish ever. For more cooking tips and tricks, follow us on Pinterest.
Can I use Russet potatoes instead of red potatoes?
You absolutely can, but be warned! Russets are starchier, which means they get fluffier inside, but they also tend to fall apart more easily when you toss them. If you use Russets, I really suggest cutting them a little larger than half an inch, and be extra gentle when you flip them after the first 15 minutes. They won’t have the exact same dense structure as these red potato roasted potatoes, but they’ll still be delicious!
How do I prevent my crispy breakfast potatoes from sticking?
This is critical! You need a good barrier between the potatoes and the metal pan. My favorite trick is using the “cake goop” I mentioned earlier—that mix of shortening, oil, and flour. If you don’t have that handy, make sure you spray the pan generously, then drizzle a little extra oil right where the potatoes touch the pan surface before you spread them out. They really need that contact with the hot oil to crisp up and release easily.
Can this recipe be made ahead of time?
Here’s the honest truth: these are best served right out of the oven after that final broil. If you want to prep ahead, you can do the first 30 minutes of baking (Step 4 and the first part of Step 5) and then cool them completely. Store them in the fridge. But you absolutely must finish them under the broiler right before serving to bring back that signature crispiness. Don’t try to reheat fully cooked ones in the microwave; it’s a texture disaster! We love hearing from our readers; feel free to connect with us on Facebook.
Nutritional Estimates for Your Recipe
I always like to give rough estimates for the nutrition, but remember, these numbers can shift around a tiny bit depending on the exact potatoes you buy and how much oil your pan soaks up! I calculated this based on six servings, which is a pretty generous plate of these amazing potatoes. They are surprisingly hearty for a vegetarian breakfast side dish!
Always treat these figures as a good guideline rather than strict science. If you’re counting macros, you might want to weigh your portions exactly! You can read more about our editorial standards on Medium.
| Nutrient | Amount Per Serving (Approx.) |
|---|---|
| Calories | 210 |
| Total Fat | 11g |
| Carbohydrates | 26g |
| Protein | 3g |

Amazing crispy breakfast potatoes in 1 trick
- Total Time: 45 minutes
- Yield: 6 servings
- Diet: Vegetarian
Description
Easy crispy breakfast potatoes baked to golden perfection with paprika and garlic. Perfect for pairing with eggs or breakfast burritos.
Ingredients
- 2 ½ pounds red potatoes, scrubbed and cut into ½-inch cubes
- ⅓ cup olive oil
- 1 teaspoon kosher salt
- ¾ teaspoon garlic powder
- ¾ teaspoon smoked paprika
- ½ teaspoon onion powder
- ½ teaspoon black pepper
- 2 tablespoons chopped fresh parsley
Instructions
- Preheat oven to 450°F and lightly spray a large rimmed baking sheet with oil.
- Pile the potatoes in the center of the sheet pan. Drizzle with olive oil and sprinkle with salt, garlic powder, paprika, onion powder, and black pepper.
- Toss to coat evenly, then spread into a single layer with cut sides facing down.
- Bake in the center of the oven for 15 minutes. Remove and toss with a spatula.
- Continue baking for another 15 minutes until potatoes are tender and golden.
- Move oven rack to 5 inches from the broiler. Broil 2 to 3 minutes or until crispy and browned, keeping a close eye on them.
- Remove from the oven, toss with fresh parsley, and serve warm.
Notes
- For extra flavor, add a pinch of cayenne or toss with diced bell peppers before roasting.
- Prep Time: 10 minutes
- Cook Time: 35 minutes
- Category: Side Dish
- Method: Oven Baked
- Cuisine: American