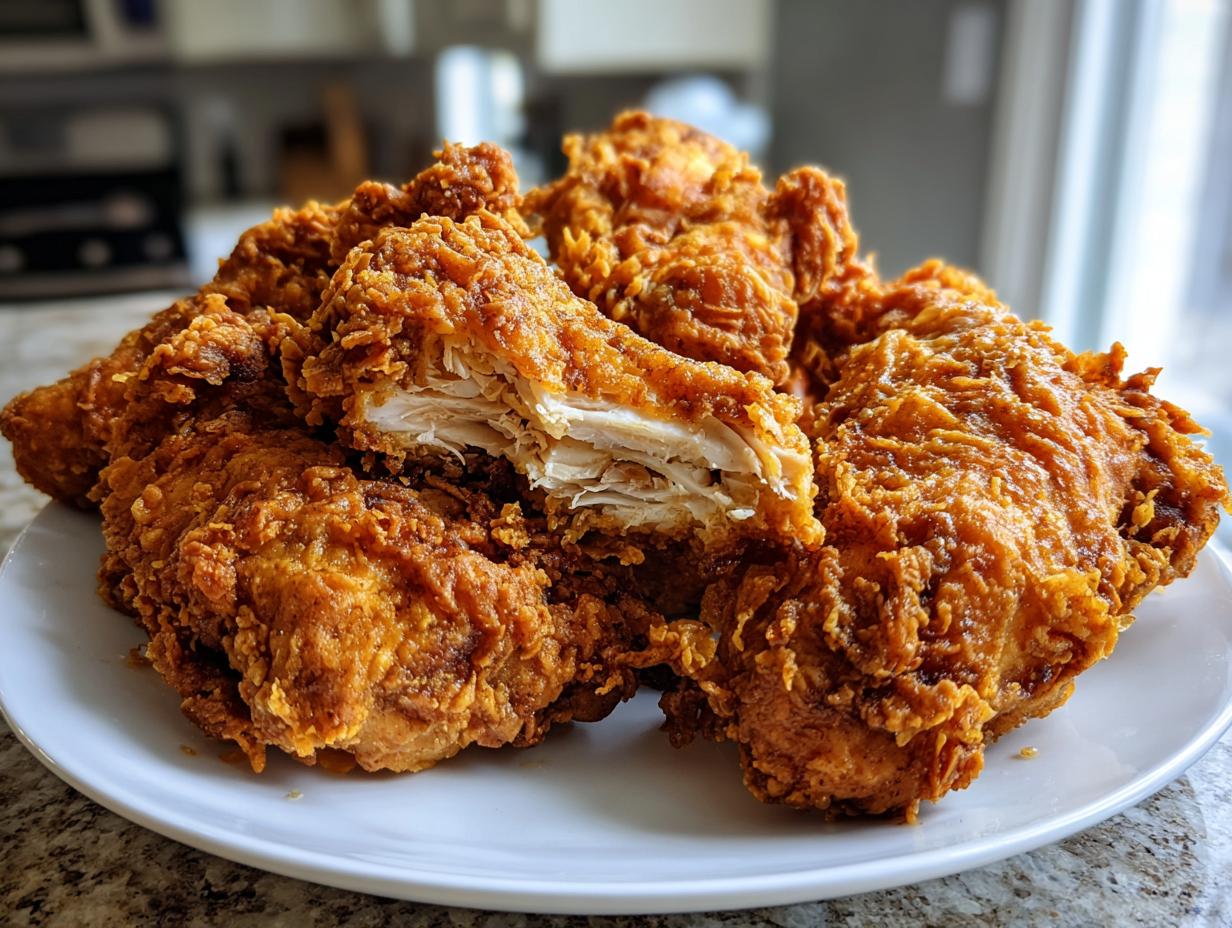
Let’s be real, sometimes you just crave that perfect crunch of fried chicken, right? But lugging out the deep fryer and dealing with all that oil? Ugh, no thank you! I spent years trying to find that perfect balance: the golden, shatteringly crisp coating you expect, but without the heavy guilt afterward. This recipe, my friends, is the answer to that craving. We’re talking about Crispy Baked Fried Chicken that somehow manages to be gloriously crunchy on the outside while staying unbelievably tender and juicy inside.
This isn’t just about making something healthier; it’s about technique. I’ve tried everything—spraying oil, tossing and turning—but I finally nailed the trick using a simple buttermilk marinade and a specific blend of breadcrumbs baked right onto a buttered sheet. It took a few messy attempts, trust me! But now, this oven-baked version tastes so much like the real deal, I almost feel like I’m cheating. It’s become my go-to comfort food for weeknights when I want that classic flavor without the fuss.
This method proves you don’t need a vat of hot oil to achieve that signature crunch. It’s all about prepping the chicken properly and letting the oven do the heavy lifting. Seriously, you’re going to be amazed!

Why You Will Love This Crispy Baked Fried Chicken Recipe
I know what you’re thinking: baked chicken can’t be truly crispy. Well, prepare to have your mind changed! This recipe delivers all the satisfaction of traditional fried chicken but skips the mess and the extra fat. It’s shockingly easy to pull off, even on a busy Tuesday night. The buttermilk marinade works magic on the texture, and the double-layer coating guarantees that crunch we all chase.
This is the go-to meal when I want real comfort food that won’t weigh me down. Trust me, once you make this Crispy Baked Fried Chicken, you won’t go back to deep frying for this cut of meat!
Key Advantages of Our Crispy Baked Fried Chicken
- Super easy cleanup since we skip the oil bath.
- Significantly lighter than deep-fried versions, perfect for weeknights.
- The buttermilk makes the chicken unbelievably tender inside.
- Guaranteed golden, crackly crust every single time.
Equipment Needed for Perfect Crispy Baked Fried Chicken
Before we even look at the spice rack, we need to make sure our kitchen is set up for success. Getting the right gear ready first makes the whole process so much smoother—and prevents that frantic searching halfway through the dredging! Honestly, you don’t need anything fancy, but having the right setup ensures you get maximum crunch without turning things into a sticky mess.
This recipe relies on a few simple items to get that surface area just right for baking evenly.
Essential Tools for Success
- A rimmed baking sheet—this is crucial because we need that edge to hold in the melted butter!
- Parchment paper, don’t skip this, it saves your cleanup time big time.
- Three separate bowls for the marinade, the flour dredge, and for holding the chicken pieces.
- Tongs for flipping the chicken without messing up the coating.
- A small whisk or fork for mixing the coating ingredients.
Ingredients for Delicious Crispy Baked Fried Chicken
Okay, now for the fun part: gathering the goods! The secret to getting that fantastic texture in this Crispy Baked Fried Chicken isn’t just in the oven; it starts right here with the marinade and the coating blend. We’re keeping the chicken cut simple—tenders or thin-sliced breasts work best because they cook quickly and evenly at that high temperature. Don’t try to substitute anything major here, especially the panko; it’s what gives us that signature jagged, crispy edge!
Make sure you have your chicken patted down really well before it goes into the breading station. Soggy chicken equals soggy crust, and we absolutely cannot have that happening here. Everything needs to be ready to go before you even think about mixing the marinade!
Buttermilk Marinade Components
- 1 \u00bd pounds chicken tenders or thinly sliced chicken breasts
- 1 cup buttermilk (If you don’t have buttermilk, just mix 1 cup of regular milk with 1 tablespoon of lemon juice and let it sit for five minutes until it looks a tiny bit curdled—that’s our secret backup!)
- 1 teaspoon garlic powder
- 1 teaspoon smoked paprika
- \u00bd teaspoon onion powder
- \u00bd teaspoon chili powder
- \u00bd teaspoon salt
- \u00bc teaspoon black pepper
The Crispy Breading Mixture for Crispy Baked Fried Chicken
This is where the crunch factor gets dialed up to eleven. The combination of flour, panko, and cornmeal creates that amazing, textured surface for our Crispy Baked Fried Chicken.
- 1 cup all-purpose flour
- 1 cup panko breadcrumbs (These are non-negotiable for the best crisp!)
- \u00bc cup fine cornmeal
- 1 teaspoon garlic powder
- 1 teaspoon smoked paprika
- \u00bd teaspoon chili powder
- \u00bd teaspoon salt
- \u00bd teaspoon black pepper
- 3 tablespoons unsalted butter, melted (This is what we use to coat the pan later, so have it ready!)
Step-by-Step Instructions for Crispy Baked Fried Chicken
Alright, let’s get cooking! I like to think of this process in three simple stages: the soak, the setup, and the bake. If you follow these steps closely, you’ll end up with the crunchiest, most satisfying Crispy Baked Fried Chicken you’ve ever pulled out of your oven. Don’t rush the chilling time—that’s where the tenderness really sets in!
Marinating the Chicken
First things first, we need to get that chicken soaking up all that tangy goodness. Grab a medium bowl or, even better, a sturdy zip-top bag—less cleanup! Whisk together your buttermilk with all the marinade spices: the garlic powder, paprika, onion powder, chili powder, salt, and pepper. Once that’s mixed up, toss in your chicken pieces. Make sure every surface is coated. Seal the bag, give it a good massage, and pop it right into the fridge. I insist you let this go for at least four hours, but overnight? Oh my gosh, that’s when the real magic happens. It tenderizes the meat beautifully.
Preparing for Baking the Crispy Baked Fried Chicken
Once your chicken has had its spa day in the fridge, it’s time to get the oven ready. Crank that temperature up to 400 degrees Fahrenheit. While it’s heating, grab your rimmed baking sheet and line it with parchment paper. This paper is your best friend! Now, take those three tablespoons of melted butter and brush them evenly all over that parchment paper. This butter melts right into the coating as it bakes, giving us that ‘fried’ look and helping the bottom crisp up. Next, set up your dredging station: one bowl with the wet chicken, and the other shallow bowl filled with your flour, panko, cornmeal, and dry spices. It’s all about efficiency for perfect Crispy Baked Fried Chicken!
Breading and Baking Technique
Take the chicken out of the marinade one piece at a time and gently pat it dry with a paper towel. You don’t want it dripping wet; just damp enough for the coating to stick. Dredge that piece completely in the breading mixture. Here’s the critical part: press that coating onto the chicken firmly with your hands. Really press it in! Then, lay the pieces onto your buttered sheet, making sure they aren’t touching—they need space to breathe and crisp up. Bake them for 10 minutes exactly. Then, flip every single piece over carefully. Bake for another 10 to 12 minutes. If you want that extra, extra crunch, switch the oven to the broiler for just 1 or 2 minutes. Watch it like a hawk during this stage, though! It goes from golden to burnt in about ten seconds flat. Once it looks perfectly golden brown, pull it out and let it rest for five minutes before you dive in.

Tips for Achieving Truly Crispy Baked Fried Chicken
Listen, trying to get that deep-fried texture in the oven takes a little finesse. I’ve made this Crispy Baked Fried Chicken enough times to know the little things that make the difference between great and legendary. A soggy bottom is the enemy here, so we have to be smart about moisture control and heat application. Don’t worry if your first batch isn’t perfect; baking is just as much about feel as it is about the recipe!
The secret sauce, if you will, is making sure every surface of the breading touches that hot butter on the pan. If the pieces are crowded, they steam instead of crisping. Give them room to shine, and they will reward you with that incredible golden crunch.
Understanding Internal Temperature and Resting
Food safety is non-negotiable, especially when dealing with chicken. You absolutely have to check that internal temperature; aiming for 165 degrees Fahrenheit is the target. Use a meat thermometer tucked into the thickest part of the tender. If you pull it out and it’s 160, pop it back in for a few minutes! But once it hits that number, take it out immediately. Then, let it rest for a full five minutes. I know, I know, you want to tear into that Crispy Baked Fried Chicken right away, but resting lets those juices redistribute. If you cut it immediately, all the moisture rushes out, and you end up with drier chicken!
Ingredient Notes and Substitutions
I mentioned the buttermilk substitute earlier, but let’s reiterate: if you use the milk-and-lemon-juice trick, let it sit for the full five minutes before adding the spices. That little bit of acid is what breaks down the proteins in the chicken, making it so tender. Also, about those breadcrumbs—please, please use panko! Regular breadcrumbs just absorb moisture too fast. Panko breadcrumbs are flakier and lighter, which is exactly what we need to mimic that airy crunch of true fried chicken for our Crispy Baked Fried Chicken recipe.
Serving Suggestions for Your Crispy Baked Fried Chicken
We’ve done the hard work, and now we have this gorgeous, crunchy chicken. What do we serve it with? This baked version is lighter, so it pairs beautifully with sides that feel comforting but aren’t overly heavy. Think bright flavors to cut through the richness of the coating. I love serving this on a weeknight because it feels like a treat!
And don’t even get me started on dipping sauces. That tangy buttermilk marinade really shines when dipped into something creamy or sweet. Have a few options ready on the table; everyone always grabs a different one!
Pairing Sides with Baked Chicken
- Creamy coleslaw—the crunch of the slaw plays perfectly against the crunch of the chicken.
- Roasted green beans tossed with a little lemon zest.
- A simple, fluffy mashed potato to soak up any leftover pan butter goodness (yes, I drizzle that on top!).
Frequently Asked Questions About Crispy Baked Fried Chicken
I know you probably have a few burning questions after reading all that! It’s normal, especially when you’re trying to convert a deep-fried favorite into an oven masterpiece. I’ve compiled the ones I get asked most often about getting that perfect texture and managing leftovers. Don’t worry, we’ve got solutions for everything!
Remember, the goal is always that beautiful, crunchy exterior, and these tips will help you nail it every time you make this Crispy Baked Fried Chicken.
Can I use chicken pieces instead of tenders?
Yes, you absolutely can use bone-in chicken pieces like thighs or drumsticks! If you do switch, you need to adjust your expectations slightly. Bone-in pieces take longer to cook through, so you’ll need to bump that total baking time up quite a bit—probably closer to 35 or 40 minutes total, flipping halfway, until they hit that 165°F internal temp. You might need to skip the last minute of broiling, too, because the skin can burn before the bone cooks.
How do I store leftovers of my Crispy Baked Fried Chicken?
Storing leftovers properly is key to keeping that coating intact. You want to make sure the chicken is completely cool before you put it away, otherwise, you’ll create steam inside the container, and that’s the quickest way to lose your crisp! Once cooled, store it in an airtight container. I usually place a paper towel on the bottom just to absorb any residual moisture that might try to sneak out. It keeps really well for a couple of days.
Storing and Reheating Leftover Crispy Baked Fried Chicken
I always hope there are leftovers because this Crispy Baked Fried Chicken is fantastic cold, but it’s even better reheated correctly! The biggest mistake people make is using the microwave, which turns that beautiful crust instantly chewy. We want to bring back that oven-fresh snap, and it only takes a few extra minutes to do it right. Don’t leave your leftovers sitting out too long; get them cooled down and sealed up quickly so they stay fresh.
If you followed the steps right, your chicken should hold up really nicely for a couple of days. Check out my quick guide below for the best way to manage your extra crunch!
Reheating Methods for Best Texture
Forget the microwave entirely if you care about that crisp coating! The best way to revive this chicken is by using dry heat. You can use a regular oven, or if you have an air fryer, that’s even faster and gives it an extra boost. Make sure the pieces aren’t overlapping in the pan; they need direct heat exposure all around to crisp up properly.
| Storage Duration | Reheating Method |
|---|---|
| Up to 3 days refrigerated | Oven at 350°F |
Share Your Results Making Crispy Baked Fried Chicken
I truly hope you loved making this recipe as much as I love sharing it! It brings me so much joy knowing you’ve got a batch of perfectly tender, oven-crisped chicken on your table. Did it turn out crunchy? Did you use ranch or BBQ sauce for dipping? I need to know!
Please take a second to rate this Crispy Baked Fried Chicken below and leave a comment telling me how it went. I read every single one, and seeing your pictures of that golden crust makes my whole day!
If you enjoyed this recipe, you can find more great content like this on our Facebook page or follow our inspiration on Pinterest.
Print
Amazing 1 Crispy Baked Fried Chicken Secret
- Total Time: 35 minutes plus marinating time
- Yield: 4 servings
- Diet: Omnivore
Description
Golden, crispy baked fried chicken that’s tender inside and crunchy outside. Buttermilk marinated and oven-baked for a lighter comfort classic.
Ingredients
- 1 ½ pounds chicken tenders or thinly sliced chicken breasts
- 1 cup buttermilk (or 1 cup milk + 1 tablespoon lemon juice, mixed and rested 5 minutes)
- 1 teaspoon garlic powder
- 1 teaspoon smoked paprika
- ½ teaspoon onion powder
- ½ teaspoon chili powder
- ½ teaspoon salt
- ¼ teaspoon black pepper
- 1 cup all-purpose flour
- 1 cup panko breadcrumbs
- ¼ cup fine cornmeal
- 1 teaspoon garlic powder
- 1 teaspoon smoked paprika
- ½ teaspoon chili powder
- ½ teaspoon salt
- ½ teaspoon black pepper
- 3 tablespoons unsalted butter, melted
Instructions
- Combine buttermilk, garlic powder, paprika, onion powder, chili powder, salt, and pepper in a bowl or bag.
- Add chicken, toss to coat, and refrigerate for at least 4 hours or overnight.
- Preheat oven to 400°F. Line a rimmed baking sheet with parchment paper.
- Coat the pan evenly with melted butter.
- Combine flour, panko, cornmeal, garlic powder, paprika, chili powder, salt, and pepper in a shallow bowl.
- Remove chicken from marinade and pat dry with paper towels.
- Dredge each piece in the breading mixture, pressing gently.
- Place breaded chicken on the prepared baking sheet.
- Bake for 10 minutes, then flip and bake for another 10–12 minutes until golden and crisp.
- Broil for 1–2 minutes at the end for extra crunch, watching closely.
- Let the chicken rest for 5 minutes before serving.
Notes
- Cook chicken until the internal temperature reaches 165°F for food safety.
- Serve warm with dipping sauces like honey mustard, ranch, or barbecue.
- Prep Time: 15 minutes
- Cook Time: 20 minutes
- Category: Main Course
- Method: Baking
- Cuisine: American