Oh my gosh, you guys are going to *freak out* over this recipe. Forget those sad, oily cheese dips you sometimes find at parties. We are talking about the ultimate, gloriously easy chili cheese dip that comes out of the oven bubbling hot and just begging for a scoop of salty tortilla chip. Seriously, this thing is the MVP of any gathering—game day, movie night, or just a Tuesday when you need serious comfort food.

I spent way too long trying to perfect a dip that tasted homemade but only took minutes of actual work. My goal was always bold flavor without needing a million obscure spices. This recipe nails that balance—it’s creamy, it’s beefy, and that cheddar layer gets perfectly browned. Trust me, once you master this simple technique, you’ll never buy the canned stuff again. It just screams “party food perfection!”
My Journey to the Best Chili Cheese Dip
When I first started hosting big crowds, I was terrified of appetizers. Everything seemed too fussy, and I worried about keeping things hot. I tried using slow cookers, but the cheese always seemed to separate or get that weird skin on top. It was a disaster!
This recipe was born out of sheer necessity for my first Super Bowl party. I needed something foolproof that tasted like I slaved over it for hours. I started with a basic ground beef mixture and just kept adding my favorite pantry staples—tomato sauce for depth, and then loads of cream cheese and sour cream to make it luxurious. I also love a good slow cooker chili, but this dip is faster!
The breakthrough was realizing that baking it at a moderate temperature was the key to that perfect, unified melt. It’s truly the easiest thing you’ll ever make, and it proves that even beginner cooks like I was can bring something amazing to the table. It’s my go-to because it never lets me down!
Gathering Your Ingredients for Chili Cheese Dip
Okay, get ready to raid your pantry because the best part about this amazing chili cheese dip is that you probably have most of this stuff already! We aren’t messing around with fancy, hard-to-find items here. It’s all about simple, hearty ingredients coming together to make something spectacular for the crew.
Essential Components for Flavorful Chili Cheese Dip
You’ll need just a few things to build that incredible base. First up is a full pound of ground beef—I usually go for 85/15 because I want a little fat for flavor, but you can use leaner if you prefer. We’re seasoning that meat aggressively with salt, pepper, chili powder, cumin, and garlic powder. Don’t skimp on the spices; this is where the bold flavor comes from!
Next, you need one cup of canned tomato sauce. This thickens the mix up just a touch and adds necessary moisture. Then comes the magic: eight ounces of softened cream cheese—make sure it’s soft, or you’ll be whisking forever! Stir that in until it disappears. After that, fold in one cup of sour cream for tang and creaminess. Finally, we use two cups of shredded cheddar and a half cup of Monterey Jack. You want to reserve about half of that cheddar for the topping, remember that!
Ingredient Notes and Substitutions for Your Chili Cheese Dip
For the cheese, please, please use the blocks and shred them yourself if you can. Pre-shredded cheese has anti-caking agents that can make your amazing chili cheese dip turn a little grainy when baked. If you absolutely must buy it bagged, go for a good quality sharp cheddar!
If you’re out of ground beef, ground turkey works fine, but you might need to boost the chili powder a bit since turkey is milder. And if you don’t have Monterey Jack, just use all cheddar—it’ll still be delicious, I promise!
Step-by-Step Instructions for Perfect Chili Cheese Dip
Alright, here is where the magic happens! Don’t let the number of steps scare you; we are just layering flavor here. The whole process moves really fast once you get the beef cooking. Remember, we are aiming for that super hot, bubbly, fantastic chili cheese dip that everyone crowds around!
First things first, get your oven preheated to 375 degrees Fahrenheit. That gives it time to get nice and hot while you handle the stovetop work. I always use an 8×8 baking dish for the perfect ratio of topping to creamy center.
Preparing the Beef Base for Your Chili Cheese Dip
Grab a large skillet and get it over medium heat. Toss in that pound of ground beef. Now, you need to break it up as it cooks—I use a wooden spoon or a spatula for this. Cook it until it’s totally browned, about 8 to 10 minutes. You want to make sure all the pink is gone, which is important for food safety later!
Once it’s browned, drain off any major grease—we want flavor, not swimming pools of oil! Now, season it up! Sprinkle in your salt, pepper, chili powder, cumin, and garlic powder. Stir that around for about 30 seconds just to wake up those spices. Finally, pour in the tomato sauce and let it simmer gently for three minutes. It should thicken up just slightly. That’s your flavorful beef base ready!
Creating the Creamy, Cheesy Filling
Now, turn that heat way down to low. This is crucial so we don’t scorch anything! Add your softened cream cheese right into the beef and sauce mixture. You have to stir constantly until that cream cheese is totally melted and incorporated. It turns the whole mixture into a gorgeous, thick sauce. Once it’s smooth as silk, take the pan off the heat entirely.
Off the heat, stir in your sour cream and the first cup of cheddar cheese. Mix it gently until everything is one uniform, creamy, cheesy dream. Don’t overmix it once the sour cream is in; we just want it combined!
Baking and Resting Your Chili Cheese Dip
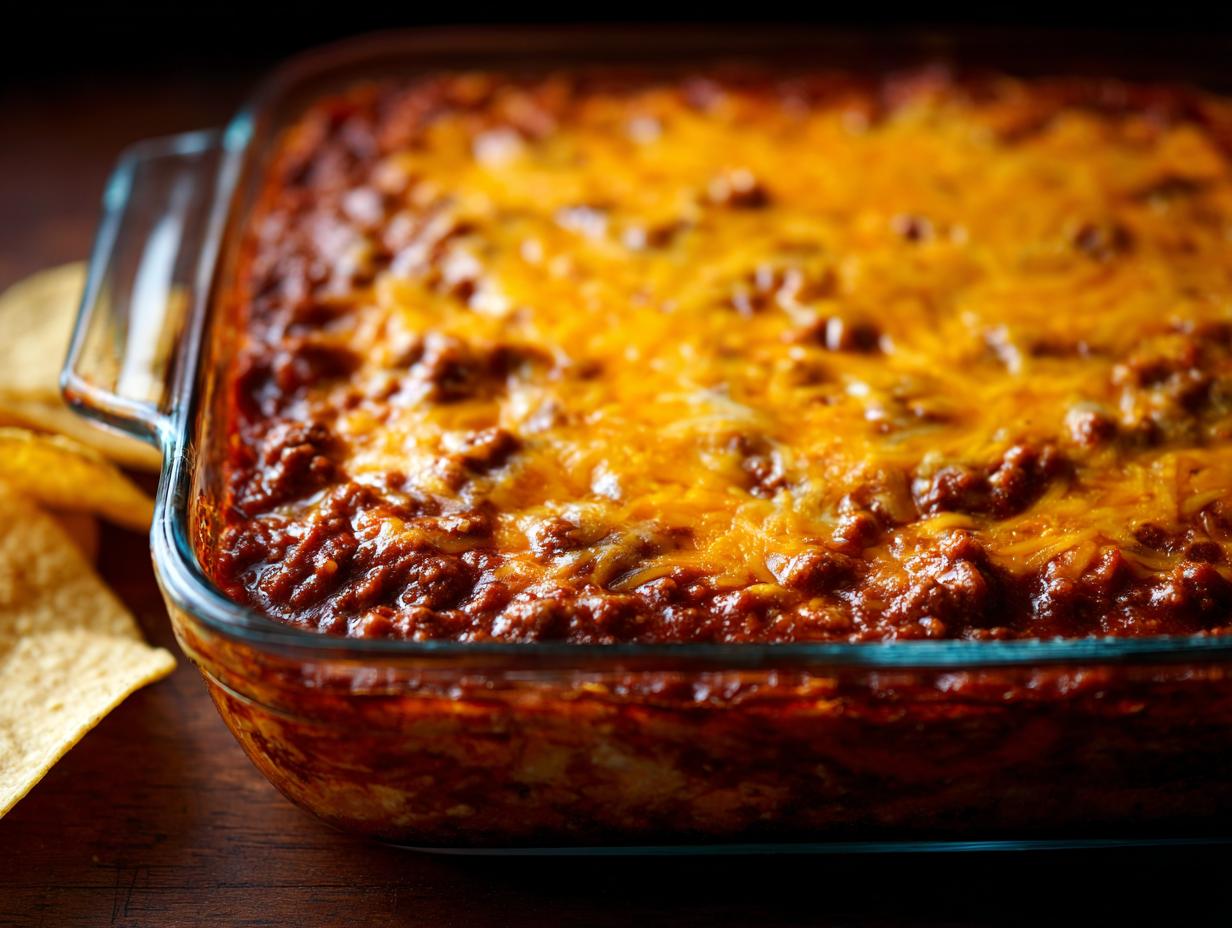
Pour that glorious filling evenly into your prepared 8×8 dish. Now for the best part: take the remaining cheddar and all of your Monterey Jack and sprinkle it evenly over the top. Make sure you get the edges! Pop that dish into your 375-degree oven and bake it for about 18 to 22 minutes. You are looking for it to be piping hot all the way through and that cheese topping should be bubbly and maybe just starting to turn golden brown.

Listen to me: you absolutely must let this incredible chili cheese dip rest for 5 minutes once it comes out. If you dig in immediately, it will be molten lava and you’ll burn your mouth! Those five minutes let it set up slightly so it holds its shape beautifully when you scoop it with those tortilla chips.
Tips for Success Making Your Chili Cheese Dip
If you want your chili cheese dip to be creamy and not oily, pay close attention to your heat management. The biggest mistake people make is trying to melt the cream cheese over high heat, which causes separation. Keep that burner on low when adding the cream cheese and sour cream—low and slow is the game plan there.
Also, don’t skip the resting time! I know it’s hard when it smells that good, but letting it sit for five minutes after baking helps the texture firm up. If you serve it too fast, the dip will run everywhere when you try to scoop it. Remember, we want it hot and bubbly, but structurally sound enough to cling to a chip! If you need more appetizer ideas, check out our collection of snacks.
Equipment Needed for This Chili Cheese Dip Recipe
You don’t need a whole arsenal of fancy gadgets for this amazing chili cheese dip, which is another reason I love it so much! Just a few basics from your kitchen drawer will get the job done perfectly for this party appetizer.
- A large skillet for browning the beef.
- A sturdy wooden spoon or spatula for stirring and breaking up the meat.
- An 8 by 8 inch baking dish (or similarly sized oven-safe dish).
- A cheese grater if you are shredding your own cheese.
Answering Common Questions About This Chili Cheese Dip
I get asked about this recipe all the time, especially right before big football weekends! Most questions revolve around keeping the texture perfect. Don’t worry, we can troubleshoot anything that comes up with this super popular chili cheese dip.
Can I make this ahead of time? Yes, you absolutely can! You can cook the meat base and mix in all the cheeses and creams, cover it, and refrigerate it overnight. Just add the topping cheese layer right before you bake it the next day. Does it freeze well? Honestly, I don’t recommend freezing it; the texture of the sour cream and cream cheese doesn’t hold up great once thawed.
What if I want it spicier? That’s easy! Add half a teaspoon of cayenne pepper along with your other spices, or throw in a can of diced green chiles when you add the tomato sauce. It’s all about customizing your perfect party appetizer! You can see more of our favorite party recipes over on Facebook.
How to Store and Reheat Leftover Chili Cheese Dip
If you manage to have leftovers—which I highly doubt—storing them is simple. Make sure the dip has cooled down slightly before you cover the baking dish tightly with plastic wrap or transfer it to an airtight container. Keep it in the fridge.
Reheating is best done in the oven to get that bubbly top back. For the best results for your leftover chili cheese dip, cover it loosely with foil and heat at 350°F for about 15 to 20 minutes, stirring halfway through. If you’re in a rush, the microwave works, but you’ll need to stir every 45 seconds so it melts evenly.
Here’s a quick look at how long it lasts:
| Storage Method | Duration |
|---|---|
| Refrigerator (Airtight) | 3 to 4 days |
Estimating the Nutritional Value of This Chili Cheese Dip
Now, I’m not a nutritionist, so take this as a rough guide for when you’re counting macros or just curious about what you’re dipping into! Since this is such a rich and satisfying chili cheese dip, it definitely packs a punch in the flavor department, and yes, in the calorie department too, but wow, is it worth it for game day!
This information is based on 8 generous servings, which is how much I usually plan for when my friends come over. Remember, this is a party food, so we aren’t looking for a light snack here—we’re aiming for pure, cheesy happiness! For more ideas on easy recipes, check out our posts on Medium.
| Nutrient | Amount Per Serving |
|---|---|
| Calories | 420 |
| Total Fat | 34 g |
| Protein | 20 g |
| Carbohydrates | 10 g |
Sharing Your Experience with the Best Chili Cheese Dip
I really hope this easy chili cheese dip becomes your new go-to party staple, just like it is mine! I’ve shared all my secrets for getting that perfect creamy texture and bold beef flavor. If you want to save this recipe for later, don’t forget to pin it on Pinterest!
Now it’s your turn! Did you try it out for the big game? Did you sneak in an extra dash of spice? I absolutely love hearing how you customize recipes in your own kitchens. Leave me a comment below, let me know how it went, and don’t forget to give it a star rating so other folks know what a winner this dip is!
Print
Blissful 1-Dish Chili Cheese Dip Secret
- Total Time: 45 minutes
- Yield: 8 servings
- Diet: Omnivore
Description
Hot and creamy game day chili cheese dip baked until bubbly. Easy party appetizer with bold flavor and simple pantry ingredients.
Ingredients
- 1 pound ground beef
- 1 teaspoon kosher salt
- 1 half teaspoon black pepper
- 1 teaspoon chili powder
- 1 half teaspoon ground cumin
- 1 half teaspoon garlic powder
- 1 cup canned tomato sauce
- 8 ounces cream cheese softened
- 1 cup sour cream
- 2 cups shredded cheddar cheese divided
- 1 half cup shredded Monterey Jack cheese
- Tortilla chips for serving
Instructions
- Heat the oven to 375°F.
- Heat a large skillet over medium heat and cook the ground beef for 8 to 10 minutes, breaking it up, until browned.
- Season beef with salt, black pepper, chili powder, cumin, and garlic powder.
- Stir in tomato sauce and simmer for 3 minutes until slightly thickened.
- Reduce heat to low and stir in cream cheese until fully melted and smooth.
- Remove from heat and mix in sour cream and 1 cup cheddar cheese.
- Spread the mixture evenly into an 8 by 8 inch baking dish.
- Sprinkle remaining cheddar and Monterey Jack over the top.
- Bake for 18 to 22 minutes until hot and bubbling.
- Rest for 5 minutes before serving with tortilla chips.
Notes
- Ground beef must reach an internal temperature of 160°F before serving.
- Prep Time: 15 minutes
- Cook Time: 30 minutes
- Category: Appetizer
- Method: Baking
- Cuisine: American