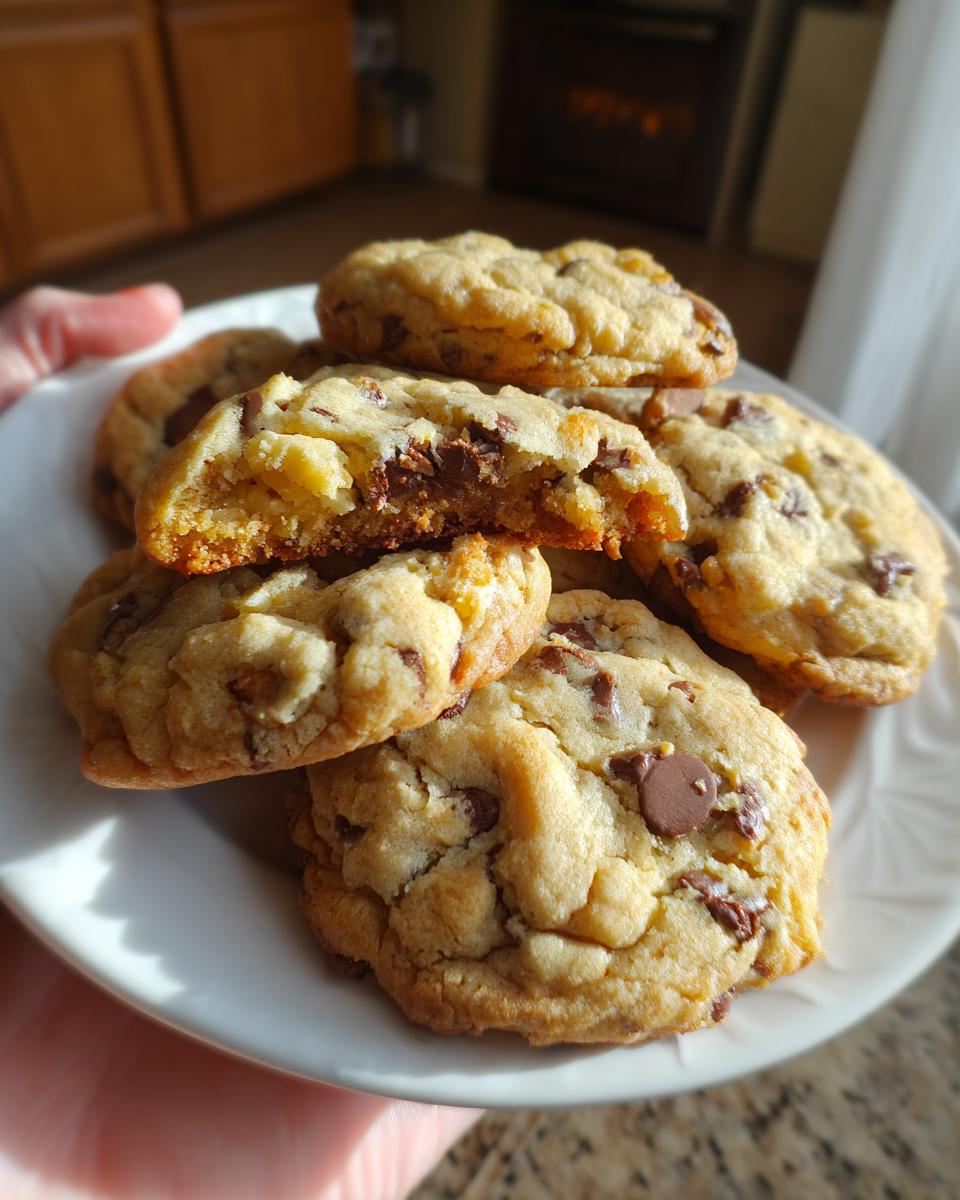
If you ask me what the desert island dessert is, it’s always going to be the perfect batch of chewy chocolate chip cookies. I spent *years* trying to nail that bakery texture at home—you know, the kind that’s soft right in the middle but has that satisfying little crack when you bite the edge? I finally cracked the code after I stopped relying on softened butter and decided to try melting it down completely. Total game changer, trust me!

The magic here is that using melted butter combined with an extra egg yolk gives you that incredible chewiness that seems impossible otherwise. Plus, chilling the dough is the non-negotiable secret weapon here. Once you make these, you’ll realize you don’t need to go to a fancy bakery for top-tier cookies anymore. I’m going to walk you through every little detail to make sure your batch is absolutely perfect.
Why You Need These Chewy Chocolate Chip Cookies Today
Honestly, I’m already craving another one just thinking about writing this section! If you’re tired of cakey cookies or cookies that spread into thin, greasy lace, you have to try this method. It completely transforms the final product.
- They have that coveted bakery-style texture—crispy edges meeting a gooey, soft center.
- Using melted butter cuts way down on mixing time; no creaming needed!
- The extra egg yolk ensures maximum chewiness in every single bite.
- These cookies freeze beautifully, so you can bake now and eat later!
Essential Ingredients for Perfect Chewy Chocolate Chip Cookies
When we talk about chewy texture, it all comes down to the fats and sugars in the bowl. Don’t just dump things in; pay close attention to how the butter and sugars need to be handled! This is where the structure truly gets set up for success.
The foundation of these cookies is honestly simple, but the preparation of those simple ingredients is what makes them special. For instance, you simply cannot skip the cornstarch; it acts like a secret ingredient that keeps the cookie tender and prevents it from getting tough or dry, which is crucial when aiming for that soft center. For the best results, make sure you’re measuring your flour correctly; I always spoon it lightly into the measuring cup and then level it off.
Also, please make sure your brown sugar is packed tightly into the cup. That packed brown sugar is what gives you that rich molasses flavor and adds necessary moisture that keeps the cookie soft for days. You can check out my guide on my favorite homemade chocolate chip cookies recipe if you want to see my favorite brand recommendations for vanilla!
- 2 1/4 cups all purpose flour
- 1 teaspoon baking soda
- 1 1/2 teaspoons cornstarch (Don’t skip this, seriously!)
- 1/2 teaspoon salt
- 3/4 cup unsalted butter melted and slightly cooled (It *must* be slightly cooled, or it cooks the eggs!)
- 3/4 cup brown sugar packed (Really pack it in there!)
- 1/2 cup granulated sugar
- 1 large egg
- 1 egg yolk (This extra yolk is major for chewiness!)
- 2 teaspoons vanilla extract
- 1 1/4 cups semi sweet chocolate chips (I use chunks sometimes for extra melty puddles!)
Step-by-Step Guide to Making the Best Chewy Chocolate Chip Cookies
Okay, get your bowls ready! This recipe is faster than the traditional method because we skip creaming the butter, but the chilling time is honestly the most important part of the whole process, so don’t sneak ahead!
Step 1: Grab a large bowl and whisk together all your dry ingredients: the flour, baking soda, that crucial cornstarch, and salt. Just give it a good 30 seconds with the whisk to make sure everything is evenly distributed. Set this bowl aside; you won’t need it again until the very end.
Step 2: In a separate, medium-sized bowl, whisk your melted butter first. You need to whisk in the packed brown sugar and the granulated sugar until it looks smooth and glossy. It should look a little like wet sand—that means the sugars are dissolving nicely! Next, whisk in your single egg, the extra egg yolk, and the vanilla extract until everything comes together into one liquid gold mixture.
Step 3: Now it’s time to combine! Pour all those beautiful wet ingredients right into your dry ingredients. Use a wooden spoon or spatula and mix only until you see just a few streaks of flour left. Do not overmix here, or you’ll activate too much gluten and lose that chew factor!
Step 4: Fold in your chocolate chips. I like to stop mixing right when they are mostly incorporated, maybe leaving a few stray flour spots. This prevents you from overworking the dough while distributing the chocolate. Then, cover that bowl tightly with plastic wrap.
Step 5: This is the make-or-break step for bakery-style cookies! You need to refrigerate the dough for a minimum of two hours, but honestly, 24 hours is even better. Chilling solidifies the fat so the cookies don’t spread too much, and it lets the flour fully hydrate, which guarantees that amazing, thick, chewy center. You can find more tips on achieving thick cookies in my guide to thick and chewy cookies.
Step 6: Preheat your oven to 325°F and line two baking sheets with parchment paper. When you take the dough out, let it sit on the counter for about 10 to 15 minutes if it’s rock hard, just so you can scoop it. If you scoop it straight from the fridge it will crack weirdly.
Step 7: Scoop out about 2 to 3 tablespoons of dough for each cookie and roll it into a ball. Here’s my little pro tip: roll them slightly taller than they are wide. This shape helps them bake up thick instead of flat! Place them about 3 inches apart on the sheet.
Step 8: Bake them for 12 to 14 minutes. You want the edges to be just barely turning golden brown, but the centers should still look very soft and slightly underbaked when you pull them out. They firm up way more on the hot cookie sheet!
Step 9: Let them sit on the baking sheet for a full 10 minutes. Seriously, don’t touch them! This resting period is crucial for setting the texture. After 10 minutes, carefully transfer them to a wire rack to cool completely. Try not to eat them all before they cool, though I never manage that myself!

Expert Tips for Next-Level Chewy Chocolate Chip Cookies
If your cookies always spread out too much and get thin, check your oven temperature immediately. At 325°F, the dough has time to set up before the butter fully melts, which is key for that thick center we are chasing. Don’t try to rush this by cranking the heat up!
Also, remember that extra egg yolk we added? That’s authority talking right there! The extra fat and emulsifiers from that yolk are what allow the cookie to stay incredibly moist and chewy for days, even if you only bake soft cookies once a week.
Why Dough Chilling is Non-Negotiable for Chewy Chocolate Chip Cookies
I know waiting is the worst when you have warm dough staring at you, but seriously, step away from the fridge. Chilling the dough solidifies the fat so much that when it hits the oven, the edges start baking before the center spreads out everywhere.
If you skip this, you end up with a flat, greasy cookie that completely misses the mark on the chewy requirement. Two hours is the minimum, but if you can swing overnight, you won’t regret the deeper flavor and better structural integrity.
Serving Suggestions for Your Chewy Chocolate Chip Cookies
Look, these cookies are amazing all by themselves, warm from the oven with chocolate still gooey in the middle, but sometimes you need companions for them! I find that pairing them with something to cut the richness really elevates the whole experience. Think about washing that intense chocolate down with something soothing.
When I’m serving these to company, I always put out a few options because everyone has a different preference. Sometimes you want to lean into the comfort food vibe, and other times you want something light to balance it out. For a healthier counterpoint to all that sugar, check out my list of light summer desserts for later!
- Extra Cold Milk: This is classic for a reason! Dipping a warm, chewy cookie into an ice-cold glass of whole milk is peak comfort.
- Hot Coffee or Espresso: The bitterness of strong coffee is the perfect contrast to the sweetness of the melted brown sugar and chocolate.
- Vanilla Bean Ice Cream: Make an ice cream sandwich! The contrast between the warm, dense cookie and the cold, creamy ice cream is heavenly.
- Fresh Raspberries: If you want to feel slightly sophisticated, a small bowl of fresh, tart raspberries alongside the cookies cuts the richness beautifully.
Storage and Reheating Guide for Chewy Chocolate Chip Cookies
Luckily, these cookies are super resilient because of all that fat and moisture we packed in there! If you have any leftovers—which, let’s be honest, is rare in my house—store them in an airtight container right on your counter at room temperature. I find they stay perfectly soft and chewy for a full week if the container seals well.
If you need to save them longer, freezing is your best bet! You can freeze the baked cookies flat for up to three months, or you can freeze the dough balls before baking. Just pop the frozen dough balls onto a baking sheet and bake them, adding about 3 to 5 extra minutes to the time.
And here’s a little tip for that one cookie you forgot about yesterday: If they get slightly stiff, don’t toss them! Pop a cookie on a microwave-safe plate and heat it for about 10 to 15 seconds. It melts the chocolate again and brings back that just-baked soft texture like magic!
Frequently Asked Questions About Chewy Chocolate Chip Cookies
These are the questions I get asked the most when people try my recipe for the first time. Usually, it all comes down to texture and timing!
I tried to keep this recipe as foolproof as possible, especially if you are trying to achieve those classic thick, bakery style cookies without using a ton of weird ingredients. But sometimes you just have a quick question pop up while you’re setting up your station!
Can I skip chilling the dough for these chewy chocolate chip cookies?
Oh, I really wish you could, but no! You absolutely shouldn’t skip the chill time if you want that perfect, dense, and soft cookie texture we talked about. Skipping the chill means the butter melts too fast in the oven, and your cookies will spread way out into thin, crispy disks instead of staying thick and chewy.
How do I make my chewy chocolate chip cookies thicker?
This is actually one of my favorite tricks! Instead of rolling your cookie dough balls into perfect spheres, try to shape them slightly taller than they are wide, almost like little footballs standing up. This intentionally awkward structure forces the cookie to spread outward less and upward more while it bakes, guaranteeing you get that satisfying thickness in the center!
Enjoy Your Perfect Chewy Chocolate Chip Cookies
That’s it—you now have the secrets to the absolute best chewy chocolate chip cookies! I’m so excited for you to pull that first warm, gooey batch out of the oven. Let me know in the comments below how they turned out and if you managed to save any for the next day!
Print
Chewy Chocolate Chip Cookies
- Total Time: 2 hours 45 min
- Yield: 18 cookies
- Diet: Vegetarian
Description
These cookies are soft in the center, lightly crisp on the edges, and contain rich chocolate. Melted butter and chilled dough create a bakery style texture.
Ingredients
- 2 1/4 cups all purpose flour
- 1 teaspoon baking soda
- 1 1/2 teaspoons cornstarch
- 1/2 teaspoon salt
- 3/4 cup unsalted butter melted and slightly cooled
- 3/4 cup brown sugar packed
- 1/2 cup granulated sugar
- 1 large egg
- 1 egg yolk
- 2 teaspoons vanilla extract
- 1 1/4 cups semi sweet chocolate chips
Instructions
- Whisk flour, baking soda, cornstarch, and salt in a large bowl. Set aside.
- Whisk melted butter, brown sugar, and granulated sugar in another bowl until smooth and glossy.
- Add the egg and egg yolk, whisking until fully combined. Stir in vanilla extract.
- Pour wet ingredients into dry ingredients and mix until a soft dough forms. Fold in chocolate chips evenly.
- Cover the dough tightly and refrigerate for at least 2 hours or up to 48 hours for best texture.
- Preheat oven to 325°F. Line baking sheets with parchment paper. Let chilled dough sit at room temperature for 10 to 15 minutes if very firm.
- Scoop about 2 to 3 tablespoons of dough and roll into balls. Shape slightly taller than wide for thicker cookies. Place on baking sheets spaced about 3 inches apart.
- Bake for 12 to 14 minutes until edges are lightly golden and centers look soft.
- Let cookies cool on the baking sheet for 10 minutes before transferring to a rack to cool completely.
Notes
- Chilling the dough is key for chewy texture and prevents spreading.
- Store cookies in an airtight container at room temperature for up to 1 week or freeze for longer storage.
- Prep Time: 15 min
- Cook Time: 13 min
- Category: Dessert
- Method: Baking
- Cuisine: American