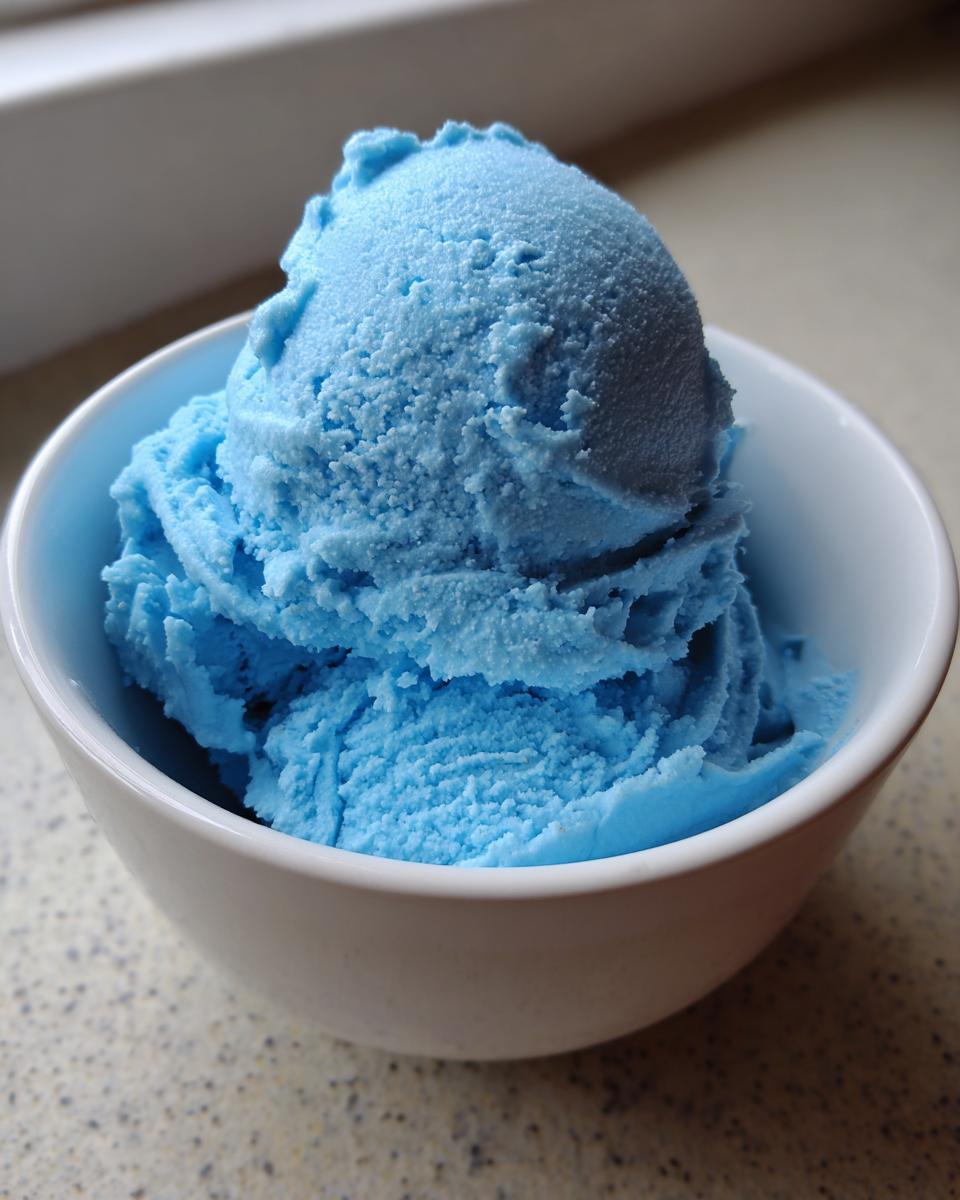
Remember those quirky, impossibly blue ice creams you’d find at the corner store as a kid? My Blue Moon Ice Cream Recipe brings all those nostalgic vibes right back into your kitchen, but trust me, it’s *so* much creamier and tastier than the store-bought stuff. My daughter’s face lit up the first time she tried it, declaring it tasted just like her favorite childhood treat!
This recipe is surprisingly simple to whip up, and the result is a super creamy, vibrantly colored ice cream that’s bursting with that classic vanilla-almond flavor. It’s perfect for warding off summer heat or just adding a pop of fun to any dessert table. Get ready to impress everyone with your homemade magic!
Why You’ll Love This Blue Moon Ice Cream Recipe
- So Easy to Make: Seriously, you don’t need to be a fancy pastry chef for this one. If you have an ice cream maker, you’ve got this!
- That Fun, Bright Color: It’s just pure joy in a bowl! That signature blue is instantly cheerful and screams summer fun.
- Nostalgic Flavor: It’s got that sweet, slightly mysterious vanilla-almond combo that just takes you right back to your childhood.
- Incredibly Creamy: Forget icy texture! This Homemade Blue Moon Ice cream is luxuriously smooth and rich.
Ingredients for Your Blue Moon Ice Cream Recipe
Okay, so for this Blue Moon Ice Cream, you’re going to want to grab a few key things. The magic really comes from that creamy base and just the right hint of almond. Don’t be tempted to skip the egg yolks; they’re crucial for that super smooth, luscious texture we’re going for!
- 2 cups heavy whipping cream
- 1 cup whole milk
- 3/4 cup granulated sugar
- 1 tablespoon pure vanilla extract
- 1/2 teaspoon pure almond extract (this is where that signature flavor comes from!)
- 4 drops blue food coloring (start with this, you can always add more for a deeper hue!)
- 2 large egg yolks
Step-by-Step Instructions for Blue Moon Ice Cream
Alright, let’s get this magic show on the road! First things first, grab a medium saucepan. You’re going to whisk together the whole milk, sugar, and those precious egg yolks until it’s all smooth as can be. Think of it as creating the velvety foundation for our creamy dream!
Now, this next part is important and requires a little patience. Put that saucepan over medium-low heat. You need to stir *constantly* for about 5 to 7 minutes. The goal here is to thicken the mixture just a bit, making it coat the back of a spoon nicely. Big no-no: do NOT let it boil! If it boils, the egg yolks can scramble, and nobody wants eggy ice cream, right?
Once it’s thickened, carefully remove the pan from the heat. This is where the richness really kicks in! Stir in the heavy whipping cream, that lovely vanilla extract, and definitely don’t forget the almond extract. That almond is the secret handshake for Blue Moon flavor, so be generous!
Time for the fun part – the color! Add your 4 drops of blue food coloring. Give it a good stir until you get that signature, vibrant blue hue. If you’re feeling daring and want an even more intense color, you can add another drop or two, but start slow. You can always add more, but you can’t take it away!
Now, cover that beautiful blue mixture up and pop it in the fridge. It needs to chill thoroughly, and I mean *thoroughly*. At least 2 hours, but honestly, if you can let it go longer, like overnight, even better. This is super important for getting that super smooth, almost decadent texture in the end, and it really helps your ice cream maker do its best work.
Once it’s truly cold, pour your chilled Blue Moon base into your ice cream maker. Now, follow your ice cream maker’s instructions to churn it all up. Depending on your machine, this usually takes about 20-30 minutes. You want it to be thick and creamy, like soft-serve.

When it’s done churning, gently transfer the deliciousness into a freezer-safe container. Seal it up tight and let it freeze for another 3 to 4 hours until it’s nice and firm. This hardening stage is key to getting those perfect scoops. While you’re waiting, maybe whip up some fun summer mocktails to go with it – you can find some awesome ideas here!
And there you have it! Your very own homemade Blue Moon Ice Cream, ready to be scooped and enjoyed. Serve it up cold and watch everyone’s happy faces!
Serving Your Blue Moon Ice Cream
This bright Blue Moon ice cream is fantastic all on its own, but here are a few little extras that make it even more special!
Fluffy Whipped Cream: A big dollop of homemade whipped cream is always a good idea. It’s light, airy, and makes the blue pop even more!
Fresh Berries: A handful of raspberries or blueberries isn’t just pretty; the tartness cuts through the sweetness perfectly. If you’re looking for more light summer dessert ideas with fruit, check out this list here.
Wafer Cookies: A simple wafer cookie or a sugar cone on the side adds a lovely little crunch that you’ll just love.

Storing and Reheating Your Blue Moon Ice Cream
Got leftovers? Lucky you! To keep your Blue Moon ice cream tasting amazing, store it in a freezer-safe airtight container. Pressing a piece of parchment paper or plastic wrap directly onto the surface of the ice cream before sealing the container can help prevent icy crystals from forming. It’ll stay beautifully creamy in the freezer for about 2 to 3 weeks before the texture starts to change, though it’s so good you’ll probably finish it way before then!
Reheating isn’t really a thing with ice cream, is it? What you *can* do, though, if it gets too hard to scoop, is let it sit on the counter for about 5-10 minutes to soften up just a bit. This brings it to that perfect scoopable consistency. It’s also fantastic for meal prep – just make a big batch on the weekend and you’ve got instant smiles ready for busy weeknights!
Frequently Asked Questions About Blue Moon Ice Cream
What makes Blue Moon Ice Cream blue?
The iconic bright blue color in this Blue Moon Ice Cream comes from a few drops of blue food coloring added to the base. It’s just for looks, but wow, does it make it special!
Can I make Blue Moon Ice Cream without an ice cream maker?
Technically yes, but it won’t be quite as smooth. You’d need to freeze the base and stir it vigorously every 30 minutes for a few hours to break up ice crystals, kind of like a no-churn method.
What is the flavor of Blue Moon Ice Cream?
It’s a super dreamy blend! You get a wonderful hit of vanilla, a subtle, sweet almond flavor, and sometimes a little hint of citrus or even banana that makes it unique and oh-so-delicious!
Before You Go
I really hope you give this Blue Moon Ice Cream Recipe a whirl! It’s such a fun, nostalgic treat that’s surprisingly simple to make and tastes amazing, almost as good as this easy strawberry ice cream. Drop a comment below and let me know how yours turns out, or share your favorite way to enjoy it! Happy scooping, and don’t forget to pin your favorites on Pinterest!
Print
Blue Moon Ice Cream Recipe
- Total Time: 6 hours 25 minutes
- Yield: 6 servings
- Diet: Vegetarian
Description
A creamy and cool homemade Blue Moon ice cream with a bright blue color and sweet nostalgic flavor, perfect for summer treats and celebrations.
Ingredients
- 2 cups heavy whipping cream
- 1 cup whole milk
- 3/4 cup granulated sugar
- 1 tablespoon vanilla extract
- 1/2 teaspoon almond extract
- 4 drops blue food coloring
- 2 large egg yolks
Instructions
- In a medium saucepan, whisk together the whole milk, sugar, and egg yolks until smooth.
- Heat the mixture over medium low heat, stirring constantly for 5 to 7 minutes until slightly thickened. Do not boil.
- Remove the saucepan from the heat and stir in the heavy whipping cream, vanilla extract, and almond extract.
- Add the blue food coloring and stir until evenly combined.
- Cover and refrigerate the mixture for at least 2 hours until fully chilled.
- Pour the chilled mixture into an ice cream maker and churn according to the manufacturer instructions until thick and creamy.
- Transfer the ice cream to a freezer safe container and freeze for 3 to 4 hours until firm.
- Scoop and serve cold.
Notes
- Chilling the ice cream base completely before churning helps create a smoother and creamier texture.
- Prep Time: 15 minutes
- Cook Time: 10 minutes
- Category: Dessert
- Method: Churning
- Cuisine: American