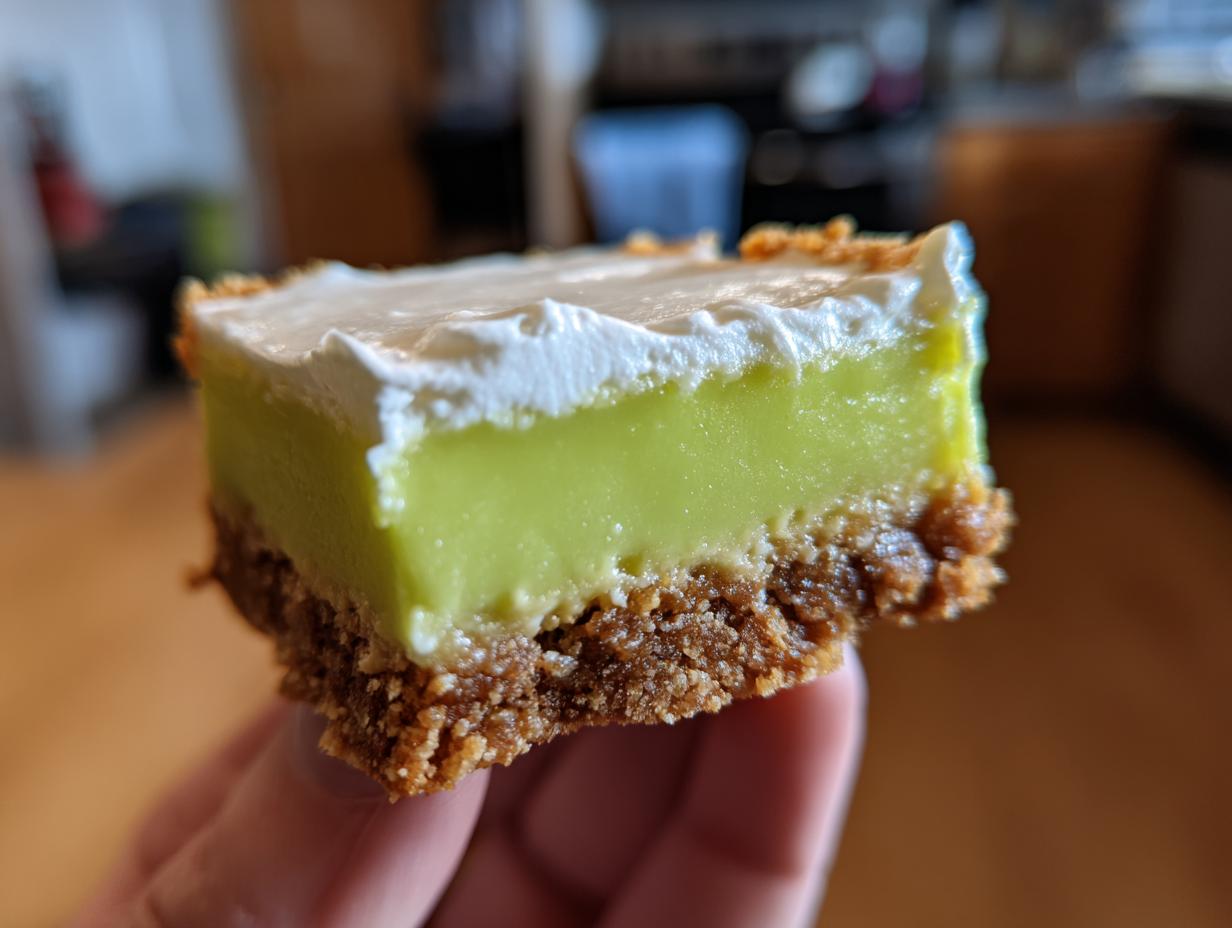
Oh my gosh, you are going to absolutely *love* these! Forget everything you think you know about tricky, delicate desserts because these **Key Lime Pie Bars** are the easiest, tangiest things you will ever make. Seriously, if you can press crumbs into a pan, you can nail this recipe. I remember the first time I tried to make anything with a graham cracker crust—I thought I needed a culinary degree!
But these bars changed everything for me. They’re my go-to dessert when I need something bright and impressive without spending all day in the kitchen. My Aunt Carol used to bring this recipe to every summer picnic, and I swear, people would fight over the last square. It’s that perfect combination of buttery crunch, silky smooth lime filling, and that fluffy cloud of topping.
What makes these the best, truly, is the balance. It’s intensely tangy but mellowed out by the sweetened condensed milk, and the texture is just heavenly. I’ve tested and tweaked this formula for years—making sure the crust bakes just right and the filling sets perfectly—so trust me when I say these **Key Lime Pie Bars** are foolproof. Let’s get started!

Essential Components for Your Key Lime Pie Bars
When you look at the ingredient list for these **Key Lime Pie Bars**, you might think it’s just a simple list, but every component plays a huge role in getting that signature texture and flavor. I’ve learned that skimping on quality here just won’t do! We need three distinct elements to come together perfectly: the base, the heart, and the cloud on top.
The Buttery Graham Cracker Crust Foundation
This is where the crunch comes from, and it needs to hold up against that wet filling! You need fine graham cracker crumbs—I mean *fine*. If they’re too chunky, the butter runs away when you press it down. Mixing the crumbs with just enough melted butter until it feels like wet sand is the key. You want it packed down so tightly you could bounce a quarter off it, otherwise, it crumbles when you try to slice it later.
Crafting the Tangy Key Lime Pie Bars Filling
This is the showstopper, the part that makes everyone ask for the recipe! The magic here is the relationship between the sweetened condensed milk, the sour cream, and the lime. The condensed milk provides the necessary sweetness and structure so you don’t have to fuss with tons of sugar. But you absolutely need that fresh key lime juice and zest for that bright, sharp tang that cuts through the richness. Don’t skip the egg yolks either; they help everything set up beautifully in these **Key Lime Pie Bars**.
Creating the Light Whipped Topping
After all that rich filling, you need something airy to finish it off. This topping is just cold heavy cream beaten hard with a little sugar until it forms stiff peaks. It’s simple, but it adds that wonderful lightness and creaminess when you take a bite. Make sure your cream is ice cold—if it’s warm, it just won’t whip up right!
Equipment Needed for Successful Key Lime Pie Bars
Don’t panic about fancy tools! For these incredible **Key Lime Pie Bars**, you really only need a few basics. Having the right pan is the most important thing for getting those clean, perfect squares later on. Trust me, a good bake starts with the right gear.
- A sturdy 9×9-inch baking pan.
- Parchment paper (you need two sheets that overlap!).
- A whisk and a large mixing bowl for the filling.
- A hand mixer or stand mixer for that fluffy topping.
- Measuring cups and spoons—precision matters here!
Step-by-Step Instructions for Key Lime Pie Bars
Okay, now for the fun part—putting it all together! Don’t worry about rushing this part. The magic of these **Key Lime Pie Bars** really happens while they chill, but getting the bake right is crucial. Follow these steps closely, and you’ll have show-stopping squares.
Preparing and Baking the Crust
First things first, we need to get that oven hot! Preheat it to 350 degrees Fahrenheit. Now, this parchment paper trick is non-negotiable for easy removal later—I learned the hard way that trying to scrape these bars out is a disaster! Line your 9×9 pan with two sheets of parchment paper, making sure they overlap in the middle like an ‘X’ so you have plenty of overhang on the sides. This overhang is your handle!
Next, get your crust mixed up. If you haven’t already, pulse those graham crackers until they are fine dust, then mix in that melted butter until it looks like damp sand. Press this mixture down *firmly* into the base of the prepared pan. Use the bottom of a flat glass or measuring cup to really compact it. Pop that crust into the oven and bake it for about 8 to 10 minutes until you see the edges just getting a tiny bit golden. Once it’s done, pull it out and immediately drop your oven temperature down to 325 degrees Fahrenheit. We need it cooler for the filling!
Mixing and Pouring the Key Lime Filling
While the crust is cooling slightly, let’s tackle that gorgeous filling. Grab a big bowl—you don’t want to overwork this, so whisking by hand is often better than a machine here. Start by whisking together the sweetened condensed milk, the key lime juice, that fragrant zest, the vanilla, and the sour cream until it looks perfectly smooth. No lumps allowed!
Then, gently whisk in your two egg yolks until everything is fully combined. Don’t beat it furiously; we don’t want a ton of air in there. Pour this beautiful, pale green mixture right over your warm, baked crust. If you see any tiny bubbles on the surface, just tap the pan gently on the counter a couple of times to release them. Those bubbles can turn into craters if you leave them!
The Final Bake and Essential Chilling Time
Carefully place the pan back into the 325°F oven. Bake these **Key Lime Pie Bars** for just 17 to 18 minutes. This is the tricky part: you want the edges set and firm, but the very center should still have a little wobble, like Jell-O. If it’s completely firm, you’ve baked it too long and it might crack later. Pull it out and let it cool completely on the counter first. Then, this next step is crucial: it needs at least four hours in the fridge, but honestly, overnight is what makes them truly perfect and firm enough to slice.

Finishing Your Key Lime Pie Bars with Topping
Once the bars are totally chilled—and I mean solid—it’s time for the topping! Make sure your heavy cream and your bowl are ice cold. Beat the cream and the two tablespoons of sugar together until you get stiff peaks. This means when you lift the whisk, the cream stands up straight. Don’t overdo it, or you’ll get butter! Spread this fluffy topping evenly over the completely chilled lime layer. Now your bars are ready for the final presentation steps.
Tips for Perfect Key Lime Pie Bars Every Time
I’ve made enough batches of these **Key Lime Pie Bars** to know exactly where things can go wrong, so let me save you some kitchen heartache! Most issues come down to either timing or temperature, but once you know the little secrets, they turn out flawless every time. Don’t let a slightly soft filling or messy edges discourage you!
Achieving Clean Slices
This is the most common struggle when serving these bars, especially when they are perfectly chilled. If you try to cut them straight from the fridge with a regular knife, the topping and the filling just drag and look messy. Here’s my trick: place your sharp knife under very hot tap water for about 30 seconds. Wipe it completely dry, and then make your first cut. Wipe the blade clean again, reheat, and cut the next slice. This hot, clean knife glides right through the layers, giving you those professional-looking squares for your **Key Lime Pie Bars**.
Ingredient Temperature Matters
Temperature is everything, especially for the topping! For the whipped cream, your heavy cream *must* be ice cold, and chilling your mixing bowl and whisk attachment in the freezer for ten minutes beforehand is a bonus. Cold fat whips up with far more volume. Conversely, your egg yolks, while not strictly necessary for chilling, should be closer to room temperature when added to the filling. This helps them incorporate much more smoothly into the cold condensed milk mixture without clumping or causing the mixture to seize up.
Storing and Keeping Your Key Lime Pie Bars Fresh
These **Key Lime Pie Bars** are honestly even better the next day, but you have to store them correctly, especially because of that lovely whipped topping we made. Since the topping is dairy-based, you can’t just leave them on the counter!
Cover the pan tightly with plastic wrap or transfer the cut squares into an airtight container. They keep wonderfully in the refrigerator for up to four days. If you wait until the last minute to add the whipped cream, they’ll last even longer, as the topping can sometimes weep or deflate a little over time.
My best advice for serving these amazing **Key Lime Pie Bars** is to take them out of the fridge about fifteen minutes before you plan to eat them. That little bit of warmth takes the chill off the filling just enough so the texture is silky smooth, not hard and stiff. Enjoy!
If you want to see more of our kitchen adventures, follow us on Facebook!
Frequently Asked Questions About Key Lime Pie Bars
I get so many questions about these bars because everyone wants theirs to turn out exactly right! It’s easy to get stuck on a tiny detail, but most issues are simple fixes. Here are the few things I hear most often about perfecting these **Key Lime Pie Bars**.
Can I use Regular Limes Instead of Key Limes?
Yes, you absolutely can! Key limes are fantastic because they are naturally tarter and smaller, giving a unique flavor kick, but they are hard to find sometimes. If you use regular Persian limes, start by using about 1/2 cup of juice and then taste your filling mixture before adding more. Regular limes can be stronger, so you might not need the full 3/4 cup. Remember, the recipe calls for zest too, so make sure you use fresh zest from those regular limes for the best flavor!
Why is my filling still runny after baking?
This almost always comes down to one of two things, so don’t worry if this happens to you once! First, if the center was still jiggly when you took them out, that’s okay—they firm up in the fridge. But if it’s truly liquid, you probably didn’t bake it long enough, or your oven runs cool. Second, make sure you didn’t forget those egg yolks! They are essential for helping the filling set firmly around that buttery **graham cracker crust**. Give it the full four hours in the fridge, minimum!
Estimated Nutritional Profile for Key Lime Pie Bars
I always tell people not to worry too much about the numbers when you’re eating something this special, but for those of you who like to keep track, here’s a general idea of what’s in one of these amazing **Key Lime Pie Bars**. Remember, this is an estimate, and the topping adds a bit to the fat and sugar content!
| Nutrient | Amount (Per Bar) |
|---|---|
| Calories | 310 |
| Fat | 17g |
| Carbohydrates | 33g |
| Protein | 6g |

Amazing 17 Key Lime Pie Bars Bliss
- Total Time: 4 hours 40 minutes
- Yield: 16 bars
- Diet: N/A
Description
Silky Key Lime Pie Bars with a buttery graham cracker crust, tangy lime filling, and fluffy whipped topping. These bars offer a bright, smooth, and irresistible dessert.
Ingredients
- 2 1/4 cups graham cracker crumbs
- 1/2 cup unsalted butter, melted
- 2 cans (14 ounces each) sweetened condensed milk
- 3/4 cup key lime juice (fresh preferred)
- 1 tablespoon key lime zest
- 2 teaspoons vanilla extract
- 2/3 cup sour cream or plain yogurt
- 2 large egg yolks
- 1 1/2 cups heavy cream, cold
- 2 tablespoons granulated sugar
Instructions
- Preheat oven to 350°F. Line a 9×9-inch baking pan with two overlapping sheets of parchment paper, leaving overhang.
- Pulse graham crackers until finely ground. Add melted butter and mix until evenly moistened. Press firmly into the bottom of the prepared pan.
- Bake the crust for 8–10 minutes until lightly golden. Reduce oven temperature to 325°F.
- In a large bowl, whisk together sweetened condensed milk, key lime juice, lime zest, vanilla, and sour cream until smooth. Add egg yolks and whisk until fully combined.
- Pour filling over the baked crust. Tap the pan lightly to remove air bubbles.
- Bake for 17–18 minutes, until edges are set but the center still jiggles slightly.
- Let cool at room temperature, then refrigerate for at least 4 hours or overnight until firm.
- Beat cold heavy cream and sugar together until stiff peaks form. Spread evenly over chilled bars.
- Lift bars from the pan using parchment. Slice into squares with a sharp knife, wiping between cuts for clean edges.
Notes
- Store covered in the refrigerator for up to 4 days.
- Add whipped cream just before serving for the best texture.
- If you cannot find key limes, substitute regular limes, starting with slightly less juice and adjusting to taste.
- Prep Time: 15 minutes
- Cook Time: 25 minutes
- Category: Dessert
- Method: Baking
- Cuisine: American