You know those times when you need something absolutely stunning on the table but you’re already running late? That was my life until I finally cracked the code on these no-bake black forest dessert cups. Forget baking; these are pure elegance without the oven drama! They look like they took hours, but trust me, they come together faster than you can decide on a dinner wine.
I spent years trying to make quick desserts that didn’t taste like they were rushed. Most of them fell flat—either too soggy or just missing that rich chocolate-cherry punch. But these individual layered desserts? They hit every single time. They’re perfect for impromptu gatherings or when you just need a little luxury after a long Tuesday.
The secret to these black forest dessert cups is keeping everything super cold and layering smartly. We’re using store-bought cake here, so don’t feel guilty! It’s about assembling perfection, not slaving over a sponge. Ready to see how we turn simple pantry staples into something that looks like it came from a fancy German pastry shop?

Essential Components for Your Black Forest Dessert Cups
When you’re making something this elegant but keeping it no-bake, the quality of your starting ingredients really shines through. For these amazing black forest dessert cups, we aren’t messing around with complicated steps, but we do need to be precise with what goes in. It’s all about the contrast: the dense, dark cake against the airy, sweet cream and the bright pop of cherry.
Don’t skip the chilling step for your cream, please! That’s non-negotiable for getting those beautiful, defined layers we want in our individual desserts.
Gathering the Ingredients for Black Forest Dessert Cups
You’ll want to measure everything out before you even touch your mixer. Organization is half the battle here! Make sure your cake is ready to crumble and your cream is ice cold. Here’s exactly what you’ll need to create the best individual black forest dessert cups:
| Ingredient | Amount | Prep Note |
|---|---|---|
| Chocolate Cake | 1 pound | Crumbled finely |
| Heavy Cream | 1 cup | Must be very cold |
| Powdered Sugar | \u00be cup | For sweetening the cream |
| Cherry Pie Filling | 1 cup | For the fruity layer |
| Semisweet Chocolate Shavings | \u00bc cup | For garnish |
| Whole Cherries w/ Stems | 6\u20138 | For the final touch |
Necessary Equipment for Assembly
You don’t need a ton of fancy gadgets, which is the beauty of a no-bake treat! Grab a mixing bowl—preferably one you chilled in the freezer for about ten minutes—and your electric mixer. You’ll also need a sturdy whisk or spatula for folding later on. Most importantly, you need those clear dessert cups! Using glass or clear plastic lets everyone admire those gorgeous layers.
Step-by-Step Guide to Assembling Black Forest Dessert Cups
Okay, now that you have your ingredients ready, let’s get building! This is where the magic happens, and honestly, it’s the most fun part. We are aiming for distinct, beautiful stripes in our black forest dessert cups, so take your time with the layering. Don’t rush this assembly phase!
Preparing the Chocolate Cake Base
First up is the cake. You want crumbs, not dust, so grab your chocolate cake—whether it’s homemade or store-bought—and just break it apart with your fingers. I like mine to be about the size of small peas. If your cake seems a little dry, don’t panic! I often keep a little simple syrup or even a splash of leftover cherry juice handy. Just drizzle a tiny bit over the crumbs and toss gently. You just want them slightly damp, not soaking wet, otherwise, your layers will bleed into each other too much.
Whipping the Cream Filling Perfectly
This is crucial! Grab that chilled bowl and pour in your very cold heavy cream. Start mixing on medium speed until it starts to thicken up a bit—you’ll see ripples forming. Then, slowly sprinkle in your powdered sugar. Don’t dump it all in at once, or it might puff up everywhere! Increase the speed and keep mixing until you get stiff peaks. This means when you lift the whisk out, the cream holds its shape perfectly straight up. If you can flop the peak over, it needs a minute or two more. We need that structure for the layers!
Layering and Finishing Your Black Forest Dessert Cups
Time to assemble your beautiful black forest dessert cups! Think of it like building a tiny, delicious tower. Start with a layer of your prepared chocolate cake crumbs at the bottom of each cup. Next, spoon a generous layer of the whipped cream right over that. Then, add a spoonful of that gorgeous, tart cherry pie filling. Now, repeat! Cake, cream, and cherry filling again. You should have enough for two full sets of layers, ending with that final flourish of whipped cream on top.
For the grand finale, grab your chocolate shavings and sprinkle them generously over the cream mound. Finally, pop one whole cherry right on top—stem and all! It makes them look instantly professional. Don’t forget to get these into the fridge right away!

Tips for Perfect Black Forest Dessert Cups
Even though these are no-bake, there are a few little tricks that separate a good dessert cup from an absolutely show-stopping one. If you follow these small tips, your black forest dessert cups will be the highlight of any meal. Seriously, these details matter when you’re building layers!
Ingredient Temperature and Cream Consistency
I can’t stress this enough: your heavy cream must be ice cold. If it’s even slightly warm, it won’t whip up properly, and you’ll end up with sweet soup instead of firm peaks. That’s why I always toss my mixing bowl and beaters in the freezer for ten minutes before I start. Cold ingredients mean instant structure for your cream layer, which is what keeps those beautiful layers in your black forest dessert cups from collapsing into a muddy mess.
Making Ahead and Setting Time
While these assemble so fast, they absolutely need time to rest. You need at least two hours in the fridge before serving. Why? First, the cream needs time to firm up completely so it doesn’t ooze out when someone tries to eat it. Second, and this is my favorite part, the flavors need to mingle! The chocolate from the cake starts to absorb a little moisture from the cherries, and the whole experience just gets richer. They taste even better the next day, which is a huge bonus for make-ahead treats!
Customizing Your Black Forest Dessert Cups
These individual desserts are fantastic as they are, but that doesn’t mean we can’t play a little! The beauty of these black forest dessert cups is how adaptable they are. You can tweak the chocolate and cherry elements easily without adding any baking time. Think of these as your canvas for personal flair!
Chocolate Variations
If you want a deeper chocolate punch, skip the standard semisweet shavings on top and use dark chocolate instead—the slight bitterness is amazing against the sweet cream. Or, here’s a fun idea: whisk a teaspoon of good quality unsweetened cocoa powder right into your heavy cream along with the powdered sugar. It gives your cream layer a gorgeous, subtle mocha tone that pairs wonderfully with the cherries in your black forest dessert cups.
Cherry Flavor Adjustments
The pie filling is easy, but if you want to step it up, try using fresh cherries if they are in season! Just pit about a cup of fresh sweet cherries, slice them in half, and toss them with a teaspoon of sugar and maybe a tiny splash of kirsch if you have it. Let them sit for about 20 minutes. They release their own juice, which makes for a brighter, fresher layer in your black forest dessert cups than the canned stuff. Just use those macerated cherries instead of the pie filling in your layering steps!
Storing and Serving Your Black Forest Dessert Cups
The great thing about these individual desserts is that they actually improve with a little rest in the fridge! You definitely don’t want to serve them straight away; they need time to set up properly so your layers stay distinct. They are best served chilled, straight from the refrigerator. Don’t even think about trying to heat these up—that cream will turn into a soupy mess instantly! We want that cool, refreshing texture.
If you’re making them for a party, you can usually get them done the day before, which takes all the stress out of entertaining. Just make sure you don’t add the final chocolate shavings and whole cherries until just a little while before serving, as the shavings can sometimes absorb moisture from the cream if they sit too long.
| Storage Method | Duration | Notes |
|---|---|---|
| Airtight Container in Fridge | Up to 3 Days | Best flavor on Day 1 or 2 |
| Freezing | Not Recommended | Cream texture will break when thawed |
Frequently Asked Questions About Black Forest Dessert Cups
I get so many questions about these easy treats! People always want to know if they can swap things out or if they can really be made ahead of time. Here are the most common things folks ask when they are planning to make their own black forest dessert cups.
Q1. Can I use regular milk instead of heavy cream for the filling?
Oh, please don’t! If you use regular milk, you won’t get that stiff, luxurious whipped cream layer that holds up the structure of these chocolate cherry desserts. Milk just won’t whip to stiff peaks; it stays liquidy. You absolutely need the high fat content of heavy whipping cream to get the right texture for these individual desserts.
Q2. My cake layer seems too crumbly; what’s the best way to fix that?
That happens sometimes, especially if you use a drier cake. Remember that optional step? If your cake crumbs are dusty, brush them very lightly with simple syrup—just water and sugar boiled for a minute—or even a little bit of the juice from the cherry pie filling. This adds just enough moisture so the crumbs stick together nicely when you press them into the bottom of the cup.
Q3. Can I make these completely vegan or dairy-free?
You totally can adapt these! For the cream, you’ll need a good quality solid coconut cream (the thick part from a chilled can of full-fat coconut milk) whipped up with powdered sugar. For the cake base, just make sure you use a vegan chocolate cake recipe. You still get the beautiful layers in your black forest dessert cups, just plant-based!
Q4. How long can I keep these individual desserts in the fridge before they start tasting stale?
They are best within the first 24 hours, but they hold up beautifully for up to three days, provided they are covered tightly. The longer they sit, the more the cake base soaks up the cherry juice, which some people actually prefer! Just remember my earlier tip: if you’re storing them for more than a day, save those delicate chocolate shavings for the last hour before serving.
Sharing Your Black Forest Dessert Cups Experience
I truly hope you loved making these no-bake treats as much as I do! They are my go-to when I need something fast and fancy. Let me know how they turned out for you! You can also follow along for more quick dessert ideas on our Facebook page.
Did you try any of the customizations we talked about? Drop a rating below and tell me in the comments what you thought of the chocolate-cherry combination in these easy cups! Feel free to save this recipe on Pinterest too!
Print
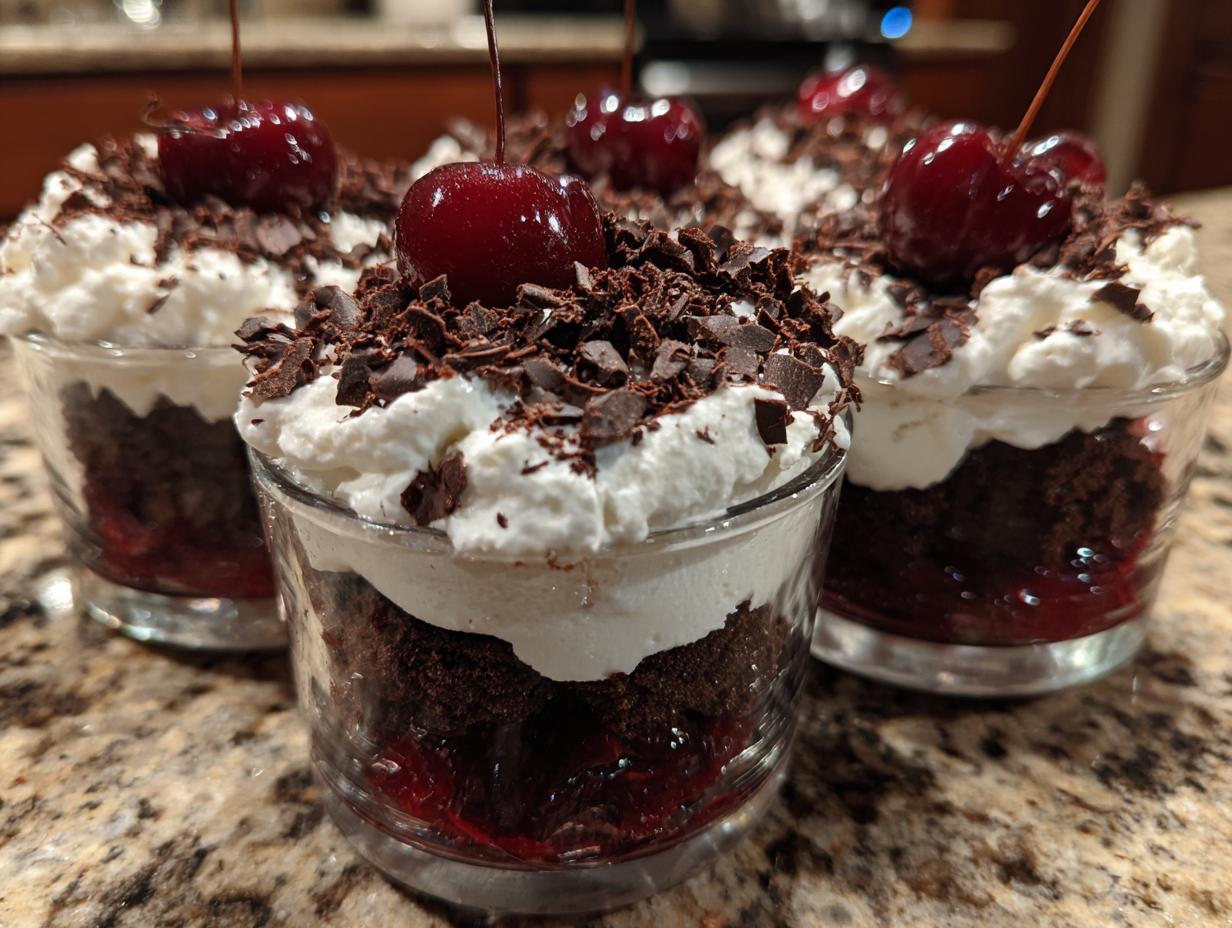
Stunning 4-Layer black forest dessert cups
- Total Time: 2 hours 15 minutes
- Yield: 6–8 dessert cups
- Diet: Vegetarian
Description
Elegant no-bake Black Forest dessert cups layered with chocolate cake, whipped cream, and cherries. This is a quick, make-ahead dessert.
Ingredients
- 1 pound chocolate cake, crumbled
- 1 cup cold heavy cream
- ¾ cup powdered sugar
- 1 cup cherry pie filling
- ¼ cup semisweet chocolate shavings
- 6–8 whole cherries with stems
Instructions
- Crumble the chocolate cake into small, even pieces. Brush crumbs lightly with simple syrup if the cake is dry.
- Beat cold heavy cream and powdered sugar in a chilled bowl until stiff peaks form.
- In 6–8 clear dessert cups, layer chocolate cake crumbs, then whipped cream, then a spoonful of cherry pie filling.
- Repeat the layering sequence: cake, whipped cream, and cherry filling, ending with a swirl of whipped cream on top.
- Sprinkle chocolate shavings over the top and place one cherry with a stem on each dessert cup.
- Refrigerate the dessert cups for at least 2 hours before serving.
Notes
- Use store-bought or homemade chocolate cake for the base.
- Ensure the heavy cream is cold for best whipping results.
- Chilling allows the flavors to combine and the cream to set properly.
- Prep Time: 15 minutes
- Cook Time: 0 minutes
- Category: Dessert
- Method: No-Bake
- Cuisine: German