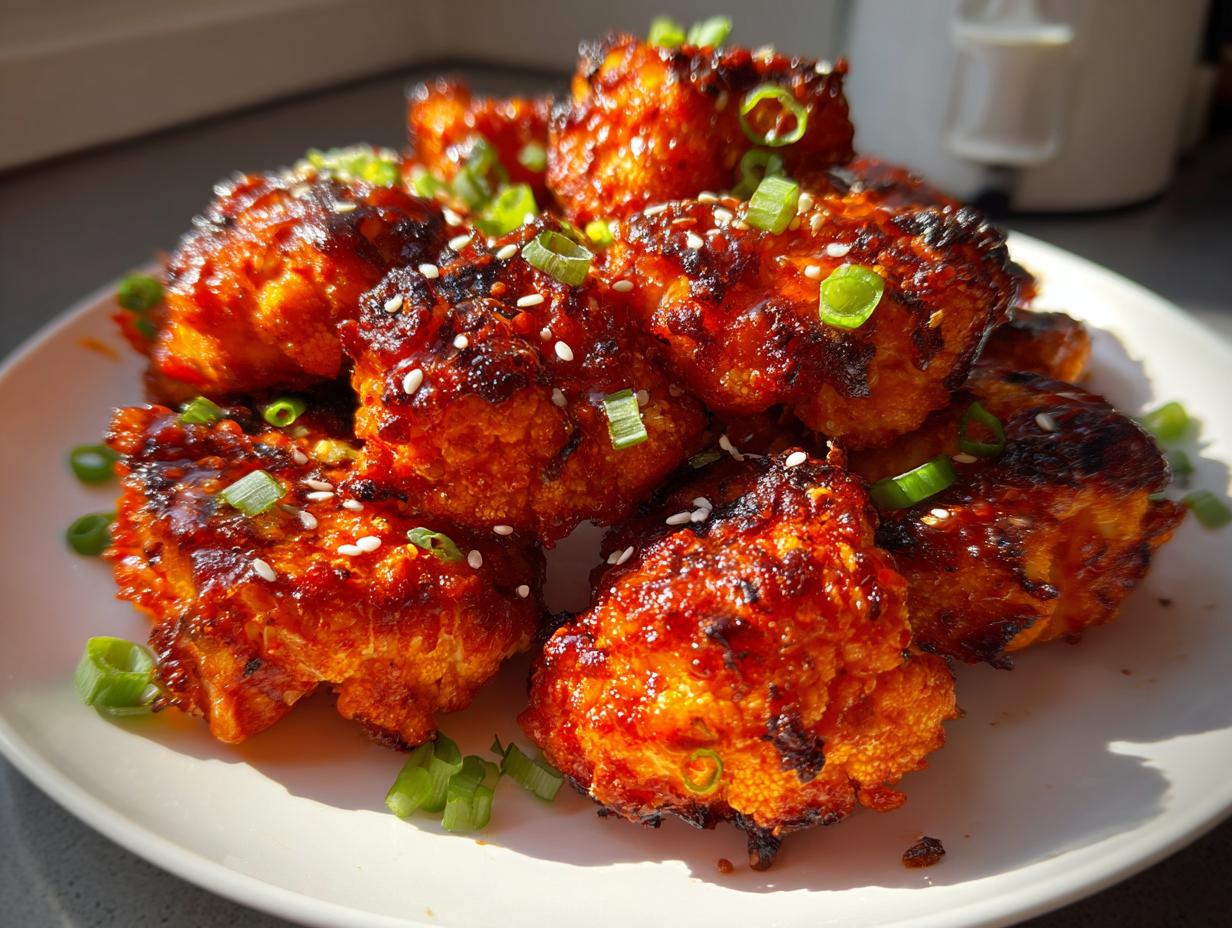
Listen, I used to think vegetables were just things you boiled until they turned a sad shade of green, but making truly fantastic baked cauliflower has completely changed my tune! This recipe, with its incredible sweet and spicy kick, is what finally converted me. Forget boring steamed sides; we are hitting that perfect crispness in the oven and then drowning it in the best glaze you’ve ever tasted.
I spent way too many years trying to get vegetables to taste like something other than… well, vegetables. But the secret to these bites is that glaze—it’s tangy, it’s sweet from the honey, and it has just the right amount of heat from the Sriracha. It clings perfectly to the roasted florets. Trust me, once you master this simple technique for baked cauliflower, you’ll be making it every single week. It’s my go-to appetizer when company pops over unannounced, because it looks fancy but takes almost no effort! 
Essential Components for Your Baked Cauliflower Recipe
Getting the right components ready is half the battle, especially when you’re trying to achieve that amazing texture with baked cauliflower. Don’t rush this part! We need crispiness from the roast and sticky goodness from the sauce, so measuring everything out first makes the whole process smooth as silk.
If you don’t have all your pieces ready, you risk burning the glaze while you’re still chopping the garlic, and nobody wants sticky, burnt garlic bits!
Gathering Ingredients for the Chili Glaze
The glaze is where the magic happens, so pay attention here. You need that lovely balance: soy sauce and rice vinegar for the tang, honey for the sweetness, and of course, the heat. I always use fresh minced garlic—don’t even think about the jarred stuff here. It just doesn’t bloom the same way in the pan. And for the spice, you get to choose your adventure: Sriracha if you want a familiar kick, or the chili garlic sauce if you like a bit more texture in your heat. The cornstarch is key; it’s what thickens our sauce so it actually sticks to the cauliflower.
Preparing the Cauliflower Florets
When you cut up the cauliflower, aim for uniformity. Seriously, this is critical for great baked cauliflower! If you have some tiny pieces and some huge chunks, the small ones will burn before the big ones are even tender. Try to keep everything roughly the same bite-size—maybe an inch across? Don’t wash the florets right before you oil them up either; we want them dry so the oil and seasoning can adhere nicely. A little olive oil, salt, and pepper are all you need for this first stage.
Equipment Needed for Perfect Baked Cauliflower
You don’t need a million fancy gadgets for this, thankfully! Keeping the tool list short helps speed things up, which is perfect for a quick appetizer like this baked cauliflower. Make sure you have these basics ready before you even preheat the oven.
- A large bowl for tossing the florets
- A large baking sheet, lined with parchment paper (this is non-negotiable for easy cleanup!)
- A small saucepan for making the glaze
- A whisk and a wooden spoon
Step-by-Step Instructions for Flavorful Baked Cauliflower
Okay, this is the fun part where everything comes together! Remember, timing is important here because we are doing two separate roasts. If you prep everything efficiently, you can have these on the table in under 35 minutes total. Don’t try to multitask too much—keep an eye on the oven!
Initial Roasting of the Cauliflower
First things first, crank that oven up to 425 degrees Fahrenheit. I always line my biggest baking sheet with parchment paper. Seriously, this saves you scrubbing sticky glaze off metal later, and you should always use parchment when you’re roasting things that will get sticky!
Take those seasoned florets—olive oil, salt, pepper—and spread them out. This is crucial: they need to be in a single layer, not piled up. If they’re touching too much, they steam instead of roast, and we are aiming for crispness here! Pop them into that hot oven for 20 minutes. Set a timer! When that timer goes off, pull the tray out, flip every piece over so they brown evenly, and slide them right back in while you handle the sauce.
Creating the Tangy Chili Glaze
While the cauliflower is doing its first roast, grab a small saucepan. We’re going to whisk together the soy sauce, rice vinegar, that sweet honey, your chosen heat source (Sriracha or chili garlic sauce), sesame oil, minced garlic, and the cornstarch. Make sure you whisk it well before it hits the heat so that cornstarch dissolves completely; nobody wants lumps of starch in their glaze!
Put this mixture over medium heat. You need to stir it constantly. It won’t take long—about two to three minutes, tops. You’ll notice it starts to bubble slightly and thicken up. It should coat the back of a spoon nicely. Once it looks glossy and thick enough to stick to the cauliflower, take it off the heat immediately. Don’t let it boil too long or it might get too stiff.
Glazing and Caramelizing Your Baked Cauliflower
Now, quickly transfer those hot, golden florets from the baking sheet into a clean bowl—we need space to toss them! Pour that warm, tangy glaze right over the top. Use a spatula or tongs to gently toss everything until every piece of baked cauliflower is coated in that beautiful, spicy shine. Don’t overmix, or you might break them up! 
Once coated, spread the glazed cauliflower back out onto the parchment-lined sheet. They need one last trip into the oven. This second roast is short—only about five minutes. This is what caramelizes the sugars in the honey and sets that glaze into a sticky, slightly chewy shell. Watch them closely during these last five minutes because the honey can blacken fast! When they look bubbly and slightly darker, pull them out, sprinkle them with those fresh green onions and sesame seeds, and serve them straight away while they’re piping hot!
Tips for Success with Roasted Cauliflower Bites
I’ve learned a few tricks over the years to make sure these baked cauliflower bites aren’t floppy or disappointing. The absolute biggest mistake people make is skipping the double-roast. That first 20 minutes dries out the cauliflower so it can actually absorb the sauce later. If you skip it, you end up with steamed mush!
Also, make sure you oil the florets well before the first roast. A dry floret won’t brown, and browning equals flavor. Don’t be shy with the salt and pepper at the start, either; seasoning before the sauce goes on builds a deep flavor base. If you follow those steps, your baked cauliflower will be perfectly crisp on the outside and tender inside, just like mine! If you enjoy quick vegetable sides, you might also love our recipe for oven-roasted potatoes.
Ingredient Notes and Simple Substitutions
Even though I preach following the recipe, I know sometimes you’re missing one little thing! Don’t panic if your pantry looks a little different than mine. The beauty of this recipe is that the core structure holds up really well to minor tweaks.
For instance, if you don’t have honey, maple syrup works in a pinch, but you might want to reduce the amount slightly since maple is often sweeter. Just taste as you go! Cornstarch is essential for getting that thick, non-runny glaze, so I wouldn’t skip it unless you want a thin sauce. If you must substitute it, arrowroot powder is the closest swap, but use just a tiny bit less.
When it comes to the heat, that’s totally personal preference. If you find Sriracha too intense, definitely use the chili garlic sauce instead—it often has a slightly mellower heat and adds those extra little flecks of garlic, which I love. If you are completely out of both, you can use a dash of cayenne pepper, but you’ll need to add a tiny bit more liquid, maybe a teaspoon of water, to make up for the missing volume in the sauce.
Serving Suggestions for Your Baked Cauliflower
These sweet and spicy baked cauliflower bites are so versatile, they can anchor almost any meal! Since they pack a lot of flavor, I usually pair them with something cool and creamy to cut through the heat. A big bowl of plain Greek yogurt mixed with a squeeze of lime juice is my absolute favorite dip for these. For another creamy appetizer idea, check out our whipped ricotta dip.
They are fantastic served over a bed of fluffy white rice or even brown rice if you want something heartier. They also make a perfect side dish for grilled chicken or steak to give your plate an Asian-inspired flair. People always ask for seconds when I bring these out!
Storing and Reheating Leftover Roasted Cauliflower
Listen, I know these baked cauliflower bites are so good you might actually have leftovers, which is a rare victory! But we have to be careful how we store them. The glaze is sticky, and if you just toss them in a regular container, they steam themselves into softness overnight. We want to fight that sogginess with everything we’ve got!
Storage Guidelines
The key to keeping them respectable is air circulation, even in the fridge. Don’t pack them tightly in plastic. I always use a shallow, airtight container, but I try not to stack the pieces too high. If you have a lot left, put a paper towel on the bottom of the container first. That helps wick away any residual moisture weeping out of the glaze.
| Storage Method | Best For | Duration |
|---|---|---|
| Airtight Container (Shallow) | Keeps them from absorbing fridge smells | Up to 3 days |
| Freezing (Not recommended) | Texture loss is significant | N/A |
Reheating Methods
If you use the microwave, I guarantee you’ll end up with sad, soft cauliflower. We worked too hard to get that crisp exterior for you to ruin it! The best way to bring these back to life is with dry, high heat.
If you have an air fryer, use it! Set it to about 350 degrees for just 4 to 6 minutes. It crisps up the outside beautifully. If you don’t have an air fryer, the oven works almost as well. Spread the leftovers in a single layer on a baking sheet—no crowding!—and bake at 375 degrees for about 8 minutes. You’ll hear them start to sizzle again, and that means the glaze is re-crisping. Serve them immediately after reheating!
Frequently Asked Questions About This Baked Cauliflower
I get so many questions about these little flavor bombs! Honestly, people want to know how to keep them crispy, and that’s fair. Here are the things folks ask me most often about making the perfect batch of baked cauliflower bites.
Can I make this recipe ahead of time?
You can definitely prep the cauliflower florets ahead of time, up to a day in advance, just keep them dry in the fridge. However, I strongly advise against mixing the sauce or tossing the florets until you are ready to bake. The best results—the true crispness—come from roasting them fresh. The glaze soaks in quickly, and the longer they sit coated, the softer they get. If you need to save time, just do the initial roast, let them cool, and then wait to glaze and do the final roast until about 15 minutes before you plan to serve them.
How do I adjust the spice level in this Baked Cauliflower?
This is totally customizable! If you’re sensitive to heat, skip the Sriracha entirely and just use the chili garlic sauce—it gives you great flavor without overwhelming heat. Or, if you want it milder still, use only half a teaspoon of the heat source and maybe add a tiny splash more rice vinegar to balance the flavor. If you love the burn, feel free to use a full tablespoon of Sriracha! It’s all about what tastes good at your table.
What temperature should I use for roasting?
High heat is your friend here! We preheat the oven to 425 degrees Fahrenheit. This high temperature is essential for driving out moisture quickly during that first 20-minute roast, which sets up the cauliflower to be perfectly crisp later. Don’t be tempted to lower it to try and prevent burning during the final glaze step; just watch them closely during those last five minutes instead!
Sharing Your Experience with This Recipe
I truly hope these sweet and spicy bites become a new favorite in your kitchen, just like they are here! If you try out this method for getting your baked cauliflower perfectly crisp and glazed, please come back and leave a star rating below. I love hearing which part of the recipe you enjoyed most—was it the sticky glaze or the tender inside? You can also follow our latest recipe updates on Facebook or save this recipe on Pinterest!
Print
Sensational Baked Cauliflower in 35 Minutes
- Total Time: 35 minutes
- Yield: 4 servings
- Diet: Vegetarian
Description
These sweet and spicy baked cauliflower bites roast until crisp and then coat in a tangy chili glaze. This recipe makes an easy, flavorful appetizer or side dish.
Ingredients
- 1 medium head cauliflower, cut into bite-size florets
- 2 tablespoons olive oil
- 1 tablespoon soy sauce
- 1 tablespoon rice vinegar
- 1 tablespoon honey
- 1 tablespoon sriracha or chili garlic sauce
- 1 teaspoon sesame oil
- 1 teaspoon cornstarch
- 1 clove garlic, minced
- 1/4 teaspoon salt
- 1/4 teaspoon black pepper
- 1 tablespoon chopped green onions for garnish
- 1 teaspoon sesame seeds for garnish
Instructions
- Preheat your oven to 425°F. Line a large baking sheet with parchment paper.
- Toss cauliflower florets in a large bowl with olive oil, salt, and pepper until they coat evenly. Spread them in a single layer on the baking sheet.
- Roast for 20 minutes, flipping halfway through, until the cauliflower is golden and tender-crisp.
- While the cauliflower roasts, whisk together soy sauce, rice vinegar, honey, sriracha, sesame oil, cornstarch, and minced garlic in a small saucepan.
- Place the saucepan over medium heat and cook, stirring constantly, until the sauce thickens slightly, about 2 to 3 minutes.
- Remove the roasted cauliflower from the oven and place it in a clean bowl. Pour the warm sauce over the cauliflower and toss until coated.
- Return the coated cauliflower to the baking sheet and roast for another 5 minutes until the glaze caramelizes slightly.
- Transfer the bites to a serving dish and garnish with green onions and sesame seeds. Serve hot.
Notes
- The total cook time is 25 minutes, which includes the two roasting stages.
- Use chili garlic sauce if you prefer a milder heat than sriracha.
- Prep Time: 10 minutes
- Cook Time: 25 minutes
- Category: Appetizer/Side Dish
- Method: Baking/Roasting
- Cuisine: Asian-inspired