When I first started trying to eat healthier for breakfast, I bought so many weird ingredients that ended up rotting in the fridge. Seriously, I struggled! That’s why I’m so excited to share this chocolate chia pudding recipe with you. It’s the one that actually stuck. It’s my absolute favorite make-ahead breakfast because it takes five minutes, uses pantry staples, and tastes like a decadent dessert. You don’t even need to turn on the stove! Learning how to make a truly simple, wholesome recipe like this chocolate chia pudding was a huge win for me, and I know it’ll be a win for you too.

Achieving Perfect Texture in Your Chocolate Chia Pudding
The secret to great chia pudding isn’t the ingredients—though they help!—it’s the initial mixing. Those little seeds are notorious for clumping up into a big gelatinous blob if you’re not careful. You absolutely have to whisk or shake it really hard right at the beginning. I mean, really commit to that first minute!
When you whisk vigorously, you’re coating every single chia seed with that creamy milk mixture before they start absorbing liquid. This process is crucial for that beautiful, even thickening we want in our chocolate chia pudding. If you skip this, you end up with sad, dry seeds stuck together at the bottom. Trust me, take the extra 30 seconds to mix it well, and you’ll get the most glorious, creamy texture imaginable.
Gathering Your Ingredients for Chocolate Chia Pudding
Okay, let’s talk ingredients! This is what I love about this recipe: it’s so short. You probably have most of this stuff sitting in your pantry right now. When you’re making something this simple, the quality really shines through, so grab your favorites. We are aiming for a rich, dark flavor in this chocolate chia pudding, so don’t skimp on your cocoa powder.
The whole point here is speed and ease, so we aren’t complicating things with tricky soaking times or obscure sweeteners. It’s just the seeds, the liquid, the chocolate flavor, and a little bit of sweetness. Easy peasy, right?
Exact Measurements for Creamy Chocolate Chia Pudding
Precision matters here, even though it’s just one serving. If you mess with the seed-to-liquid ratio too much, you end up with soup or paste. We want that perfect, scoopable consistency. Remember, you need exactly three tablespoons of chia seeds for this batch. That is the magic number that works with the liquid volume.
For sweetness, I always use maple syrup. It mixes in so much easier than granulated sugar, which can sometimes leave a gritty texture in cold mixtures. A full tablespoon gives it a lovely, balanced sweetness that complements the dark cocoa powder. Don’t forget that tiny pinch of sea salt—it just wakes up the chocolate flavor! These exact measurements ensure you get the best possible chocolate chia pudding on the first try.
Milk Choices for Your Chocolate Chia Pudding Base
You need exactly 3/4 cup of milk. That’s the non-negotiable liquid amount here. I usually reach for oat milk because it’s naturally creamy and adds a really nice, subtle sweetness that pairs perfectly with the cocoa. Almond milk works great too, especially if you’re watching calories closely. Cashew milk is another fantastic, rich option.
Honestly, you can use dairy milk if you prefer, but I find plant-based milks tend to create a slightly lighter final texture in this chocolate chia pudding. Whatever you use, make sure it’s cold when you start mixing!
Step-by-Step Instructions for Make-Ahead Breakfast
This is the best part because you literally do nothing active for the next two hours except maybe wash a dish or two. Because this is a no-cook method, all the magic happens while it sits quietly in the fridge. If you’re making this for a busy weekday morning, you’ll be so grateful you whipped this up the night before. It saves so much time!
Grab yourself a small mason jar with a lid, or any bowl you can cover tightly. We want to make sure that cold air doesn’t dry out the surface while it sets up. Remember, this recipe is all about simplicity, but we have to respect the science of the chia seed! If you want more quick breakfast ideas, check out our easy breakfast roll ups recipe.
Mixing and Initial Setting of the Chocolate Chia Pudding
Step one is just getting everything into your jar. Dump in those three tablespoons of chia seeds, the maple syrup, the vanilla, that tiny pinch of salt, and finally, your 3/4 cup of milk. Now, here’s where you need to channel your inner shaker! If you’re using a jar, put the lid on tight and shake it like you mean it for a full minute—don’t stop until you can’t see any dry powder pockets.
If you’re using a bowl, grab a whisk and beat it hard. The goal is total incorporation. You absolutely must break up those initial clumps of cocoa powder and make sure every seed is swimming in liquid. I always give it an extra 15 seconds just to be safe. This intense initial mixing is the absolute key to getting that beautiful, creamy chocolate chia pudding instead of a bowl of gritty seeds.
Refrigeration Time and Final Texture Check
Once it’s mixed, cover it up and send it to the fridge. It needs a minimum of two hours to set up properly. If you’re patient, though—and I highly recommend it—let it hang out overnight. Seriously, the overnight version of this chocolate chia pudding is miles better; the flavors meld and the texture becomes incredibly smooth.
When you pull it out, it will look pretty thick, but you still need to do one final check (Step 4 in the instructions). Take a spoon and give it one last good stir. Sometimes, a few seeds try to stick together at the bottom during the long chill time. Stirring it one last time ensures that every spoonful you scoop out is perfectly uniform and velvety. Now it’s ready to serve immediately!

Tips for Success with Your Healthy Dessert
You’ve got the basic recipe down, but I have a few little tricks up my sleeve that always make my chocolate chia pudding turn out perfectly, especially if you’re new to making it. First off, don’t be tempted to reduce the liquid right away. Chia seeds expand a lot, and if you use less milk, you’ll end up with something you need a fork for, not a spoon!
If you’re prepping these for the whole week, it’s smart to make a double batch in a larger container, but you still need to stir it really well after the first hour of chilling. Sometimes the seeds settle unevenly in a big batch. Also, don’t panic if the top looks a little dry after sitting overnight; that’s normal.
Just give it a good stir before you portion it out. My favorite practical tip is to always prep your toppings first. If you have your yogurt and chopped chocolate ready to go before you pull the pudding from the fridge, the whole serving process takes about ten seconds flat. It makes that busy morning routine so much smoother! You can find more great recipe tips on our Medium page.
Ingredient Notes and Simple Substitutions
Since this recipe has so few components, the quality of what you use really matters. If you find the pudding isn’t sweet enough after chilling—maybe your cocoa powder was extra bitter—don’t worry! You can easily sweeten it up before serving. Just stir in another half teaspoon of maple syrup until it tastes right for you. Remember, you can always add more sweetness, but you can’t take it away once it’s mixed in!
When it comes to milk swaps, you can use almost any liquid you like, but be aware that thinner milks, like skim dairy or rice milk, will result in a slightly looser final texture. You might need to add an extra half teaspoon of chia seeds if you go that route. For the cocoa powder, if you happen to have Dutch-processed cocoa, use that! It’s deeper in flavor and dissolves a bit more easily than standard unsweetened cocoa powder, which cuts down on potential clumps.
Serving Suggestions for Your Chocolate Chia Pudding
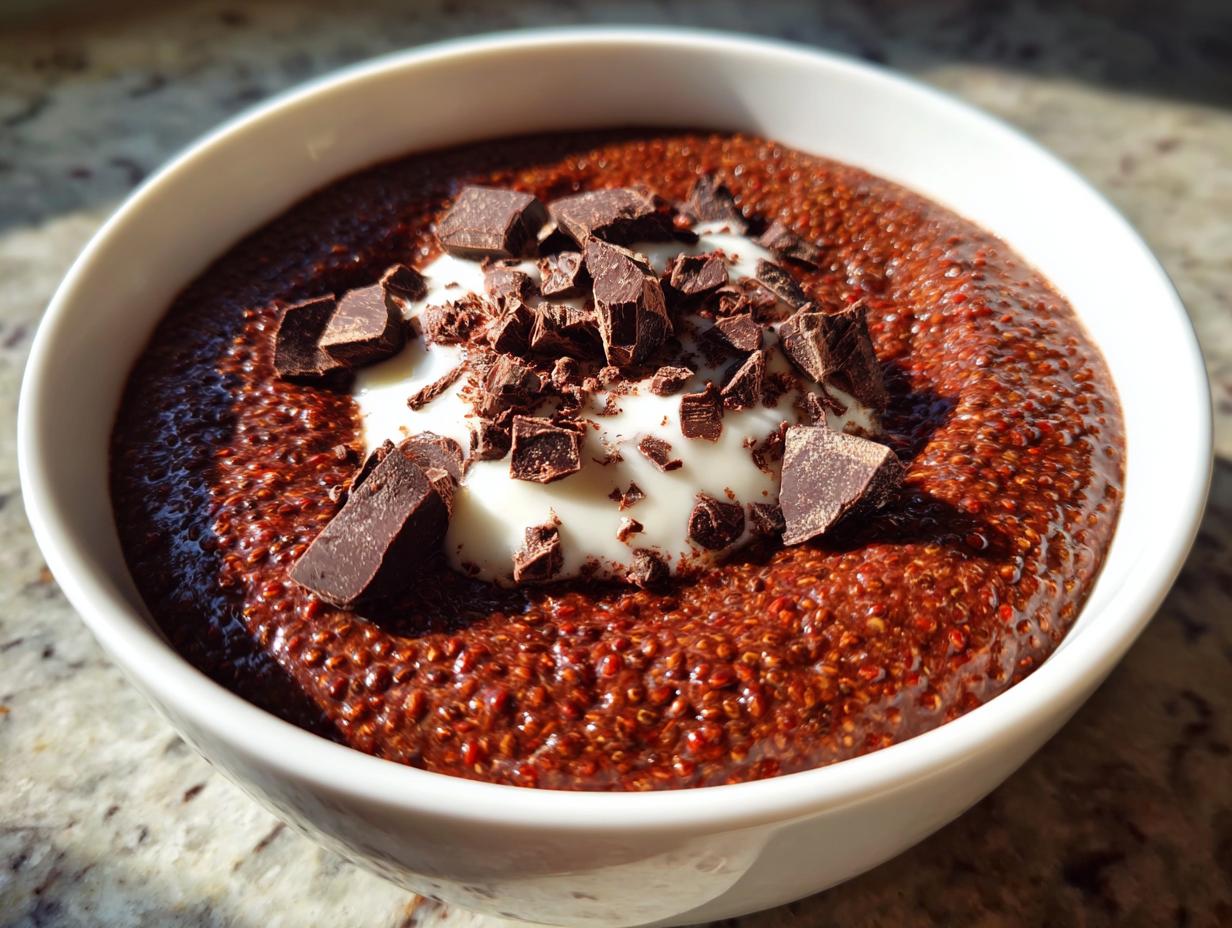
Once your pudding is perfectly set and you’ve given it that final, necessary stir, it’s time for the fun part: toppings! This is where your basic chocolate chia pudding transforms into a gorgeous, satisfying meal or dessert. I rarely eat mine plain because the toppings add such necessary texture contrast. If you are looking for other sweet treats, check out our recipe for chocolate sea salt nut bars.
The recipe notes mention coconut or Greek yogurt, and I highly recommend both. A dollop of cold, tangy yogurt cuts through the richness of the chocolate beautifully. For a true indulgence, sprinkle some finely chopped dark chocolate right on top. That little crunch when you bite into the smooth pudding is just divine. Seriously, don’t skip the crunch element!
You can also use fresh berries if you have them—raspberries are amazing with chocolate—or maybe some toasted nuts for extra healthy fat and crunch. Whatever you choose, make sure you add your toppings right before you eat it so they stay fresh and crisp!
Storing and Reheating Your Make-Ahead Breakfast
Because this is such a fantastic make-ahead breakfast, knowing how to store it is key. You can keep this sealed tightly in the refrigerator for up to four days without any real issue. Honestly, it tastes best on day two, but day four is perfectly fine! If you want to save this recipe for later, feel free to pin it on Pinterest.
The only thing you must remember is that during storage, the seeds will continue to absorb liquid, making it even thicker. So, before you dig into your stored chocolate chia pudding, give it a really good stir. You might even need to splash in a tiny bit—maybe a teaspoon—of extra milk or water to bring it back to that perfect, creamy consistency you loved right when you first made it. It’s super simple!
Common Questions About Chocolate Chia Pudding
I get asked these questions all the time when people try this recipe for the first time. Don’t sweat it if you’re wondering about these things; we’ve all been there when trying a new make-ahead breakfast!
Q1. Can I make this recipe sweeter?
Yes, absolutely! If you find the initial tablespoon of maple syrup isn’t quite enough for your sweet tooth, especially if you are using a very dark cocoa powder, just stir in another half teaspoon of sweetener right before you serve it. It’s much easier to adjust the flavor at the end than to try and fix it after it has set up.
Q2. How long can I store this in the fridge?
This keeps really well! I find it’s best within the first three days, but you can safely store your batch for up to four days. Just remember that it will thicken significantly over time, so you’ll definitely need to stir in a splash of milk before eating it later in the week.
Q3. What if I don’t have chia seeds? Can I use flax seeds instead?
You can substitute flax seeds, but the texture will be different. Flax seeds tend to create a much thicker, almost paste-like consistency rather than the pudding texture we are going for here. If you swap them, I recommend increasing the liquid slightly, perhaps by another tablespoon, to keep it spoonable.
Q4. My cocoa powder clumped up! What did I do wrong?
That’s the most common beginner mistake! You didn’t whisk hard enough at the very beginning. Make sure you beat that mixture vigorously right after adding the liquid to break up all those dry cocoa powder pockets before the seeds start absorbing everything.
Estimated Nutritional Data for This Recipe
I always tell people that while this recipe is wonderfully wholesome, paying too close attention to the exact numbers can sometimes take the joy out of cooking simple things. However, I wanted to give you a general idea of what you’re looking at here. Please remember that these numbers are just estimates based on standard ingredient averages, and they can change wildly depending on the brand of milk or the amount of maple syrup you decide to use!
This information is based on one full serving as prepared with standard unsweetened almond milk. Always treat these figures as a guideline!
| Nutrient | Amount (Approx.) |
|---|---|
| Calories | 220 |
| Total Fat | 11g |
| Carbohydrates | 24g |
| Protein | 7g |
| Saturated Fat | Unknown |

Amazing chocolate chia pudding in 5 minutes
- Total Time: 2 hours 5 minutes
- Yield: 1 serving
- Diet: Vegetarian
Description
Creamy chocolate chia pudding made with cocoa powder, chia seeds, and maple syrup. This is a wholesome, make-ahead breakfast or dessert.
Ingredients
- 3 tablespoons chia seeds
- 1 tablespoon maple syrup
- 1 tablespoon unsweetened cocoa powder
- 1/2 teaspoon vanilla extract
- 1 pinch sea salt
- 3/4 cup milk of choice (almond, oat, or cashew)
Instructions
- Add chia seeds, maple syrup, cocoa powder, vanilla, sea salt, and milk to a jar or bowl with a lid.
- Whisk or shake well until cocoa is fully mixed and no clumps remain.
- Cover and refrigerate for at least 2 hours or overnight until thickened.
- Stir once more before serving to ensure even texture.
- Spoon into a bowl and top with yogurt and chopped chocolate if desired.
Notes
- Optional toppings: coconut yogurt or Greek yogurt, finely chopped dark chocolate.
- This recipe works as breakfast, dessert, or a midday snack.
- Prep Time: 5 minutes
- Cook Time: 0 minutes
- Category: Dessert, Breakfast
- Method: No cook, Refrigeration
- Cuisine: American