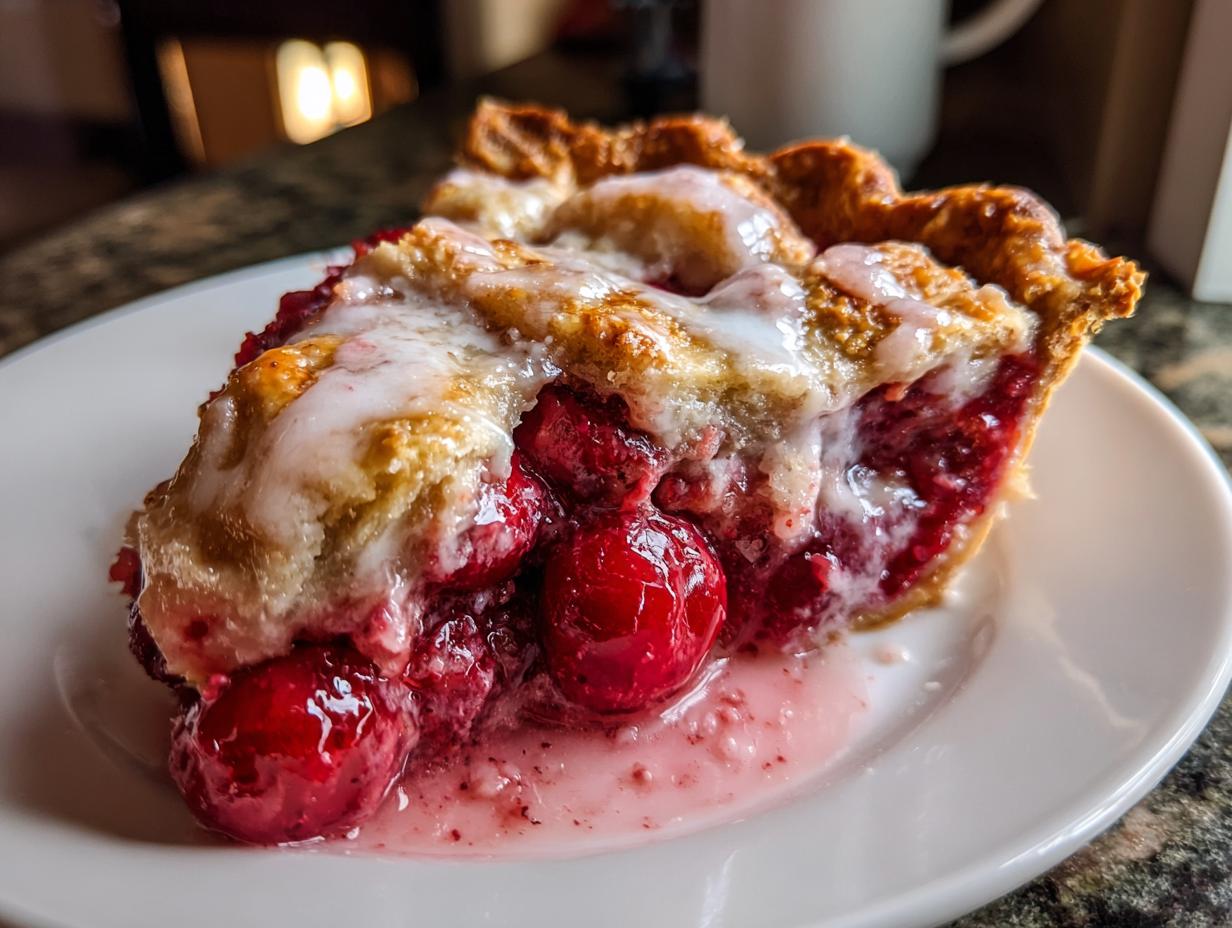
When you have a crowd coming over—and I mean a real crowd, not just Aunt Carol and the kids—you can’t mess around with fussy individual tarts. You need volume, and you need ease, which is why I’m obsessed with this cherry slab pie recipe. Forget trying to cram twelve cups of filling into standard pie dishes; this uses a giant sheet pan!
I used to dread making dessert for huge summer barbecues. Everything felt like a puzzle, trying to keep multiple pies warm or cool at the same time. But once I figured out how to scale this recipe down to fit a standard 13×19-inch pan, everything changed. This cherry slab pie is my secret weapon for feeding forty people without losing my mind.
The beauty of the slab pie isn’t just the yield; it’s how sturdy it is. You get that perfect, thick layer of juicy cherries, and the almond glaze on top? Oh, it just sings against the tart fruit. Trust me, once you try baking a giant pie like this, you’ll never go back to the small stuff for parties again.

Essential Components for Your Cherry Slab Pie
A dessert this big needs solid building blocks, right? You can’t just toss things in and hope for the best when you’re dealing with this much fruit. For this cherry slab pie to work its magic, we have to be very clear about what goes in and what tools we need. I’ve broken down the must-haves so you can pull everything out before you even turn the oven on.
Precise Ingredient Measurements for Cherry Slab Pie
Listen, the cherries are the star here, so they need to be perfect. You absolutely must pit and halve those twelve cups of fresh cherries. Don’t skimp on pitting them! Also, when it comes to the butter for dotting the top, make sure it’s cut into tiny little pieces—pea-sized is perfect. This ensures it melts evenly over the filling. The measurements for the almond extract are crucial too; too much, and it tastes like cough syrup, so stick exactly to the teaspoon amounts listed for the filling and the glaze in this cherry slab pie.
Equipment Needed for Sheet Pan Dessert Success
- A sturdy 13×19-inch rimmed baking sheet. This is non-negotiable for a slab pie!
- Two large mixing bowls—one for the fruit and one for everything else.
- A rolling pin capable of handling large sheets of dough.
- A pastry brush for getting that milk wash onto the crust just right.
- A wire cooling rack big enough to hold the entire pan.
Step-by-Step Guide to Making the Cherry Slab Pie
Okay, now for the fun part! This is where all that prep work pays off. Baking a dessert this large seems intimidating, but I promise you, once you see how simple the construction of this cherry slab pie is, you’ll be making it every chance you get. We need to move quickly once the fruit starts mixing, so make sure your oven is hot and ready before you begin.
Preparing the Crust and Cherry Filling Base for Your Cherry Slab Pie
First things first: get that oven cranked up to 400 degrees Fahrenheit. While it’s heating, take your 13×19-inch sheet pan and grease it well. Don’t skip this, or you’ll be crying when you try to get the first slice out! Take half of your pie dough—that’s enough for the bottom layer—and roll it out onto a lightly floured surface. You’re aiming for a rectangle that covers the whole bottom of the pan with a little extra hanging over the sides. Gently press it into the pan; don’t stretch it, or it will shrink back later. Set that aside.
Now for the filling of our incredible cherry slab pie. Grab your biggest bowl. Toss those pitted and halved cherries with the sugar, the flour, the lemon juice, and the almond extract. Mix it gently until everything looks coated. Let that sit on the counter for about ten minutes. You’ll notice the sugar starts pulling out the juices, creating that beautiful, thick syrup we want. That’s the sign that it’s ready to go onto the crust.

Assembling and Baking the Sheet Pan Pie
Once your fruit mixture has sat for a bit, spoon it carefully and evenly over that bottom crust you laid in the pan. Try to keep the fruit pile relatively flat. Next, take those two tablespoons of butter and cut them into tiny little pieces—we call this ‘dotting’ the top. These little pockets of fat melt down into the filling and make it richer. Now, roll out the remaining pie dough. You can either roll it into another full sheet to cover everything or, my favorite way, cut it into strips for a lattice top. A lattice lets you see that gorgeous filling bubbling up! If you are looking for other great baking ideas, check out our chocolate chip sweet sourdough recipe.
Arrange your top crust or lattice strips, and then crimp those edges shut with the bottom overhang. Make sure you seal it tight! Brush the entire top surface with a little milk or half-and-half—this helps it brown beautifully. Then, sprinkle that extra half cup of sugar all over the top. This is the secret to that crackly, sugary crust! Pop it into the hot 400-degree oven for exactly 10 minutes. After that initial blast, drop the temperature right down to 350 degrees. Keep baking it for another hour and forty to fifty minutes. You’ll know it’s done when the filling is thick and bubbling all over, and the crust is deep golden brown. Don’t rush this cooling step; it needs to set!
Creating the Almond Glaze and Finalizing Your Cherry Slab Pie
Resist the urge to cut into this beautiful creation immediately! You must let the entire cherry slab pie cool completely in the pan. I mean it—if you glaze it while it’s hot, the glaze will just melt right off into a puddle. Patience is key here; give it at least two hours, maybe more if your kitchen is warm. Cooling completely allows the filling to set up so it doesn’t run everywhere when you slice it.
Once it’s cool, it’s time for the final flourish. In a small bowl, whisk together the powdered sugar, the remaining teaspoon of almond extract, and just a splash of milk or half-and-half. You want a thick but pourable consistency. If it’s too thick, add a tiny bit more liquid; if it’s too thin, add more powdered sugar. Drizzle this lovely almond glaze artfully over the top of the cooled pie. Let it set for about 15 minutes until it stiffens up slightly, and then you are ready to serve this massive, glorious dessert! If you want a refreshing drink pairing, try our cranberry sparkling mocktail.

Tips for Perfecting Your Cherry Slab Pie Results
Making a giant pie like this is all about managing moisture and heat, which is why a few specific techniques make all the difference in this cherry slab pie. My biggest piece of advice, which I learned the hard way with a soupy berry pie years ago, is the cooling time. You cannot rush the cooling process! If you try to cut it warm, you’ll end up with a beautiful mess instead of neat squares. You can see more of our recipe tips on our Medium page.
Also, always taste a raw cherry before you start mixing if you can. If they are very tart, you might want to bump that granulated sugar up by another quarter cup—but only if they taste sour! The quality of your fruit dictates the final sweetness, so trust your taste buds. This recipe is designed for maximum flavor payoff, but it requires you to pay attention to those details.
Ingredient Notes and Simple Substitutions
If you can’t find twelve cups of beautiful, fresh cherries—which happens, I know—you can use frozen, but you must thaw them first and drain off almost all the liquid. If you skip draining, your filling will be watery, and that initial 10-minute high-heat bake won’t fix it. Just pat the thawed fruit dry with paper towels before tossing it with the sugar mixture.
For the milk or half-and-half used to brush the crust or in the glaze, heavy cream works wonderfully if you have it on hand. If you need a dairy-free alternative for the glaze, just use a little water mixed with a tablespoon of melted coconut oil—it helps the glaze set up nicely without tasting like coconut.
Understanding the Nutritional Profile of This Cherry Slab Pie
Since this cherry slab pie is built to serve a crowd, you might be curious about what you’re handing out per slice. Because we are dealing with so much fruit and a good amount of sugar to balance that tartness, it’s good to have a ballpark idea of the macros. Remember, these are estimates based on the ingredients listed, and they assume you cut the pie into 48 even servings—which is a lot of pie!
I always look at the fat content first because of the double crust, but honestly, for something this indulgent, 6 grams of fat per slice is pretty reasonable, especially considering how much fruit you’re getting. Here’s a quick look at what’s in a standard slice:
| Nutrient | Amount Per Serving |
|---|---|
| Calories | 180 |
| Fat | 6g |
| Carbohydrates | 29g |
| Protein | 2g |
Storing and Serving Your Large Batch Cherry Slab Pie
When you manage to have leftovers of this amazing cherry slab pie—which is rare at my house—you need a plan. Since this is a sheet pan dessert, storing it is super simple, but you cannot just wrap it up tightly right out of the gate. It needs to be completely cool and the glaze set before you even think about covering it. If you want to save this recipe for later, pin it on Pinterest!
The biggest question I always get is how to handle serving it once it’s been sitting for a day or two. Do you reheat it? Do you serve it cold? Here’s my quick guide for making sure every slice tastes as good as the first:
| Storage Method | Best For | Serving Tip |
|---|---|---|
| Covered, Room Temp (1-2 Days) | Short-term storage if the glaze is fully set | Serve as is, or slightly warmed (no glaze). |
| Airtight Container, Refrigerator (Up to 5 Days) | Longer storage | Let slices sit on the counter for 20 minutes before eating; this softens the crust. |
Common Questions About Making a Sheet Pan Pie
Since this recipe makes such a huge amount, I always get questions about adapting it or what to do if things look a little different than expected. Don’t worry if your edges are a little uneven; this is a rustic dessert, not a wedding cake!
Here are the three biggest things folks ask me about when they tackle a massive pie for the first time:
- Q: Can I use store-bought pie crust and still get a good result? Absolutely! When you are making this much filling, honestly, saving time on the dough is smart. Just make sure you buy the large, fold-out sheets if you can find them, or use about six standard 9-inch crusts worth of dough, rolled together.
- Q: My pie is taking way longer than the recipe says! What’s up? That’s normal, especially with a deep sheet pan filling. If your crust is browning too fast but the center is still soupy, you need to tent the edges with foil. That protects the crust while the middle finishes cooking.
- Q: Is 48 servings realistic? It is if you cut small squares, like for a tasting! If you are serving this as a main dessert after a big meal, plan more toward 30 generous slices. It’s better to have a little extra than to run out when everyone wants seconds!

Amazing cherry slab pie feeds 48 now
- Total Time: 2 hours 50 minutes
- Yield: 48 servings
- Diet: Vegetarian
Description
This cherry slab pie features fresh cherries and a sweet almond glaze. Bake it in a sheet pan for an easy, big-batch dessert ideal for large gatherings.
Ingredients
- 12 cups fresh cherries, pitted and halved
- 1½ cups granulated sugar
- ½ cup all-purpose flour
- 1 tablespoon almond extract
- 1 tablespoon lemon juice
- 2 tablespoons unsalted butter, cut into small pieces
- 6 pie crusts (store-bought or homemade, enough for a 13×19-inch pan)
- ⅓ cup milk or half-and-half (for brushing)
- ½ cup granulated sugar (for sprinkling)
- 1½ cups powdered sugar (for glaze)
- 1 teaspoon almond extract (for glaze)
- 2 tablespoons milk or half-and-half (for glaze)
Instructions
- Preheat oven to 400°F. Grease a 13×19-inch rimmed baking sheet.
- Roll out half of the pie crusts into a rectangle large enough to fit the sheet pan. Press into the pan, allowing a slight overhang.
- In a large bowl, toss cherries with sugar, flour, almond extract, and lemon juice. Let sit for 10 minutes to form syrup.
- Spoon cherry mixture evenly over the crust. Dot with butter.
- Roll out remaining pie crusts and cut into strips for a lattice top. Arrange over the filling, then fold and flute the edges.
- Brush the crust with milk and sprinkle with sugar.
- Bake for 10 minutes at 400°F, then reduce temperature to 350°F and bake for 1 hour 40–50 minutes, until the filling bubbles thickly and crust is golden brown.
- Cool completely in the pan.
- Whisk glaze ingredients together and drizzle over cooled pie. Let set 15 minutes before slicing.
Notes
- Use fresh cherries for the best flavor.
- Ensure the pie cools completely before applying the glaze.
- Prep Time: 1 hour
- Cook Time: 1 hour 50 minutes
- Category: Dessert
- Method: Baking
- Cuisine: American