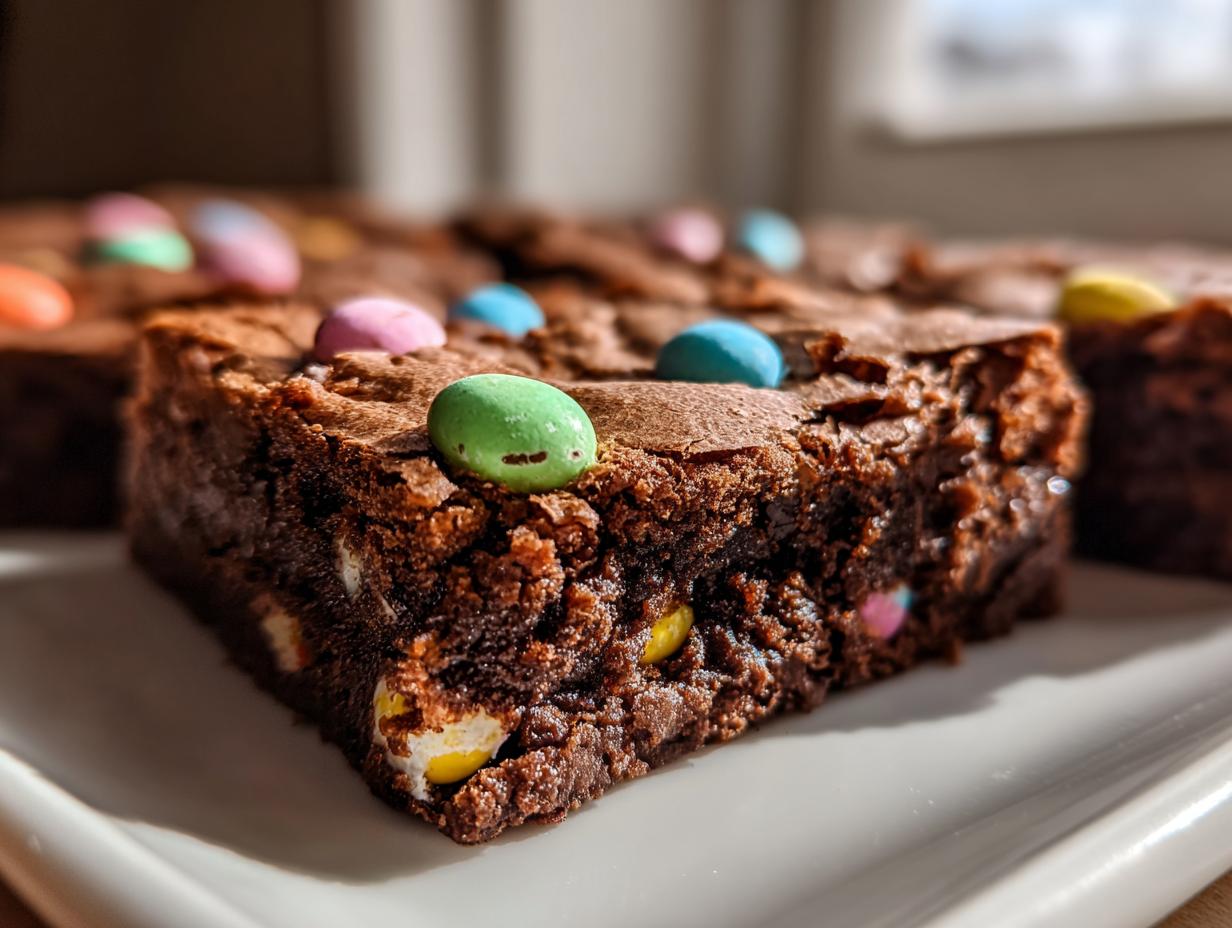
Oh my goodness, you are going to absolutely *adore* these! Forget those dry cakey squares you sometimes end up with when you try a new recipe. We are making the ultimate Fudgy Spring Pastel Brownies today, and I promise, they are foolproof, even if you usually shy away from baking. Seriously, my first attempt at a crinkle-top brownie ended up looking like volcanic rock, but this recipe? It’s different.
This recipe is my go-to whenever I need a guaranteed win for a spring gathering. The chocolate is deep and decadent, and those little pastel candy eggs just scream “happy!” I spent ages tweaking the ratios so that you get that perfect chewy edge and that melt-in-your-mouth fudge center every single time. It’s all about that glorious, paper-thin, shiny crust on top. Trust me, once you master this technique, you’ll never go back to the box mix again. Let’s get messy!

Essential Ingredients for Fudgy Spring Pastel Brownies
Okay, listen up, because the quality of your ingredients is what separates a good brownie from the *best* Fudgy Spring Pastel Brownies you’ll ever eat. We aren’t cutting any corners here! I’ve listed the exact amounts, so grab your measuring cups and let’s talk specifics for this amazing chocolate treat.
Dry Components and Chocolate Selection
For the dry stuff, you need exactly 3/4 cup of flour, and you must spoon it into your measuring cup and level it off—don’t scoop straight from the bag, or you’ll pack it in and make your brownies cakey! We use Dutch-process cocoa powder because it gives that deep, dark chocolate flavor that really makes these fudgy. For the main chocolate flavor, use a good quality 4 ounces of semi-sweet baking chocolate bar, chopped up nicely. Skip the chips if you can; the bar melts so much smoother!
Wet Ingredients and Flavorings
This is where the magic starts! Make sure your two large eggs are at room temperature; this helps them whip up huge later on. We use 1/2 cup of melted salted butter, which adds richness. Instead of plain vanilla extract, I insist on vanilla bean powder if you have it—it adds tiny little flecks of flavor that just elevate everything. It’s a small thing, but trust me, it makes a difference in the final taste.
Equipment Needed to Create Fudgy Spring Pastel Brownies
You don’t need a million fancy gadgets to make these incredible Fudgy Spring Pastel Brownies, but you do need a couple of specific things to get that perfect texture. First things first, grab an 8×8 inch square baking pan. That size is crucial for getting the right depth and set on the edges.
You’ll need a heatproof bowl for melting that beautiful chocolate—the microwave works great, but be careful! Also, you need a large mixing bowl, preferably glass or metal, for whipping up that egg foam. Honestly, the biggest tool here isn’t electric; it’s your arm power for whisking, or if you must, a hand mixer. And please, have a silicone spatula ready for gentle folding later!
Step-by-Step Instructions for Fudgy Spring Pastel Brownies
Alright, let’s get down to business! Making these Fudgy Spring Pastel Brownies is a process, but every single step serves a huge purpose, especially when it comes to that shiny top layer everyone raves about. Don’t rush the mixing part, and you’ll have bakery-quality results right in your own kitchen! If you want to see more of my baking tips, check out my baking insights on Medium.
Preparing the Pan and Chocolate Base
First, get your oven warmed up to 350°F. I always line my 8×8 inch pan with parchment paper, but here’s the trick: leave an overhang on two sides. You want “handles” so you can lift the entire cooled brownie slab out later—it makes slicing so much cleaner. Next, deal with your chocolate. Coarsely chop those 4 ounces of semi-sweet bar. Pop it in a microwave-safe bowl and zap it in short 20-second bursts, stirring well between each one until it’s totally smooth and glossy. Set that aside to cool just a tiny bit while you work on the wet ingredients.
Creating the Shiny Crinkle Top: The Egg Foam Technique
This is the most important step for achieving that signature crinkle top—don’t skip the time here! In your large mixing bowl, whisk together your melted butter and sugar for about two minutes until they look happy and combined. Now, add your room-temperature eggs and the vanilla bean powder. You need to whisk this mixture vigorously, either by hand or with your mixer, for a full five minutes. Seriously, five minutes! It will change color from yellow to pale and look thick and airy, almost like a loose meringue. This step incorporates the air that creates the crust when it bakes. If you skimp here, you won’t get that beautiful crackle! If you need a refresher on how to whip eggs properly, check out my cottage cheese scrambled eggs guide for whisking tips.
Combining and Baking Your Fudgy Spring Pastel Brownies
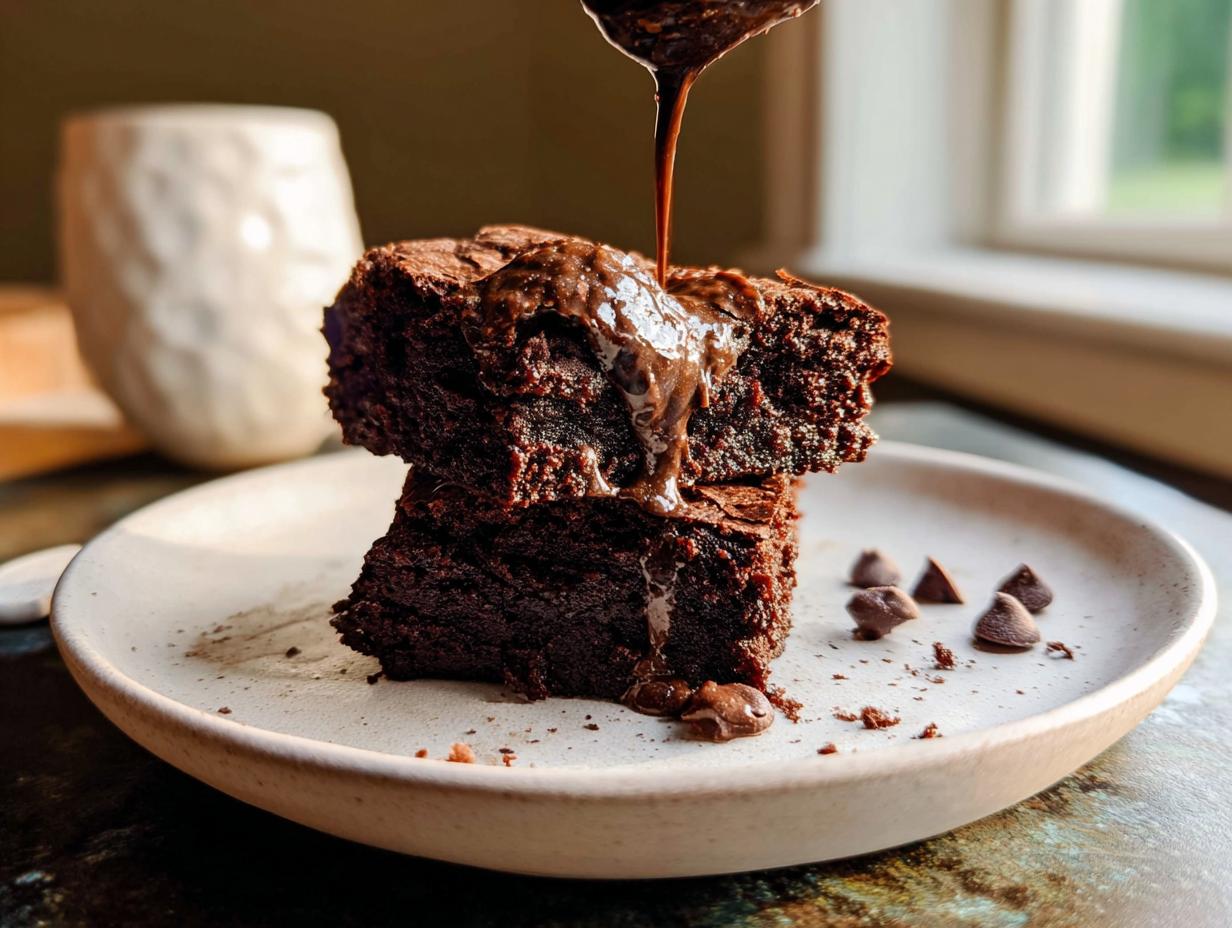
Once your eggs are foamy, drizzle in that smooth melted chocolate and gently fold it in—we don’t want to deflate all that air we just worked so hard to create! Now, sift your dry ingredients—the flour, cocoa powder, and salt—right over the top of the wet mixture. Use your spatula and fold gently until you just can’t see any more dry flour streaks. Overmixing here makes tough brownies! Finally, fold in that cup of roughly chopped pastel candy eggs. Pour the batter into your prepared pan, smooth the top, and then press the remaining whole candy eggs right onto the surface for decoration. Bake these beauties for about 25 to 28 minutes. You want the edges set, but the center should still feel a little soft when you gently nudge the pan.

Tips for Achieving Perfect Fudgy Spring Pastel Brownies
Getting these Fudgy Spring Pastel Brownies right is all about respecting the timing and temperature. The biggest mistake people make is slicing them when they are still warm! I know, I know, the smell is intoxicating, but resist the urge! If you cut them hot, they’ll just collapse into a gooey puddle because the structure hasn’t set properly. You absolutely must let them cool completely in the pan on a wire rack.
Remember that vigorous five-minute whisking session for the eggs and sugar? That is your secret weapon for the shiny crinkle top. Don’t stop early thinking you’re done; you need that mixture to get pale and voluminous. Also, when you fold in the dry stuff, be gentle! It’s a balancing act between mixing enough so there’s no dry flour left and not mixing so much that you knock out all that lovely air. If you follow those rules, you’ll nail the fudgy texture every time. For more baking inspiration, follow me on Pinterest!
Another thing: use room temperature eggs. Cold eggs just don’t whip up the same way, and it affects the final volume needed for that perfect crackle on your Fudgy Spring Pastel Brownies.
Ingredient Notes and Substitution Guidance
I know measuring can sometimes feel like chemistry homework, but for these Fudgy Spring Pastel Brownies, precision matters, especially with the flour. Please, please, please spoon the flour into your measuring cup and then level it off with a straight edge. If you just scoop it, you end up packing in way too much, and that ruins the fudgy texture we are aiming for. You want light, airy flour, not a dense brick!
Also, while I absolutely adore the vanilla bean powder for those tiny little flavor specs, if you don’t have it on hand, don’t panic! You can safely substitute it with 1 teaspoon of good quality, pure vanilla extract. Just make sure it’s pure, not imitation! For the chocolate, stick to the semi-sweet bar for the best melt, but if you are in a pinch and only have semi-sweet chocolate chips, they will work, though the final texture might be slightly less smooth. If you’re looking for other chocolate recipes, check out my hot chocolate cookies recipe.
Serving Suggestions for Your Fudgy Spring Pastel Brownies
Once you finally manage to slice these gorgeous Fudgy Spring Pastel Brownies, the fun really begins! Since they are so rich and chocolatey on their own, you don’t need much fuss. For a really simple spring dessert, a tiny dollop of freshly whipped cream is perfect—it adds lightness without overpowering the chocolate.
If you want to lean into that spring theme, a light dusting of powdered sugar mixed with a tiny pinch of freeze-dried strawberry powder makes a beautiful pinkish hue. I also love serving them slightly chilled alongside a scoop of simple vanilla bean ice cream. The contrast between the cold ice cream and the dense, fudgy brownie is just divine! You can also find me sharing recipe photos on Facebook.
Storing and Reheating Your Fudgy Spring Pastel Brownies
The best part about these Fudgy Spring Pastel Brownies is that they actually taste even better the next day once the structure has fully set up! That fudgy texture you worked so hard for stays put, provided you store them correctly. We definitely don’t want them drying out, especially with all those candy eggs in there!
The key to keeping them fresh is cutting down on air exposure. Once they are completely cool—and I mean stone cold—you need to wrap them up tight. I usually cut them into squares first, and then wrap each individual brownie tightly in plastic wrap before placing them into an airtight container. This keeps the edges soft and the center perfectly moist.
Storage and Freshness Table
| Storage Method | Duration | Optimal Conditions for Fudgy Texture |
|---|---|---|
| Airtight Container (Room Temp) | Up to 3 days | Keep sealed tightly on the counter, away from direct heat or sunlight. |
| Airtight Container (Refrigerated) | Up to 5 days | Store on the counter first; chill only if needed for longer storage. Bring back to room temp before serving. |
| Freezer (Wrapped Individually) | Up to 3 months | Wrap tightly in plastic wrap, then foil. Thaw on the counter for several hours. |
If you do store them in the fridge, don’t eat them straight out of the cold! Cold mutes the chocolate flavor and makes them too firm. Just let them sit on the counter for about an hour before serving, or microwave an individual square for just 10 seconds. That little bit of warmth brings back all that wonderful, gooey fudginess! If you are interested in other baked goods, check out my recipe for sheet pan cookie bars.
Frequently Asked Questions About Fudgy Spring Pastel Brownies
I get so many wonderful messages about these brownies! It’s exciting when people try to recreate my favorite Fudgy Spring Pastel Brownies. Here are some of the questions I get asked most often about getting that perfect texture and timing right.
Why are my brownies not fudgy enough?
Usually, if your brownies aren’t fudgy, it comes down to two main things. First, you might have used too much flour because you scooped instead of spooned and leveled it. That extra flour turns them cakey fast! Second, and this is a big one, you didn’t whisk the eggs and sugar long enough. If you stop whisking before that mixture gets pale, thick, and voluminous—that five-minute mark—you won’t develop the structure needed for that signature shiny crust and dense interior. The chocolate ratio is also key; make sure you use the full 4 ounces of quality baking bar!
Can I make these ahead of time?
Absolutely! In fact, I highly recommend it. These Fudgy Spring Pastel Brownies are better the next day. Once they are completely cooled, wrap them tightly as I described in the storage section. They hold up beautifully at room temperature for about three days. Letting them sit overnight allows the moisture to redistribute, making them even fudgier and easier to slice cleanly. You don’t want to leave them uncovered for even a second!
Sharing Your Fudgy Spring Pastel Brownies Experience
I truly hope you loved making these Fudgy Spring Pastel Brownies as much as I love baking them for my family! When you pull that shiny, crinkle-top slab out of the oven, I want to see it! Please come back here and leave a star rating—it helps other folks know this recipe is a winner.
And if you snap a picture of those colorful candy eggs shining on top, tag me on social media! Sharing our baking successes is the best part of having a community in the kitchen.
Print
Breathtaking Fudgy Spring Pastel Brownies 5
- Total Time: 43 minutes
- Yield: 16 brownies
- Diet: Omnivore
Description
Decadent, crinkle-top chocolate squares studded with crunchy, candy-coated chocolate eggs. These achieve a chewy edge and a soft, fudge-like center.
Ingredients
- 4 ounces semi-sweet baking chocolate bar, coarsely chopped
- 1/2 cup salted butter, melted
- 1 cup granulated sugar
- 2 large eggs, room temperature
- 1 teaspoon vanilla bean powder (non-alcoholic)
- 3/4 cup all-purpose flour, spooned and leveled
- 1/4 cup unsweetened Dutch-process cocoa powder
- 1/2 teaspoon fine sea salt
- 1 cup pastel candy-coated chocolate eggs, roughly chopped
- 1/4 cup additional whole pastel chocolate eggs for topping
Instructions
- Preheat your oven to 350°F and line an 8×8 inch square baking pan with parchment paper, leaving an overhang on the sides for easy removal.
- Place the chopped semi-sweet chocolate in a heatproof bowl and microwave in 20-second intervals, stirring in between, until completely smooth.
- Whisk the melted butter and granulated sugar together in a large mixing bowl for 2 minutes until fully combined and slightly cooled.
- Add the room-temperature eggs and vanilla bean powder to the butter mixture.
- Vigorously whisk the egg mixture by hand or with a mixer for 5 full minutes until it becomes pale, thick, and voluminous.
- Pour the melted chocolate into the egg foam and gently fold it in until just combined.
- Sift the flour, cocoa powder, and sea salt directly over the wet ingredients.
- Fold the dry ingredients into the batter using a silicone spatula just until no flour streaks remain.
- Gently stir in the 1 cup of chopped candy-coated chocolate eggs.
- Pour the batter into the prepared pan and smooth the top into an even layer.
- Press the remaining 1/4 cup of whole chocolate eggs into the surface of the batter for decoration.
- Bake for 25 to 28 minutes until the edges are set and pull slightly away from the pan, but the center remains slightly soft.
- Allow the brownies to cool completely in the pan on a wire rack to set the structure before slicing.
Notes
- Whisking the eggs and sugar to a pale ribbon stage creates the paper-thin shiny crust.
- Use room temperature eggs for the best volume when whisking.
- Cool the brownies completely before slicing for clean cuts.
- Prep Time: 15 minutes
- Cook Time: 28 minutes
- Category: Dessert
- Method: Baking
- Cuisine: American