If you’re looking for that perfect, rich, hearty dinner for a cold night, stop scrolling right now! Seriously, this Dutch oven chili ground beef recipe is my absolute go-to, and I promise, it tastes like it simmered for days, even though it’s surprisingly beginner-friendly. I’ve made this chili countless times for family events, and the secret isn’t fancy ingredients; it’s all about how you treat the beef in that heavy pot.
Because I’ve been perfecting this for years, I can tell you exactly where the flavor comes from—that deep, dark crust you get on the bottom of the pot. That crust, which we call fond, is pure gold. My goal here is to show you how to safely build that incredible depth of flavor using just basic ground beef and a few simple spices. You won’t need any fancy equipment, just your trusty Dutch oven. Trust me, once you master this technique, you’ll never look back!

Ingredients for Your Dutch Oven Chili Ground Beef
Gathering your ingredients is half the fun! For the best Dutch oven chili ground beef, you need quality staples. I always use 85/15 ground beef because it gives you just the right amount of fat needed for flavor, but you can absolutely adjust that if you want something leaner. Make sure your vegetables are diced consistently so they cook evenly.
Don’t skimp on that canned tomato department either; having crushed, sauced, and diced tomatoes adds layers to the final texture, which is so important!
Essential Components for Rich Flavor
- 2 pounds of 85/15 ground beef
- 1 tablespoon of olive oil
- One large yellow onion and two different colored bell peppers (I love the sweet flavor they add)
- A whole head of garlic—yes, 4 cloves minced!
- Two big cans of crushed tomatoes, one can of tomato sauce, and one can of diced tomatoes
- 2 cups of beef broth
- All three cans of beans—kidney, black, and whatever else you might have on hand!
Flavor Builders and Spices
This is where the magic happens, so don’t substitute these spices! We need serious depth here. You’ll want a generous amount of chili powder—about 3 tablespoons—to give it that classic kick. Then, bring in the earthy tones with ground cumin and smoked paprika. I also add oregano and a little granulated garlic for that extra punch. These spices bloom beautifully when you toast them briefly.
Preparing Your Dutch Oven Chili Ground Beef Step-by-Step
Okay, this is the most important part! If you follow these steps exactly, your Dutch oven chili ground beef will taste incredible. We are building layers of flavor starting right from the bottom of that heavy pot. Grab your 6-quart Dutch oven, and let’s get cooking!
Building the Base: Browning the Beef
First things first: heat that olive oil over medium-high heat until it’s shimmering—you want it hot enough to give that beef a good sear. Now, add your two pounds of ground beef, along with the salt and pepper. Here is my absolute non-negotiable tip: Let it sit! Don’t touch it for a full 5 minutes. You want a deep, dark brown crust to form on the bottom of the pot. This crust is where all the rich chili flavor comes from, and if you stir it too soon, you just end up steaming the meat.
After those 5 minutes, break the beef up with a sturdy spoon into nice, bite-sized chunks. Keep cooking until all the pink is gone and everything is nicely browned. Remember, for food safety, we need that beef cooked all the way through to at least 160°F, but we’re also aiming for texture here!
Sautéing Aromatics and Toasting Spices
Once the beef is browned, reduce the heat slightly to medium. Now toss in your diced onion and both bell peppers. Cook these down for about 6 or 7 minutes. You want them soft and slightly sweet, letting the onion turn translucent. This softens the harsh bite of the raw veggies!
Next up, the spice party! Stir in your minced garlic, chili powder, cumin, smoked paprika, oregano, and granulated garlic. Keep stirring for just one minute. This step is called blooming the spices, and you’ll instantly smell the difference—it wakes up all those dried herbs and makes your kitchen smell amazing. Don’t let the garlic burn; that minute is all it needs.
The Low and Slow Simmer in the Dutch Oven
Time to bring in the liquids! Pour in the crushed tomatoes, tomato sauce, diced tomatoes, and the beef broth. Give everything a good stir to scrape up any little flavorful bits stuck to the bottom—that’s flavor we don’t want to lose! Add in your rinsed and drained beans and mix it all together thoroughly.
Turn the heat up high until the whole pot is boiling hard. Once it hits that rolling boil, immediately drop the heat down to low. We want a gentle simmer—just little bubbles breaking the surface occasionally. Now, cover the pot partially (I like to leave a small gap) and let it go for at least 90 minutes, but honestly, 2 hours is better for this Dutch oven chili ground beef. You need to stir it every 20 to 30 minutes so nothing sticks to the bottom and burns. That long simmer is what tenderizes the beef and thickens the sauce perfectly!

Tips for Truly Great Dutch Oven Chili Ground Beef
Even with a straightforward recipe like this Dutch oven chili ground beef, a few little tricks can take it from good to absolutely legendary. I learned these the hard way, so please take notes! If you skip these simple things, you might end up with something soupy or bland, and we certainly don’t want that.
Achieving Deep Browning Without Steaming
Remember when I told you to let the beef sit undisturbed? That’s crucial, but if you have 2 pounds of beef, you can’t just dump it all in and expect it to brown. If you overcrowd the pot, the meat releases its juices and just steams itself into gray mush. If you see the bottom of your pot looking crowded when you first add the meat, stop! Take half the beef out, brown it in batches, and then add the first batch back in before moving on to the next. Proper browning equals amazing flavor.
Adjusting Consistency and Seasoning
Around the 90-minute mark, give that chili a serious taste test. This is when you adjust everything. If it tastes a bit too bright or acidic from the tomatoes, stir in just a tiny pinch of sugar—it balances things out instantly. If it seems thin, take the lid off completely for the last 30 minutes of simmering so some liquid can evaporate. If it needs more depth, add another half teaspoon of chili powder. Don’t be afraid to season as you go!
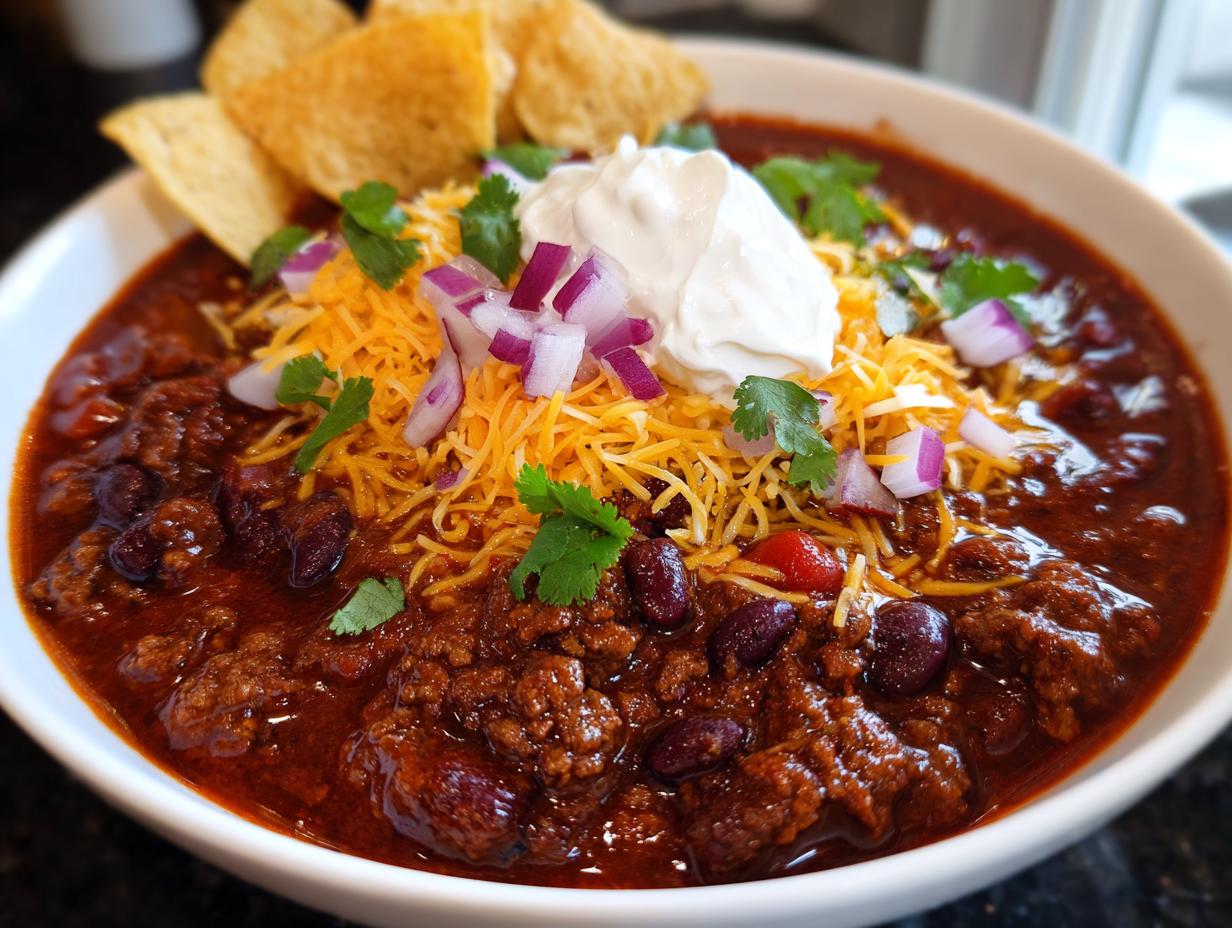
Serving Suggestions for Your Hearty Beef Chili
Once your hearty beef chili has simmered away and developed that incredible flavor, the fun part is piling on the toppings! This chili base is rich and savory, so you need cool, creamy, and crunchy elements on top. My absolute favorite way to serve it is loaded high in a bowl. If you are looking for other hearty dinner ideas, check out my creamy white chicken chili recipe!
You definitely need a mountain of shredded cheddar cheese—it melts beautifully into the hot beef. Don’t forget a big dollop of sour cream right in the middle. I love the bite from freshly diced red onion and a sprinkle of bright cilantro. And of course, you need tortilla chips for dipping, or maybe even crumbled on top for extra crunch!
Storing and Reheating Your Leftover Chili
The best part about making a big batch of Dutch oven chili ground beef is that it tastes even better the next day! Honestly, the flavors really meld together overnight, so don’t feel bad if you aren’t hungry right away. You did the hard work, now let the chili rest! If you want to see more of my favorite comfort food recipes, check out my cozy winter loaded chicken chili bake.
Optimal Storage Methods
When it comes to storing your chili, you need an airtight container. Make sure the chili has cooled down completely on the counter before you seal it up and put it in the fridge. It should stay perfectly good in the refrigerator for up to five days—which is great for quick lunches! If you know you won’t get to it that fast, it freezes like a dream for up to three months. Just portion it out before freezing so you can thaw what you need.
Simple Reheating Techniques
Reheating is super easy. I usually prefer the stovetop because you can control the heat best. Just put the chili in a saucepan over medium-low heat, stirring occasionally until it’s steaming hot all the way through. If you’re in a rush, the microwave works fine, but make sure you use a microwave-safe bowl and heat it in short bursts, stopping to stir in between so you don’t get hot spots!
Frequently Asked Questions About Dutch Oven Chili Ground Beef
I get so many questions about this recipe because everyone wants their first batch of Dutch oven chili ground beef to be perfect. Here are a few things I hear most often, along with my best tips! For more cooking inspiration, follow along on Pinterest.
Q1. Can I substitute the ground beef with something else?
You certainly can try, but you’ll lose some of that classic, rich texture that comes from browning the beef fat. If you must substitute, use ground turkey or chicken, but you’ll need to add an extra tablespoon of olive oil and maybe a little extra smoked paprika because those meats are leaner and won’t self-baste the way 85/15 beef does.
Q2. Why is the simmering time so long?
That long, slow simmer—90 minutes minimum—is what transforms simple ingredients into deep, comforting flavor. It allows the spices to fully meld with the tomatoes and broth, and it ensures the beef is incredibly tender. If you rush it, it tastes like canned soup, not homemade chili!
Q3. What if my chili is too acidic after simmering?
This is a common issue with canned tomatoes, especially during certain seasons. Don’t panic! The fix is simple: taste it at the 90-minute mark. If it’s too sharp, stir in just a half teaspoon of granulated sugar or a tiny splash of apple cider vinegar. It rounds out the acidity instantly. Trust me, a little sugar works wonders in chili. You can also find more general cooking tips on my Medium page.
Q4. Do I really have to brown the beef undisturbed for 5 minutes?
Yes, please do! That initial 5 minutes without stirring creates that dark, flavorful crust—the fond—on the bottom of your Dutch oven. If you break it up right away, you boil the meat instead of searing it, and you miss out on the best part of making Dutch oven chili ground beef.
Sharing Your Dutch Oven Chili Ground Beef Experience
I put all my heart into perfecting this recipe, and now it’s your turn! When you make this Dutch oven chili ground beef, please come back and tell me how it went. Did you love the deep flavor from the long simmer? Rate the recipe below and leave a comment. I absolutely love seeing your photos when you share your bowls! Don’t forget to connect with us on Facebook too!
Print
Amazing Dutch oven chili ground beef 2 hour magic
- Total Time: 2 hours 30 minutes
- Yield: 8 servings
- Diet: Omnivore
Description
Make hearty Dutch oven chili with ground beef. Simple browning and low-and-slow simmering create deep, rich flavor perfect for cold winter nights. This recipe is beginner-friendly.
Ingredients
- 1 tablespoon olive oil
- 2 pounds 85/15 ground beef
- 1 teaspoon salt
- 1/2 teaspoon black pepper
- 1 large yellow onion, diced
- 1 green bell pepper, seeded and diced
- 1 red bell pepper, seeded and diced
- 4 cloves garlic, minced
- 3 tablespoons chili powder
- 1 tablespoon ground cumin
- 1 tablespoon smoked paprika
- 1 teaspoon dried oregano
- 1 teaspoon granulated garlic
- 1 can (28 ounces) crushed tomatoes
- 1 can (15 ounces) tomato sauce
- 1 can (15 ounces) diced tomatoes
- 2 cups beef broth
- 2 cans (15 ounces each) kidney beans, drained and rinsed
- 1 can (15 ounces) black beans, drained and rinsed
- Shredded cheddar cheese (for serving)
- Sour cream (for serving)
- Diced red onion (for serving)
- Fresh cilantro (for serving)
- Tortilla chips (for serving)
Instructions
- Heat olive oil in a 6-quart Dutch oven over medium-high heat until shimmering, about 2 minutes.
- Add ground beef, salt, and black pepper to the hot Dutch oven and let it cook undisturbed for 5 minutes until the bottom develops a deep brown crust.
- Break up the beef with a wooden spoon or spatula into bite-sized chunks and continue cooking, stirring occasionally, until no pink remains and beef is browned all over, about 5 more minutes.
- Add diced onion and bell peppers to the pot, reduce heat to medium, and cook for 6-7 minutes until vegetables soften and onion becomes translucent.
- Stir in minced garlic, chili powder, cumin, smoked paprika, oregano, and granulated garlic, cooking for 1 minute until fragrant.
- Pour in crushed tomatoes, tomato sauce, diced tomatoes, and beef broth, then add drained beans and stir to combine everything thoroughly.
- Bring the mixture to a boil over high heat, then reduce heat to low so the chili maintains a gentle simmer with occasional bubbles breaking the surface.
- Simmer uncovered for 90 minutes to 2 hours, stirring every 20-30 minutes to prevent sticking and ensure even cooking.
- Taste the chili after 90 minutes and continue simmering if deeper flavor is desired; the beef should be tender and the liquid thickened.
- Let the chili rest off the heat for 10-15 minutes before serving.
- Serve hot topped with shredded cheese, sour cream, diced onion, cilantro, and tortilla chips. Cook all ground beef to 160°F for food safety.
Notes
- Do not overcrowd the pot when browning beef; work in batches if needed to achieve proper browning instead of steaming.
- Partially cover the Dutch oven during the first hour of simmering, then uncover for the final 30 minutes to thicken.
- Taste at the 90-minute mark and adjust seasoning with salt, chili powder, or a pinch of sugar to balance acidity.
- Chili tastes better the next day after flavors meld overnight.
- Let the beef cook undisturbed for the first 5 minutes to develop a flavorful crust before breaking it apart.
- Storage: Store cooled chili in an airtight container in the refrigerator for up to 5 days or freeze for up to 3 months. Reheat on the stovetop or microwave.
- Prep Time: 15 minutes
- Cook Time: 2 hours 15 minutes
- Category: Main Dish
- Method: Stovetop Simmering
- Cuisine: American