Okay, listen up, because you absolutely NEED to know about this Hawaiian Roll Mini Grilled Cheese Recipe Easy Party Snack. I swear, the last time I threw a get-together, these little guys were GONE in minutes. My kids were literally fighting over the last one, and they’re usually pretty picky!
Seriously, these are the ultimate crowd-pleaser. They’re ridiculously easy to make, they taste like pure cheesy happiness, and they’re always a HUGE hit. Get ready to wow your friends and family with minimal effort!
Why You’ll Love This Hawaiian Roll Mini Grilled Cheese Recipe
- Ridiculously Easy to Make: Seriously, the hardest part is slicing the rolls, and even that’s a breeze. You can whip these up in about 10 minutes, leaving you more time to actually hang out with your guests!
- Super Speedy: Need a last-minute appetizer? These bake up in just 15 minutes, so you can go from zero to hero snack-maker in no time at all.
- Pure Cheesy Bliss: Who doesn’t love a good grilled cheese? We’re talking buttery, golden-brown Hawaiian rolls stuffed with gooey, melted cheddar. It’s comfort food perfection in a bite.
- The Ultimate Party Pleaser: These mini sandwiches are bite-sized, mess-free, and disappear faster than you can say “more cheese, please!” They’re perfect for game days, birthdays, holidays, or just a Tuesday night craving.
Ingredients for Your Easy Party Snack Hawaiian Roll Mini Grilled Cheese
- 12 Hawaiian rolls (the little slider-sized ones are perfect!)
- 6 slices cheddar cheese (your favorite kind, sharp or mild works great!)
- 4 tablespoons unsalted butter, melted (don’t skimp here, it makes them golden!)
- 1 teaspoon garlic powder (for that savory kick)
- 1 tablespoon chopped fresh parsley (adds a pop of color and freshness)
Step-by-Step Instructions for the Easiest Hawaiian Roll Mini Grilled Cheese
Step 1: First things first, get that oven preheated to 375°F (that’s 190°C for my friends across the pond!). While it’s warming up, grab a baking sheet or a small baking dish and line it with parchment paper. This is my little trick to make cleanup a breeze – no stuck-on cheese here!
Step 2: Now for the fun part: slicing the Hawaiian rolls! You want to slice them all in half horizontally – think like you’re making little slider buns. The key here is to try and keep all the bottom halves together and all the top halves together. I usually do this with a good serrated knife, making sure not to cut all the way through to the other side on the top half.
Step 3: Lay out the bottom half of your sliced rolls on that prepared baking sheet. Make sure they’re not all squished together; give them a little breathing room so they get nice and toasty.
Step 4: Time for the gooey goodness! Layer your cheese slices evenly over the bottom half of the rolls. I find that one slice per roll is perfect, but hey, you do you! More cheese never hurt anyone, right?
Step 5: Gently place the top half of the rolls back on top of the cheese. Just a light press is all you need. They should sit nicely, ready for their buttery bath. These are always a huge hit, right alongside a big bowl of easy guacamole!
Step 6: In a small bowl, whisk together your melted butter and garlic powder. This is where the magic happens! I find that brushing the butter evenly ensures a consistent golden-brown crust, and the garlic powder adds just that little something extra. Trust me, don’t skip this step!
Step 7: Liberally brush this glorious butter mixture all over the tops of your assembled mini sandwiches. Get into all the nooks and crannies! This is what gives them that irresistible golden finish.

Step 8: Pop them into your preheated oven and bake for about 12 to 15 minutes. Keep an eye on them – you want the tops to be a beautiful golden brown and the cheese to be all melty and delicious. If your oven tends to run hot, you might want to loosely cover them with foil for the first half of the baking time so the tops don’t get too dark before the cheese melts.
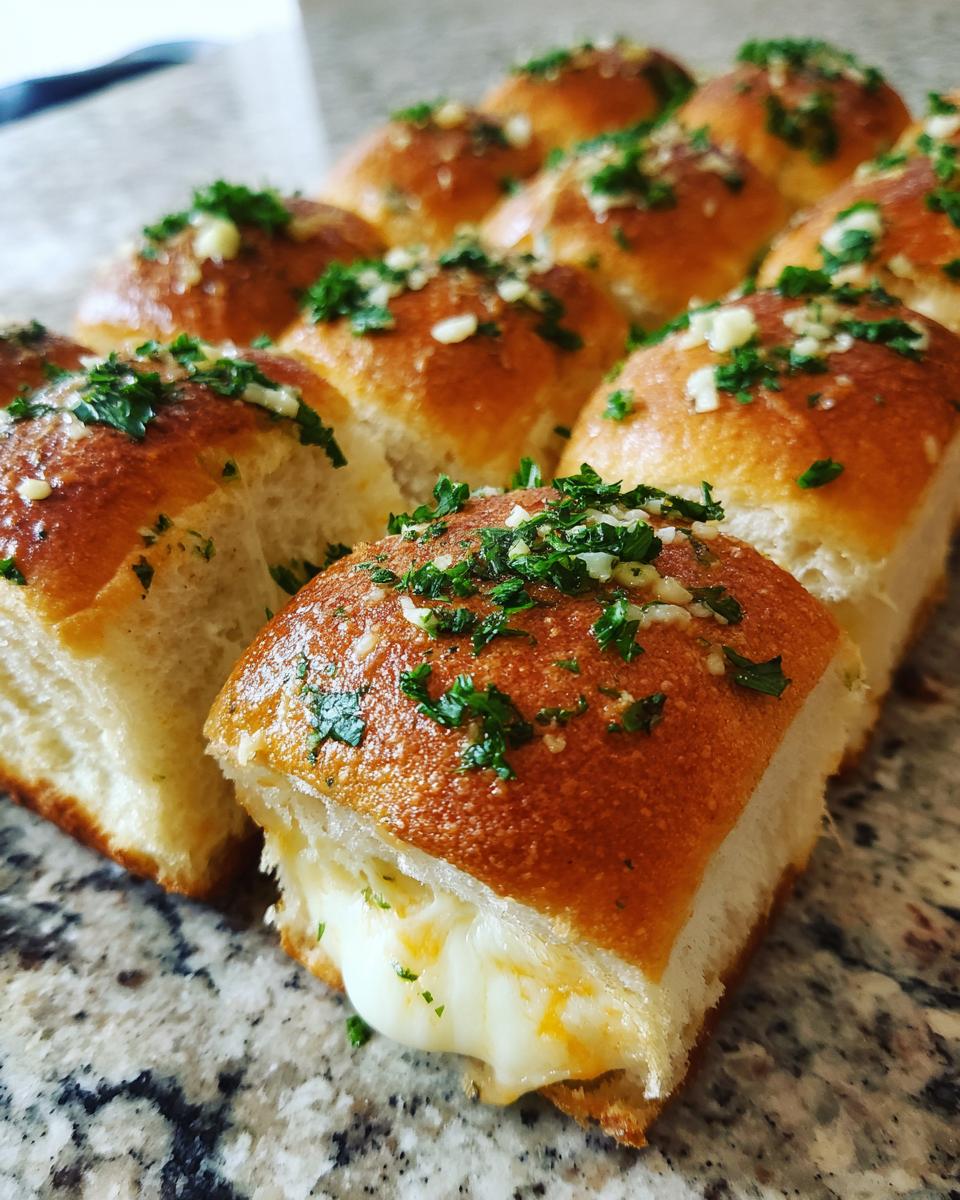
Step 9: Once they’re out of the oven and look amazing, sprinkle them with your chopped fresh parsley. It adds a lovely bit of color and a fresh little zing that balances out all that cheesy goodness. Serve them warm and watch them disappear!

What to Serve with Your Hawaiian Roll Mini Grilled Cheese
These little guys are pretty amazing on their own, but they also play *really* well with others! Here are a few ideas that I love to pair with them for a full-on party spread:
Easy Guacamole: You saw how I mentioned it earlier? Seriously, a big bowl of fresh, homemade easy guacamole is a must. The cool, creamy avocado is the perfect contrast to the warm, cheesy mini sandwiches.
Crispy Chickpea Salad: For something a little lighter and with a nice crunch, a salad like this cucumber salad with crispy chickpeas is fantastic. It brings in some fresh veggies and another textural element that’s super satisfying.
Tomato Soup Shooters: Okay, this is a bit more fun! Serve small cups of warm tomato soup alongside the mini grilled cheese. It’s like a grown-up version of dunking your grilled cheese, and everyone loves a little nostalgic comfort food.
Storing and Reheating Your Easy Party Snack
Got leftovers? Lucky you! To store these cheesy delights, let them cool completely first. Then, pack them into an airtight container. I usually put a piece of parchment paper between layers if I’m stacking them, just to prevent them from sticking together too much. They’ll keep well in the fridge for up to 2 days. Honestly, though, they’re best eaten fresh!
Reheating is super simple. Skip the microwave if you can – it makes them a bit soggy. Instead, pop them back on a baking sheet at around 350°F (175°C) for about 5-7 minutes. This gives them a lovely refresh and gets that cheese melty again. They’ll be almost as good as when they were first baked!
Frequently Asked Questions about Hawaiian Roll Mini Grilled Cheese
Can I use different types of cheese for these mini grilled cheese?
Absolutely! While cheddar is a classic for a reason, feel free to experiment. Provolone, Monterey Jack, or even a mild Gruyere would be delicious. Just make sure they’re good melting cheeses! I’ve even mixed a little bit of pepper jack in for a tiny kick, and it was fantastic on my last batch of these easy party snacks.
How do I make these Hawaiian Roll Mini Grilled Cheese ahead of time?
You can assemble them about an hour or two before you need them and keep them covered at room temperature. For longer prep, assemble and store them in the fridge, but bake them closer to serving time for the best hot and gooey result. You could also bake them and then reheat them just before guests arrive!
Are these mini grilled cheese suitable for vegetarians?
Yes! This Hawaiian roll grilled cheese recipe is completely vegetarian, making it a fantastic option for parties where you might have guests with different dietary preferences. Just ensure your cheese is vegetarian-friendly if that’s a concern for your guests.
Enjoy Your Delicious Hawaiian Roll Mini Grilled Cheese!
I really hope you give these Hawaiian Roll Mini Grilled Cheese a try soon! They’re so simple and always a guaranteed hit. Don’t forget to share this recipe if you enjoyed it, and you might also love our easy Italian pasta salad! You can also follow along for more ideas on Pinterest!
Print
Hawaiian Roll Mini Grilled Cheese
- Total Time: 25 min
- Yield: 12 mini sandwiches
- Diet: Vegetarian
Description
Easy party snack with buttery, cheesy, golden Hawaiian rolls and melty cheese.
Ingredients
- 12 Hawaiian rolls
- 6 slices cheddar cheese
- 4 tablespoons unsalted butter, melted
- 1 teaspoon garlic powder
- 1 tablespoon chopped fresh parsley
Instructions
- Preheat your oven to 375°F. Line a baking sheet or small baking dish with parchment paper.
- Slice the Hawaiian rolls in half horizontally, keeping the rolls connected.
- Place the bottom half of the rolls on the prepared baking sheet.
- Layer the cheddar cheese evenly over the bottom rolls.
- Place the top half of the rolls over the cheese.
- Stir together the melted butter and garlic powder.
- Brush the butter mixture over the tops of the rolls.
- Bake for 12 to 15 minutes until the tops are golden brown and the cheese is melted.
- Sprinkle with fresh parsley before serving.
Notes
- Cover loosely with foil during the first half of baking if the tops brown too quickly.
- Prep Time: 10 min
- Cook Time: 15 min
- Category: Appetizer
- Method: Baking
- Cuisine: American