Cheesecake. Just saying the word feels fancy, doesn’t it? For years, I avoided making it because everyone told me you absolutely *needed* that fussy water bath—the bain-marie—or you’d end up with a cracked, sad mess. I tried it once when I was first learning to bake, and yep, disaster struck. It looked like the surface of the moon!
But I love cheesecake too much to let fear win. So, I spent ages tinkering, testing different oven temperatures and mixing speeds, trying to crack the code. And I finally did it! This recipe for Classic Cheesecake Creamy and Foolproof is the one that finally clicked.
I’m telling you, this version is my absolute reliable champion. We’re skipping the foil wrapping and the big pan of water entirely. This method gives you that perfectly smooth, rich texture everyone dreams about, and it comes out clean every single time. It’s the recipe I hand to friends who are intimidated by baking, and they succeed! Trust me, once you see how easy it is to get that Classic Cheesecake Creamy and Foolproof result, you’ll never look back.

Essential Ingredients for Your Classic Cheesecake Creamy and Foolproof
You know, the difference between a good cheesecake and one that makes people stop talking mid-sentence is usually the ingredients, not the fancy technique. For this Classic Cheesecake Creamy and Foolproof recipe to work its magic, temperature is everything. Seriously, don’t rush this part!
Make sure your cream cheese and your sour cream are fully softened to room temperature. If they are cold, you’ll end up beating them forever trying to get rid of lumps, and that overmixing is what causes cracks later on. It’s worth the wait, I promise!
Also, notice we are using vanilla powder instead of extract sometimes—it just keeps the filling cleaner and prevents that slight liquid thinning. When you lay out your ingredients, check that you have everything ready, because the mixing goes pretty fast once you start!
Gathering Your Baking Supplies
You absolutely need a 9-inch springform pan for this. It’s the only way to get those beautiful, clean sides when you finally release the cake. Don’t try to substitute a regular cake pan; you’ll be crying later trying to get it out!
Since we aren’t using a water bath, we still want a little insurance against any accidental leaks from the bottom seal. Grab some heavy-duty foil. You’ll wrap the outside of the pan just in case. That’s my little safety net for all my baking adventures! You can see more of my baking tips on my Pinterest page.
You’ll also need your stand mixer or a good hand mixer for creaming everything smoothly, and a sturdy rubber spatula for scraping down the sides constantly. Keep that spatula handy!
Step-by-Step Instructions for Classic Cheesecake Creamy and Foolproof
Okay, once you have your room-temperature ingredients laid out, the active time flies by! You’re looking at about 25 minutes of prep before this beauty goes into the oven for roughly 75 minutes of cook time. Remember, patience comes later during the cooling phase, so let’s focus on getting this batter perfect first.
Preparing the Crust Base
First things first, get that oven preheated to 350 degrees Fahrenheit. While it’s warming up, grease that 9-inch springform pan. Then, grab your heavy-duty foil and wrap the outside bottom and sides securely. I always do two layers of foil just for good measure; better safe than sorry when things involve melted butter!
In a small bowl, toss together your graham cracker crumbs and that 1/4 cup of sugar. Pour in the 6 tablespoons of melted butter and mix it up until it looks like wet sand—evenly moistened is the goal here. Press this mixture super firmly into the bottom of your prepared pan. I use the bottom of a measuring cup to really pack it down tight. You want a solid foundation! If you are interested in other crust recipes, check out my homemade pie crust guide.
Pop that crust into the 350-degree oven for exactly 10 minutes. This sets it up nicely. When the timer goes off, pull it out, and immediately drop that oven temperature down to 325 degrees. We’re moving into the gentle phase now!
Mixing the Creamy Cheesecake Filling
This is where you need to be gentle! Grab your large bowl and start with the softened cream cheese. Beat it until it’s completely smooth—no lumps allowed! This usually takes just about a minute if your cheese is truly room temperature.
Next, add the 3/4 cup of sugar and mix until it’s creamy again. Now, the eggs! This is crucial: add them one at a time, mixing on low speed *just* until each egg disappears into the batter. If you whip them hard, you’re incorporating too much air, and air equals cracks later on. Don’t overdo it!
Finally, fold in the sour cream, the vanilla powder, and that tiny pinch of salt. You are just mixing until everything looks uniform and velvety. The second it’s smooth, stop mixing! Scrape the sides one last time, pour that lovely filling right over your pre-baked crust, and smooth the top surface with your spatula.
Baking and Cooling Protocol
Back into the 325-degree oven it goes! Bake this masterpiece for about 55 to 65 minutes. How do you know it’s done without a water bath? Look for the edges to be set—they should look firm—but the very center should still have a slight, gentle jiggle when you nudge the pan. It should look almost like soft gelatin in the middle.
This next step is the secret weapon for achieving that Classic Cheesecake Creamy and Foolproof texture: cooling gradually. As soon as that 65 minutes is up, turn the oven OFF. Don’t open the door yet! Just crack it open a little bit—I usually wedge a wooden spoon in the door—and let the cheesecake hang out in that slowly cooling environment for a good 45 minutes.
This slow transition prevents the temperature shock that causes sinking and cracking. After 45 minutes in the cooling oven, take it out and let it finish cooling completely on the counter until it reaches room temperature. Then, and only then, cover it and move it to the fridge for at least 6 hours. Seriously, don’t rush the chill! You can follow my updates on Medium.
Tips for Achieving Classic Cheesecake Creamy and Foolproof Perfection
Getting that flawless, smooth top on your cheesecake takes a little intuition, but mostly it comes down to avoiding air bubbles. Air is the enemy of the smooth, Classic Cheesecake Creamy and Foolproof look we’re going for! Remember how I told you to mix those eggs slowly? That’s the number one rule for preventing major cracks.
Another thing people forget is the foil. Even though we aren’t using a water bath, the foil around the bottom helps insulate the crust from direct heat. This keeps the bottom from baking too fast, which can cause the whole cake to pull away unevenly from the sides.
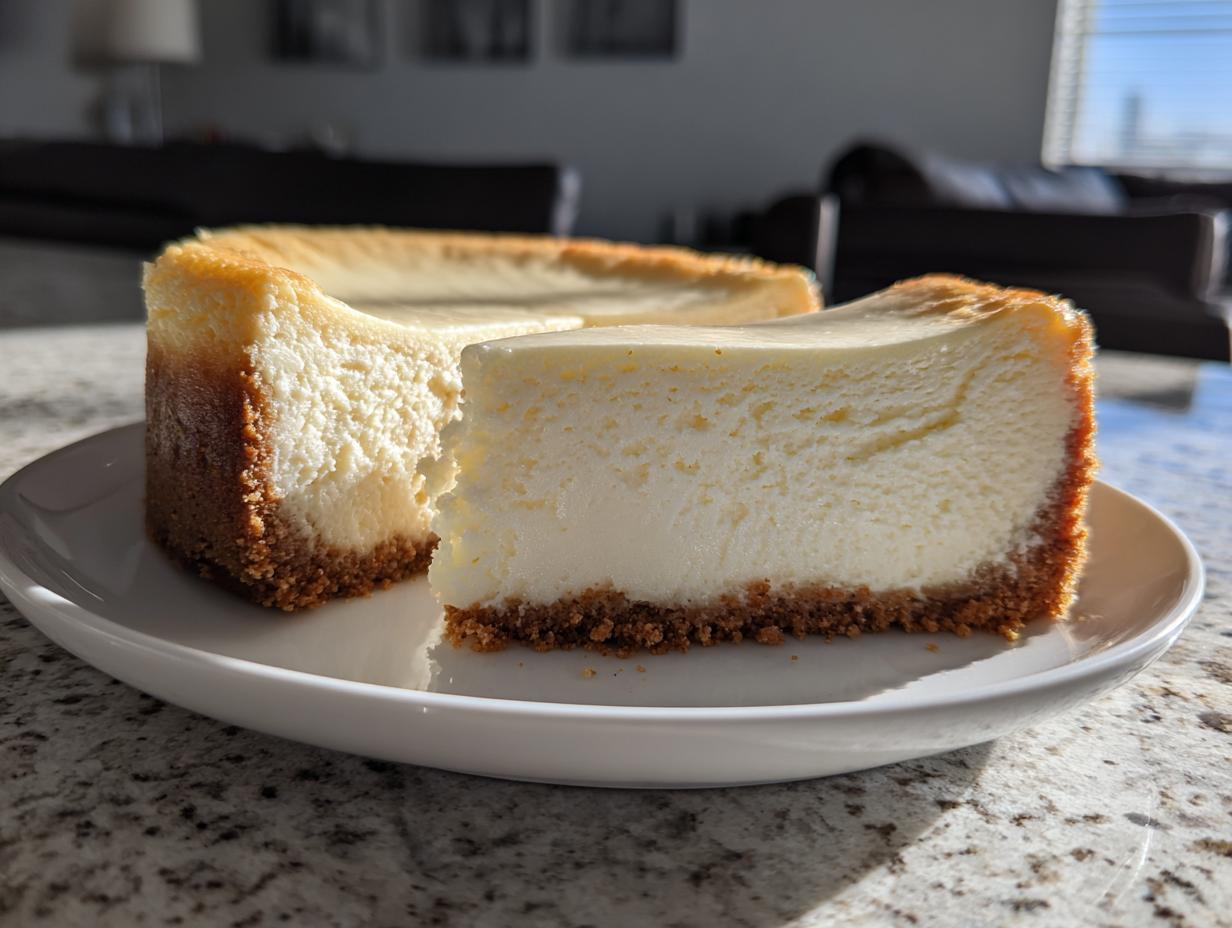
If you want those gorgeous, clean slices, you need a sharp, thin knife dipped in hot water and wiped dry between every single cut. It sounds fussy, but trust me, it wipes away any crumbs clinging to the blade and leaves behind a perfect, velvety edge. This method ensures your Classic Cheesecake Creamy and Foolproof dessert looks as good as it tastes! For more baking tips, check out my Facebook page.
And please, don’t skip that long chill time in the fridge. That’s what firms up the texture so it holds its shape beautifully when you slice it.
Storing and Handling Your Finished Dessert
The hardest part is waiting, I know! But you absolutely must let this cheesecake chill for a minimum of six hours. I usually make mine the day before I plan to serve it because overnight chilling really lets that texture set into the perfect density. It should be firm enough to give you those clean slices we talked about.
When you store it, keep the springform ring off, but cover the top loosely with plastic wrap or foil. Keep it in the main body of the fridge, not the door, where the temperature fluctuates too much.
If you have leftovers—which is rare in my house—it keeps really well. You can leave leftovers covered in the fridge for up to five days. If you need to serve a slice that’s rock hard from the cold, just let it sit on the counter for about 20 minutes before you slice it again. It brings the flavor right back!
- Storage Duration (Refrigerated): Up to 5 days
- Best Serving Temp: Slightly cooler than room temperature
- Freezing: Acceptable, but texture may soften slightly upon thaw
Frequently Asked Questions About Classic Cheesecake Creamy and Foolproof
I get so many questions about this recipe because people are always shocked it comes out so well without the water bath! Here are the things I hear most often about achieving this Classic Cheesecake Creamy and Foolproof result.
Q1. Why don’t I need a water bath for this cheesecake?
That’s the best part! We skip the water bath because of the careful temperature control we use. By starting the oven hot for the crust, dropping the temp down to 325°F for the filling, and then letting it cool *inside* the turned-off oven for 45 minutes, we eliminate the rapid temperature changes that cause cracking. It’s all about gradual cooling, which gives you that beautiful, Creamy Cheesecake texture without the fuss.
Q2. My batter had small lumps even after mixing. Will this ruin my Classic Cheesecake Creamy and Foolproof result?
Don’t panic! If you used room temperature cream cheese, the lumps should be minimal. If you see a few tiny ones, they usually melt away during the long baking time. However, if you have big lumps, you *can* gently push the batter through a fine-mesh sieve before pouring it into the crust. That’s my fix when I feel rushed and didn’t let the cheese soften enough!
Q3. Can I top this No Water Bath Cheesecake with fruit immediately after cooling?
Absolutely not! You have to let it chill for at least six hours, remember? If you put warm fruit topping on a room-temperature cake, you risk softening the top layer too much. Wait until it’s fully chilled, then add your toppings right before serving. This ensures your slice maintains that perfect structure.
Q4. What is the best way to ensure my cheesecake doesn’t sink too much in the middle?
The sinking is usually tied to overmixing or opening the oven door too early. Stick to the low speed when adding the eggs, and crucially, follow the protocol of turning the oven off and letting it sit inside for 45 minutes. That slow, gentle descent is what locks in the height and keeps your Classic Cheesecake Creamy and Foolproof recipe looking level!
Understanding the Nutritional Estimate
Now, I’m not a nutritionist, so take these numbers with a grain of salt—or maybe a grain of sugar! This estimate is based on the ingredients listed above for one slice. Because this is a rich dessert, it’s definitely a treat, not an everyday thing. But wow, is it worth those calories! If you’re looking for lighter options, check out my weight loss recipes section.
- Calories: 390
- Total Fat: 29 g
- Carbohydrates: 26 g
- Protein: 7 g
Enjoying this Classic Cheesecake Creamy and Foolproof dessert is about celebrating, not counting, but it’s good to have a ballpark idea of what you’re diving into!
Print
Amazing 1 Classic Cheesecake Creamy and Foolproof
- Total Time: 100 minutes
- Yield: 12 servings
- Diet: Vegetarian
Description
This classic cheesecake is rich, smooth, and baked without a water bath. It is a reliable recipe that yields clean slices and a perfect texture.
Ingredients
- 1 1/2 cups graham cracker crumbs
- 1/4 cup granulated sugar
- 6 tablespoons unsalted butter melted
- 24 ounces cream cheese softened
- 3/4 cup granulated sugar
- 3 large eggs at room temperature
- 1 cup sour cream at room temperature
- 1 teaspoon vanilla powder
- 1/4 teaspoon fine sea salt
Instructions
- Heat oven to 350°F and grease a 9-inch springform pan. Wrap the outside with heavy-duty foil.
- Mix graham cracker crumbs, sugar, and melted butter until evenly moistened. Press firmly into the bottom of the prepared pan.
- Bake the crust for 10 minutes. Remove the pan and reduce the oven temperature to 325°F.
- Beat the cream cheese in a large bowl until smooth, about 1 minute.
- Add sugar and mix until creamy, scraping the bowl as needed.
- Add eggs one at a time, mixing on low speed just until incorporated.
- Add sour cream, vanilla powder, and salt. Mix gently until smooth.
- Pour the filling over the crust and smooth the top surface.
- Bake for 55 to 65 minutes until the edges set and the center jiggles slightly when shaken.
- Turn off the oven. Crack the door open and let the cheesecake cool inside for 45 minutes.
- Cool the cheesecake completely at room temperature. Refrigerate for at least 6 hours before slicing.
Notes
- Room-temperature ingredients help prevent cracks and ensure a smooth batter.
- Prep Time: 25 minutes
- Cook Time: 75 minutes
- Category: Dessert
- Method: Baking
- Cuisine: American