If you’re running around like a whirlwind and need a snack that actually tastes like heaven but takes zero oven time, you’ve come to the right place. Seriously, these Homemade Granola Bars with Peanut Butter are my absolute go-to. I’ve made countless versions of no-bake snacks over the years—some that turned to dust the second you touched them, and others that were just sticky messes.
But this recipe? This is the one that works every single time. It’s so beginner-friendly, I taught my niece how to make them when she was eight! The magic here isn’t waiting for the oven; it’s in the ratio of sticky stuff to oats. I spent ages perfecting the balance so you get chewy, satisfying oatmeal bars that hold their shape. Trust me, once you nail this simple technique, you’ll never buy those cardboard boxes from the store again.

Essential Components for Homemade Granola Bars with Peanut Butter
When you’re not baking, the quality of your raw ingredients really shouts louder, you know? Since these Homemade Granola Bars with Peanut Butter don’t see any heat, we have to rely on the ingredients themselves to deliver that perfect texture and flavor. I’ve learned over the years that skimping here is what leads to crumbly messes that stick to your fingers.
Choosing the right stuff means these bars stay chewy and satisfying, just like they should be for a great no bake snack.
Selecting Your Base Ingredients
The oats are the backbone of the whole operation. You absolutely must use old-fashioned rolled oats, not the instant kind. Instant oats break down too much and turn mushy once they soak up the peanut butter. We want body! For the peanut butter, I always recommend a good creamy brand that you know you like the taste of. If your peanut butter is super oily or natural-style (the kind you have to stir), it might throw off the balance, so go for something standard and smooth. It helps everything bind together beautifully.
Sweeteners and Flavor Enhancers for Homemade Granola Bars with Peanut Butter
Honey is my binder of choice here. It sets up firmer than maple syrup does in a no bake situation. Don’t go for low-sugar honey substitutes; we need that stickiness! I use a full teaspoon of vanilla extract because it rounds out the salty peanut flavor so nicely. And please, don’t skip the salt! A little fine sea salt cuts through the sweetness of the honey and chocolate chips. It’s what makes these Homemade Granola Bars with Peanut Butter taste complex instead of just sugary.
Mix-Ins That Add Texture and Appeal
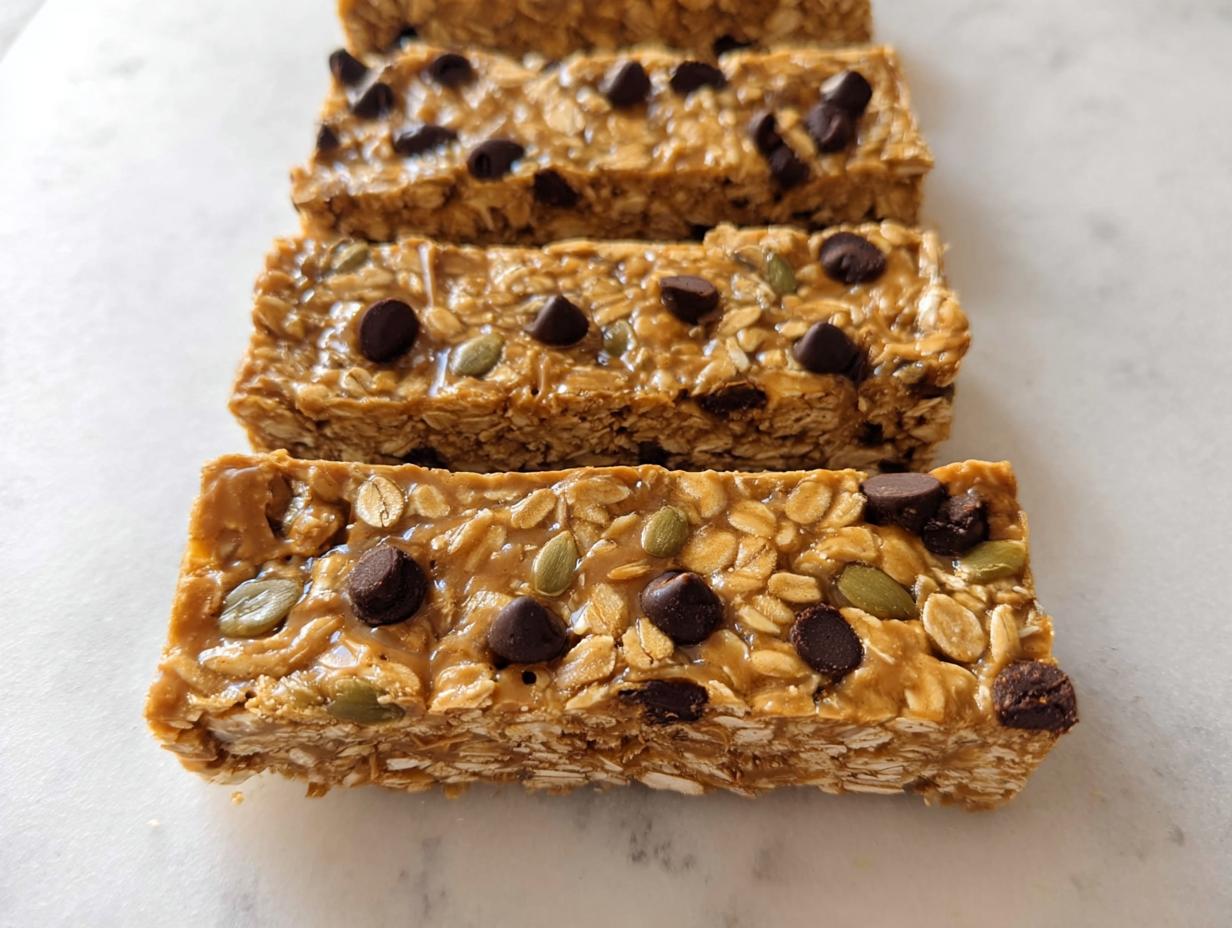
This is where we have some fun, but keep it balanced. Mini chocolate chips are crucial because they distribute better than the big ones, giving you chocolate in every bite without huge chunks pushing the bar apart. And the pepitas—those pumpkin seeds—are non-negotiable for me! They add a fantastic little crunch that contrasts perfectly with the chewiness of the oats. They are my secret weapon for texture that keeps people coming back for more oatmeal bars.

Equipment Needed for No-Bake Homemade Granola Bars with Peanut Butter
The best part about this recipe is that you don’t need a fancy stand mixer or even turn on the oven! We are keeping this super simple for you busy folks. You really only need a few basic items that I bet you already have sitting in your drawers.
For making these Homemade Granola Bars with Peanut Butter, grab a large mixing bowl—the bigger the better so you don’t splash everything everywhere when stirring! You’ll also need a sturdy spatula or wooden spoon for mixing it all up until it’s perfectly combined.
The most important piece of equipment is your 8 by 8 inch baking pan. Make sure you have parchment paper handy! You need a generous sheet so you can lift the whole block out easily later. That parchment paper acts like handles, saving your bars from sticking or breaking.
Step-by-Step Guide to Preparing Homemade Granola Bars with Peanut Butter
Okay, here’s the part where we bring everything together! This is straightforward, but the details matter, especially when you’re not baking. We are aiming for a sticky, cohesive mixture that packs down beautifully. Follow these steps closely if you want those perfectly chewy Homemade Granola Bars with Peanut Butter that don’t crumble when you pick them up.
First things first: always prep your pan before you start mixing anything. I learned the hard way that trying to line the pan after the mixture is ready is a recipe for sticky disaster! Grab that 8 by 8 inch pan and line it completely with parchment paper. Make sure you leave a nice overhang on two opposite sides—these little flaps are your handles later on, so make them generous!
Preparation and Combining the Wet Ingredients
Grab your largest bowl. We start with the sticky stuff. Measure out your creamy peanut butter, the honey, the vanilla extract, and that little bit of fine sea salt. Now, you need to mix this vigorously until it’s completely uniform. At first, it might look like it’s fighting you, especially if your peanut butter is cold, but keep stirring! You want a smooth, glossy mixture here. If you see streaks of honey or unmixed clumps of peanut butter, the final bars won’t bind correctly. Give it a good minute or two of hard stirring until it looks like one happy, thick sauce.
Incorporating Dry Ingredients and Achieving the Right Consistency
Once your wet base is perfect, it’s time for the oats, the mini chocolate chips, and those lovely pepitas. Dump them all right into the bowl with the peanut butter mix. Now, this is where technique comes in—you need to stir thoroughly, but not aggressively. Use a sturdy spatula and fold everything together. You aren’t whipping air into this; you are coating every single oat flake with that sticky peanut butter mixture. Keep folding and scraping the bottom and sides of the bowl until you see no dry spots of oats remaining. The mixture should start looking thick and slightly heavy, almost like wet sand that just barely holds together when you squeeze a small amount in your hand.
Pressing and Chilling for Perfect Bar Structure
Transfer that whole thick mixture into your prepared pan. Don’t just dump it! Use your spatula to spread it out evenly across the bottom. Now, for the most important step for structure: compaction! Place another sheet of parchment paper right on top of the mixture. Take the flat bottom of a measuring cup—I usually grab a 1-cup measure—and press down *hard* all over the surface. You need to compact this layer until it feels dense and solid. The harder you press now, the less likely your Homemade Granola Bars with Peanut Butter are to crumble later. Once it’s firmly packed, pop the whole thing into the refrigerator. You must let it chill for at least one hour. Resist the urge to cut it early; chilling is what sets that honey and makes the bars firm enough to slice without breaking apart.
Tips for Success with Homemade Granola Bars with Peanut Butter
I’ve made enough batches of these to know exactly where things can go wrong! The biggest complaint I hear about no-bake bars is that they crumble everywhere or they stick to the container like glue. We can fix both issues easily, so don’t stress if your first attempt isn’t perfect.
If your bars are crumbling, it almost always means your wet-to-dry ratio is off, or you didn’t press hard enough. Remember that compaction step? Go back and press again! You can use a small rolling pin right on top of that second sheet of parchment paper for extra leverage. Don’t be shy; you want to physically squeeze the air out of those oats.
If sticking is the problem, check your parchment overhang. Those flaps need to be long enough so you can get a good grip to lift the whole block out cleanly before slicing. For the absolute best texture in your Homemade Granola Bars with Peanut Butter, always keep them refrigerated. They soften quickly at room temperature, which makes them feel a little fragile. A quick trip to the fridge keeps them perfectly chewy and intact for snacking! If you want to see more of our quick recipes, check out our posts on Medium.
Storing and Serving Your Homemade Granola Bars with Peanut Butter
Now that you’ve got these beautiful, chewy bars, the last thing you want is for them to turn into a sticky puddle or a pile of loose oats. Keeping these Homemade Granola Bars with Peanut Butter fresh is super easy, thankfully, because we didn’t use any eggs or dairy that needs fussy handling—except for the chocolate chips, of course!
The key to preserving that perfect, dense chewiness is temperature control. I know it’s tempting to leave a container on the counter for easy grabbing, but trust me on this one: these bars are happiest when they are cold. They hold their shape much better and don’t get that slightly oily texture that happens when the peanut butter warms up. Follow us on Pinterest for more snack ideas!
Proper Storage Methods
My absolute number one rule for these bars is to store them in the refrigerator. Seriously, that’s the secret note Grandma always wrote on her recipe cards for anything sticky! Place your sliced bars into an airtight container. To make sure they don’t stick to each other in a big clump, I always place a small square of parchment paper or wax paper between the layers. This prevents any slight stickiness from transferring.
They will last beautifully in the fridge for about a week, maybe even ten days if you don’t sneak too many! If you’re making a huge batch for school lunches or work snacks over a longer period, you can absolutely freeze them. Wrap individual bars tightly in plastic wrap first, then toss them into a freezer-safe bag. They thaw out perfectly in about 15 minutes on the counter, or you can just grab one straight from the freezer if you like them extra firm! We love sharing our kitchen wins on Facebook too!
Frequently Asked Questions About Peanut Butter Bars
I get so many questions about these simple snacks because everyone wants that perfect chewy result! Here are a few things readers often ask me when they’re trying out their first batch of no bake snack bars.
Q1. My bars are too soft and won’t cut cleanly. What happened?
Usually, this means they didn’t chill long enough, or you didn’t press them firmly enough into the pan. If you’re short on time, try chilling them for 90 minutes instead of the standard hour. You need that cold time for the honey to set up properly. If they still seem too soft after chilling, just pop them back in the fridge for another 30 minutes before slicing.
Q2. Can I use maple syrup instead of honey?
You can try, but you might get a softer bar. Maple syrup doesn’t bind quite as firmly as honey does once chilled, so your oatmeal bars might be a little more fragile. If you substitute, you might need to slightly reduce the amount of honey called for, maybe by a tablespoon, just to compensate for the different moisture level.
Q3. What other seeds or nuts work well in these peanut butter bars?
Pepitas are fantastic, but feel free to experiment! Sunflower seeds work great for crunch. If you want a different flavor profile, try using chopped almonds instead of pepitas. Just make sure that whatever you add doesn’t exceed the amount of mix-ins listed, or you run the risk of having too much dry stuff and not enough binder.
Q4. Can I make these vegan?
That’s a great question! You would need to swap the honey for maple syrup (and accept a slightly softer texture, as mentioned above). If you use a vegan-certified peanut butter and skip the dairy chocolate chips, you can easily make these fit a plant-based diet.
Estimated Nutritional Breakdown for One Homemade Granola Bar with Peanut Butter
I always tell people that even though these Homemade Granola Bars with Peanut Butter are a treat, they are way better for you than those processed things you grab at the gas station! Since this is a no-bake recipe with simple ingredients, we know exactly what’s going into each serving. It’s good to know what you’re fueling up with when you need that quick afternoon boost.
Here’s a rough estimate for one bar, based on the recipe proportions. Keep in mind that if you use super oily peanut butter or different chocolate chips, these numbers might shift a tiny bit, but this gives you a great baseline for these satisfying oatmeal bars.
| Nutrient | Amount Per Bar (Approx.) |
|---|---|
| Calories | 320 |
| Total Fat | 18g |
| Carbohydrates | 32g |
| Protein | 9g |
See? Nine grams of protein! That peanut butter really steps up to the plate and makes these bars actually fill you up until dinner time. That’s why I love making big batches!
Print
Chewy 9-Minute Homemade Granola Bars
- Total Time: 10 minutes
- Yield: 8 bars
- Diet: Vegetarian
Description
Chewy homemade granola bars made with oats, peanut butter, honey, and chocolate chips. Easy no bake snack for busy days.
Ingredients
- 1 cup creamy peanut butter
- ⅓ cup honey
- 1 teaspoon vanilla extract
- ½ teaspoon fine sea salt
- 2½ cups old fashioned rolled oats
- ⅓ cup mini chocolate chips
- 3 tablespoons pepitas
Instructions
- Line an 8 by 8 inch baking pan with parchment paper, leaving overhang for easy removal.
- In a large bowl, stir together the peanut butter, honey, vanilla extract, and salt until smooth and fully combined.
- Add the rolled oats, mini chocolate chips, and pepitas to the bowl.
- Stir thoroughly until the mixture is evenly mixed and begins to hold together.
- Transfer the mixture to the prepared pan and spread evenly.
- Place a sheet of parchment paper on top and press firmly using the back of a measuring cup to compact the mixture.
- Refrigerate for at least 1 hour until firm.
- Lift out of the pan and slice into bars.
Notes
- Store bars in the refrigerator for the best texture.
- Prep Time: 10 minutes
- Cook Time: 0 minutes
- Category: Snack
- Method: No Bake
- Cuisine: American