Look, I get it. Some nights you walk in the door, you’re starving, and the thought of making a complicated dinner feels like climbing a mountain. That’s exactly why I perfected this vegetarian bean chili. Seriously, this is the dump-and-stir champion of my kitchen rotation!
We’re talking pantry staples here—beans, canned tomatoes, broth—and you don’t need any fancy techniques. It’s foolproof, hearty, and it tastes like it simmered all day, even though it’s ready in about 30 minutes of actual cooking time. When I first started experimenting with meatless meals, I needed something that my skeptical husband wouldn’t complain about. This chili was the one!
I remember one Tuesday last winter, the kids had soccer practice running late, and I forgot to thaw anything. I threw this together while waiting for the water to boil. Twenty minutes later, we were eating a warm, satisfying bowl of goodness. That night, this chili earned its permanent spot as my emergency dinner hero. If you’re new to cooking or just tired, this recipe is your new best friend. Trust me on this one—it’s the easiest chili ever.

Gathering Your Ingredients for vegetarian bean chili
The best part about this recipe being my weeknight savior is that you probably have 90% of this stuff already hiding in your pantry. We aren’t messing around with fresh meat or complicated soaking times here. This is pure convenience that tastes like you tried really hard!
Canned beans and tomatoes are the backbone, which keeps the cost down and the prep time almost zero. Don’t feel stressed about running to the store; just check your shelves first. This chili proves you don’t need gourmet ingredients for a gourmet flavor, but you do need to be precise with your spices.
I’ve broken down exactly what you need below. Remember, having everything measured out before you start cooking is the secret to keeping that 10-minute sauté time on track!
Essential Components for This vegetarian bean chili
When you gather these items, make sure you rinse and drain those canned beans really well—that takes away that metallic canned taste. Also, those vegetables need to be diced small so they cook down nicely during the simmer.
- 2 tablespoons olive oil
- 1 medium yellow onion, diced
- 2 medium carrots, diced
- 1 red bell pepper, diced
- 1 green bell pepper, diced
- 4 cloves garlic, minced
- 2 tablespoons chili powder
- 2 teaspoons ground cumin
- 1 teaspoon smoked paprika
- 1 teaspoon dried oregano
- 1 teaspoon salt
- \u00bd teaspoon black pepper
- 1 can (28 ounces) diced tomatoes with juices
- 1 can (15 ounces) black beans, drained and rinsed
- 1 can (15 ounces) kidney beans, drained and rinsed
- 1 can (15 ounces) pinto beans, drained and rinsed
- 1 can (15 ounces) corn kernels, drained
- 2 cups vegetable broth
- 2 teaspoons lime juice
Suggested Toppings for Your Chili
This is where you can really personalize your bowl! I always keep sour cream and sharp cheddar on hand, but the fresh stuff makes all the difference when you’re serving this easy chili.
- Shredded cheddar cheese
- Sour cream
- Fresh cilantro, chopped
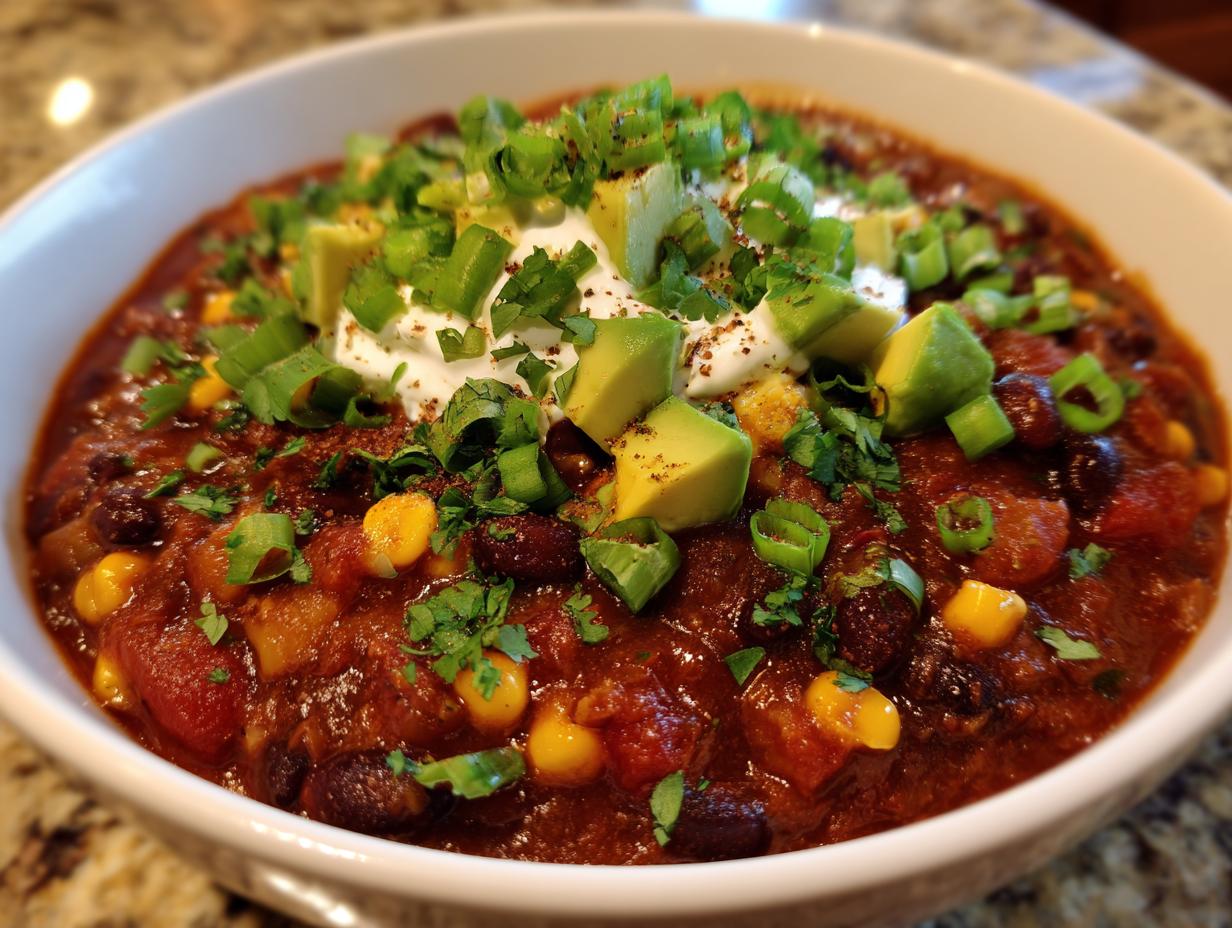
- Diced avocado
- Sliced green onions
- Tortilla chips
Ingredient Table
Please make sure you follow these exact amounts for the best balance of spice and savoriness. You’ll want a large pot or Dutch oven ready for all these treasures!
| Ingredient | Amount | Preparation Note |
|---|---|---|
| Olive Oil | 2 tablespoons | For sautéing |
| Yellow Onion | 1 medium | Diced |
| Carrots | 2 medium | Diced |
| Bell Peppers (Red & Green) | 1 each | Diced |
| Garlic | 4 cloves | Minced |
| Chili Powder | 2 tablespoons | Spice |
| Cumin | 2 teaspoons | Spice |
| Smoked Paprika | 1 teaspoon | Spice |
| Dried Oregano | 1 teaspoon | Spice |
| Salt & Pepper | 1 tsp salt / \u00bd tsp pepper | To taste |
| Diced Tomatoes | 1 can (28 ounces) | With juices |
| Beans (Black, Kidney, Pinto) | 1 can (15 ounces each) | Drained and rinsed |
| Corn Kernels | 1 can (15 ounces) | Drained |
| Vegetable Broth | 2 cups | Liquid base |
| Lime Juice | 2 teaspoons | Added at the very end |
Step-by-Step Instructions for Perfect vegetarian bean chili
Okay, now that everything is measured and ready to go, this is where the magic really happens! Since we aren’t relying on meat to give us deep flavor, we have to coax it out of the vegetables and spices. Don’t rush the first few steps, because that’s what transforms this from a simple vegetable soup into a rich, delicious chili.
Sautéing Aromatics and Building Flavor
First things first, get that olive oil shimmering in your biggest pot over medium-high heat. We want it hot enough to start softening things up quickly. Toss in your diced onion, carrots, and both bell peppers. You need to let these cook for a good 8 to 10 minutes, stirring every now and then. I know, ten minutes feels long when you’re hungry, but we are aiming for tender vegetables, especially those carrots, which take a bit longer to soften up!
Once they look translucent and happier, it’s time for the spice punch! Throw in your minced garlic—just one minute here until you can really smell it—and immediately add the chili powder, cumin, smoked paprika, oregano, salt, and pepper. This step is called ‘blooming’ the spices. Stirring them directly in the hot oil wakes them up! If you skip this, your chili will taste flat, trust me. Let them toast for about a minute until they are super fragrant.

Combining the Base and Simmering the vegetarian bean chili
Now we introduce the liquid! Pour in the entire can of diced tomatoes, juices and all, and scrape up any browned bits stuck to the bottom of the pot—that tastes like flavor gold! Give that a good swirl to mix it with your spices.
Next, it’s time for the main event: the beans, the corn, and the vegetable broth. Add everything in and stir thoroughly. You want to make sure those beans aren’t clumped up at the bottom. Bring the whole pot up to a rolling boil over high heat. Once it’s bubbling happily, immediately drop the heat down way low, cover it up, and let it simmer for 30 minutes. Remember, stir it every ten minutes or so; those beans love to stick to the bottom of the pot if you forget!
Finalizing Texture and Brightening Flavors
After that half-hour, take the lid off. If the chili looks a little thin for your liking, don’t panic! Just let it simmer uncovered for another 10 to 15 minutes until it thickens up just right. I often do this because I like a really robust chili consistency.
When it’s as thick as you want it, turn the heat completely off. This is critical: stir in those two teaspoons of fresh lime juice. This doesn’t make it taste like lime; it just brightens up all the deep, earthy flavors we built. Finally, give it a taste test. Does it need more salt? A little more kick from the chili powder? Adjust it now! Let it rest for five minutes before you ladle it out; this little break lets the flavors settle and the chili cools down just enough so you don’t burn your mouth off!

Tips for Achieving Expert-Level vegetarian bean chili Every Time
Even though this is my easiest recipe, I have a few tricks up my sleeve that take it from good to absolutely fantastic. These little adjustments, which I learned through trial and error, are what make people ask me for the recipe every single time I serve this meatless chili.
Adjusting Consistency and Seasoning
My biggest piece of advice? Salt generously! Vegetarian dishes, especially those heavy on beans and vegetables, need more salt than you think to really make those spices pop. Taste it right before serving and don’t be shy about adding more salt until the flavors feel balanced.
If you find yourself with a batch that’s just a little too brothy, I have a great little secret for you. Take about one cup of the finished chili—make sure you get some beans and some broth—and carefully blend it up until it’s smooth. Pour that creamy mixture right back into the pot and stir it in. It thickens the whole thing up beautifully without making it heavy!
Making Ahead: Why This vegetarian bean chili Improves Overnight
If you can manage it, please make this vegetarian bean chili the day before you plan to eat it. I know, patience is hard when you’re hungry, but it is worth the wait!
When you let the chili sit overnight in the fridge, all those wonderful spices—the cumin, the paprika, the oregano—really have time to mingle and meld with the tomatoes and broth. The flavors deepen so much that it tastes like it simmered for hours, not just 30 minutes. Reheating it the next day is honestly better than eating it fresh off the stove, so plan ahead if you can!
Frequently Asked Questions About This Easy vegetarian bean chili
I get so many questions about this recipe because everyone wants to know how something so simple tastes so good! Here are some of the things I hear most often about making this easy chili.
Can I use different types of beans in this vegetarian bean chili?
Absolutely! The three beans listed—black, kidney, and pinto—give you that great textural variety, but if your pantry is low, feel free to swap them out. If you have cannellini beans or great northern beans, they work wonderfully in this meatless chili. Just make sure whatever you use, you drain and rinse them well before tossing them in the pot. Consistency matters more than the exact type!
How long does this meatless chili take to cook?
The timing is what makes this recipe a lifesaver! You need about 10 minutes of prep time, and then the active cooking time is around 45 minutes total. That includes the 8 to 10 minutes for sautéing the veggies and the full 30-minute simmer. It’s fast enough for a busy weeknight but flavorful enough for company!
Is this recipe freezer friendly?
Yes, this vegetarian bean chili freezes like a dream! It’s one of those meals that tastes even better when reheated. Make a huge batch and freeze the leftovers. Just make sure you let it cool completely before packing it up, and always leave about an inch of space at the top of your container for expansion.
Storage and Reheating for Leftover vegetarian bean chili
This chili is one of those rare dishes that tastes even better the second day, so making extra is always a good idea! When you store it, make sure it’s completely cooled down before you seal the container. If you are freezing it, you absolutely must leave about an inch of space at the top of your container. That space is super important because the liquid expands when it freezes, and we don’t want any cracked lids!
If you’re just refrigerating it for later in the week, it keeps beautifully. I’ve got a quick guide below so you know exactly how long you can safely keep those delicious leftovers on hand.
Storage Table Guide
| Storage Method | Duration | Important Note |
|---|---|---|
| Refrigerator | Up to 5 days | Store in an airtight container |
| Freezer | Up to 3 months | Leave 1 inch of headspace |
Understanding the Nutrition in Your vegetarian bean chili
I always tell people that eating healthy shouldn’t mean sacrificing flavor, and this easy chili proves it! Since we are relying on beans and vegetables instead of heavy meats, the nutrition profile is fantastic. Keep in mind these numbers are just an estimate based on the recipe as written, assuming you skip the toppings for the base calculation.
Estimated Nutritional Breakdown
| Nutrient | Amount Per Serving |
|---|---|
| Calories | 245 |
| Total Fat | 5g |
| Carbohydrates | 42g |
| Protein | 12g |
Share Your Experience with This Simple vegetarian bean chili
Well, that’s it! You now have the keys to the easiest, most satisfying vegetarian bean chili in your back pocket. I truly hope this recipe saves your busy weeknights like it saved mine! Please come back and let me know how it turned out. I’d love to hear what toppings you chose—did the avocado win, or did you go heavy on the cheese? Rate it below!
If you enjoyed this recipe, you can find more quick and easy meals like this one over on our Facebook page, or check out our latest posts on Pinterest.
Print
Amazing 30-Minute Vegetarian Bean Chili
- Total Time: 55 minutes
- Yield: 8 servings
- Diet: Vegetarian
Description
This beginner-friendly vegetarian bean chili with canned corn is hearty, simple, and delicious. No meat needed—just dump, stir, and simmer for 30 minutes. It uses pantry staples to create a satisfying meal.
Ingredients
- 2 tablespoons olive oil
- 1 medium yellow onion, diced
- 2 medium carrots, diced
- 1 red bell pepper, diced
- 1 green bell pepper, diced
- 4 cloves garlic, minced
- 2 tablespoons chili powder
- 2 teaspoons ground cumin
- 1 teaspoon smoked paprika
- 1 teaspoon dried oregano
- 1 teaspoon salt
- ½ teaspoon black pepper
- 1 can (28 ounces) diced tomatoes with juices
- 1 can (15 ounces) black beans, drained and rinsed
- 1 can (15 ounces) kidney beans, drained and rinsed
- 1 can (15 ounces) pinto beans, drained and rinsed
- 1 can (15 ounces) corn kernels, drained
- 2 cups vegetable broth
- 2 teaspoons lime juice
- For Serving: Shredded cheddar cheese, Sour cream, Fresh cilantro, chopped, Diced avocado, Sliced green onions, Tortilla chips
Instructions
- Heat olive oil in a large pot or Dutch oven over medium-high heat until shimmering.
- Add diced onion, carrots, and bell peppers to the pot; cook for 8-10 minutes, stirring occasionally, until the onion becomes translucent and the carrots begin to soften.
- Stir in minced garlic, chili powder, cumin, smoked paprika, oregano, salt, and black pepper; cook for 1-2 minutes, stirring constantly, until the spices become fragrant.
- Pour in the diced tomatoes with their juices and stir well to combine with the vegetable mixture.
- Add black beans, kidney beans, pinto beans, corn, and vegetable broth to the pot; stir thoroughly to distribute all ingredients evenly.
- Bring the chili to a rolling boil over high heat, stirring occasionally.
- Once boiling, reduce heat to low, cover the pot, and simmer for 30 minutes, stirring every 10 minutes to prevent sticking on the bottom.
- After 30 minutes, remove the lid and check the consistency; if too thin, continue simmering uncovered for 10-15 more minutes until thickened to your preference.
- Turn off the heat and stir in lime juice to brighten the flavors.
- Taste and adjust salt, pepper, or chili powder as needed; the chili should be well-seasoned with balanced flavors.
- Let the chili rest for 5 minutes before serving to allow it to thicken slightly and cool to a safe eating temperature.
- Ladle into bowls and serve hot with your choice of toppings such as shredded cheese, sour cream, cilantro, avocado, green onions, and tortilla chips.
Notes
- Salt generously to bring out all the flavors; vegetarian dishes often need more salt than meat-based recipes to create depth.
- Canned beans and tomatoes make this recipe easy and budget-friendly while still delivering great flavor.
- The chili tastes better the next day after the flavors meld, so make it ahead for maximum flavor.
- For a creamier texture, blend 1 cup of the chili in a blender and stir it back into the pot before serving.
- Do not skip the lime juice at the end; it adds brightness that balances the richness of the beans.
- Store leftovers in airtight containers in the refrigerator for up to 5 days.
- Freeze chili after cooling completely, leaving 1 inch of headspace; thaw overnight in the refrigerator before reheating.
- Prep Time: 10 minutes
- Cook Time: 45 minutes
- Category: Main Dish
- Method: One-Pot Simmer
- Cuisine: American