Okay, listen up, because I finally cracked the code on sourdough that doesn’t taste like a sour punch to the face! For years, I thought sourdough meant that super-tangy, chewy bread that was great for dipping in soup but terrible for a kid’s lunchbox. Nope! I’m here to tell you about my absolute favorite creation: the **sweet sourdough sandwich bread**.
This recipe is magic because it’s soft—I mean, truly soft, tender crumb soft—but it still has that beautiful, mild tang we all love from a good slow ferment. I developed this because my youngest kept rejecting anything I baked that wasn’t pillowy. I wanted that sourdough nutrition without the extreme sourness, and wow, did I nail it.
It uses just a touch of honey and oil to keep things gentle and sweet. If you’ve been intimidated by sourdough, trust me, this is the recipe that will make you feel like a total pro. It slices beautifully straight out of the oven (once it cools, of course!).

Essential Ingredients for Sweet Sourdough Sandwich Bread
You don’t need a fancy pantry for this recipe, which is what I love most about it. We are relying on simple things, but the ratios have to be right. Getting these measurements spot-on is what transforms a standard loaf into that incredibly soft sweet sourdough sandwich bread we’re aiming for. Don’t be tempted to swap out the honey for plain sugar; that honey is doing some serious flavor heavy lifting here!
We are keeping the tang mild, so the ingredients need to work together harmoniously. Everything gets mixed right in one bowl, which keeps the cleanup simple. Trust me, the process is straightforward once you have these items ready to go.
Measuring for Success with Sweet Sourdough Sandwich Bread
The absolute number one thing you need is an active starter. If your starter isn’t bubbly and doubled after feeding, your dough won’t rise right, no matter how much honey you add! For this sweet sourdough sandwich bread, you want that starter to be fed 4 to 12 hours before you start mixing. Also, please use bread flour if you can find it. Bread flour has more protein, which gives you that great structure needed for a tall, sliceable loaf.
Ingredient Clarity Table
Here’s exactly what you need gathered before you even look at your mixing bowl. I always measure everything out twice before starting!
| Ingredient | Amount | Notes |
|---|---|---|
| Active Sourdough Starter | 1 cup | Must be active and bubbly |
| Warm Water | 1 cup | Should feel comfortably warm, not hot |
| Honey | 3 tablespoons | Our secret weapon for sweetness |
| Neutral Oil | 3 tablespoons | Like canola or vegetable oil |
| Bread Flour | 4 cups | Use bread flour for the best texture |
| Fine Sea Salt | 1 1/2 teaspoons | Don’t skip the salt! |
| Neutral Oil | 1 tablespoon | For prepping the loaf pan |
Step-by-Step Instructions for Sweet Sourdough Sandwich Bread
Now for the fun part—turning those ingredients into a magnificent, sliceable loaf! This process takes time, but most of it is hands-off. The key to a successful sweet sourdough sandwich bread is patience during the resting periods. Don’t rush the rise; that’s where the flavor develops!
Mixing and Initial Kneading
First things first, grab that 9×5 loaf pan and give it a good slicking with about a tablespoon of oil. Set it aside. In your biggest bowl, whisk together the bubbly starter, warm water, that gorgeous honey, and the three tablespoons of oil. You want this liquid mixture to look happy and uniform.
Next, dump in all the flour and the salt. Mix it with a wooden spoon or even your hands until you have what I call a “shaggy mess.” Don’t try to make it smooth yet; just make sure there are no dry flour pockets hiding anywhere. Once it’s shaggy, it’s time to knead! You can use a stand mixer with a dough hook for about 6 to 8 minutes, or you can knead it by hand on a lightly oiled counter. The goal is to get it smooth and elastic. When you poke it gently, it should spring back slowly. The dough for this sweet sourdough sandwich bread should feel soft, almost pillowy, but it shouldn’t stick to your fingers aggressively.
Bulk Fermentation: The First Rise
Once you have that lovely smooth ball, tuck it back into your bowl, cover it tightly—a clean plastic bag or cling wrap works great—and let it do its thing. This is the bulk fermentation, and it’s critical. We are looking for it to double in size. Depending on how warm your kitchen is, this can take anywhere from 4 to 5 hours. If your house is chilly, don’t panic! It might take longer, maybe even 6 hours. Just trust the “doubled in size” rule, not the clock. If you try to shape it too soon, you’ll fight the gluten the whole way.
Shaping and Final Proofing
When it’s doubled, gently turn the dough out onto a clean surface—no extra flour needed if you kneaded correctly. You need to be gentle here! Carefully press the dough into a rough rectangle. Then, you’re going to roll it up tightly, like rolling a jelly roll, making sure to seal the seam at the bottom. This tight rolling gives you that beautiful oven spring and structure for slicing later.
Place that seam-side down into your oiled loaf pan. Cover it again loosely. The second rise, or final proof, takes less time, usually 2 to 3 hours. You want the dough to crown about one full inch over the rim of the pan. This is when you should preheat your oven to 375°F! If it’s not crowned high enough, it might collapse a little in the oven. You’re aiming for proud and puffy!

Why You Will Love This Sweet Sourdough Sandwich Bread
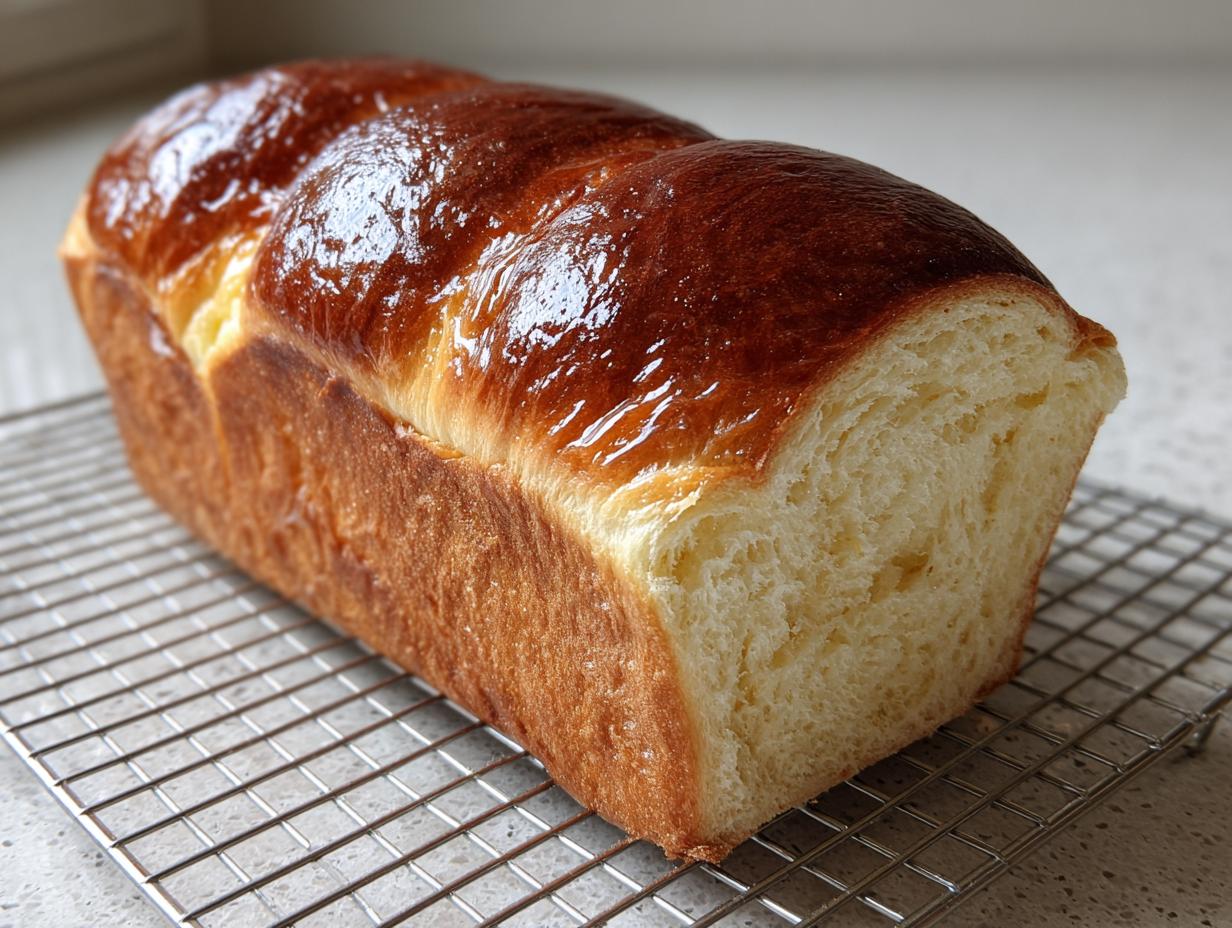
Honestly, this loaf changed the way my family eats bread. It’s the perfect middle ground between rustic sourdough and soft, commercial white bread. If you need a reliable loaf that pleases everyone, this sweet sourdough sandwich bread is your answer. It’s everything you want in a daily bread, without any fuss!
- Incredibly Tender Crumb: Thanks to the honey and oil, this bread is surprisingly soft, making it perfect for little hands and soft palates.
- Mild, Pleasant Tang: You get all the digestibility benefits of sourdough, but the sour notes are very subtle—ideal for beginners.
- Amazing Longevity: Seriously, this loaf stays fresh sitting on the counter for days without drying out, which is just unheard of sometimes!
- Perfect Slicer: It bakes up sturdy enough that you get clean, even slices every single time.
Tips for Achieving Expert Results with Your Sweet Sourdough Sandwich Bread
Baking sourdough is all about feeling the dough, but even I mess up sometimes! Getting that perfect rise and that signature tenderness in the sweet sourdough sandwich bread comes down to a few simple checks. Don’t let the long rise times scare you; just pay attention to what the dough is telling you. A little bit of common sense goes a long way here.
One thing I learned early on is to keep your liquids slightly warm—think bathwater temperature, not hot tub! If the water is too cold, the starter just won’t wake up fast enough, and your bulk fermentation will take forever. Conversely, if your oven spring looks weak, it usually means you under-proofed it the second time around. Make sure it’s really crowned before you slide it in at 375°F.
Troubleshooting Dough Texture
The recipe note says the dough should be soft but not sticky, and this is a huge checkpoint. If you kneaded for the full 8 minutes and your dough is still sticking to your hands like glue, you might need a tiny bit of extra flour—add it one tablespoon at a time while mixing. Don’t dump a quarter cup in, or you’ll end up with dry sweet sourdough sandwich bread!
Now, if you’re finding the dough is too stiff—it tears when you try to stretch it, or it feels like clay—you probably added too much flour, or maybe your starter wasn’t quite as hydrated as mine was. If it’s too stiff, just put it back in the bowl, drizzle a teaspoon of warm water over it, and work it in gently. It might take a few minutes of gentle folding, but it will loosen up and become that perfect soft texture we need.
Equipment Needed for Baking Sweet Sourdough Sandwich Bread
You don’t need a ton of fancy gadgets for this loaf, but a few things really help make sure your sweet sourdough sandwich bread comes out perfect. Having the right tools just takes the guesswork out of the long rises!
- A standard 9 by 5 inch loaf pan is essential for that classic sandwich shape.
- You absolutely need a very large mixing bowl because the dough doubles in size!
- I highly recommend having an oven thermometer. Ovens lie, and you need that 375°F to be exact for the final bake.
- A digital scale is great for weighing the flour if you want maximum consistency, but cups work fine if you’re careful!
Frequently Asked Questions About Sweet Sourdough Sandwich Bread
I get so many questions about this loaf because people are amazed it comes out so soft! Here are the top things folks always ask when they are trying to make the perfect sweet sourdough sandwich bread for the first time.
Q1. How can I make sure my sourdough has a mild tang instead of being super sour?
That’s the beauty of this recipe! The honey actually balances out the acidity during the long fermentation. To keep it mild, use a starter that you fed recently—ideally 4 to 8 hours before mixing. A starter that has gone past its peak will produce a much sharper, sour flavor in your final sweet sourdough sandwich bread.
Q2. My loaf didn’t rise much in the oven. Did I do something wrong?
Usually, that means the second rise (the proofing in the pan) wasn’t quite long enough. You need that dough to be truly crowned—about an inch over the rim. If it’s not fully proofed, the yeast and bacteria don’t have enough power left for oven spring. Make sure your oven is fully heated to 375°F before you put that soft sourdough in!
Q3. Can I use all-purpose flour instead of bread flour for this sandwich loaf?
You certainly can, but I have to warn you, the texture won’t be quite as chewy or as tall. Bread flour has a higher protein content, which helps trap those gases during the long fermentation, giving you that ideal structure for slicing. If you use AP flour, just be extra careful not to over-knead it, or it will get tough!
Q4. How long does this sweet sourdough sandwich bread stay fresh on the counter?
Because of that touch of oil and honey, this loaf is a champion at staying fresh! I find it’s still perfectly tender and sliceable for about three days if kept in a sealed bag on the counter. After that, it’s still great, but I usually pop the rest into the freezer.
Storing and Reheating Your Sweet Sourdough Sandwich Bread
The best part about this sweet sourdough sandwich bread is how long it stays delicious! Unlike some artisan loaves that go stale overnight, this one is designed for real life—lunchboxes and week-long toast consumption. You want to keep that soft crumb intact, so how you store it really matters. Never put this beautiful loaf in the fridge right away; cold temperatures make bread go stale faster, and we want to avoid that!
Here’s my quick guide on keeping your sweet sourdough sandwich bread at its absolute best, whether you’re eating it today or saving it for next week.
| Storage Duration | Method | Tip for Reheating |
|---|---|---|
| 1-3 Days | A paper bag followed by a sealed plastic bag on the counter. | Pop a slice directly into the toaster or microwave for 10 seconds. |
| Up to 3 Months | Wrap tightly in plastic wrap, then place in a freezer bag. | Thaw on the counter, then toast or refresh in a 350°F oven for 5 minutes. |
| Storing Sliced | Always freeze sliced! It thaws faster and more evenly. | Toast directly from frozen for quick sweet sourdough sandwich bread! |
If you enjoyed this recipe, you can find more baking inspiration on our Pinterest page!
Print
Divine 3 Ingredient Sweet sourdough sandwich bread
- Total Time: 55 minutes
- Yield: 1 loaf, about 12 slices
- Diet: Vegetarian
Description
Soft sweet sourdough sandwich bread with a tender crumb and mild tang. Perfect for toast and sandwiches using simple pantry ingredients.
Ingredients
- 1 cup active sourdough starter
- 1 cup warm water
- 3 tablespoons honey
- 3 tablespoons neutral oil
- 4 cups bread flour
- 1 1/2 teaspoons fine sea salt
- 1 tablespoon neutral oil (for pan)
Instructions
- Lightly oil a standard 9 by 5 inch loaf pan and set aside.
- In a large bowl, whisk the sourdough starter, warm water, honey, and oil until smooth.
- Add the bread flour and salt. Mix until a shaggy dough forms.
- Knead by hand or mixer until smooth and elastic, about 8 minutes. The dough should be soft but not sticky.
- Shape the dough into a ball, cover, and let rise at room temperature until doubled, about 4 to 5 hours.
- Turn the dough out, gently press into a rectangle, and roll tightly into a loaf.
- Place seam side down in the prepared pan. Cover and let rise until the dough crowns about 1 inch over the rim, about 2 to 3 hours.
- Heat the oven to 375°F during the final rise.
- Bake for 35 minutes until deep golden and the center reaches 190°F.
- Cool in the pan for 10 minutes, then transfer to a rack and cool completely before slicing.
Notes
- This bread slices cleanly and stays fresh for days.
- It works well for toast, lunchboxes, and grilled sandwiches.
- The dough should be soft but not sticky after kneading.
- Prep Time: 20 minutes
- Cook Time: 35 minutes
- Category: Bread
- Method: Baking
- Cuisine: American