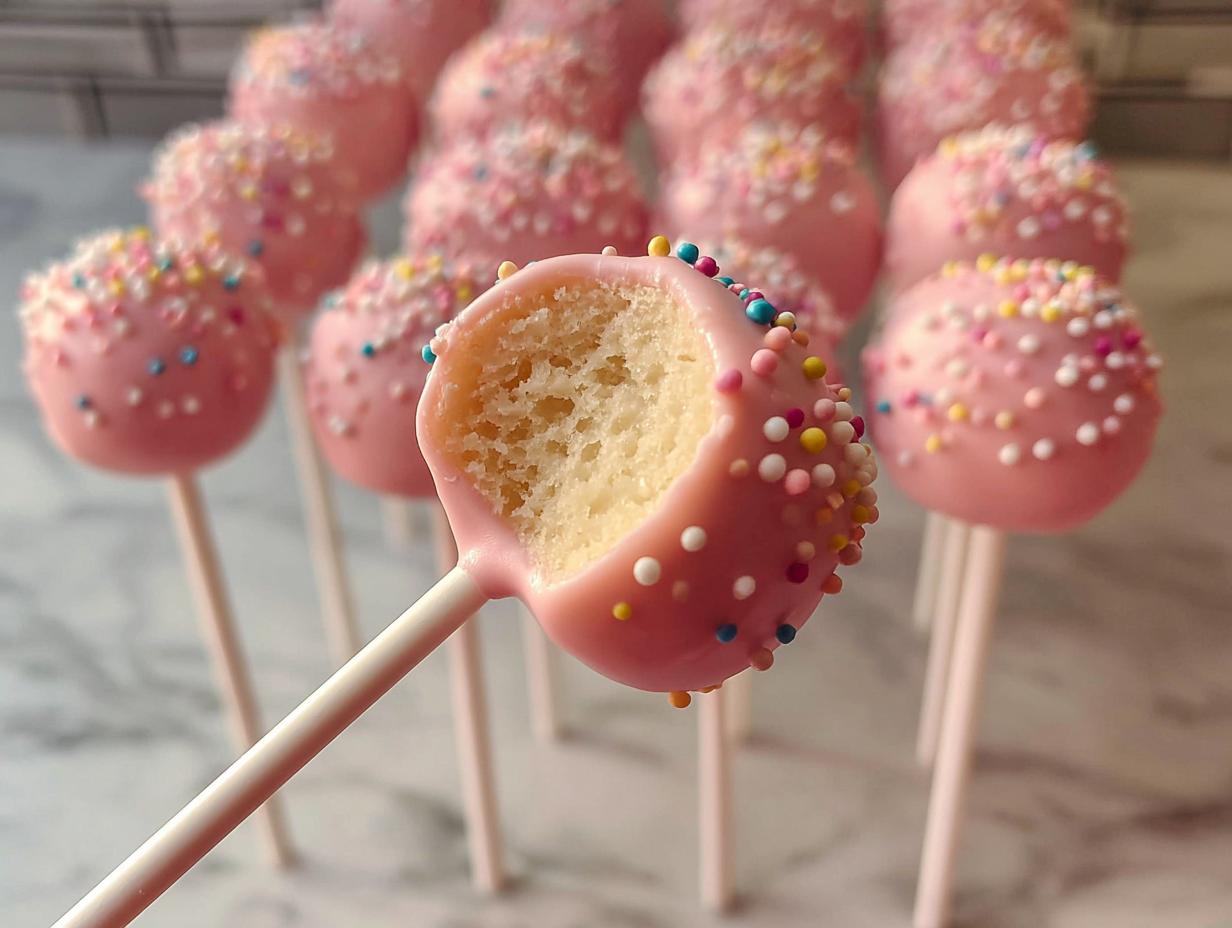
Starbucks Copycat Birthday Cake Pops are what I call “gateway baking,” and honestly, they are the reason my blog, NoobRecipes, even exists! When I first started trying to bake, the idea of making those perfectly smooth, spherical treats seemed impossible. I remember trying to make regular cake balls years ago—they crumbled, they cracked, they looked like sad, lumpy potatoes covered in melted chocolate. I almost quit baking forever right there!
But then I realized the secret wasn’t some fancy pastry school technique; it was about using the right base and getting the consistency just right. That’s why this copycat recipe is my absolute favorite to share with new bakers. We are cutting corners in all the right ways—starting with a simple box cake mix—to get that iconic sweet vanilla flavor. Trust me, if you can mix ingredients in a bowl and crumble a cake, you can nail these cake pops on your very first try. They are fun, they are festive, and they taste exactly like the ones from the coffee shop, but you made them yourself!

Why You’ll Love These Starbucks Copycat Birthday Cake Pops
I know you’re here because you want that famous sweet flavor without the headache, and these homemade cake pops deliver every single time. Seriously, these are foolproof, which is why they are perfect for anyone new to the kitchen. Forget complicated techniques!
- They use a simple cake mix base, making the prep time unbelievably fast for a dessert this fun.
- The texture is spot-on—moist, dense, and perfectly balanced before we even get to the coating stage.
- They are excellent for last-minute parties or just when you need a sweet vanilla cake pop fix without the Starbucks line.
- You get that signature look, and nobody will believe you made these amazing cake pops from scratch!
Essential Equipment List for Starbucks Copycat Birthday Cake Pops
Okay, listen up, because while this recipe is easy, you need a few specific tools to nail that perfect sphere shape and smooth coating. Don’t panic if you don’t have everything; most of this stuff is standard kitchen gear, but a couple of items really make the dipping process manageable for us beginners.
Here’s what you absolutely need to grab before you start mixing:
- A stand mixer or a sturdy hand mixer (we need that paddle attachment for crumbling!).
- A large mixing bowl—you’ll be doing a lot of mixing here.
- A small bowl just for melting the candy coating.
- Lollipop sticks, of course!
- A block of styrofoam or a cake pop stand to hold them while they dry upright. This is critical so the coating sets evenly.
Gathering Your Ingredients for Starbucks Copycat Birthday Cake Pops
This is the fun part—gathering our supplies! I know what you’re thinking: “Adam, I’m supposed to make the cake *and* the filling?” Yes, you are, but don’t let that intimidate you! We are using a box mix for the cake, which is our secret weapon for keeping this recipe beginner-friendly. Seriously, that vanilla cake mix does 90% of the heavy lifting here. The filling is just a quick buttercream stirred right into the crumbs, so it’s super straightforward.
We are basically making a dense, sweet cake dough, which is how those coffee shop cake pops get that signature texture that doesn’t crumble when you dip it. Keep your butter soft, and make sure you have enough candy melts because that coating is what seals in all the flavor. Here is everything you need laid out so you can check your pantry!
| Component | Key Ingredients |
|---|---|
| Cake Base | Vanilla Cake Mix, Oil, Eggs, Water/Milk |
| Buttercream Filling | Softened Butter, Powdered Sugar, Vanilla |
| Coating & Decoration | Candy Melts, Sprinkles |
Clarifying Ingredient Measurements and Types
Because we are aiming for perfection here, let’s just clarify a couple of things from the list so you don’t get any surprises later on. First, for the oil in the cake batter, any neutral oil works great—vegetable, canola, or even avocado oil. Just avoid anything super strong tasting like olive oil, okay? We want pure vanilla flavor!
Second, when it comes to the buttercream, that 1/4 cup of butter absolutely *must* be softened. If it’s cold, it won’t mix into the powdered sugar properly, and you’ll end up with hard chunks in your cake dough, which we absolutely do not want. Softened means you can press your finger into it easily, but it shouldn’t be melted or greasy. Also, don’t worry about sifting the powdered sugar for the filling; just stir it in well, and we’ll handle any small lumps when we mix it into the cake crumbs later. Easy peasy!
Step-by-Step Instructions for Starbucks Copycat Birthday Cake Pops
Alright, deep breath! This is where we turn simple ingredients into those famous spheres. Remember, every step here is designed to make things easier for you, the beginner baker. We bake, we mix, we chill, and then we dip. It’s a rhythm, and once you get it, you’ll be making these all the time!
Baking the Cake Base to Avoid Dryness
First things first, get that oven preheating! You’re aiming for 325 to 350℉, depending on what your cake mix box tells you for your specific pan size. The absolute most important thing here is this: **do not overbake the cake**. If you bake it too long, those vanilla cake pops will be dry, and dry crumbs don’t stick together well. Mix up your cake batter following the box directions—cake mix, oil, eggs, and liquid—and pour it into your prepared pan. Bake it, but start testing with a toothpick about 4 minutes before the box says it should be done. You want moist crumbs clinging to that toothpick, not completely clean or wet batter. Pull it out right when it passes that test!
Creating the Perfect Cake Pop Dough Texture
Transfer that warm cake directly into your stand mixer bowl—yes, while it’s hot! Use the paddle attachment and mix it on low speed until it’s completely crumbled, looking like coarse sand. If you don’t have a mixer, just crumble it by hand, but it takes some elbow grease! While that’s happening, quickly whisk together your softened butter, powdered sugar, vanilla, salt, and that tiny bit of extra milk in a separate small bowl. It’s okay if it’s a little lumpy; we’re going for rustic here, not flawless buttercream!
Now, add that quick buttercream right into the cake crumbs. Mix it until everything is just incorporated and you can easily squeeze a piece between your fingers without it falling apart. This is your dough! Roll these babies into little balls, about 1 and 1/4 inches wide, or weigh them out to about 30 grams each if you want that professional consistency. Pop all your rolled balls into the freezer for 15 minutes. Chilling is key for a smooth dip later!

Dipping Techniques for a Smooth Candy Coating on Starbucks Copycat Birthday Cake Pops
While the pops chill, melt a small amount of your candy melts—I like to use pink first for that classic look. Melt them slowly in the microwave, stirring every 15 to 30 seconds so they don’t seize up on you. Once melted, take a lollipop stick and dip the very tip into the melted candy. Insert that sticky tip halfway into a chilled ball and put them all back in the freezer for another 15 minutes. This step anchors the stick!
After the second chill, let the pops sit out for about 10 minutes so they aren’t rock hard. Melt the rest of your candy coating until it’s nice and thin. Fully submerge the cake pop, making sure the coating goes all the way down to the stick base—this locks everything in place. Lift it out, and hold it over the bowl. Gently tap the stick against the side of the bowl until the excess coating drips off. Avoid dipping twice, seriously, that’s how they fall! Decorate right away with your sprinkles before you place them upright in your styrofoam block to dry completely.
Expert Tips for Perfect Starbucks Copycat Birthday Cake Pops
I’ve made enough of these homemade cake pops to know exactly what goes wrong when you’re starting out, so let me save you some heartache! The biggest enemy here is temperature shock. If your cake balls come straight from the freezer and hit hot candy coating, they will crack instantly as they warm up too fast. That’s why that 10-minute warm-up time before the final dip is non-negotiable.
Another thing: don’t rush the tapping! When you lift the pop out of the melted candy, spend a good 10 seconds gently tapping that stick. If you pull it out too fast, you get a thick pool of coating around the base of the pop, and when that hardens, it creates a weak point, causing the pop to fall off later. Also, if your candy coating seems too thick for dipping, don’t add water! Add a tiny bit of vegetable oil, maybe half a teaspoon at a time, until it flows smoothly. Oil helps keep the coating stable, whereas water will make it seize up completely. Follow these little tricks, and you’ll have professional-looking vanilla cake pops every time!
Storing and Serving Your Homemade Cake Pops
The best part about these Starbucks Copycat Birthday Cake Pops is that they are super stable once the candy coating is set. You don’t need to worry about refrigeration, which is a huge win if you’re making them ahead of time for a party! Keep them out of direct sun, and they should stay fantastic for a few days. They are definitely best enjoyed within the first 48 hours, but they hold up well.
If you happen to have any leftovers (which is rare in my house!), here is how you keep them fresh. Remember, these are not meant to be reheated, just stored at room temperature.
| Condition | Storage Guidelines |
|---|---|
| Best Enjoyed | Within 48 hours |
| Maximum Storage Time | Up to 3 days |
| Environment | Airtight container at room temperature |
Frequently Asked Questions About Starbucks Copycat Birthday Cake Pops
I get so many questions about these delicious treats, so let’s clear up a few common concerns right now! I want everyone who tries this recipe to have success with their homemade cake pops.
Q1. Why did my candy coating crack after it hardened?
Cracking almost always happens because of temperature shock! Your cake ball was too cold when it hit the melted candy. Remember that 10-minute warm-up period after the second chill? Stick to that, and you should get a smooth, crack-free finish on your vanilla cake pops.
Q2. My cake balls are falling apart when I try to roll them. What am I doing wrong?
That means your cake was overbaked and too dry, or you didn’t add enough of the buttercream filling! The filling acts as the binder. If they are still too crumbly, try mixing in just a tiny bit more softened butter, maybe a teaspoon at a time, until they hold together when squeezed.
Q3. Can I use chocolate cake mix instead of vanilla for these copycat cake pops?
You absolutely can! While the classic Starbucks version uses vanilla, feel free to swap that cake mix for chocolate, red velvet, or even strawberry. Just make sure you match the wet ingredients listed on that new box, and you’ll have a whole new set of amazing homemade cake pops to enjoy!
Q4. How do I get the coating really thin like the store-bought ones?
The key is patience when melting! You need to stir frequently and stop heating just as soon as the last lump dissolves. If it’s still too thick, add a scant 1/4 teaspoon of vegetable oil and stir really well. That little bit of oil thins the candy melts without making them seize up.
Understanding the Estimated Nutrition for Starbucks Copycat Birthday Cake Pops
Hey everyone! Just a quick note before you start counting macros while devouring these amazing treats. Since we are using store-bought cake mix and various brands of candy melts, the exact nutritional breakdown can swing wildly. Please treat the numbers below as a rough guideline only!
The final numbers really depend on the specific brands of cake mix and candy melts you decide to use in your homemade cake pops.
| Nutrient | Estimated Amount Per Pop |
|---|---|
| Calories | [Estimate Needed] |
| Sugar | [Estimate Needed] |
| Fat | [Estimate Needed] |
Share Your NoobRecipes Success
That’s it! You’ve officially mastered the Starbucks Copycat Birthday Cake Pops. I want to see your beautiful, sprinkle-covered creations! Please jump down to the comments section and give this recipe a star rating so other new bakers know it’s easy to follow. Even better, snap a picture and tag us on social media. Seeing your success is why I run NoobRecipes!
If you want to save this recipe for later, be sure to follow us on Pinterest or share your results on our Facebook page!
Print
Starbucks Copycat Birthday Cake Pops: 3 amazing tips
- Total Time: 70 minutes
- Yield: Makes approximately 24 cake pops
- Diet: Vegetarian
Description
Make Starbucks Copycat Birthday Cake Pops at home with this easy recipe. These treats use a simple cake mix base and a homemade buttercream filling, coated in sweet candy melts and sprinkles. They are perfect for celebrations and simple enough for new bakers.
Ingredients
- 1 box (13.25 oz) vanilla cake mix
- 1/3 cup neutral oil (vegetable, avocado, canola, etc.)
- 1 cup milk or water
- 4 large eggs
- 1/4 cup unsalted butter, softened
- 1 cup powdered sugar
- 1 teaspoon vanilla extract
- pinch salt
- 1 teaspoon milk (add more if needed)
- 12 oz candy melts
- white nonpareils or sprinkles
Instructions
- Preheat oven to 325-350℉ (162-175℃). Follow the cake box directions for the exact temperature based on your pan size.
- Combine all cake ingredients in a large bowl. Pour batter into a greased or lined pan and bake. Test doneness with a toothpick 2-4 minutes before the listed bake time ends. Do not overbake.
- Transfer the hot cake to a large stand mixing bowl. Crumble the cake on low speed using a paddle attachment until smooth. You can also use a handheld mixer or crumble cooled cake by hand.
- In a small bowl, combine all buttercream ingredients. Sifting the powdered sugar is not needed. Stir until fairly smooth; some lumps are normal.
- Add the buttercream to the crumbled cake mixture. Mix until everything incorporates fully.
- Roll the mixture into cake pops about 1¼-inch (3 cm) in diameter or 30 g each. Place cake pops in the freezer for 15 minutes to chill.
- While chilling, melt a small amount of pink candy melts in the microwave per package directions, stirring in 15-30 second intervals until smooth and thin.
- Dip the tip of a lollipop stick into the melted candy, then gently insert the dipped tip halfway into a chilled cake ball. Repeat for all cake balls. Chill the dipped sticks in the freezer for another 15 minutes.
- Take the cake pops out of the freezer and let them warm up for 10 minutes at room temperature. Melt the remaining candy melts until you reach the desired thinness.
- Dip each cake pop fully into the melted candy coating, making sure you submerge it all the way to the stick base. This secures the pop.
- Hold the stick and gently tap the cake pop to let excess candy melt drip off. Aim for one even coat. Avoid dipping a second time, as this can make the pop fall off.
- Decorate immediately with sprinkles or nonpareils. Place the finished cake pops upright in a styrofoam block to dry. Repeat for the remaining pops.
Notes
- Chilling the cake pops before dipping results in a smoother coating and helps prevent cracking.
- Use different colored candy melts for variety in your decorations.
- Store the finished cake pops in an airtight container at room temperature for up to three days.
- Prep Time: 30 minutes
- Cook Time: 30 minutes
- Category: Dessert
- Method: Baking and Dipping
- Cuisine: American