Snickerdoodle Cookies were the absolute first thing I ever successfully baked when I started NoobRecipes, and let me tell you, they were a game-changer for me! I used to think baking was this scary, highly technical thing only professionals could handle. I remember my first attempt at *any* cookie ended up looking like a pile of sweet, flat lace. But these cookies? They are ridiculously forgiving. They taught me that even simple recipes, like these classic Snickerdoodle Cookies, can produce amazing results. If you’re just starting out, trust me, this recipe is your ticket to immediate cookie success without any fuss or fancy equipment.
Why You Will Master These Snickerdoodle Cookies
I designed this recipe specifically for folks who are just dipping their toes into the baking pool. Seriously, if you can stir ingredients together, you can nail these cookies. We aren’t dealing with finicky bread doughs or temperamental chocolate here. These Snickerdoodle Cookies are built for success, giving you that satisfying, soft, and chewy texture every single time. You won’t end up with flat, greasy discs, I promise!
Here’s why you’ll be adding this recipe to your weekly rotation:
- You get that perfect crinkly top and satisfyingly soft middle without any complicated chilling time.
- The flavor profile is pure nostalgia—that unmistakable tangy sweetness from the cream of tartar hits just right.
- The entire process, from mixing to pulling them out of the oven, takes less than half an hour, which is perfect for a weeknight craving.
- You only need standard pantry staples, meaning no emergency trips to specialty stores required!

Quick Prep and Clear Results for Snickerdoodle Cookies
One of the best parts about this recipe is how fast it comes together. We’re talking about only 20 minutes of prep time. That’s faster than most delivery apps! Because we use softened butter and skip the chill time, you can mix up the dough, roll those lovely balls, and have warm, chewy Snickerdoodle Cookies cooling on the rack before you even finish your coffee. The texture is guaranteed chewy because we watch the bake time like a hawk—they come out shiny in the center, which is your secret weapon for softness!
Essential Ingredients for Perfect Snickerdoodle Cookies
Okay, let’s talk fuel. Even though these are easy Snickerdoodle Cookies, the ingredients matter! I’ve listed out exactly what you need below. There’s nothing weird here—just good quality basics elevated by one tiny powerhouse ingredient that makes all the difference. When I first started baking, I used whatever butter was handy, but trust me, using softened, salted butter makes the creaming step so much smoother. Make sure your butter isn’t melted, just soft enough to press a finger into easily. That’s the key!
Understanding the Cream of Tartar in Snickerdoodle Cookies
If you’ve never used cream of tartar before, this is the recipe that will convert you! It’s the absolute secret sauce for authentic Snickerdoodle Cookies. It’s an acid, and when it reacts with the baking soda, it creates that signature slight tang you taste in the best versions. More importantly, it controls the spread of the cookie and helps lock in that wonderful, soft, puffy texture we are aiming for. Don’t skip it or try to substitute it—it’s non-negotiable for that classic cookie!
Ingredient Table for Snickerdoodle Cookies
Here is the exact breakdown so you can check your pantry:
| Ingredient | Amount |
|---|---|
| Salted Butter, softened | 1 cup (2 sticks) |
| Granulated Sugar | 1 and 1/3 cup |
| Brown Sugar, packed | 1/3 cup |
| Large Eggs | 2 |
| Vanilla Extract | 2 teaspoons |
| All-Purpose Flour, spooned and leveled | 3 and 1/4 cups |
| Baking Soda | 1 teaspoon |
| Kosher Salt | 3/4 teaspoon |
| Cream of Tartar | 1 and 1/2 teaspoons |
| For Rolling Sugar/Cinnamon Mix | 1/3 cup sugar + 1 1/2 tbsp cinnamon |
Step-by-Step Guide to Making Snickerdoodle Cookies
This is where the magic happens, and honestly, it’s so straightforward, you’ll be shocked at the results. First things first, get that oven warmed up to 350°F! I always line my baking sheets with silicone mats or parchment paper. It makes cleanup a breeze, and for beginner bakers, it ensures those cookies slide right off without sticking.
Preparing the Base Dough for Snickerdoodle Cookies
Start by creaming your softened butter in a big bowl until it’s nice and smooth. You need to get some air in there, so beat in both the granulated sugar and that packed brown sugar for a solid two minutes until the mixture looks lighter in color and fluffy. Don’t rush this part—it builds the foundation for chewy cookies! Next, add your two eggs one at a time, mixing well after each addition, followed by the vanilla. Scrape down the sides constantly so everything incorporates evenly.
Now for the dry stuff. In a separate bowl, whisk together your flour, baking soda, salt, and that crucial cream of tartar. Add these dry ingredients to your wet mixture, but here is my biggest tip: mix gently! You only want to combine them until you see no more dry streaks of flour. If you beat this mixture too long, you develop gluten, and suddenly your soft cookie turns into a tough biscuit. We want soft Snickerdoodle Cookies, so stop mixing as soon as it comes together!
Rolling and Coating Your Snickerdoodle Cookies
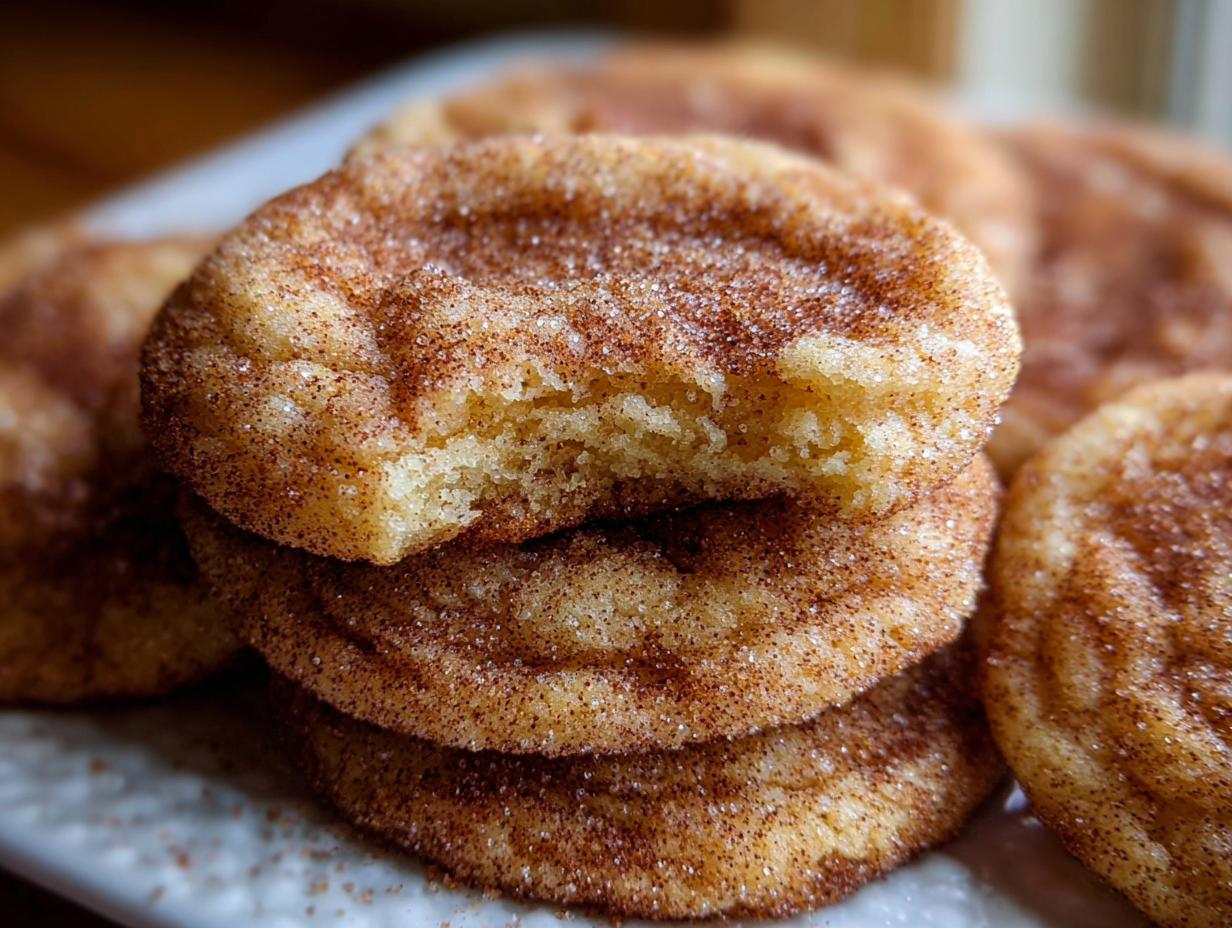
Time to make them look like the classics! Grab a small bowl and mix up your rolling coating: that 1/3 cup of sugar and the tablespoon and a half of cinnamon until it’s perfectly blended. I use a small cookie scoop or just eyeball them into dough balls, aiming for about 1½ to 2 inches wide. You want them hefty enough to stay soft inside. Roll each dough ball until it’s completely covered in that sweet cinnamon mixture. Make sure they are thoroughly coated—that outside layer caramelizes beautifully as they bake.
Place your coated dough balls about two inches apart on your prepared sheets. They need space to spread out and become the perfect, crinkly Snickerdoodle Cookies we are aiming for.

Baking and Finishing Your Snickerdoodle Cookies
Bake these beauties for 9 to 11 minutes. Don’t walk away! You are looking for the edges to look set, but the very centers should still look a little bit shiny. If they look totally matte and dry when you pull them out, they are already overbaked. Trust me on this one; they keep cooking on the hot pan.
Here’s the trick for that signature round shape: as soon as they come out of the oven—and I mean immediately—take a small spoon or the back of a round measuring cup and gently press down on the edges to push them back toward the center. This rounds out the cookie beautifully. Let them sit on the hot pan for about three to five minutes to firm up before moving them to a wire rack. For an extra burst of flavor, if you have any cinnamon sugar left over, give the tops another light dusting while they are still warm. Serve them up while they are still warm!
Tips for Success with Your Snickerdoodle Cookies
Even though these are easy, there are a few little things that can make the difference between a good cookie and a *great* one. I learned these the hard way, so you don’t have to! Follow these three quick tips and you will have perfect results every time you whip up these Snickerdoodle Cookies.
- Use room temperature, salted butter, but don’t let it get greasy or melted! If the butter is too warm when you cream it, the cookies spread too much in the oven and end up flat.
- Watch that oven like a hawk! Seriously, pull them out right when they look slightly shiny in the middle. If you wait until the shine is gone, they will be crisp instead of chewy.
- Don’t skip the second coating of cinnamon sugar! Doing that second roll or dusting while the cookies are still warm pulls that extra flavor right into the cookie, making them taste much richer.
Storing and Reheating Your Homemade Snickerdoodle Cookies
The hardest part about making these amazing Snickerdoodle Cookies is stopping yourself from eating them all in one sitting! Luckily, they store really well, though truthfully, they are best eaten the day you bake them. If you happen to have any leftovers, just keep them in an airtight container at room temperature. They should stay soft and delicious for about three to four days, provided you don’t peek too often! If you want to see more of my favorite baking tips, check out my Pinterest boards.
Freezing Dough for Future Snickerdoodle Cookies
This is my favorite trick for busy weeks. You can totally freeze the dough balls before you roll them in the cinnamon sugar, or roll them and then freeze them—either way works! Just place the dough balls on a parchment-lined tray and pop them in the freezer until they are solid. Once frozen, transfer them to a heavy-duty freezer bag. They keep great for up to three months, ready to go whenever a craving hits! If you want to save this recipe for later, be sure to follow me on Facebook.
Storage and Reheating Table
If you need a quick reference for how long your hard work will last, check out this handy chart. Remember, when baking from frozen, just add a few extra minutes to the baking time!
| Storage Method | Duration | Reheating Tip |
|---|---|---|
| Countertop (Airtight) | 3–4 days | A few seconds in the microwave brings back the softness. |
| Refrigerator | Up to 1 week | Best warmed briefly on a baking sheet at 300°F. |
| Freezer (Dough Balls) | Up to 3 months | Bake straight from frozen; add 2–3 minutes to cook time. |
Frequently Asked Questions About Snickerdoodle Cookies
When you’re learning to bake, questions pop up faster than you can mix the dough! I get tons of emails about these Snickerdoodle Cookies because everyone wants that perfect texture. Here are the top things I hear from my readers who are mastering their first batches of these easy cookies. If you are looking for other easy baking projects, check out my recipe for Sugar Cookie Bars.
Can I make these Snickerdoodle Cookies without cream of tartar?
Honestly, no, you shouldn’t if you want a real Snickerdoodle Cookie. Cream of tartar does two huge jobs here: it gives that signature slight tang that balances the sweetness, and chemically, it interacts with the baking soda to create the puffy, cracked look we love. If you skip it, you’ll end up with a basic sugar cookie that spreads too much and doesn’t have that classic flavor. It’s worth keeping on hand!
How do I get my Snickerdoodle Cookies extra chewy?
This is the secret to avoiding crisp, flat cookies! You must avoid overbaking them. Pull them out when the edges look set but the middle still looks slightly shiny and underdone—they continue to bake on the pan. Also, that second roll in the cinnamon sugar right after they come out of the oven really locks in moisture and gives you that extra layer of chewy goodness. Those two steps combined guarantee chewy Snickerdoodle Cookies every time. For another chewy favorite, try my Brown Butter Chocolate Chip Cookies.
Share Your Snickerdoodle Cookies Creations
I truly hope you loved baking these easy cookies as much as I love sharing them with you! Now that you’ve mastered your first batch of perfect Snickerdoodle Cookies, I’d love to hear about it. Hop over and leave a quick rating below so other beginner bakers know this recipe is a winner. Better yet, snap a photo and tag me on social media—seeing your success stories is why I started NoobRecipes!
Print
3 Amazing Snickerdoodle Cookies Secrets
- Total Time: 31 minutes
- Yield: About 3 dozen cookies
- Diet: Vegetarian
Description
Snickerdoodle Cookies are soft, chewy cookies coated in a classic cinnamon-sugar mix. This recipe delivers perfect results for new bakers.
Ingredients
- 1 cup salted butter (2 sticks), softened
- 1 and 1/3 cup granulated sugar
- 1/3 cup brown sugar, packed
- 2 large eggs
- 2 teaspoons vanilla extract
- 3 and 1/4 cups all-purpose flour, spooned and leveled
- 1 teaspoon baking soda
- 3/4 teaspoon kosher salt
- 1 and 1/2 teaspoons cream of tartar
- For rolling: 1/3 cup granulated sugar
- For rolling: 1 and 1/2 tablespoons cinnamon
Instructions
- Preheat your oven to 350°F. Prepare baking sheets with parchment paper or silicone mats.
- Beat the butter in a large bowl until smooth. Scrape the sides often.
- Add the white sugar and brown sugar. Beat for 2 minutes until light and fluffy.
- Add the eggs and vanilla extract. Beat well until smooth. Scrape the sides.
- Add the flour, baking soda, salt, and cream of tartar. Gently combine until no dry streaks show. Do not overmix.
- Shape the dough into balls, about 1½ to 2 inches wide.
- Combine the rolling sugar and cinnamon in a small bowl. Coat each dough ball completely in the mixture.
- Place the balls 2 inches apart on the baking sheet.
- Bake for 9-11 minutes. The edges should be set, and the centers just shiny. Avoid overbaking.
- Immediately after baking, use a spoon to gently push the edges inward to round the cookies.
- Let the cookies set on the pan for 3-5 minutes. Move them to a wire rack to cool a bit.
- While warm, coat both sides again in the remaining cinnamon sugar for extra flavor. Serve them fresh.
Notes
- Shape the dough balls, roll them in cinnamon sugar, and freeze them for up to 3 months.
- Bake directly from frozen. Add a few extra minutes to the baking time when baking frozen dough.
- Prep Time: 20 minutes
- Cook Time: 11 minutes
- Category: Dessert
- Method: Baking
- Cuisine: American