If you’ve ever been intimidated by cooking a big pot of chili, stop right there! Seriously, this is the recipe you need. We’re making the Easiest Simple Chili with Bell Peppers & Onions, and I promise it’s built for beginners. I’ve made this chili hundreds of times over the years, and what I love most is how it forces you to practice your knife skills safely.
When you’re starting out, chopping vegetables can feel like the hardest part, right? But mastering the basic dice on onions and peppers is crucial for flavor distribution. This recipe breaks those steps down for you so everything cooks evenly. We use good, hearty ingredients, and by the time this chili is simmering, your kitchen is going to smell absolutely incredible. Trust me, once you nail this basic technique, you’ll feel like you can tackle anything on the stove!

Gather Your Ingredients for Simple Chili with Bell Peppers & Onions
Okay, let’s talk about what you need before we even touch a cutting board. Getting everything measured out first—we call that *mise en place*—is the secret weapon for any busy cook. It keeps you calm when things start heating up on the stove! Don’t skip measuring your spices; that’s where the real flavor balance comes from in a good, simple chili.
Essential Components for This Simple Chili with Bell Peppers & Onions
These are the big players that make up the bulk of your hearty chili. Make sure your beans are drained and rinsed well—that gets rid of that extra can-y taste. And for the beef, about a pound and a half is perfect for 8 hungry people!
- 2 tablespoons olive oil
- 1 large yellow onion
- 1 green bell pepper
- 1 red bell pepper
- 4 cloves garlic
- 1\u00bd pounds ground beef
- 1 can (28 ounces) diced tomatoes
- 1 can (15 ounces) tomato sauce
- 2 cups beef broth
- 1 can (15 ounces) kidney beans, drained and rinsed
- 1 can (15 ounces) black beans, drained and rinsed
Spices and Flavor Builders
This is where the magic happens! We’re not using a pre-made packet here; we build the flavor from scratch, which tastes so much fresher. The smoked paprika is my favorite addition—it gives that deep, slow-cooked flavor without simmering for hours.
- 3 tablespoons chili powder
- 1 tablespoon ground cumin
- 1 tablespoon tomato paste
- 1 teaspoon smoked paprika
- 1\u00bd teaspoons salt
- \u00bd teaspoon black pepper
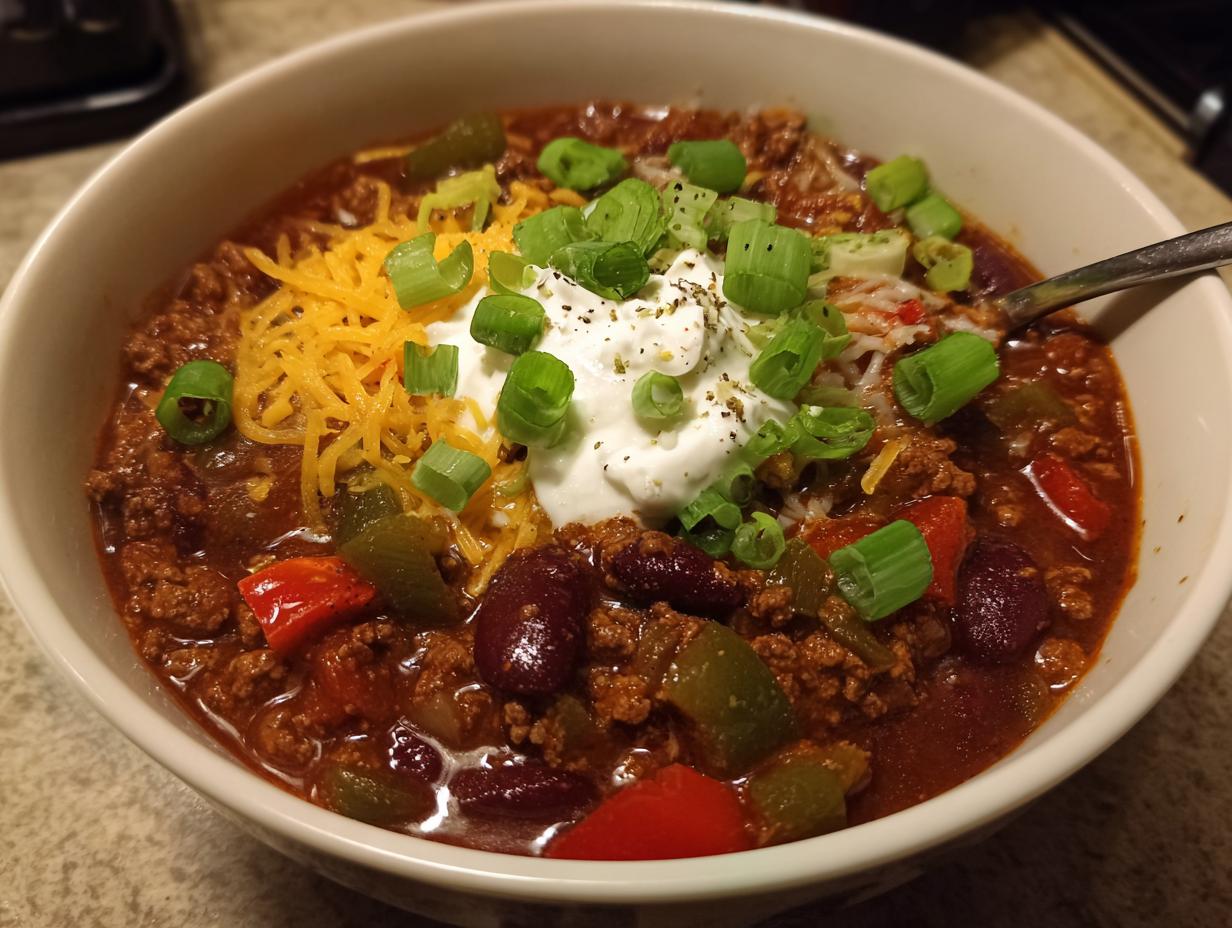
Suggested Toppings and Sides
Chili is honestly only half the fun without the toppings! I always put out a little topping bar so everyone can customize their bowl. Shredded cheese is non-negotiable in my house, but green onions add a nice, fresh bite late in the game.
- Shredded cheddar cheese (for serving)
- Sour cream (for serving)
- Sliced green onions (for serving)
- Tortilla chips (for serving)
Ingredients for Simple Chili with Bell Peppers & Onions
| Component | Amount | Notes |
|---|---|---|
| Olive Oil | 2 tablespoons | For sautéing |
| Yellow Onion | 1 large | Diced |
| Bell Peppers (Green & Red) | 1 of each | Diced evenly |
| Garlic | 4 cloves | Finely minced |
| Ground Beef | 1\u00bd pounds | Browned and drained |
| Chili Powder | 3 tablespoons | The main spice base |
| Cumin | 1 tablespoon | For earthiness |
| Tomato Paste | 1 tablespoon | For depth |
| Smoked Paprika | 1 teaspoon | My secret ingredient! |
| Diced Tomatoes | 1 can (28 ounces) | Undrained |
| Tomato Sauce | 1 can (15 ounces) | |
| Beef Broth | 2 cups | |
| Kidney Beans & Black Beans | 1 can (15 ounces) each | Rinsed well |
Building Foundational Knife Skills: Preparing for Simple Chili with Bell Peppers & Onions
This is the part where we get our hands dirty! Honestly, if you can master chopping this chili base, you’ve already won half the battle. The key to making this Simple Chili with Bell Peppers & Onions taste great is making sure all the vegetables cook at the same rate, and that only happens if they are cut roughly the same size. Don’t rush this, and please, use a sharp knife—it’s safer than a dull one, I promise!
I know when I first started, the sound of a knife hitting the board was terrifying. But think of this prep work as your training session. We’re building muscle memory here so that next time you make chili, you’ll be flying through these steps without even thinking about it. If you want more ideas on mastering basic cooking techniques, check out our Italian Chicken Skillet Recipe for more practice!
Preparing the Onion Safely
Onions always make me cry, but peeling them first helps a little! Peel off the papery outer layer, then slice the onion in half from top to bottom—right through the root end. Place the flat, cut side down on your board. Now, slice it into strips going toward the root, but stop right before you cut through the root itself. That root holds it together! Then, turn the onion 90 degrees and dice it across those strips. My biggest safety tip? Keep your fingertips curled securely under, using your knuckles as a guide for the knife blade. That way, the knife slides against your knuckle, not your skin!
Dicing Bell Peppers Evenly
Bell peppers are so colorful, and they add such a wonderful sweetness here. Slice them right down the middle lengthwise, pull those seeds and the white pithy core right out—toss all that away. Now, you have two nice, flat halves. Slice those into strips, just like we did the onion. Then, line those strips up and dice them into small, even half-inch pieces. Consistency matters here so your peppers aren’t mushy while your onions are still crunchy!
Mincing the Garlic
Garlic is potent, so we want it small enough to really melt into the chili base. Peel your cloves, give them a good whack with the side of your heavy knife to flatten them slightly—that loosens the skin, making it easy to slip off. Slice them thinly, and then gather them close together and rock your knife back and forth until you have fine little bits. We only cook this for about a minute later on, so we want it ready to go!
Step-by-Step Cooking: Making Your Simple Chili with Bell Peppers & Onions
Alright, prep work is done, and now it’s time for the fun part—turning those fresh veggies into a fantastic meal! We are going to coax out all the flavor from these simple ingredients. Keep your heat managed; that’s the secret to preventing scorching and building deep flavor in this Simple Chili with Bell Peppers & Onions.
Sautéing the Vegetables
Grab your biggest pot or Dutch oven—you need room for this chili to bubble away happily! Set the heat to medium-high. Drizzle in your two tablespoons of olive oil and let it get nice and shimmery. You want it hot enough to sizzle when the vegetables hit it. Toss in your perfectly diced onions and bell peppers. They need about five to six minutes here, stirring often, until they start to soften up and those onions turn wonderfully translucent. Don’t rush this softening time; it releases their sweetness!
Once they look good, toss in your minced garlic. Garlic burns so fast, so watch it like a hawk! It only needs about 60 seconds until you can really smell that amazing, pungent aroma. If you smell anything bitter, you’ve gone too far, so pull the pot off the heat immediately!
Browning the Beef and Blooming Spices
Now for the protein! Add your ground beef right into the pot with the veggies. You’ll need to cook this for about seven or eight minutes, using your spoon to break it up into nice, small crumbles as it cooks. Once it’s completely browned through—no pink left!—you might have excess fat sitting on top. If it looks greasy, carefully tilt the pot and spoon most of that fat out. Nobody wants greasy chili!
Here comes the flavor boost: dump in your chili powder, cumin, tomato paste, smoked paprika, salt, and pepper. Stir everything around until the meat and veggies are totally coated in those spices. Cook this mix for just a minute or two. This step is called ‘blooming’ the spices, and it wakes them up so they taste way more intense than just dumping them into liquid later.
Building the Chili Base
Time to add the wet stuff! Pour in the entire can of diced tomatoes (juice and all!), the tomato sauce, and those two cups of beef broth. Give it a really good stir, making sure you scrape up any little brown bits stuck to the bottom of your pot—that’s pure flavor gold you don’t want to leave behind! If you are looking for other easy dinner ideas, check out this Sheet Pan Chicken Parmesan.
Simmering for Flavor Development
Next, add in your rinsed kidney beans and black beans. Stir them in gently to distribute them evenly throughout the liquid. Now, crank the heat up until the whole pot comes to a rolling boil. Once it’s boiling hard, immediately drop the heat way down to low. You want a gentle bubble, not a violent churn. Cover the pot, but leave a small gap open so steam can escape—we want this to thicken, not water down. Simmer this masterpiece for a solid 45 minutes. Remember to stir it every 15 minutes or so to keep the bottom from sticking. After 45 minutes, taste it! Adjust salt and pepper if you need to, and then ladle it out! You can find more great soup and chili recipes on our Medium page.

Tips for Perfect Simple Chili with Bell Peppers & Onions Every Time
Even though this is a simple recipe, sometimes things don’t go exactly to plan, especially when you’re learning the ropes. Don’t sweat it! A few little tweaks near the end can save your dinner. I’ve learned these tricks over years of trial and error to ensure every batch of my Simple Chili with Bell Peppers & Onions is spot on.
Achieving the Right Consistency
If your chili looks a little too soupy after that 45-minute simmer, don’t panic! That just means your veggies released a bit more liquid than mine did that day. The easiest fix is to take the lid completely off and turn the heat up just a touch—medium-low works well—and let it simmer uncovered for another 10 or 15 minutes. You’ll see it thicken up nicely as the water evaporates. On the flip side, if you accidentally made it too thick and it looks like paste, just stir in a half-cup of extra beef broth or even water until it loosens up to that perfect, hearty consistency you want.
Seasoning Adjustments
This is where you make the chili yours! Always taste right before you serve it. The flavors really marry together during that long simmer, but sometimes they need a little nudge. If it tastes a bit flat, it usually needs salt. Add a small pinch, stir it in, wait a minute, and taste again. If you want more depth, add a tiny dash more cumin or chili powder. If it tastes too sharp or acidic from the tomatoes, a half-teaspoon of sugar can miraculously balance everything out. Never be afraid to adjust seasoning at the very end! For more flavor balancing tips, check out our guide on Walnut Banana Muffins Recipe (yes, baking has similar flavor principles!).
Storing and Keeping Your Simple Chili with Bell Peppers & Onions Fresh
This chili is even better the next day, so making a huge batch is totally encouraged! But we have to be smart about how we store leftovers to keep that beef safe and tasty. Food safety is key, especially with ground meat, so please don’t leave this sitting on the counter for hours after dinner. Get it cooled and tucked away as soon as you’re done eating! If you want to save this recipe for later, feel free to pin it on Pinterest.
Refrigerator Storage Guidelines
When you’re cooling it down, try to spread the chili out into shallower containers rather than keeping it all in one big, deep pot. This helps it chill down much faster, which is important for food safety. Once it’s cool, pop it into an airtight container. I’ve found that this Simple Chili with Bell Peppers & Onions tastes amazing for up to five days in the fridge. If you’re not planning on eating it all within that time, you should move the rest straight to the freezer!
Freezing for Later Meals
Freezing chili is a lifesaver for busy weeknights. Just like with the fridge, you must let the chili cool down completely on the counter first—maybe an hour or two—before putting it into freezer-safe bags or containers. Don’t fill your containers right to the top! Liquids expand when they freeze, so you have to leave about an inch of empty space at the top. This prevents your containers from cracking. It freezes beautifully and keeps well for about three months!
Storage and Reheating Guide
Reheating is usually just as easy as making it, honestly. For the fridge leftovers, I often just toss them in a pot over medium heat and let it bubble gently until hot all the way through. For frozen chili, thaw it overnight in the fridge first, and then heat it gently on the stove or even nuke it in the microwave in batches.
| Storage Method | Maximum Time | Reheating Tip |
|---|---|---|
| Refrigerator | Up to 5 days | Stovetop over medium heat until steaming |
| Freezer | Up to 3 months | Thaw overnight, then reheat gently |
Frequently Asked Questions About Simple Chili with Bell Peppers & Onions
I get so many questions about this recipe because it’s such a great starting point! People always wonder how to switch things up or how long certain steps take. Here are a few things I hear all the time about making this Simple Chili with Bell Peppers & Onions.
Can I make this chili vegetarian?
Absolutely! If you need to skip the ground beef, you have a couple of great options. My favorite substitute is using a mix of lentils—red or brown—or pulsing some hearty mushrooms in the food processor until they resemble ground meat. You’ll still want to follow the spice blooming steps exactly as written, just skip draining the fat! It adds a completely different texture but keeps that amazing pepper and onion base. If you are interested in vegetarian options, check out our Sweet Potato Black Bean Breakfast Tacos.
How long does the prep work really take?
If you’re focusing on those knife skills, you should budget about 15 minutes for prep time, just like the recipe says. Now, if you’re new to dicing, it might take you closer to 20 minutes the first time, and that is totally fine! Remember, we are focusing on consistent cuts, not speed. The 55 minutes of cooking time is mostly hands-off simmering, so the active time is pretty low.
What is the best way to serve this chili?
You know I love a good topping bar! For this simple chili, you can never go wrong with the classic trio: a big dollop of cool sour cream, a generous sprinkle of sharp shredded cheddar cheese, and a scattering of fresh, sliced green onions for color and bite. If you want something crunchy, tortilla chips are perfect for dipping!
Sharing Your Simple Chili with Bell Peppers & Onions Experience
Honestly, seeing you all succeed with this recipe is what makes me share all my kitchen secrets! This Simple Chili with Bell Peppers & Onions is more than just a meal; it’s a confidence booster. It shows you that you can handle spices, manage heat, and master basic vegetable prep all in one go. You can follow our updates on Facebook!
I really want to know how it turned out for you. Did you find that knife skill practice made a big difference? Did you add an extra dash of paprika like I sometimes sneak in? Don’t be shy! Head down to the comments below and give this recipe a star rating. Share your photos too—I love seeing your dinner bowls!
Happy cooking, everyone, and I’ll see you next time for another easy, flavor-packed meal!
Print
Make 1 Simple Chili with Bell Peppers & Onions
- Total Time: 1 hour 10 minutes
- Yield: 8 servings
- Diet: Omnivore
Description
Make simple chili with bell peppers and onions. This recipe helps beginner cooks build basic knife skills while preparing a hearty, flavorful chili.
Ingredients
- 2 tablespoons olive oil
- 1 large yellow onion
- 1 green bell pepper
- 1 red bell pepper
- 4 cloves garlic
- 1½ pounds ground beef
- 3 tablespoons chili powder
- 1 tablespoon ground cumin
- 1 tablespoon tomato paste
- 1 teaspoon smoked paprika
- 1½ teaspoons salt
- ½ teaspoon black pepper
- 1 can (28 ounces) diced tomatoes
- 1 can (15 ounces) tomato sauce
- 2 cups beef broth
- 1 can (15 ounces) kidney beans, drained and rinsed
- 1 can (15 ounces) black beans, drained and rinsed
- Shredded cheddar cheese (for serving)
- Sour cream (for serving)
- Sliced green onions (for serving)
- Tortilla chips (for serving)
Instructions
- Peel the onion, cut it in half top to bottom, place cut-side down, slice into strips, and then dice into small pieces.
- Cut bell peppers in half lengthwise, remove stems and seeds, slice into strips, and dice into small, even ½ inch pieces.
- Peel garlic cloves, slice thinly, then chop until finely minced.
- Heat olive oil in a large Dutch oven or pot over medium-high heat until shimmering.
- Add diced onion and bell peppers; cook for 5-6 minutes, stirring often, until vegetables soften and the onion is translucent.
- Add minced garlic and cook for 1 minute, stirring constantly, until fragrant.
- Add ground beef; cook for 6-8 minutes, breaking it into crumbles until completely browned; drain excess fat if necessary.
- Stir in chili powder, cumin, tomato paste, smoked paprika, salt, and black pepper; cook for 1-2 minutes until spices are fragrant and coat the meat.
- Pour in diced tomatoes, tomato sauce, and beef broth; stir well to combine and scrape browned bits from the bottom.
- Add kidney beans and black beans; stir thoroughly to distribute evenly.
- Bring the mixture to a rolling boil over high heat, then reduce heat to low, cover partially, and simmer for 45 minutes, stirring every 15 minutes.
- Check that the chili reaches 165°F internal temperature; taste and adjust seasoning, then ladle into bowls and serve with toppings.
Notes
- Keep your fingers curled under and use knuckles as a guide when chopping to protect fingertips.
- Use a sharp knife for easier, safer chopping.
- Dice all vegetables to roughly the same size for even cooking.
- Cook onions for 8 minutes initially to release natural sugars.
- Store leftovers airtight in the refrigerator for up to 5 days.
- Freeze chili after it cools completely, leaving 1 inch of headspace.
- Prep Time: 15 minutes
- Cook Time: 55 minutes
- Category: Main Dish
- Method: Stovetop Simmering
- Cuisine: American