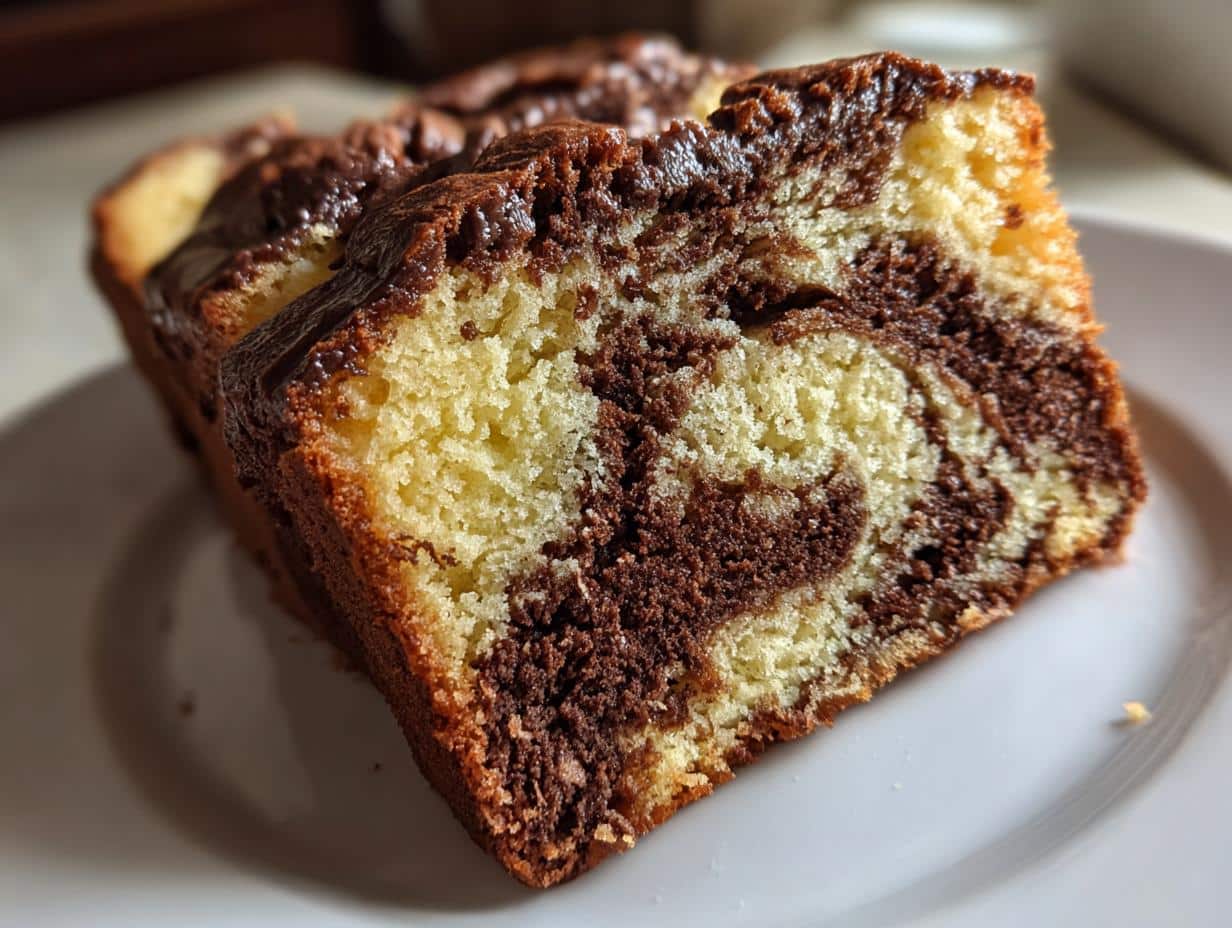
Oh, get ready to fall in love with this marble cake! Seriously, it’s become my go-to for pretty much everything. It looks so fancy with those gorgeous swirls, right? But the best part? It’s ridiculously easy to whip up. You know how some recipes look amazing but end up stressing you out? Not this one! I’ve messed around with marble cakes for ages, trying to get that perfect balance of chocolate and vanilla without making a mess, and I finally landed on this gem. It’s just… perfect.

Why This Most Perfect Marble Cake Recipe Stands Out
What makes this marble cake recipe my absolute favorite? It’s all about that effortless elegance. You get these stunning, intricate swirls that look like you spent hours on them, but honestly, it’s more about the technique than the time. I’ve tried so many variations over the years, and this one just nails it – the vanilla side is light and fluffy, and the chocolate part is rich and decadent, but they both bake up beautifully together. It’s the kind of cake that makes people ask, “Wow, did you *really* make this?” And the answer is always a proud “Yes!” Plus, it’s so versatile. Birthdays, potlucks, or just a Tuesday treat – it always fits the bill and disappears lightning fast. It’s become my secret weapon for impressing guests without breaking a sweat.
Gathering Your Ingredients for the Most Perfect Marble Cake
Okay, let’s get our ducks in a row, shall we? Having all your ingredients prepped and ready makes baking so much smoother, and trust me, it’s half the battle! For this gorgeous marble cake, you’ll need some pantry staples and just a couple of things that make that chocolate swirl sing.
Flour and Leavening Agents
First up, the dry stuff! You’ll want 2 ½ cups of all-purpose flour. Make sure you spoon it into your measuring cup and level it off, don’t just scoop straight from the bag, or you’ll end up with a dense cake. We’re also adding 1 teaspoon of baking powder and ½ teaspoon of baking soda for lift. A little pinch of ¼ teaspoon of salt is super important too – it just balances all the sweetness and makes the flavors pop. I always give these dry ingredients a good sift together; it just makes sure everything is evenly distributed and helps avoid any flour lumps.
Wet Ingredients and Sweeteners
Now for the creamy, dreamy part! We need 1 cup of unsalted butter, and it’s really important that it’s softened. Leave it on the counter for about an hour before you start, but you don’t want it melted, just soft enough that you can easily press your finger into it. Then, we have 1 ¾ cups of granulated sugar to make it nice and sweet. You’ll also need 4 large eggs – make sure they’re at room temperature too, it helps them incorporate better. And of course, 1 teaspoon of vanilla extract for that classic cozy flavor, and 1 cup of milk to help bring it all together.
The Rich Chocolate Swirl
This is where the magic happens! For that beautiful dark swirl, you’ll need ¼ cup of unsweetened cocoa powder. Make sure it’s unsweetened, otherwise, your chocolate part will be way too sweet. Then, grab 3 tablespoons of hot water. Just mix the cocoa powder and hot water together until you have a smooth, thick paste. It’s like a little chocolate shot that we’ll swirl into the batter later. Easy peasy!
Step-by-Step Guide to Creating the Most Perfect Marble Cake
Alright, let’s get this show on the road! Making this marble cake is actually way simpler than it looks. Just follow these steps, and you’ll be slicing into those gorgeous swirls in no time. Trust me, it’s worth every second!
Preparing the Batter Base
First things first, let’s get that oven preheating to 350°F (175°C). While it’s warming up, grab your loaf pan or a Bundt pan and give it a good grease and line it. I usually use a bit of baking spray or butter and then dust it with flour, or sometimes a parchment paper liner if I’m feeling fancy. Now, in a medium bowl, go ahead and sift together your flour, baking powder, baking soda, and salt. Give it a quick whisk to make sure it’s all mixed. In a separate, bigger bowl – this is where the magic starts – cream your softened butter and sugar together. You want it to get nice and fluffy and pale yellow, almost like whipped honey. This usually takes a few minutes with an electric mixer. Then, add your eggs one at a time, beating well after each one goes in. Stir in that lovely vanilla extract. Now, here’s the rhythm: you’ll add about a third of your dry ingredients, mix until just combined, then add half of your milk, mix again. Keep alternating, ending with the dry ingredients. So it’s dry, milk, dry, milk, dry. Just mix until everything is *just* combined. Don’t go crazy overmixing here!

Crafting the Chocolate and Vanilla Batters
Okay, you’ve got this beautiful plain batter. Now we need to split it! Take about half of the batter and gently spoon it into a separate small bowl. For the chocolate part, take that little paste you made earlier with the cocoa powder and hot water. Gently fold that rich chocolate mixture into one of the bowls of batter. Be careful not to overmix it; you just want it incorporated so you have two distinct batters: one vanilla, one chocolate. They should both look super smooth and delicious!
Achieving the Perfect Marble Swirl
This is the fun part! Grab your prepared pan. Now, start dropping alternating spoonfuls of the vanilla batter and the chocolate batter into the pan. You can do little dollops, or big ones, it really doesn’t matter. Just try to spread them out a bit as you go. Once all the batter is in the pan, take a butter knife or a skewer and *gently* swirl through the batters just once or twice. Seriously, one or two passes is all you need! You want those beautiful ribbons of chocolate and vanilla, not a muddy brown cake. Over-swirling will just mix everything together, and we want those distinct patterns.
Baking and Cooling the Most Perfect Marble Cake
Pop that swirled beauty into your preheated oven. It’ll need to bake for about 50 minutes. You’ll know it’s ready when a toothpick or a thin knife inserted right into the center comes out clean – no wet batter clinging to it! Once it’s done, let it cool in the pan for about 10 minutes. This helps it set up a bit. Then, carefully turn it out onto a wire rack to cool completely. Patience is key here; slicing into a warm cake can be messy, and you want those perfect swirls to show off!
Tips for Baking the Most Perfect Marble Cake
Alright, let’s talk about making this marble cake absolutely *perfect*. It’s pretty forgiving, but a few little tricks can really elevate it. You want those gorgeous swirls to pop and that cake to be super moist, right? I’ve learned a thing or two along the way!
Ensuring Consistent Marble Patterns
The secret to those stunning swirls is really about not overdoing it. When you’re dropping the batters into the pan, try to alternate them fairly evenly. Then, when you swirl with your knife, just do it once or twice, very gently. Think of it as just *kissing* the batters together. If you swirl too much, you’ll end up with a uniform brown cake, and we definitely don’t want that! You want to see those beautiful distinct ribbons.
Achieving a Moist and Tender Crumb
For that wonderfully moist texture, make sure your butter and eggs are at room temperature. This really helps them emulsify properly, creating a smoother batter and a tender crumb. Also, resist the urge to overmix once you add the flour and milk – just mix until it’s combined. Overmixing develops the gluten too much, which can make the cake tough. And finally, don’t overbake! That toothpick test is your best friend. A few moist crumbs are perfect; a completely dry toothpick means it’s gone a bit too far and might be dry.
Frequently Asked Questions About the Most Perfect Marble Cake
Can I Use a Different Pan for the Most Perfect Marble Cake?
Absolutely! While I love my trusty loaf pan or a pretty Bundt pan for this marble cake, you can totally use other pans. If you’re using a 9×13 inch rectangular pan, you might need to adjust the baking time a little – it usually bakes a bit faster, maybe around 35-40 minutes. Just keep an eye on it and do the toothpick test! If you’re using round cake pans, you might need two 8-inch pans, and the baking time would be similar to the loaf pan, around 45-50 minutes. Just make sure the batter isn’t too deep, or it can get tricky to bake evenly.
How Do I Store Leftover Most Perfect Marble Cake?
Oh, if there’s any leftover, that is! The best way to keep this marble cake fresh is to wrap it tightly in plastic wrap or pop it into an airtight container. It’ll stay nice and moist at room temperature for about 2-3 days. If you want it to last a bit longer, you can pop it in the fridge, but I find it can dry out a tad in there. For longer storage, slicing it and freezing the individual slices wrapped well is a great option. You can just thaw a slice at room temperature when you fancy a piece!
What Are Some Variations for the Most Perfect Marble Cake?
This cake is pretty perfect as is, but you know me, I love to play around! For a little extra zing, you could add some orange zest to the vanilla batter – it pairs wonderfully with chocolate. Or, if you’re feeling adventurous, a tablespoon of espresso powder mixed into the hot water for the chocolate batter can really deepen that chocolate flavor. You could also try adding a handful of mini chocolate chips to the chocolate batter for little bursts of chocolatey goodness. Just keep it simple so those beautiful swirls still shine through!
Understanding the Nutritional Profile of the Most Perfect Marble Cake
When it comes to baking up this beautiful marble cake, I focus on the joy and deliciousness it brings to the table! Because everyone uses slightly different ingredients – like the specific brand of butter or milk – it’s tricky for me to give exact nutritional numbers that would be spot-on for *your* cake. So, while I don’t have precise nutritional info to share, just know that this cake is made with love and simple, wholesome ingredients!
Serving and Enjoying Your Most Perfect Marble Cake
This cake is a showstopper all on its own, but a little something extra never hurts! I love a simple dusting of powdered sugar over the top – it just highlights those gorgeous swirls. Or, if you want to go a little fancier, a light drizzle of a simple vanilla glaze or even a chocolate ganache looks amazing and tastes even better.
Presentation Ideas for Your Most Perfect Marble Cake
Honestly, the swirls do most of the work for you! But if you want to make it extra special, serve it on a pretty cake stand. A few fresh berries on the side, like raspberries or strawberries, add a lovely pop of color and freshness that balances the richness. It looks so elegant and totally makes it feel like a celebration, even if it’s just for you!


Most Perfect Marble Cake: Divine Swirls
- Total Time: 70 minutes
- Yield: 1 loaf cake or bundt cake
- Diet: Vegetarian
Description
A simple yet impressive marble cake recipe with beautiful swirls, perfect for any occasion.
Ingredients
- 2 ½ cups all-purpose flour
- 1 tsp baking powder
- ½ tsp baking soda
- ¼ tsp salt
- 1 cup unsalted butter, softened
- 1 ¾ cups granulated sugar
- 4 large eggs
- 1 tsp vanilla extract
- 1 cup milk
- ¼ cup cocoa powder
- 3 tbsp hot water
Instructions
- Preheat your oven to 350°F (175°C). Grease and line a loaf or bundt pan. In a bowl, sift together the flour, baking powder, baking soda, and salt.
- In a separate large bowl, cream the butter and sugar until fluffy. Add the eggs one at a time, mixing well after each, then stir in the vanilla. Alternately add the dry ingredients and the milk to your butter mixture, starting and ending with the dry ingredients.
- Divide the batter in half. In a small bowl, mix the cocoa powder and hot water until smooth, then gently fold this into one half of the batter.
- Pour alternating spoonfuls of the vanilla and chocolate batters into your prepared pan. Use a knife to gently swirl through the batter just once or twice to create a marbled look.
- Bake for about 50 minutes, or until a toothpick inserted into the center comes out clean. Let it cool for 10 minutes before moving it to a wire rack to cool completely.
Notes
- The cake disappeared quickly at a special occasion.
- The swirls are impressive but the cake is simple to make.
- Prep Time: 20 minutes
- Cook Time: 50 minutes
- Category: Dessert
- Method: Baking
- Cuisine: American