I remember standing in my kitchen years ago, staring at yeast packets like they held ancient secrets. I wanted that gorgeous, crackly, artisan loaf you see in fancy bakeries, but the idea of kneading dough until my arms ached? Forget it! I nearly gave up on homemade bread entirely until I stumbled upon this method. It changed everything.
This recipe is pure magic because it does all the hard work while you sleep. Seriously, you mix four simple ingredients, cover the bowl, and walk away. When you wake up, you have this bubbly, active dough ready to go. It’s the ultimate confidence booster for anyone who thinks baking bread is too complicated. Trust me, if you can stir ingredients with a wooden spoon, you can nail this Easy No-Knead Overnight Artisan Bread.
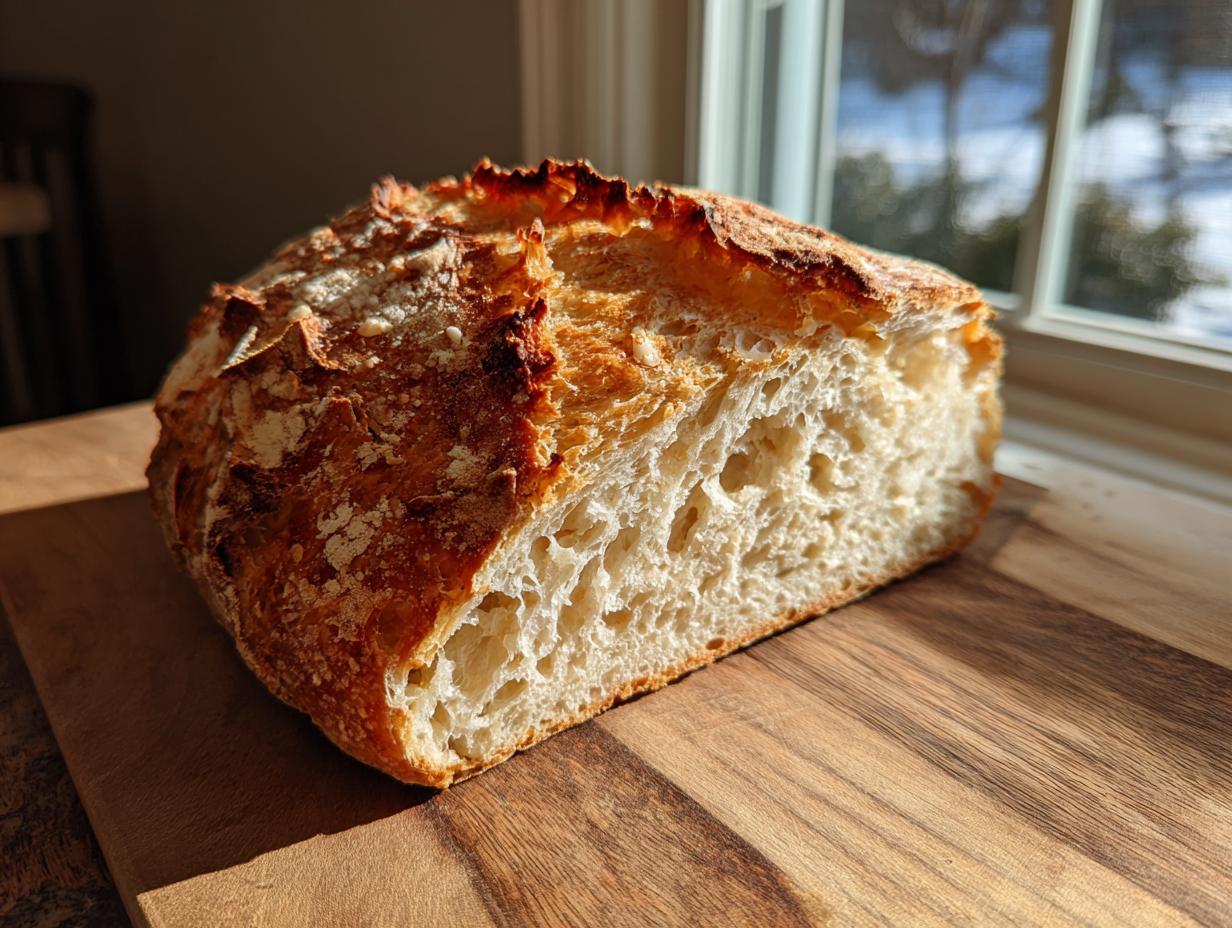
The result is incredible: a thick, dark, audibly crackling crust hugging a soft, chewy interior. It tastes like it took hours of dedicated labor, but your hands barely did anything! It’s my go-to solution for busy weeks when I still crave that fresh-baked smell filling the house. We’re talking golden perfection with zero fuss.

Why This Easy No-Knead Overnight Artisan Bread Recipe is Perfect For You
If you’ve been intimidated by bread making, stop right now. This is the recipe that’s going to convert you into a bread baker overnight—literally! It requires almost zero physical effort, which is why I love it so much on hectic days. It’s designed for people who want huge rewards for minimal input.
You get that incredible, rustic texture without ever touching the dough aggressively. It’s the perfect entry point into the world of artisan baking, and you’ll be shocked at the results.
Key Benefits of Our Easy No-Knead Overnight Artisan Bread
- Minimal Hands-On Time: Seriously, about five minutes of actual work the night before. That’s it!
- Incredible Texture: You get that signature chewy interior and shatteringly crisp crust everyone dreams about.
- Beginner Proof: If you can mix flour and water, you can master this Easy No-Knead Overnight Artisan Bread.
- Flavor Development: The long, slow rest allows the flavors to deepen beautifully, making it taste complex.
Essential Ingredients for Easy No-Knead Overnight Artisan Bread
Okay, let’s talk supplies. The beauty of this Easy No-Knead Overnight Artisan Bread is how few things you actually need. You probably have most of this stuff sitting in your pantry right now. We’re sticking to the basics because the long rest time does all the heavy lifting for flavor development. We aren’t adding eggs or oil—just the core four elements that make real bread taste like real bread.
I always measure my flour using a kitchen scale if I can, just because humidity plays tricks on measuring cups. But if you don’t have one, just spoon the flour lightly into the cup and level it off. Don’t pack it down, or you’ll end up with a brick instead of a beautiful loaf!
Ingredient Clarity and Measurements
Here is the magic formula. Pay close attention to the yeast type and the water temperature; those two things are crucial for getting that beautiful bubble structure overnight.
- All-Purpose or Bread Flour: You need three and one-third cups. Bread flour gives you a bit more chew, but regular AP flour works just fine for this recipe.
- Instant Yeast: Just half a teaspoon! That tiny amount works over many hours to create the rise. Don’t use active dry yeast unless you activate it first; stick to instant for simplicity.
- Kosher Salt: One and a quarter teaspoons. Salt is flavor, but it also helps control the yeast, so don’t skip it!
- Warm Water: One and a half cups. This is important: it should be warm, around 110 degrees Fahrenheit. If it’s too hot, you’ll kill your yeast before it even starts working its overnight magic.
Equipment Needed for Your Bake
You don’t need fancy mixers or proofing baskets for this bread, which is part of why I love it! The most important tool you’ll need is a heavy, sturdy bowl—one that can hold the dough and be covered tightly. I use my biggest ceramic mixing bowl.
But the real star here is your Dutch oven. You need a 6-quart one with a lid, and it needs to be oven-safe up to 450 degrees. That pot traps the steam released by the dough, which is how we get that incredible, professional crust without needing a separate steam pan. Don’t forget parchment paper; it’s your best friend for safely moving the sticky dough into that hot oven!
Step-by-Step Guide to Making Easy No-Knead Overnight Artisan Bread
This is where the magic happens, or rather, where you let the magic happen while you go about your life. Seriously, the instructions are so straightforward. We break this down into three main phases: mixing, resting, and finally, the exciting part—baking!
Initial Mixing and the Overnight Rest
First things first: grab that big bowl. Whisk your flour, instant yeast, and salt together really well. You want those dry ingredients totally combined so the yeast is evenly distributed. Next, pour in that warm water. Now, ditch the mixer and forget the idea of kneading! Grab a wooden spoon—yours or mine, doesn’t matter—and just stir until everything is incorporated. It won’t look pretty; it will be sticky and shaggy, almost like a wet mess. That is exactly what you want!
Cover that bowl super tightly with plastic wrap. I mean airtight! We need to trap all the moisture and gases in there. Now, leave it alone. You must let this dough rest at room temperature for 12 to 18 hours. I usually mix mine right after dinner, and by the next morning, it’s ready. Don’t stress about the exact time; 14 hours is perfect, but 18 hours makes it even tangier!

Shaping and Final Proofing for Your Easy No-Knead Overnight Artisan Bread
When you come back the next day, wow! The dough will have doubled, look loose, and you’ll see tons of bubbles on the surface. That’s the fermentation working hard. Lightly flour a big sheet of parchment paper. Gently scrape all that bubbly dough out onto the paper. This is not the time to punch it down; we want to keep those air pockets!
Now for the shaping. Take the edges of the dough and gently fold them over toward the center, just two or three times. Don’t overwork it! You are just trying to create a little surface tension. Shape it into a rough round ball. Cover that lightly with a tea towel and let it rest for just 30 minutes. This final little nap is important for the structure of your Easy No-Knead Overnight Artisan Bread.
Baking Instructions in the Dutch Oven
While your dough is taking its final rest, it’s time to heat up the engine. Place your Dutch oven, lid and all, into the oven and preheat it to 450 degrees Fahrenheit. It needs to get screaming hot! This takes about 30 minutes.
When the oven is ready, carefully take out that blazing hot pot. Use the parchment paper to lift your dough—it acts like a sling—and gently lower the whole thing right into the center of the Dutch oven. Pop the lid back on immediately. Bake covered for 35 to 40 minutes. The lid traps the steam, giving you that gorgeous oven spring and crust development. Finally, take the lid off and bake uncovered for another 10 to 15 minutes until it’s that deep, golden-brown color you see in magazines. Patience for the final cool-down is key, trust me!
Tips for Perfect Easy No-Knead Overnight Artisan Bread
Even though this recipe is incredibly forgiving, a few little tricks will take your Easy No-Knead Overnight Artisan Bread from great to absolutely show-stopping. If your dough seems way too sticky when you turn it out, don’t panic and don’t add more flour! Just use slightly more flour on your hands and the parchment paper. Remember, it’s supposed to be wet.
For that deep, mahogany crust we love, make sure your Dutch oven is fully preheated. It needs to be ripping hot when the dough goes in. If you want an even darker color, you can leave the lid off for the last 18 minutes instead of 15. Also, if you’re tempted to slice it right out of the oven—don’t! Let it cool for at least 30 minutes on a rack. That cooling time sets the interior structure, making it chewy instead of gummy. These small steps ensure every loaf of your Easy No-Knead Overnight Artisan Bread is perfect.
Storing and Enjoying Your Loaf
The hardest part about this bread is waiting for it to cool down! I know, the smell is intoxicating, but slicing into it too soon makes the crumb gummy, and you worked too hard for a gummy crumb. Let it rest on a wire rack for at least 30 minutes—an hour is better if you can manage it. That time allows the steam to escape and the interior structure to set perfectly.
Once cooled, storing this bread is super easy. You want to keep that hard-earned crust crisp, so skip the plastic bag! A paper bag or wrapping it loosely in a clean kitchen towel works best on the counter for a couple of days. If you need it to last longer, freezing is the way to go.
Storage and Reheating Guide
Here’s my cheat sheet for keeping your loaves fresh. Honestly, I rarely have leftovers past day two, but better safe than sorry!
| Storage Method | Duration | Reheating Tip |
|---|---|---|
| Countertop (loosely wrapped) | 2 days | Quick spritz of water, wrap in foil, heat at 350°F for 5 minutes. |
| Freezer (tightly wrapped) | Up to 1 month | Thaw on counter, then reheat as above for that fresh-baked sound. |
Frequently Asked Questions About This Beginner Bread
I get so many questions about this recipe, which tells me you all are excited to bake! Most people worry about the timing or if they can swap ingredients around. Don’t worry about tweaking things too much right away; stick to the basics the first few times until you trust the process. Here are the things I hear most often:
Q1. What if I forget to mix the dough the night before? Can I still make the Easy No-Knead Overnight Artisan Bread?
You can, but it won’t taste the same! The overnight rest is what develops the deep, complex flavor. If you truly forget, you can try letting it sit on the counter for 3 to 4 hours instead, but the texture will be much more cake-like, and you’ll miss out on that artisan tang. It’s worth planning ahead! If you want to see other bread recipes, check out our guide on 4 Ingredient Artisan Bread Recipe.
Q2. Can I use whole wheat flour in this recipe?
You can substitute up to one cup of the all-purpose flour with whole wheat flour. If you use more than that, the dough will become very stiff and dense, and it won’t rise as well because the bran in whole wheat cuts the gluten strands. Keep it mostly white flour for this specific method!
Q3. Why is my dough not bubbly after resting?
This usually means your water was too hot and killed the yeast, or your kitchen is super cold. Yeast needs warmth to wake up and work its magic. If your kitchen is chilly, try placing the covered bowl in the oven with just the light on for a few hours—it creates a nice, gentle warmth.
Q4. Can I add cheese or herbs to the Easy No-Knead Overnight Artisan Bread?
Absolutely! I love adding Parmesan cheese or a tablespoon of dried rosemary. Make sure you add those mix-ins right when you add the water—before the long rest so they can flavor the dough evenly. For other savory baking ideas, you might enjoy our Caramelized Onion Goat Cheese Tart.
Share Your Easy No-Knead Overnight Artisan Bread Creations
I truly hope you loved making this bread as much as I love eating it! I get so excited seeing your success stories. When you pull that gorgeous, crusty loaf out of your oven, snap a picture!
Tell me what you thought about the texture or if you tried adding any herbs to your Easy No-Knead Overnight Artisan Bread. Hearing how this recipe worked for you—or even if you had a little oops moment—keeps me inspired to keep sharing my kitchen secrets! You can follow our updates on Facebook or save this recipe on Pinterest.
Print
Amazing 1 Easy No-Knead Overnight Artisan Bread
- Total Time: 55 minutes (plus overnight rise)
- Yield: 1 large loaf
- Diet: N/A
Description
This overnight artisan bread is golden and crusty on the outside, soft and chewy inside. Just mix, rest overnight, and bake — no kneading required.
Ingredients
- 3 ⅓ cups all-purpose or bread flour (430 g)
- ½ teaspoon instant yeast
- 1 ¼ teaspoons kosher salt
- 1 ½ cups warm water (about 110°F)
Instructions
- In a large bowl, whisk together flour, yeast, and salt.
- Add warm water and stir with a wooden spoon until a sticky, shaggy dough forms. Do not knead.
- Cover the bowl tightly with plastic wrap and let it rest at room temperature for 12 to 18 hours.
- The next day, the dough should look bubbly and loose.
- Lightly flour a piece of parchment paper and scrape the dough onto it.
- Sprinkle with flour and gently fold it over itself 2 to 3 times. Shape into a rough round or oval.
- Cover lightly with a towel and let rest for 30 minutes.
- Place a 6-quart Dutch oven with its lid inside your oven and preheat to 450°F while the dough rests.
- Carefully remove the hot Dutch oven. Lift the parchment paper with the dough and lower it into the pot.
- Cover with the lid and bake for 35 to 40 minutes.
- Remove the lid and bake another 10 to 15 minutes until golden brown and crusty.
- Transfer the loaf to a cooling rack and let cool at least 30 minutes before slicing.
Notes
- Add 2 tablespoons grated parmesan or 1 teaspoon chopped herbs to the dough before the overnight rest for a flavorful variation.
- Prep Time: 5 minutes
- Cook Time: 50 minutes
- Category: Bread
- Method: Baking
- Cuisine: Artisan