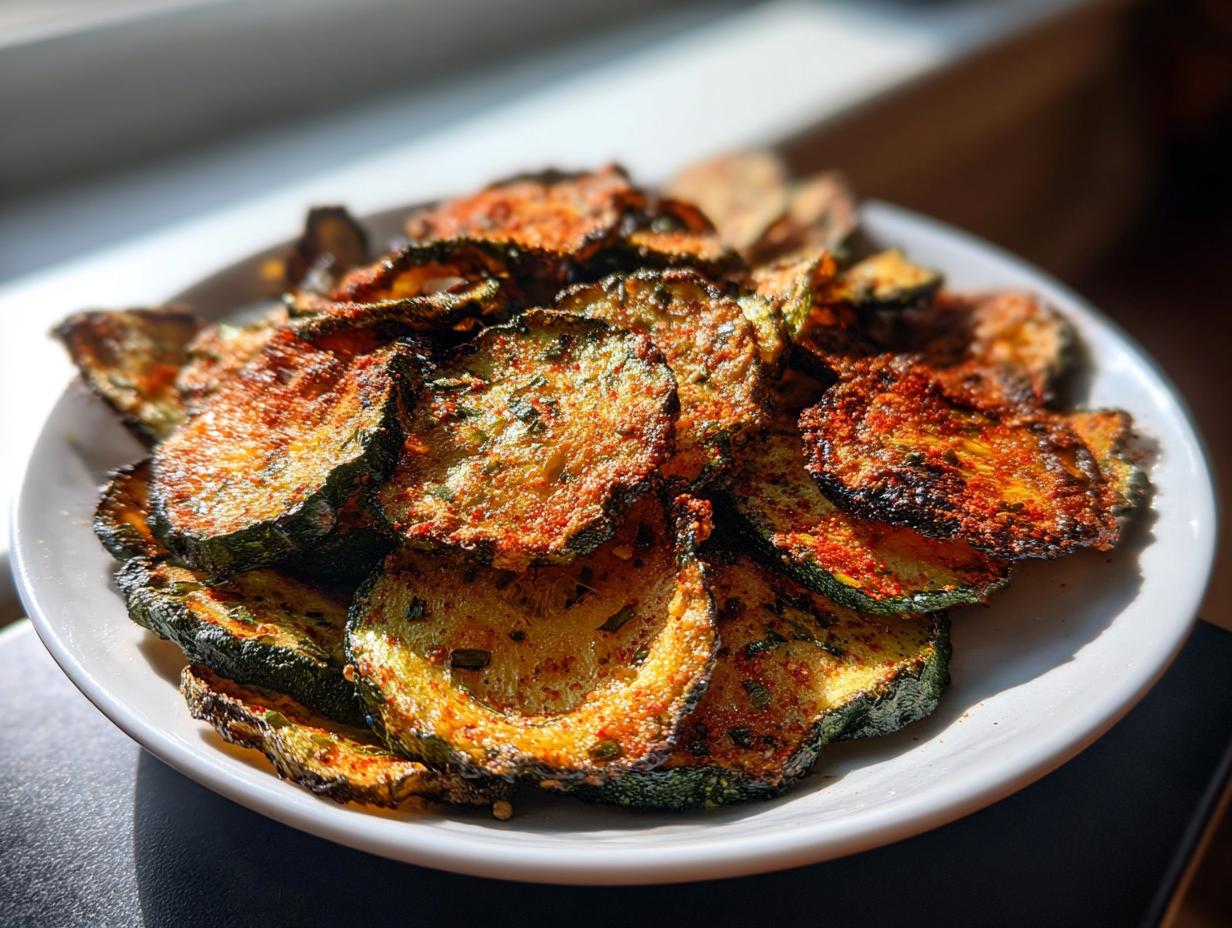
If you’re like me, sometimes you just need a snack that tastes amazing but doesn’t leave you feeling sluggish afterward. That’s why I’m so obsessed with these Crispy Baked Zucchini Chips! Seriously, they are the answer to every healthy craving you’ve ever had.
Forget those floppy, under-seasoned baked zucchini attempts you might have tried before. My secret method guarantees they come out unbelievably light and crunchy, almost like delicate crackers. They are so easy, even if you’re brand new to the kitchen, you can nail this recipe on your very first try. Trust me, once you see how simple it is to make these Crispy Baked Zucchini Chips, you’ll never buy those bagged chips again!

Gathering Your Ingredients for Crispy Baked Zucchini Chips
Okay, gathering supplies is my favorite part because it means we’re one step closer to snacking heaven! Don’t worry if you don’t have fancy equipment; most of this list is probably already in your pantry. The key here is using fresh zucchini and good quality olive oil. We want those chips to sing, not just sit there, right?
The measurements are super important, especially when we start pulling the water out of the zucchini. We don’t want soggy chips, we want shatteringly crisp ones! I’ve laid out everything you need below, including that little bit of Parmesan if you want to add some savory depth.
Ingredient List for Crispy Baked Zucchini Chips
Here is exactly what you need to make the best Crispy Baked Zucchini Chips you’ve ever had:
| Zucchinis | 2 medium (make sure they aren’t huge!) |
| Olive Oil | 1\u00bd tablespoons |
| Sea Salt | \u00bd teaspoon |
| Garlic Powder | \u00bd teaspoon |
| Smoked Paprika | \u00bd teaspoon |
| Black Pepper | \u00bc teaspoon |
| Parmesan Cheese (Optional) | 2 tablespoons, finely grated |
Essential Equipment Needed
You don’t need a massive setup, but these tools make the job infinitely easier. First, you absolutely must have parchment paper. If the zucchini touches the bare metal pan, it sticks, and we can’t have that!
Next, slicing evenly is non-negotiable for perfect chips. I highly recommend a mandoline slicer because it gets those paper-thin slices every time, which is crucial for crispness. If you don’t have one, just use your sharpest knife and take your time. You’ll also need two large baking sheets so we don’t crowd the pan later on!
Step-by-Step Guide to Perfect Crispy Baked Zucchini Chips
This is where the magic happens, but honestly, it’s less about complicated cooking and more about patience—especially with pulling out the water. If you follow these steps exactly, especially the drying part, you’ll be rewarded with the crunchiest Crispy Baked Zucchini Chips you’ve ever made at home. Don’t rush the waiting parts; they are essential!
Preparation and Moisture Removal
First things first, get that oven warmed up! We need a low and slow bake, so set it to 250\u00b0F. While it’s heating, line two large baking sheets completely with parchment paper. Don’t skip this paper; it saves your sanity later!
Now for the slicing. This is the make-or-break step. You need those rounds to be about \u2153-inch thick—no thicker! If they are too chunky, they will just steam instead of crisping up. If you’re using a mandoline, be careful and use the guard—safety first, always!
Once sliced, lay all those pretty rounds out on a layer of paper towels. Sprinkle them lightly with just a pinch of salt. Let them sit there for about 10 minutes. You’ll actually see little beads of water forming on the surface. After the time is up, use more paper towels to blot them completely dry. I mean bone dry! Any remaining moisture means floppy chips.
Seasoning and Arranging for Baking Success
Time to flavor these little guys! Put your dried zucchini slices into a bowl. Drizzle on that olive oil and sprinkle over your spices: garlic powder, smoked paprika, black pepper, and the remaining sea salt. If you’re using that optional Parmesan, toss it in now too.
Gently toss everything together until every single slice has a light, even coating. Don’t overmix or you’ll break them! Once seasoned, you have to arrange them on your prepared baking sheets. And here’s a huge tip for making amazing Crispy Baked Zucchini Chips: they must be in a single layer. Absolutely no overlapping!
If the zucchini slices are touching, the steam gets trapped, and boom—you’ve got steamed zucchini, not crunchy chips. Use both pans if you need to. It’s better to use two pans than to crowd one!
The Baking Process for Crispy Baked Zucchini Chips
Slide those trays into the preheated oven. We are baking these for a long time at a low temperature, usually between 1 hour 45 minutes and 2 hours total. The low heat helps them dry out without burning.
Crucially, you must flip them halfway through—around the one-hour mark. Use tongs to turn each one over so they dry evenly on both sides. Keep an eye on them towards the end; they can go from perfect to burnt quickly!
When they look golden brown and you can easily bend one without it flopping over, they are done. Pull them out, but don’t eat them just yet! Let them cool on the baking sheet for about 5 minutes. This final cooling time is where the last bit of steam escapes and they achieve that ultimate, satisfying crunch for your Crispy Baked Zucchini Chips.

Tips for Achieving Ultimate Crispy Baked Zucchini Chips
I’ve made so many batches of these chips that I’ve learned a few tricks that separate the good ones from the truly amazing ones. Honestly, the secret sauce for these Crispy Baked Zucchini Chips isn’t the paprika; it’s all about air and dryness!
First, let’s talk airflow. That low oven temperature is key, but the air needs to move around the zucchini. If you have a convection setting on your oven, use it! It mimics professional dehydrating and really speeds up the drying process while keeping the heat gentle.
Second, I cannot stress this enough: slice them evenly. If you have some that are super thin and others that are thick, the thin ones will burn before the thick ones even start to crisp. If you don’t own a mandoline, try to eyeball them as perfectly as you can, maybe even using a ruler for the first few slices just to set your standard.
And finally, when you arrange them on the sheet, imagine you are placing them on a crowded bus—no one should be touching anyone else! If you stick to a single layer, you guarantee that wonderful, even crispness across the entire batch of Crispy Baked Zucchini Chips. If you skip this, you’ll end up with soft spots, and nobody wants that!
Simple Variations for Your Crispy Baked Zucchini Chips
Once you master the basic technique—especially getting them dry enough—you can start playing with the flavor profiles! That’s the fun part about making your own Crispy Baked Zucchini Chips; you control the salt and the spices completely. We used smoked paprika and garlic, which is savory and smoky, but there are so many other directions you can go.
If you love Italian flavors, try swapping the paprika for dried oregano and basil. Add just a tiny pinch of onion powder too. When you toss them with the oil, make sure those herbs get evenly distributed so every chip gets a hit of flavor.
For something totally different, try a little heat! A quarter teaspoon of cayenne pepper mixed in with the regular spices gives these Crispy Baked Zucchini Chips a fantastic kick. If you want something brighter, skip the Parmesan and instead toss the dried slices with a teaspoon of lemon zest right before they go into the oven. That citrus smell while they bake is incredible!
Remember, no matter what spices you choose, the process stays the same: dry, toss lightly, and bake low and slow. Experimenting with seasonings is the best way to make these Crispy Baked Zucchini Chips your own signature healthy snack! Roasted chickpeas are another great crunchy alternative!
Serving Suggestions for Your Baked Vegetable Chips
Now that you have a massive pile of gorgeous, crunchy chips, you need some things to dip them in! Honestly, these baked vegetable chips are so flavorful on their own, they don’t even need anything extra, but where’s the fun in that?
For a classic pairing, you can’t beat a simple Greek yogurt dip. Mix some plain yogurt with a squeeze of fresh lemon juice, a little dried dill, and maybe a clove of minced garlic if you’re feeling bold. It’s tangy and cool, which is a perfect contrast to the warm, smoky chip. Try our Greek Yogurt Ranch Dip for an easy option!
If you want something creamier, hummus is always my go-to. I usually buy plain hummus and swirl in a little bit of pesto right before serving—it looks fancy but takes zero effort! These also work beautifully as a crunchy topping sprinkled over a main course. Try crushing a few up and using them instead of croutons on your next salad for an extra layer of texture!
Storing and Keeping Your Crispy Baked Zucchini Chips Fresh
We’ve done all that hard work getting these chips perfectly dry, so we definitely need to store them correctly, right? The absolute number one rule for keeping your Crispy Baked Zucchini Chips crunchy is avoiding moisture. If you put them in a plastic bag or a container that isn’t airtight, they will soften up within hours. Not good! You can find more great snack ideas on our site.
Use a sturdy, sealed, airtight container and keep it in a cool, dark pantry. If you can find one of those glass jars with the rubber seals, those are my favorite for chip storage.
Now, if you open the container the next day and they’ve lost a little bit of their snap—don’t panic! You can bring them right back to life. Just spread the Crispy Baked Zucchini Chips back out on a baking sheet and pop them into a 300\u00b0F oven for about 5 to 8 minutes. This quick blast of dry heat will bake off any residual dampness, making them crispy again, just like fresh!
Frequently Asked Questions About Crispy Baked Zucchini Chips
I get so many questions about these little gems! People are always amazed that you can get this kind of crunch without deep frying. Here are the top things folks ask me about making these Crispy Baked Zucchini Chips.
Q1. Why are my baked zucchini chips soft instead of crispy?
Nine times out of ten, it comes down to moisture! Did you blot the zucchini slices thoroughly after salting them? If there’s water left, they steam. Also, make absolutely sure they aren’t touching each other on the baking sheet. Airflow is everything for a great healthy snack!
Q2. Can I make these without an oven, like in an air fryer?
You absolutely can, and they cook way faster! Air fryers are amazing for getting things extra crisp. You’ll want to cook them at about 350\u00b0F, but you need to check them every 5 minutes after the first 10 minutes. They might only take 15 to 20 minutes total, depending on your machine. Just watch them closely so they don’t burn!
Q3. Are these really a low calorie snack?
They are! Since we are baking them with just a tiny bit of olive oil, they keep the calorie count way down compared to potato chips. Most of the bulk is just water weight from the zucchini itself. They are such a guilt-free way to satisfy that crunchy craving.
Q4. My slices aren’t uniform. Should I worry?
A little bit, yes. If you have some slices that are paper-thin and some that are half a centimeter thick, the thin ones will burn before the thick ones are done. That’s why I push the mandoline so hard! For the best Crispy Baked Zucchini Chips, try your best to keep the thickness consistent.
Sharing Your Results
I seriously cannot wait for you to try these Crispy Baked Zucchini Chips! They have changed my snacking game completely. Once you pull that tray out and hear that satisfying crunch, let me know what you think! Drop a rating down below and tell me what seasoning variation you tried first. Happy baking! You can share your creations with us on Pinterest.
Sharing Your Results
I seriously cannot wait for you to try these Crispy Baked Zucchini Chips! They have changed my snacking game completely. Once you pull that tray out and hear that satisfying crunch, let me know what you think! Drop a rating down below and tell me what seasoning variation you tried first. Happy baking! Follow our latest updates on Medium.
Print
Amazing 1-Hour Crispy Baked Zucchini Chips
- Total Time: 2 hours 0 minutes
- Yield: 4 servings
- Diet: Vegetarian
Description
Light, crunchy, and perfectly seasoned, these crispy baked zucchini chips make a healthy snack or side—easy to make and full of flavor.
Ingredients
- 2 medium zucchinis
- 1½ tablespoons olive oil
- ½ teaspoon sea salt
- ½ teaspoon garlic powder
- ½ teaspoon smoked paprika
- ¼ teaspoon black pepper
- 2 tablespoons finely grated Parmesan cheese (optional)
Instructions
- Preheat oven to 250°F. Line two baking sheets with parchment paper.
- Wash and dry zucchinis well. Slice them into ⅓-inch rounds using a mandoline or sharp knife.
- Arrange slices on paper towels and lightly sprinkle with a pinch of salt. Let sit for 10 minutes to draw out moisture. Pat dry thoroughly.
- In a bowl, toss the slices with olive oil, garlic powder, smoked paprika, black pepper, and Parmesan (if using).
- Lay zucchini slices in a single layer on the prepared baking sheets without overlapping.
- Bake for 1 hour 45 minutes to 2 hours, flipping halfway through, until golden and crisp.
- Let cool for 5 minutes to finish crisping before serving.
Notes
- For best results, slice evenly and avoid crowding the pan so air circulates freely.
- Prep Time: 10 minutes
- Cook Time: 1 hour 50 minutes
- Category: Snack
- Method: Baking
- Cuisine: American