Okay, so you want to make Biko? I remember the first time I tried—it was a sticky, sad mess that refused to set! But don’t worry about my early failures, because I cracked the code, and I’m sharing the secret to the ultimate easy biko recipe perfect for absolute beginners. This isn’t some complicated, stovetop-stirring-for-three-hours recipe; we’re using the oven to do most of the heavy lifting!
The best part about this biko recipe is how forgiving it is once you get the rice texture right. We skip the traditional, intense stirring phase by baking the topping on, which gives you that gorgeous, slightly crisp golden top without burning your arm out. Seriously, if you can soak rice and stir a pot for a little while, you can nail this chewy, sweet Filipino sticky rice cake. It’s rich, it’s comforting, and it tastes exactly like the celebrations I grew up with.

Gathering Your biko recipe Ingredients
Making truly great Biko relies heavily on using the right stuff, especially when it comes to the rice and the sugar. Don’t try to cheat here; the quality of these two things makes or breaks the texture and that beautiful deep caramel color we’re aiming for in this biko recipe. I spent years wondering why my batches weren’t as chewy as my Tita’s, and it always came down to the sugar. You absolutely must use dark brown sugar, not light. The molasses content is crucial for that rich, almost burnt-sugar flavor in the glaze that makes Biko famous.
Glutinous rice, which we call sweet rice, is non-negotiable too. Regular long-grain rice just won’t get sticky enough. Once you have your components ready, the mixing goes so quickly, but getting organized first is key!
Essential Components for Your biko recipe
For the best results in this biko recipe, pay close attention to the soaking time for the rice and make sure you grab the dark brown sugar. That dark sugar is the backbone of the flavor!
- Glutinous Rice: Needs a long soak—at least six hours!
- Dark Brown Sugar: Used for both the rice base and the topping for deep caramel notes.
- Coconut Milk: We use it both in the cooking process and separately for the glaze.
Equipment Needed for Preparation
You don’t need a ton of fancy gadgets, thankfully! Make sure your biggest pot is clean and ready for the initial cooking phase. Having a good whisk on hand for the topping is also helpful.
- Large heavy-bottomed pot (for cooking the rice mixture).
- Small saucepan (for simmering the caramel topping).
- A sturdy 9×13-inch baking dish (greased well!).
- A rubber spatula or wooden spoon for stirring—metal can sometimes scratch your pots.
Step-by-Step biko recipe Instructions
This is where we turn those soaking grains into something truly special. Don’t rush the process, but honestly, once you start cooking, it moves fast! We’re doing this in three main phases: getting the rice cooked, making it sticky sweet, and then baking it under that beautiful glaze. Follow these steps closely, especially the stirring parts, and you’ll have a fantastic biko recipe result.
Preparing the Glutinous Rice Base
First things first: drain and rinse that soaked rice really well. You want the water to run clear before it hits the pot. Now, grab your large pot. We are combining the main portion of the coconut milk—that’s four cups—with an equal amount of plain water. Pop this on medium heat and let it come up to a gentle boil. Once it’s simmering nicely, pour in your rinsed rice.
This initial cooking takes about 10 to 12 minutes. You need to stir it occasionally, almost like you’re making risotto, just to make sure nothing sticks to the bottom and the rice cooks evenly. You’ll know it’s ready for the next step when you see that most of the liquid has been absorbed and the grains are starting to swell and feel tender when you press them against the side of the pot. It shouldn’t be mushy yet, just starting to soften!
Cooking the Sweet and Chewy Rice Cake
Time to bring in the flavor and the stickiness! Lower your heat down—we don’t want scorching here. Stir in your 1\u00bd cups of dark brown sugar and that half teaspoon of salt. Now, this is the part that requires your full attention for about five to seven minutes. You have to stir constantly! The sugar will melt, releasing more liquid, and then that liquid needs to cook down until the whole mixture is thick and super sticky. Trust me, if you walk away, you will end up with a burnt mess stuck to the bottom of your pot. Keep scraping the bottom and sides until it pulls away cleanly when you drag your spoon through it.
Once it’s thick like that, take it off the heat. Preheat your oven to 350 degrees Fahrenheit now, and make sure you grease that 9×13 baking dish generously. Press that sweet, sticky rice evenly into the dish. Don’t pack it down too hard; you want it level but still relatively light.
Creating the Caramel Topping and Baking
While the rice is settling in the pan, use a separate small saucepan for the topping. Combine the remaining 1 cup of coconut milk and 1 cup of brown sugar. Bring this to a simmer over medium heat. You need to watch this closely for about 8 to 10 minutes, stirring often—it’s going to bubble up! You’re looking for it to thicken just a bit, becoming syrupy. It won’t be super thick, but it should coat the back of a spoon lightly.
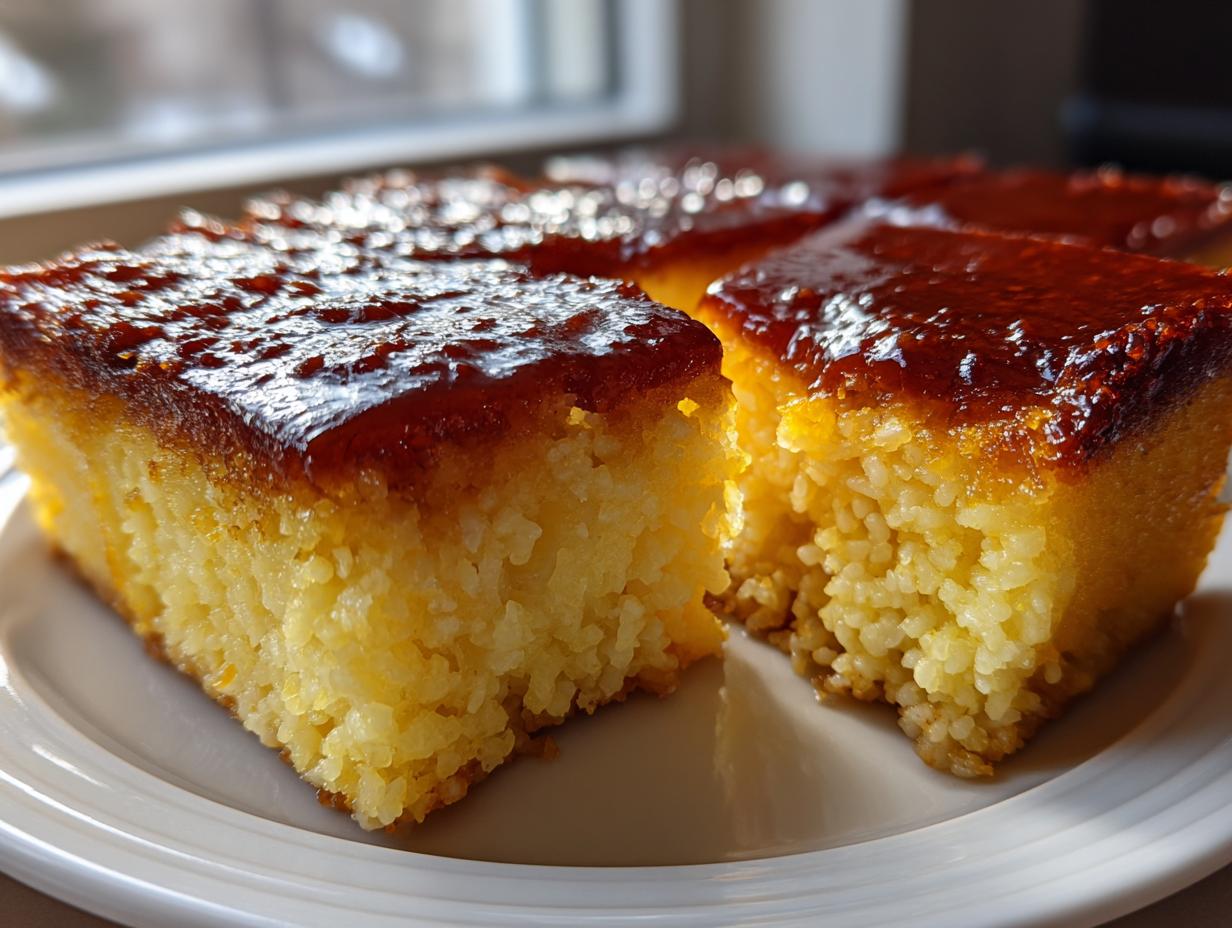
Pour that beautiful caramel mixture evenly over the rice layer in the baking dish. Don’t just dump it in one spot; try to distribute it gently. Now, pop it into the preheated oven. It needs to bake for about 55 to 65 minutes. You are waiting for that topping to turn deep golden brown and look slightly crisp around the edges. It’s magical! Let it cool completely before cutting. Seriously, let it set, or it will fall apart when you try to slice those lovely squares.

Equipment Needed for Preparation
You don’t need a ton of fancy gadgets, thankfully! Make sure your biggest pot is clean and ready for the initial cooking phase. Having a good whisk on hand for the topping is also helpful.
- Large heavy-bottomed pot (for cooking the rice mixture).
- Small saucepan (for simmering the caramel topping).
- A sturdy 9×13-inch baking dish (greased well!).
- A rubber spatula or wooden spoon for stirring—metal can sometimes scratch your pots.
Tips for a Perfect biko recipe
Even with the easiest instructions, sometimes Biko throws a little curveball! Most issues come down to either the rice being too wet or the topping not setting right. If you follow this biko recipe but still have trouble, these little fixes usually solve everything right away. Remember, Biko is supposed to be chewy and dense, not soupy!
Managing Rice Texture
If your rice feels undercooked after the initial pot cooking (Step 3), don’t panic and add tons of water! That’s the quickest way to get mush. Instead, cover the pot tightly and let it steam off the heat for another 10 minutes before adding the sugar. If the final baked Biko seems too soft, it probably needed more time stirring when you added the first round of sugar—that stirring is what evaporates excess moisture. It should be thick enough to mound on your spoon!
Achieving the Golden Glaze
The topping is tricky because you don’t want it to burn before it thickens. When you’re simmering the coconut milk and sugar for the glaze, keep the heat at medium-low. If it boils too aggressively, the sugar will crystallize instead of turning into that nice syrup. Watch for the tiny bubbles breaking the surface—that’s your cue that it’s getting syrupy. Pouring it over the room-temperature rice base helps it set evenly in the oven, too, so don’t rush that cooling time!
Essential Ingredient Notes and Swaps
Let’s talk substitutes, because sometimes you just don’t have what the recipe calls for! The biggest sticking point is the rice. Please, please try to find actual glutinous or sweet rice. If you use regular long-grain white rice, you will end up with a grainy, crumbly mess, not the satisfying chewiness Biko is famous for. It just won’t absorb the liquid the same way.
For the sugars, I mentioned dark brown sugar is best for color and flavor, but if you are truly desperate, you can use light brown sugar. Just know the final product will be lighter in color and slightly less complex in taste. Don’t try to swap the coconut milk for regular milk, though! That coconut fat is what gives the rice its rich mouthfeel. Stick to the coconut for the best results!
Serving Suggestions for Your biko recipe
This sweet, chewy biko recipe is wonderful all on its own, but presentation makes it feel extra special for parties! I always cut mine into neat diamond shapes—it just looks more authentic that way. If you want to elevate it even further, try topping individual squares with a dollop of fresh, slightly sweetened whipped cream or a sprinkle of toasted coconut flakes. It adds a lovely textural contrast to the dense rice cake. Serve it slightly warm or at room temperature, paired with strong black coffee or maybe some fresh mango slices! If you enjoy sweet treats, you might also like our recipe for sweet potato pie cookies.
Storing and Reheating Your biko recipe
I know you won’t be able to finish this entire batch of biko recipe goodness in one sitting—it’s huge! The good news is that this sticky rice cake keeps really well, which is why it’s perfect for making ahead of time. You want to make sure it cools completely before you even think about putting it away. If you wrap it while it’s warm, you’ll trap steam, and that leads to a soggy topping, which is just sad.
Store leftovers tightly covered at room temperature for up to two days, or if your kitchen is really warm, pop it in the fridge for up to four days. When you’re ready to enjoy it again, reheating is simple, but you need to be gentle so you don’t melt that lovely baked glaze completely.
Here’s my quick cheat sheet for keeping your Biko perfect:
| Storage Method | Duration | Reheating Tip |
|---|---|---|
| Airtight Container (Room Temp) | Up to 2 Days | Serve as is, or microwave 10 seconds per square. |
| Airtight Container (Refrigerator) | Up to 4 Days | Microwave longer (20-30 seconds) or warm slightly in a low oven (300°F). |
Frequently Asked Questions About biko recipe
I get so many questions about this sticky rice cake, which tells me everyone wants to master this biko recipe! Here are the top things readers ask me when they’re getting ready to bake their first batch.
Q1. Can I skip soaking the glutinous rice?
Oh, please don’t! Soaking is essential. If you skip it, the rice won’t absorb the coconut milk evenly, and you’ll end up with a mixture that’s either hard and grainy or completely mushy. Aim for at least six hours, or overnight if you can manage it.
Q2. My topping is cracked and dry. What went wrong?
That usually happens if you bake it too long or if the rice mixture was packed down too tightly. The topping needs a little moisture underneath it to bake properly. Also, make sure you let the cake cool completely before slicing; slicing it hot forces the glaze to crack because it hasn’t set.
Q3. Can I substitute the dark brown sugar with white sugar?
You can, but I really advise against it for this specific biko recipe. White sugar gives you a pale, sweet cake, but the dark brown sugar is what creates that deep, almost molasses-y caramel flavor, especially in the topping. It’s worth the extra trip to the store! If you are looking for other sweet treats, check out our chocolate sea salt nut bars recipe.
Q4. Why is my rice sticking to the bottom of the pot during the initial cooking?
That means your heat was too high! When you add the rice to the simmering coconut milk, it needs to stay at a gentle simmer, not a rolling boil. Keep stirring gently but consistently during those first 10 minutes to lift the grains off the bottom before the sugar goes in.
Share Your biko recipe Experience
I truly hope this easy recipe brings that wonderful Filipino comfort food into your kitchen! Once you’ve cut those beautiful squares, I’d love to see how yours turned out. Did the topping set perfectly? Leave a rating below so I know what you thought, or tag me in your photos on social media. You can follow our updates on Facebook or see our inspiration on Pinterest. Happy baking, everyone!
Print
Amazing 1 Easy biko recipe Bake Secret
- Total Time: 1 hour 20 minutes (plus soaking time)
- Yield: 20 squares
- Diet: Vegetarian
Description
This easy Biko recipe makes a sweet and chewy coconut sticky rice cake topped with a golden caramel glaze. It is perfect for dessert or celebrations.
Ingredients
- 4 cups glutinous rice (sweet rice)
- 4 cups coconut milk (for base)
- 1½ cups water
- 1½ cups dark brown sugar (for base)
- ½ teaspoon salt
- 1 cup coconut milk (for topping)
- 1 cup dark brown sugar (for topping)
Instructions
- Soak the glutinous rice in water for at least 6 hours or overnight. Drain and rinse well before cooking.
- Combine 4 cups coconut milk and water in a large pot. Bring to a gentle boil over medium heat.
- Stir in the soaked rice. Cook 10–12 minutes, stirring occasionally, until most of the liquid absorbs and the rice is tender.
- Lower the heat. Stir in 1½ cups brown sugar and salt. Cook 5–7 minutes, stirring constantly, until thick and sticky.
- Preheat your oven to 350°F. Grease a 9×13-inch baking dish and spread the sweet rice mixture evenly inside.
- In a small saucepan, combine 1 cup coconut milk and 1 cup brown sugar. Simmer over medium heat 8–10 minutes, stirring often, until slightly thickened and syrupy.
- Pour the caramel mixture evenly over the rice layer.
- Bake 55–65 minutes, until the top is deep golden brown and slightly crisp.
- Cool completely before cutting into squares or diamonds. Serve at room temperature.
Notes
- Soaking time is not included in the total time calculation.
- Use dark brown sugar for the best caramel color and flavor.
- Prep Time: 20 minutes
- Cook Time: 1 hour
- Category: Dessert
- Method: Baking
- Cuisine: Filipino