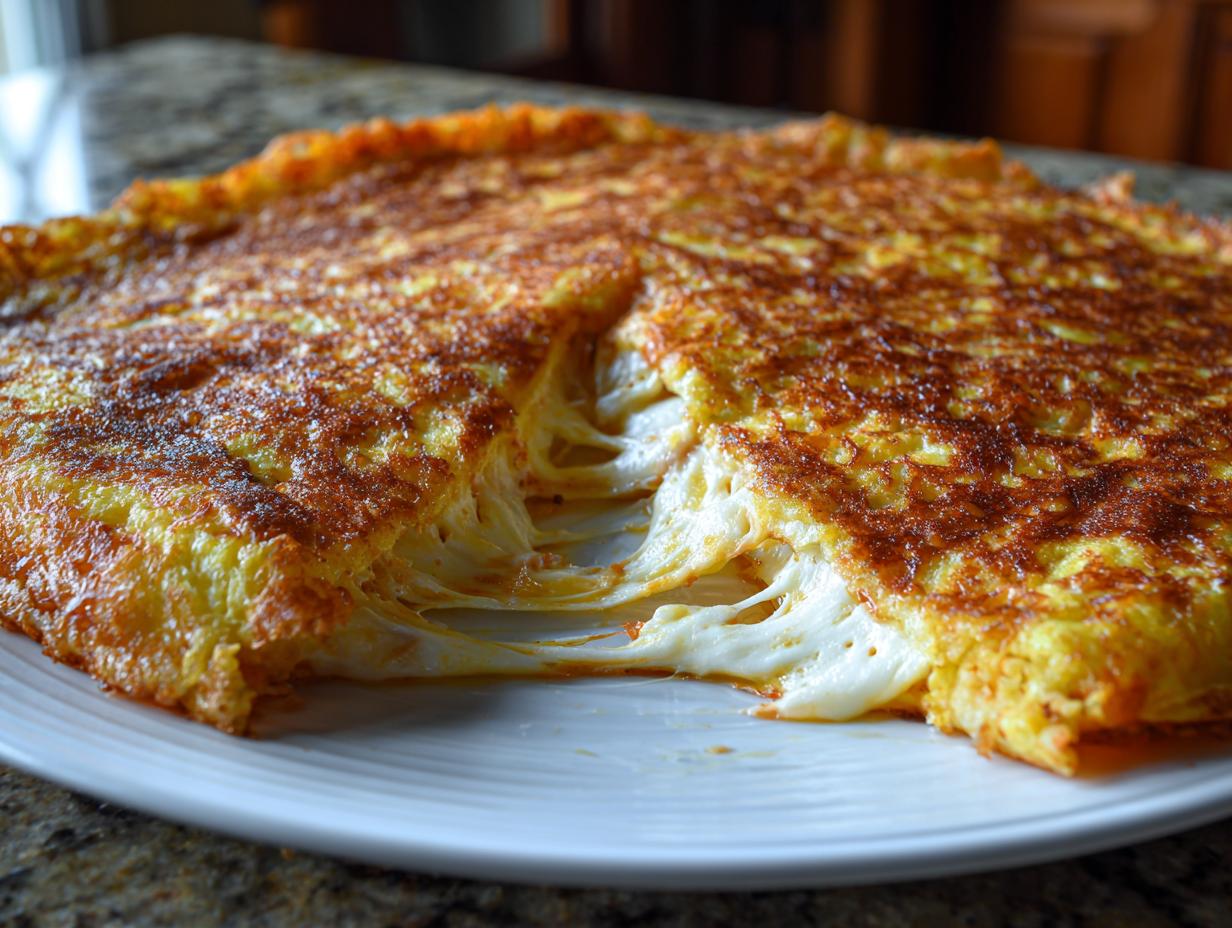
There’s nothing quite like the absolute comfort of something warm, savory, and cooked right in a skillet, is there? Forget complicated baking projects; I live for recipes that deliver huge flavor with minimal fuss. That’s why I’m dying to share my recipe for the most incredible cheese stuffed pancakes you’ll ever taste. I’m talking about that perfect contrast: golden, shatteringly crisp on the outside, and just bursting with gooey, melted cheese on the inside.

When I first started messing around with savory breakfast items, I struggled so much with things sticking to the pan or the filling oozing out halfway through cooking. It took me a few messy tries, but I finally cracked the code on these. This recipe is proof that you don’t need fancy techniques to make something truly special. It’s simple, it uses pantry staples, and it’s absolutely foolproof once you know the secret to sealing them up tight. If you’re new to the kitchen or just need a reliable weeknight dinner, trust me, these cheese stuffed pancakes are about to become your new favorite thing. You can see more of our savory ideas over on our Pinterest page.
Gathering Your Ingredients for Perfect cheese stuffed pancakes
Getting ready for these cheese stuffed pancakes is half the fun, and honestly, it’s mostly just pulling things out of the pantry! Because this recipe is so simple, the quality of what you use really shines through. We aren’t adding a ton of spices or complex additions, so making sure your core components are fresh makes a huge difference in that final crispy texture.
The main thing to remember here is measuring your dry ingredients accurately. Unlike a cake where you can sometimes eyeball things, these pancakes rely on the right ratio of flour to baking powder to get that perfect rise and structure around the filling.
Essential Dry Mix Components
Grab your largest mixing bowl! We need 2 cups of all-purpose flour, which is the backbone of our structure. Don’t skimp on the leavening—2 teaspoons of baking powder are crucial for getting that puff we want before the cheese melts. Then, just 1 teaspoon of sugar to balance the saltiness, and about three-quarters of a teaspoon of kosher salt. Whisk these together really well until they are totally uniform. That’s our foundational success right there.
Dairy and Fat Requirements
For the wet stuff, you’ll need 1 cup of whole milk—don’t reach for skim milk here; the fat content helps everything stay tender. We also need 2 tablespoons of good unsalted butter, melted, but let it cool just slightly before you add it to the milk so it doesn’t scramble anything. Now for the star: the cheese! You need 1.5 cups of shredded mozzarella and half a cup of cheddar. That combination gives you that fantastic stretch from the mozzarella and the sharp flavor from the cheddar in your cheese stuffed pancakes.
Equipment Needed for Your Skillet cheese stuffed pancakes
You won’t need anything fancy for these, which is why I love them so much for a quick breakfast or dinner. We are keeping this strictly to standard kitchen tools because we want the focus to be on those amazing cheese stuffed pancakes, not complicated gadgets.
Mixing and Cooking Tools
- Large mixing bowl for the dough base
- Whisk and measuring cups/spoons
- A sturdy, large skillet (cast iron works great if you have it!)
- A spatula for flipping
Step-by-Step Instructions for Savory cheese stuffed pancakes
Okay, now for the fun part! This process moves surprisingly fast once you get the hang of it, so have your filling ready to go. We are aiming for a soft dough, not a runny batter, remember that. It’s a little rustic, which is exactly what we want for that crispy exterior.
Mixing the Dough Base
Take that bowl with your whisked dry ingredients—the flour, baking powder, salt, and sugar—and make a little well right in the center. Pour in the whole milk and the slightly cooled melted butter. Now, grab a wooden spoon or a spatula and gently fold everything together. I mean gently! As the recipe note says, you absolutely must not overmix the pancake dough. We are mixing just until it comes together into a soft, shaggy ball. If you see a few streaks of flour left, that is totally fine; honestly, it’s perfect. Stop mixing right there.
Portioning and Filling the cheese stuffed pancakes
This is where we turn dough into magic. Divide that soft dough into 8 equal pieces. You can eyeball it, or if you’re feeling precise, use a kitchen scale! Roll each piece lightly between your palms to form a small ball, and then gently flatten that ball into a small round, maybe about 3 inches across. Don’t make it too thin yet, or it will tear when you fill it.
Now, take about a quarter cup of your combined mozzarella and cheddar cheese mix and place it right in the middle of that flat round. This is the most important part for beautiful cheese stuffed pancakes: you have to seal them up tight. Bring the edges of the dough up and over the filling, pinching them together securely at the top like you’re closing a little money bag. Once sealed, gently flatten the whole thing again into a thick pancake shape—it should still be thicker than a standard crepe. Make sure the seam is completely closed so that cheese doesn’t escape into the hot oil later.

Cooking for Maximum Crispness
Time to heat up the skillet! Put your 3 tablespoons of olive oil into your large skillet and set the heat to medium. You want the oil shimmering, but not smoking furiously. If it’s too hot, the outside will burn before the cheese melts, and if it’s too cool, you’ll end up with greasy, soggy pancakes.
Carefully place your stuffed pancakes into the hot oil, ensuring they don’t touch each other. Cook them for 3 to 4 minutes on the first side. You are looking for a deep, beautiful golden brown color that looks wonderfully crisp. Flip them over gently, and cook the second side for another 3 to 4 minutes. Once both sides are perfectly golden, transfer them to a plate lined with a paper towel. Let them rest for just two minutes before serving warm. That little rest allows the steam to settle and keeps the outside crispier while the cheese inside stays molten! For more savory ideas, check out our caramelized onion grilled cheese recipe.
Tips for Achieving Expert-Level cheese stuffed pancakes
We’ve all been there—you’re so excited about making these amazing cheese stuffed pancakes, and then *poof*, all the cheese rushes out into the hot oil! It happens to the best of us, but after making these dozens of times, I’ve learned a couple of tricks to guarantee success. Remember, these aren’t your fluffy breakfast flapjacks; they are dense, savory pockets, and a little patience goes a long way.
Mastering the Cheese Seal
Seriously, this is non-negotiable. When you pinch those edges together to seal the filling, you need to be firm but gentle. Think about creating a complete barrier. If you see any thin spots or holes where the cheese might peek through, pinch a tiny bit of extra dough over that spot, or just re-roll that piece slightly until you feel confident it’s totally enclosed. A bad seal means a lost filling, and nobody wants that. If you want to follow along with video tutorials, check out our Facebook page.
Temperature Control for the Skillet
The biggest mistake people make is cranking the heat up too high because they are impatient! We need medium heat, not medium-high. If the oil is too aggressive, the outside of the dough will develop that perfect golden crust in about 90 seconds, leaving you with a cold, hard lump of dough protecting perfectly melted cheese inside. Medium heat gives the dough time to cook through evenly while the exterior gets wonderfully crisp. It takes about 3 to 4 minutes per side, and that’s okay! Good things take a moment.
Frequently Asked Questions about Your cheese stuffed pancakes
I get so many questions after people try these for the first time, usually because they’re shocked how good they are! Most of the worries are about timing or how to switch things up. Don’t sweat it if your first batch isn’t perfect; learning how to get those crispy pancakes just right takes a couple of tries.
Can I Make the Dough Ahead of Time
You really shouldn’t make the dough too far ahead of time, and definitely don’t let it sit after you’ve divided and sealed the cheese inside. Because we use baking powder, the reaction starts pretty quickly once the wet and dry ingredients meet. If you let the sealed pancakes sit for more than 15 minutes before cooking, they might deflate slightly when they hit the hot oil. If you need to prep ahead, mix your dry ingredients in one container and your milk/butter in another, and keep them separate until you are ready to eat! For more breakfast ideas, try our easy breakfast roll ups recipe.
Best Cheese Substitutions for Melting
While the mozzarella and cheddar combo is my absolute favorite for flavor and stretch, you can certainly play around with your savory pancakes filling. If you want something sharper, swap some of the cheddar for Gruyère—it melts beautifully! Monterey Jack is a great substitute for mozzarella if you want a milder flavor profile. The main thing is to stick to good melting cheeses. Avoid anything super crumbly like feta, unless you mix it with a good melter like Jack, otherwise, you’ll end up with hot cheese crumbles instead of a gooey center.
Storage and Reheating Instructions for Leftover cheese stuffed pancakes
I know these are best eaten piping hot right out of the skillet, but let’s be real—sometimes you have leftovers! The good news is that these reheat surprisingly well, provided you avoid the dreaded soggy microwave reheat. We want to bring back that amazing crispness we worked so hard for when making these savory bites.
| Storage Method | Maximum Duration |
|---|---|
| Airtight Container (Refrigerated) | 2 to 3 days |
Storing Cooked Pancakes
If you have any leftover cheese stuffed pancakes, make sure they are completely cool before storing them. Place them in a good airtight container—layering them with parchment paper between each pancake helps prevent them from sticking together. They should last happily in the fridge for about 2 or 3 days.
Reheating for the Best Texture
Please, for the love of all things crispy, do not use the microwave! It will steam them and make the crust soft. The best way to revive that golden exterior is in a conventional oven or toaster oven set to about 350 degrees Fahrenheit for about 8 to 10 minutes. If you only have one or two, just toss them in a dry, non-stick skillet over medium heat for a couple of minutes per side until they are hot all the way through and the outside snaps! If you want to read more about our recipes, check out our Medium page.
Sharing Your Experience with our cheese stuffed pancakes
I’ve poured all my best tips into this guide, and now I really want to know how they turned out for you! Did you manage to get that perfect cheese pull? Did you have any favorite dipping sauces? Please leave a rating below and tell me what worked best in your kitchen. I always love seeing photos of your beautiful, crispy results!
Print
Shocking 8 cheese stuffed pancakes secret
- Total Time: 30 minutes
- Yield: 4 servings
- Diet: Vegetarian
Description
Crispy cheese stuffed pancakes are golden outside with a melty center. This is an easy skillet recipe using simple pantry ingredients. They offer a crunchy exterior and soft, cheesy centers.
Ingredients
- 2 cups all-purpose flour
- 2 teaspoons baking powder
- 1 teaspoon sugar
- 0.75 teaspoon kosher salt
- 1 cup whole milk
- 2 tablespoons unsalted butter melted
- 1.5 cups shredded mozzarella cheese
- 0.5 cup shredded cheddar cheese
- 3 tablespoons olive oil
Instructions
- Whisk flour, baking powder, sugar, and salt in a bowl.
- Stir in milk and melted butter until a soft dough forms.
- Divide dough into 8 equal pieces.
- Flatten each piece into a small round.
- Place about 0.25 cup cheese filling in the center of each round.
- Fold edges over the filling and gently flatten into thick pancakes.
- Heat olive oil in a large skillet over medium heat.
- Cook pancakes 3 to 4 minutes per side until golden brown and crisp.
- Transfer to a plate and rest 2 minutes before serving warm.
Notes
- Use a mix of cheeses for varied flavor.
- Do not overmix the pancake dough.
- Ensure the cheese is completely sealed inside the dough before cooking.
- Prep Time: 15 minutes
- Cook Time: 15 minutes
- Category: Breakfast
- Method: Skillet Cooking
- Cuisine: American