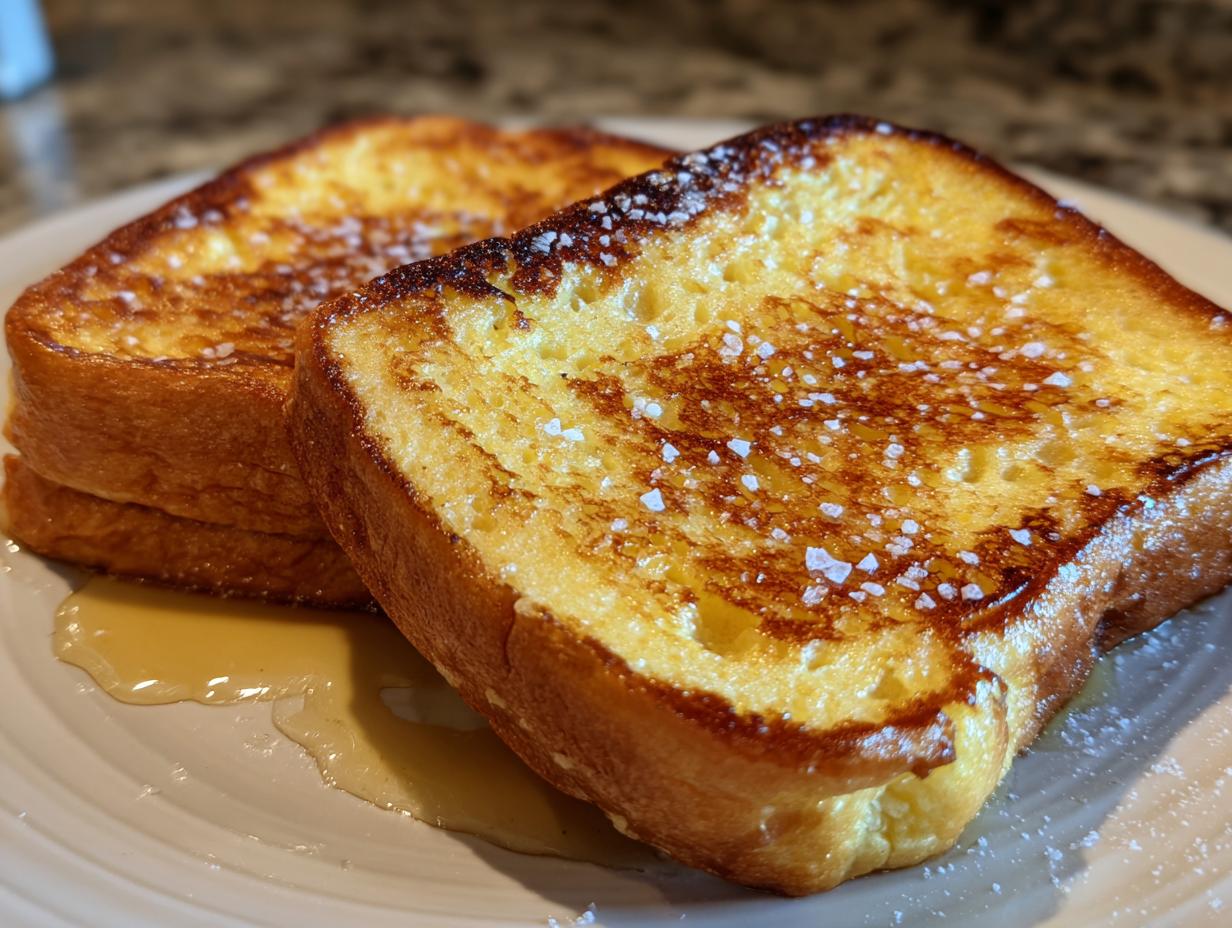
Forget those sad, pale slices you get from a toaster! We are talking about true, restaurant-quality perfection here. Mastering the perfect butter toasted bread is an essential life skill, and honestly, it’s the foundation of a great breakfast. This recipe uses just a skillet, but trust me, the technique gives you that golden crisp edge and a wonderfully soft, warm center. It’s all about building that simple, foundational flavor. I learned this method because I used to burn everything!

Why This Simple Butter Toasted Bread Recipe Works
The magic behind getting the absolute best butter toasted bread isn’t complicated equipment—it’s pure technique. We use a nonstick skillet and keep the heat low. This might sound counterintuitive, but cooking low and slow allows the butter to fully infuse every nook and cranny of the bread before the surface has time to burn. This is how you achieve that incredible textural contrast: perfectly crisp on the outside, yet tender and almost custardy inside. It’s the hallmark of true skillet toast expertise.
My Journey to Flawless Butter Toasted Bread
Oh, my early toast attempts were a disaster. I used to crank the toaster up too high, resulting in blackened edges and cold centers. Or worse, I’d use too little butter and end up with dry, crumbly sadness. When I finally switched to the skillet method, everything changed. Seriously, if you’re new to making breakfast, this is your foolproof entry point. There’s no guesswork; just watch the butter melt, and you’ll get that incredible, evenly golden butter toasted bread every single time. It’s so simple, it feels like cheating!
Gathering What You Need for Butter Toasted Bread
You only need a few things for this recipe, but quality really matters here because there are so few ingredients to hide behind! When you are making something as simple as butter toasted bread, every single component gets a starring role. Don’t skimp on the butter; it’s what provides that rich, nutty flavor and the perfect golden color we are aiming for. Remember, we are building flavor from the ground up!
Essential Components for Your Butter Toasted Bread
We are keeping this list short and sweet, which is why it comes together so fast. You’ll need four slices of sandwich bread. I really prefer a standard white or sourdough slice that’s about half an inch thick; anything too thin burns really fast, and anything too thick won’t warm through properly. For the fat, use exactly two and a half tablespoons of good unsalted butter. Unsalted gives you control over the final seasoning. Finally, just a tiny pinch—about an eighth of a teaspoon—of regular table salt to really wake up the flavor of the toasted bread.
Simple Equipment for Skillet Toasting
You don’t need any fancy gadgets for this! Grab your favorite nonstick skillet—that’s important for easy flipping and cleanup. You’ll also need a reliable spatula, preferably one that’s thin enough to slide easily under the bread without tearing it up when you flip. That’s it! Maybe a small knife for spreading the butter if you need to touch up the pan.
Step-by-Step Instructions for Butter Toasted Bread
Okay, this is where the magic happens! Making phenomenal butter toasted bread is all about moving slowly and deliberately. Don’t rush the heat, and don’t walk away from the stove—it moves fast once it gets going! Follow these steps exactly, and I promise you’ll have the best toast of your life in under seven minutes.
Preparing the Skillet and Butter
First things first: get your nonstick skillet on the stove and set the heat to medium-low. I cannot stress this enough—medium-low! If you start too high, your butter will burn into a black, bitter mess before the bread even has a chance to turn golden. We want that butter to melt slowly and gently coat the bottom of the pan. Add your two and a half tablespoons of butter and let it melt completely. Swirl the pan around so the entire surface is glistening with melted fat. You’re looking for a calm, steady sizzle, not an aggressive, spitting frenzy.
Achieving Golden Perfection on Both Sides
Once the butter is melted and happy, lay your four slices of bread into the skillet in a single layer. Don’t crowd the pan, or they’ll steam instead of toast! Let them cook undisturbed for about two to three minutes. You need to watch carefully for that first side to turn that beautiful, even golden brown color. Once you see that color, it’s time for the flip. Use your spatula and turn them over quickly. This second side usually cooks a bit faster than the first, so keep an eye on it—maybe only one to two minutes this time. This is where you decide how crispy you want it! If you like it softer, pull it sooner.

The Final Touch for Your Butter Toasted Bread
As soon as that second side hits your desired level of crispness, pull the bread immediately out of the hot skillet and place it on a clean plate or cutting board. You don’t want it sitting in the residual heat, or it will keep cooking and get too hard! This is the moment to sprinkle lightly with salt—just an eighth of a teaspoon total, sprinkled evenly over the warm surfaces. That little bit of salt right at the end makes all the difference in flavor. Serve this butter toasted bread right away while it’s hot and the edges are perfectly crisp!
Tips for Success with Your Butter Toasted Bread
Even though this recipe for butter toasted bread is incredibly simple, there are a few tiny pitfalls that can send your beautiful slices straight into the burnt pile. Don’t worry, I’ve made all those mistakes so you don’t have to! Mastering the heat and knowing how to tweak the fat content are my top pieces of advice for consistently perfect results.
Controlling Heat for Even Toasting
Seriously, I think the biggest mistake people make when trying to achieve true skillet toast perfection is impatience with the heat. Medium-low is your sweet spot, and you must stick to it. If you go to medium or medium-high, the milk solids in the butter brown way too fast, giving you a burnt, bitter crust long before the center of your bread slices has even warmed up. We want the butter to melt slowly enough to create a golden, even coating across that entire half-inch slice. Think of it like a gentle tanning session, not a sudden flash burn. If you see the butter start to smoke or turn dark brown quickly, pull the pan off the heat immediately and wait for it to calm down before continuing!
Ingredient Adjustments for Flavor Variations
While the classic recipe calls for unsalted butter, feel free to experiment slightly without ruining the core concept of butter toasted bread. If you want a deeper, nuttier flavor right from the start, use clarified butter or ghee instead of regular butter. It has a higher smoke point, so you can push the heat just a tiny bit higher without worrying about burning. If you aren’t worried about dairy, browned butter is incredible—just make sure to only use the browned milk solids and pour off the excess dark bits before adding your bread!
As for the salt, if you happen to be making this to go with something sweet, like jam, you can absolutely skip the salt entirely. Or, for a fun twist, try swapping the salt for a tiny sprinkle of garlic powder right after the flip. It sounds strange, but it gives your toast a wonderful savory edge that pairs amazingly well with eggs!
Common Questions About Butter Toasted Bread
I always get questions about this recipe because people are used to electric toasters, and the skillet method feels almost revolutionary! Don’t worry about getting it wrong; we can adjust for whatever texture you love. Here are the top things people ask when they first try making truly great butter toasted bread.
How Crisp Should My Butter Toasted Bread Be
This is totally up to you, but I aim for a “two-stage crisp.” On the first side, I want it deeply golden and crisp, maybe a solid three minutes on medium-low. That’s the structural side. The second side only needs about ninety seconds to two minutes—just enough to warm the center and give it a lighter, delicate crispness. If you want it cracker-like all the way through, just leave it on the second side for an extra minute or two, but keep that heat low so the butter doesn’t scorch!
Can I Use Different Types of Bread
Yes, you absolutely can explore with different breads, but you have to adjust your timing! The standard white sandwich bread works best because of its uniform texture. If you use a thick-cut sourdough, you’ll need to drop the heat down even lower and cook it longer—maybe four minutes per side—to ensure the dense interior gets warm without burning the crust. Whole wheat bread tends to absorb butter faster, so watch it closely! Anything with lots of seeds or grains might burn more easily, so medium-low heat is non-negotiable if you want that perfect butter toasted bread finish.
Storing and Warming Up Leftover Butter Toasted Bread
Look, the absolute best way to enjoy this skillet toast is immediately—when the butter is fragrant and the center is still soft. But let’s be real, sometimes you make too much, or you want a quick snack later. You absolutely cannot just leave your leftover butter toasted bread sitting on the counter, or it turns into sad, leathery cardboard, which is the opposite of what we worked for!
Best Practices for Storage
If you must store it, you need to lock out the air immediately. Place the cooled toast slices into a truly airtight container. I use one of those plastic containers with the snap-lock lids—no flimsy zip-top bags! If you store it this way, it should stay reasonably fresh for about a day. Honestly, anything past 24 hours starts to lose that lovely texture, even sealed up tight. Don’t refrigerate it, though; the cold air dries bread out something awful!
Reheating for Maximum Crunch
This is the important part: reheating is key to bringing back the crunch! Do not, under any circumstances, put this back in the microwave; it will turn instantly rubbery. The best method to restore that perfect texture is to use a dry skillet—no extra butter needed this time! Heat your nonstick skillet over medium heat. Once it’s warm, lay the toast slices down. Give them about 30 to 60 seconds per side, pressing down gently with your spatula. This dries out the surface moisture that accumulated during storage and brings back that lovely crispness. It works like a charm!
Here’s a quick reference for what you need to know:
| Action | Method | Duration |
|---|---|---|
| Storage | Airtight container only | Up to 24 hours |
| Reheating | Dry skillet, medium heat | 30-60 seconds per side |
Serving Suggestions for Your Butter Toasted Bread
Once you have achieved that perfect, warm, buttery crust, you don’t want to weigh it down with anything too complicated! The beauty of this simple butter toasted bread is how well it plays supporting roles. It’s fantastic on its own, but it shines when paired with just a few clean flavors. Think minimal effort for maximum enjoyment!
Pairing with Sweet Spreads
If you’re craving something sweet, keep it classic. A thin layer of high-quality fruit jam—I love tart raspberry or strawberry—is always perfect. The warmth of the toast slightly melts the jam, which is just heavenly. Alternatively, a drizzle of pure, local honey works wonders; it seeps right into those little nooks and crannies from the toasting process. Sometimes, simple is truly the best way to go!
Companion Dishes for Breakfast
For a fuller breakfast, this toast is the ideal companion for something savory. Try serving it alongside perfectly soft-scrambled eggs—the slight crispness of the bread is great for soaking up any residual creamy yolk. A side of fresh, sliced avocado sprinkled with a little black pepper is also a fantastic, healthy pairing. Or, just keep it light with a bowl of seasonal berries to balance out the richness of the butter.
Share Your Experience Making Butter Toasted Bread
Now that you know all my secrets for achieving that perfect golden crust and soft center, I really want to hear from you! Did you manage to keep that heat on medium-low? Did you use your favorite sourdough for this batch of butter toasted bread? Don’t keep your triumphs to yourself! If you want to see more simple breakfast ideas, check out my easy breakfast roll ups recipe.
I’d absolutely love it if you left a star rating below—it really helps other folks know what to expect from this simple skillet method. And if you snapped a picture of your beautifully golden slices, tag me on social media! You can find more recipe inspiration on our Pinterest page. Seeing your success stories is honestly the best part of sharing these family-style recipes. Let me know how this simple snack or breakfast side changed your toast game forever!
Print
Amazing 4 Step Butter Toasted Bread secrets
- Total Time: 7 minutes
- Yield: 2 servings
- Diet: Omnivore
Description
Achieve butter-toasted bread perfection with golden crisp edges and a soft warm center using a simple skillet method.
Ingredients
- 4 slices sandwich bread (about 1/2 inch thick)
- 2 1/2 tablespoons unsalted butter
- 1/8 teaspoon salt
Instructions
- Heat a nonstick skillet over medium low heat.
- Add the butter and let it melt completely, swirling to coat the pan.
- Place the bread slices in the skillet in a single layer.
- Cook for 2 to 3 minutes until the bottoms are evenly golden.
- Sprinkle lightly with salt.
- Flip the bread slices carefully.
- Cook for 1 to 2 minutes until the second side is lightly crisp and warmed through.
- Remove from the skillet and serve immediately.
Notes
- Use medium low heat to prevent the butter from burning before the bread toasts.
- Adjust cooking time based on your desired level of crispness.
- Prep Time: 2 minutes
- Cook Time: 5 minutes
- Category: Breakfast
- Method: Skillet Toasting
- Cuisine: American