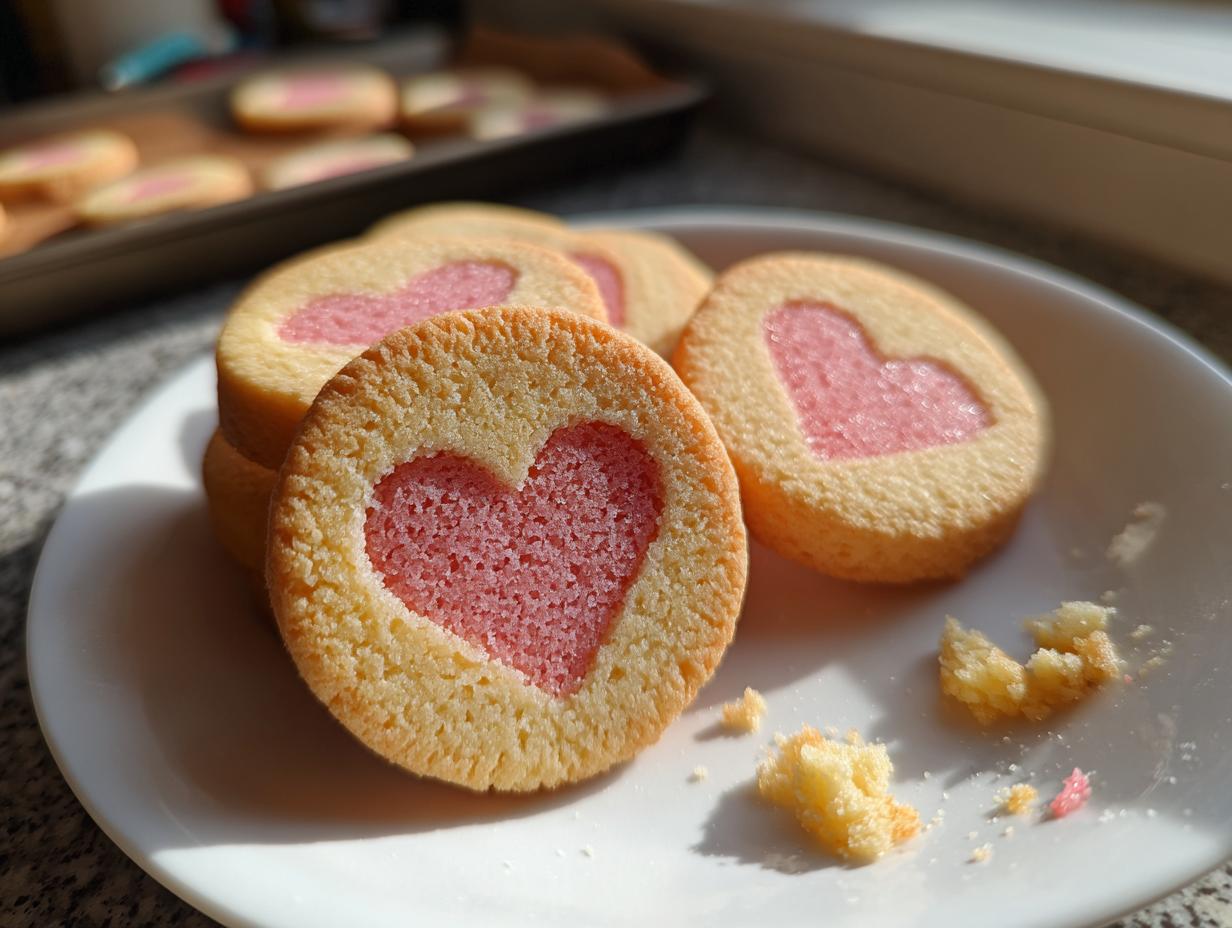
If you are looking for a cookie that screams fun but doesn’t demand an hour of rolling and cutting intricate shapes, you’ve found your holy grail! These slice and bake cookies are my absolute go-to for holidays and last-minute gifts because the real magic happens *inside* the dough log. We’re creating a stunning, perfectly formed pink heart surprise in every single round.
I first tried this technique years ago when I was trying to bake for a huge school bake sale and realized I didn’t have time to roll out dozens of separate shapes. This method—where you build the design inside a log and just slice it—is a total game-changer. Seriously, once you master the chilling times, you’ll never go back to traditional cut-out sugar cookies again. The best part? Almost no flour mess on the counter when you’re done!

It’s all about layering cold dough around a frozen core. Trust me, the patience required for chilling pays off tenfold when you pull out a tray of perfectly uniform, heart-filled treats. It’s pure baking wizardry, and you’re about to learn the trick! Check out our Pinterest for more visual inspiration.
Gathering Your Ingredients for Slice and Bake Cookies
Getting ready for these slice and bake cookies is really about preparation. Since we’re building a design inside the dough, we need everything measured out perfectly before we start mixing. Don’t skimp on the quality here, especially with the butter and the vanilla, because those buttery vanilla notes are what make the outer dough sing.
The most important thing to remember is that we are dealing with two separate doughs that need to be combined correctly. That’s why we’ll separate our ingredients clearly. Having everything laid out means you can move quickly between steps, which is key before that pink dough gets too warm.
Here is exactly what you’ll need on your counter before you even think about turning on the mixer:
| Ingredient | Amount |
|---|---|
| Unsalted Butter | 1 cup, softened |
| Granulated Sugar | 1 cup |
| Large Egg | 1 |
| Vanilla Bean Paste (Alcohol Free) | 1 Tablespoon |
| All Purpose Flour | 3 cups |
| Baking Powder | 1/2 teaspoon |
| Fine Sea Salt | 1/2 teaspoon |
| Pink Gel Food Coloring | 1 teaspoon |
Essential Components for Slice and Bake Cookies
We need precision for these shaped slice and bake cookies, especially when it comes to the texture forming the heart shape. Every measurement matters to ensure the outer dough can wrap tightly around the frozen center without cracking.
Wet Ingredients Clarity
Make sure your butter is truly softened—not melted! It should give just a little when you press it. We need that classic creaminess from the butter and sugar. For flavor, please use a good quality, alcohol-free vanilla bean paste. That paste gives you those lovely little vanilla specks that make the sugar cookie taste so rich, and we need one nice, large egg to bind everything together.
Dry Ingredients Clarity
For the structure, we are using standard all-purpose flour, combined with a small lift from baking powder and just a touch of fine sea salt to balance the sweetness. The star for the surprise element is the pink gel food coloring. Gel works much better than liquid coloring because it won’t thin out your dough. You only need a tiny bit to get that vibrant pink!
Mastering the Technique: How to Prepare Slice and Bake Cookies
Okay, this is where the magic happens, but you have to follow my rhythm. If you rush the chilling steps, the whole log will smear when you slice it, and that’s a tragedy we want to avoid! We’re going to build this design layer by layer, making sure everything is perfectly cold before the final bake.
Creating the Vanilla Sugar Cookie Base
First up, you need to cream that softened butter and the sugar. Use a stand mixer or a hand mixer, but really beat it on medium speed for a full three minutes. You’re looking for that pale, fluffy texture—we’re incorporating air here! Next, mix in your egg and that beautiful vanilla bean paste until it’s just combined. Don’t overbeat once the egg goes in.
While that’s happening, take a separate bowl and whisk together your flour, baking powder, and salt. Now, slowly add the dry stuff to the wet mixture, but only on low speed. Stop mixing the second you see the last bit of flour disappear. Seriously, stop! Overmixing develops gluten, and we want tender cookies, not chewy hockey pucks.

Forming the Hidden Pink Heart Center
Now we divide! Take your soft dough and split it into two portions: keep two-thirds plain, and take the final one-third and mix in that pink gel coloring until it’s uniform. Pat that pink dough down onto some plastic wrap into a flat slab—about three-quarters of an inch thick. Wrap it tight and pop it in the freezer for 20 minutes. It needs to get firm!
Once the pink is stiff, use a one-inch cutter to punch out your hearts. You’ll need to stack these up—face to back—to form one long cylinder of solid pink hearts. Wrap that heart log tightly and put it back in the freezer for another 20 minutes until it’s rock solid. This step is non-negotiable for clean slices later!
Encasing the Heart for Your Slice and Bake Cookies
This is the tricky part for our slice and bake cookies. Take that plain dough that’s still soft and crumble it around the frozen heart log. You must press it firmly and evenly so that the plain dough completely seals the pink log inside, forming one smooth, round cylinder. Wrap this finished log and put it in the fridge for a full hour. This hour lets the two doughs bond together properly.
When you’re ready to bake, preheat your oven to 350 degrees F—no hotter! Line two big baking sheets with parchment paper. Take your chilled log and slice it into rounds that are exactly 1/4 inch thick. If they’re too thick, the heart distorts. Lay them out on the sheets, making sure they have at least 2 inches of space between them because they will spread just a tiny bit. Bake these beauties for 10 to 12 minutes until the edges look set.

Cooling and Finishing the Slice and Bake Cookies
When the timer goes off, resist the urge to touch them immediately! Let the cookies cool right there on the hot baking sheet for about five minutes. This allows them to firm up enough so they don’t crumble when you move them. After five minutes, carefully transfer them onto a wire rack to cool completely. That’s it! A perfect, hidden heart in every single cookie! Follow us on Facebook for daily recipe updates.
Tips for Success with Shaped Slice and Bake Cookies
The difference between a beautiful, uniform cookie and a melted puddle is almost entirely down to temperature control with these slice and bake cookies. You absolutely cannot rush the chilling!
If your dough seems too soft when you try to slice it, don’t panic and don’t try to force the knife through. Just pop the whole log back into the freezer for 10 or 15 minutes. It’s better to chill it too long than not long enough. Remember, the inner heart needs to be rock solid so it doesn’t smear when the plain dough is pressed around it.
When you are crumbling the plain dough around the pink core, use cold hands if you can, or work quickly. Warm hands transfer heat right into the dough, which ruins the structural integrity we worked so hard to build in the freezer. Press firmly but gently to ensure there are no air pockets between the layers.
Also, always slice your cookies at a consistent 1/4 inch thickness. If you eyeball it, some will bake too fast and some will stay raw in the middle. Use a sharp, thin knife for the cleanest cuts possible! For more baking tips, see our guide on soft sugar cookies.
Storage and Reheating Instructions for Slice and Bake Cookies
One of the best things about these slice and bake cookies is that you can make the dough log weeks ahead of time! That’s right, instant dessert whenever you need it. The dough log keeps beautifully in the refrigerator for up to a week. Just make sure it’s wrapped super tight in plastic wrap so it doesn’t dry out or pick up any fridge smells.
If you need them even longer, wrap the log in a layer of plastic wrap and then a layer of foil, and freeze it! The dough log lasts for about three months in the freezer. When you want cookies, just pull the log out, let it sit on the counter for about 10 minutes to soften slightly, slice, and bake! If you are interested in other make-ahead desserts, check out our edible cookie dough bites.

Baked cookies are just as easy to store. Keep them in an airtight container at room temperature, and they stay great for nearly a week. Here’s a quick guide:
| Item | Storage Duration | Location |
|---|---|---|
| Unbaked Dough Log | Up to 7 days | Refrigerator |
| Unbaked Dough Log | Up to 3 months | Freezer |
| Baked Cookies | Up to 7 days | Airtight Container |
Common Questions About Shaped Sugar Cookies
Baking always brings up questions, especially when you’re working with dough that needs to be frozen solid! Don’t worry if you run into a snag; most of these issues are easily fixed with a little patience and maybe an extra trip to the freezer.
I’ve answered the top things people ask me when they try this technique for the first time. It always comes down to temperature, honestly!
Can I use a different cutter size for the heart?
You absolutely can change the size of the cutter you use for the pink hearts! However, you must adjust how you encase it. If you use a smaller cutter, say 3/4 inch, you’ll have more plain dough surrounding the center, which means the heart will look tinier when baked. If you use a larger cutter, say 1 1/4 inch, you might run out of plain dough to press around it, or the outer layer will become too thin and crack.
My advice? Stick to the one-inch cutter, or if you change it, make sure the heart cylinder isn’t much wider than the dough you have left over to wrap it with. If the heart is too wide, it won’t look like a heart anymore once it bakes and spreads a little!
Why is the dough so crumbly when I press it around the log?
If your outer plain dough is crumbly when you try to press it around that frozen heart core, it’s too cold or you didn’t mix it enough initially. Remember, we mixed the plain dough just until combined, which keeps it tender but can make it feel a bit shaggy.
The key here is pressing firmly. You want to use the heat of your hands to gently warm the outer dough just enough so it adheres to the frozen log underneath. If it’s truly crumbly and won’t stick, let the log sit on the counter for five minutes, then start pressing again. You need complete coverage—no gaps—or the heat will hit that pink dough too fast, and it will melt out during baking!
Why You Will Love These Slice and Bake Cookies
Seriously, these slice and bake cookies are my secret weapon for looking like I spent hours in the kitchen when I really didn’t! They are incredibly rewarding because the payoff is huge for the effort you put in up front. If you enjoy this style of baking, you might also like our red velvet crinkle cookies.
Once you have the dough logs chilled, you are set for weeks! You get consistent, beautiful results every single time you slice one up. Here’s why these are going straight into your permanent rotation:
- Minimal active prep time once the dough is made.
- Perfectly uniform cookies right out of the oven—no rolling needed!
- They make the most stunning, surprising gifts for neighbors or friends.
- The vanilla sugar cookie base is melt-in-your-mouth delicious.
- That fun, beautiful pink heart reveal is pure joy!
—
Print
Amazing 1 trick for slice and bake cookies
- Total Time: 2 hours 12 minutes
- Yield: 24 cookies
- Diet: Vegetarian
Description
Buttery vanilla sugar cookies with a festive pink heart hidden inside each slice. The dough requires no rolling for the final shape.
Ingredients
- 1 cup unsalted butter, softened
- 1 cup granulated sugar
- 1 large egg
- 1 tablespoon alcohol free vanilla bean paste
- 3 cups all purpose flour
- 1/2 teaspoon baking powder
- 1/2 teaspoon fine sea salt
- 1 teaspoon pink gel food coloring
Instructions
- Beat the softened butter and granulated sugar in a large bowl on medium speed for 3 minutes until creamy and pale.
- Mix in the egg and alcohol free vanilla bean paste until fully combined.
- Whisk the flour, baking powder, and salt together in a separate medium bowl.
- Add the dry ingredients to the wet mixture in three additions and mix on low speed just until a soft dough forms.
- Divide the dough and color one third of the batch with pink gel food coloring leaving the remaining two thirds plain.
- Pat the pink dough into a slab about 3/4 inch thick, wrap it in plastic, and freeze it for 20 minutes to firm up.
- Cut heart shapes out of the cold pink dough using a 1 inch cutter and stack them tightly face to back to create a long cylinder of hearts.
- Freeze the heart cylinder for 20 minutes until it is solid and resistant to bending.
- Crumble the plain dough and press it firmly around the frozen heart log to completely encase it in a smooth round cylinder.
- Wrap the finished log in plastic and refrigerate it for 1 hour to ensure the layers bond and chill thoroughly.
- Preheat the oven to 350°F and line two large baking sheets with parchment paper.
- Slice the cold log into rounds 1/4 inch thick, place them 2 inches apart on the baking sheets, and bake for 10 to 12 minutes until the edges are set.
- Wash hands after handling raw egg and allow cookies to cool on the baking sheet for 5 minutes before moving to a wire rack.
Notes
- The chilling times are necessary for the dough to hold its shape during slicing and baking.
- Use a 1 inch cutter for the hearts to fit correctly inside the outer dough.
- Prep Time: 2 hours
- Cook Time: 12 minutes
- Category: Dessert
- Method: Baking
- Cuisine: American