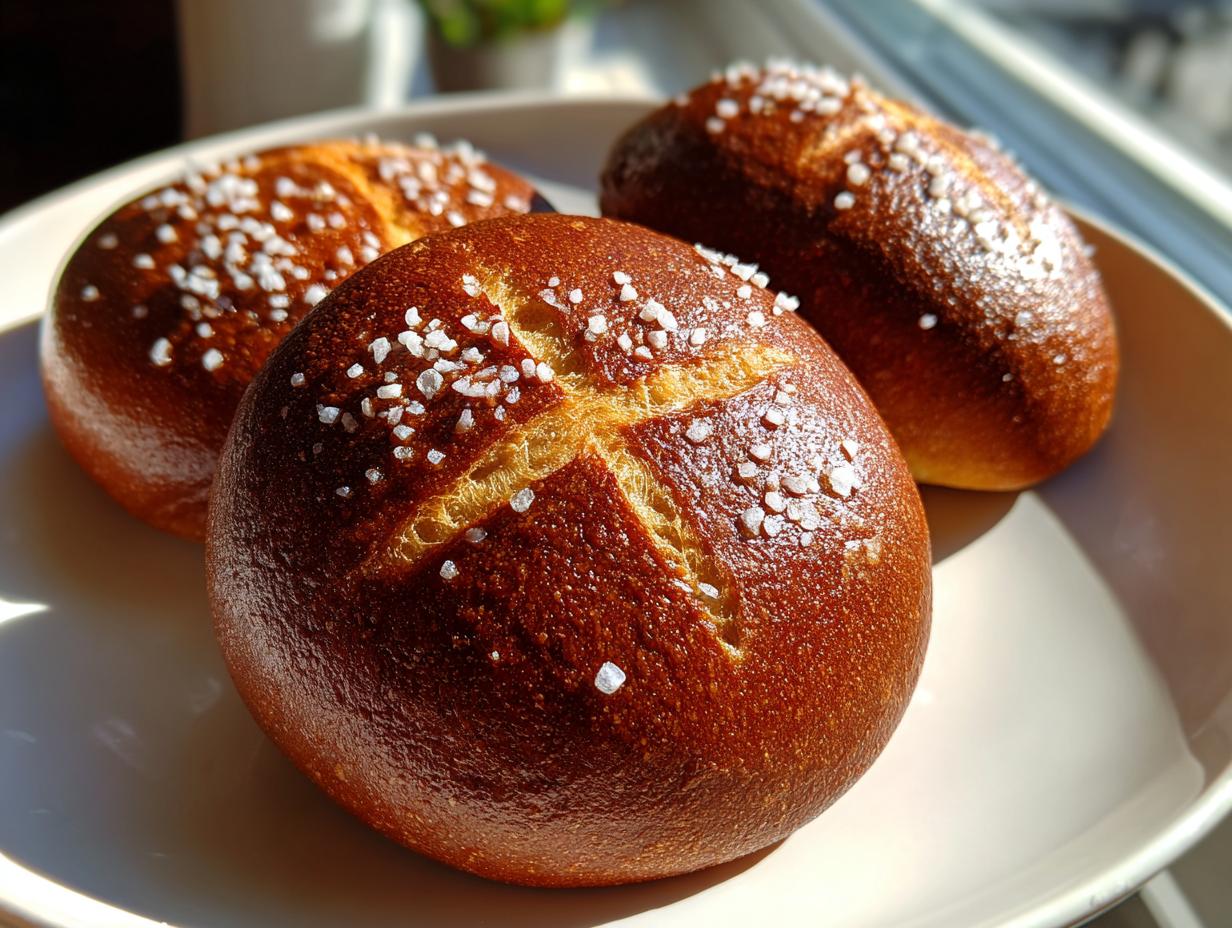
Forget those sad, pale burger buns you get from the store. I’m telling you, once you try these homemade soft pretzel buns, you’ll never go back. I’ve spent years tweaking this recipe—and I mean years, testing yeast amounts and rise times—just to nail that perfect balance: that deep, gorgeous mahogany crust you expect from a real pretzel, but with an interior so soft it practically melts around your patty. Seriously, they are magic for burgers, but they’re also great for pulled pork sandwiches!
The secret to getting that perfect rise and that signature crust really comes down to a few small but mighty steps we’ll cover below. We’re aiming for a bun that holds up to heavy toppings without getting soggy. Trust me when I say that once you master these pretzel buns, your BBQ game changes forever. Let’s get baking!

Essential Ingredients for Your Pretzel Buns
Okay, listen up! Making incredible pretzel buns isn’t about fancy gear; it’s about respecting the basics. You need clear measurements here because baking is chemistry, even when it feels like fun. I’ve listed exactly what you need below, but pay close attention to the state of the water and the butter. That’s where most folks stumble when aiming for that classic pretzel flavor in a bun shape.
Don’t even think about substituting ingredients in the soda bath—that’s non-negotiable for the color! These ingredients create the structure that lets these homemade pretzel buns shine.
Dry Ingredients for Pretzel Buns
For the main dough, we need precision. Grab your all-purpose flour—we need exactly 3 and a half cups of it—and make sure you measure it correctly so your dough isn’t too stiff. Then, we add 2 teaspoons of plain table salt and just 1 teaspoon of granulated sugar to feed the yeast. That’s it for the dry stuff!
Wet Ingredients and Butter Requirements
The yeast needs happy water. It must be warm—think bathwater temperature, around 105 to 115 degrees Fahrenheit—and you need 1 and 1/4 cups of it. For the fat, you must use 1/4 cup of salted butter. Make sure it’s melted, but let it cool down slightly before adding it to the yeast mixture so you don’t shock the yeast. We also use a tiny bit of vegetable oil to grease the bowl later.
The Crucial Pretzel Buns Soda Bath Components
This is the magic step that makes them pretzels! You need a big pot—I mean big—with 6 cups of water ready to boil. Once it’s boiling hard, you carefully dump in 1/2 cup of baking soda. This creates the alkaline bath that gives your pretzel buns that signature dark, chewy crust. And don’t forget the coarse sea salt for sprinkling on top right after they come out of the bath!
Step-by-Step Instructions to Make Pretzel Buns
Alright, time to roll up our sleeves! This process has a few distinct stages, but if you follow the timing, you’ll have perfect pretzel buns. Don’t rush that first rise—that’s where the flavor builds!
Activating Yeast and Mixing the Pretzel Buns Dough
First things first, wake up that yeast! In a small bowl, stir your yeast and sugar into the warm water. Set it aside for about 10 minutes. If it gets foamy and bubbly on top, congratulations, your yeast is alive and ready to work! While that’s happening, toss your flour and table salt into your stand mixer bowl fitted with the dough hook. Once the yeast is foamy, pour that mixture right in, along with your melted butter. Start mixing on the lowest speed until everything just comes together into a shaggy mess. Don’t worry, it looks ugly right now!
Kneading, First Rise, and Shaping Your Pretzel Buns
Now we build structure. Increase your mixer speed to medium-low and let it knead for a solid 7 minutes. You’re looking for a dough that feels smooth, elastic, and springs back when you poke it gently. Once it’s perfect, lightly oil a large clean bowl with your vegetable oil—just a thin coat—and plop the dough in, turning it once to coat. Cover it up and let it hang out in a warm spot for a full hour until it’s doubled in size. When it’s risen, punch it down gently and divide that dough into 8 equal pieces. This next part is key for great pretzel buns: shape each piece into a super tight ball. You do this by tucking the edges underneath the bottom and rolling it with a cupped hand to create surface tension. This tension is what stops your buns from spreading into flat discs! Arrange them on a sheet lined with parchment paper and let them rest for 20 minutes while you get the oven ready.

The Signature Baking Soda Bath Process for Pretzel Buns
Time for the deep color! Preheat your oven to 425 degrees Fahrenheit. In a large, sturdy pot, bring 6 cups of water to a rolling boil. Now, be ready—when you add the 1/2 cup of baking soda to that boiling water, it will bubble up like crazy! Be careful, it spits! Once the foam settles down a bit, you’re ready to dip. Using a slotted spoon, carefully lower one or two of your shaped pretzel buns into the bath. They only need 30 seconds per side. Don’t leave them longer, or they get tough! Transfer them immediately back to the baking sheet.
Final Scoring and Baking Your Pretzel Buns
As soon as they come out of the bath, they need a little scoring—use a very sharp knife to quickly cut a shallow ‘X’ across the top of each bun. This lets steam escape and helps them bake evenly. Sprinkle them right away with that coarse sea salt before they dry out. Pop them into the 425°F oven and bake them for about 20 to 22 minutes. You are looking for that deep mahogany brown color. If you have a thermometer, check the middle—it should hit 190 degrees Fahrenheit to make sure the inside is fully cooked. Let them cool slightly before slicing!
Pro Tips for Achieving the Best Pretzel Buns Texture
You’ve nailed the recipe steps, but texture is what separates a good bun from an amazing one. My biggest piece of advice comes from years of watching mine deflate! It always comes down to surface tension and bath temperature. If your dough balls aren’t shaped tightly—really tight—they’ll spread out in the oven, and you’ll end up with wide, flat disks instead of proud little pretzel buns.
Also, please don’t guess the water temperature for the yeast activation. Too hot, and you kill the yeast; too cold, and it takes forever to wake up. Aim for that sweet spot where it feels comfortably warm, not hot, on your wrist. These little details are what make the difference between a decent bake and truly restaurant-quality soft pretzel buns. If you want to see more of my baking secrets, check out my best bread recipes!
Ingredient Notes and Substitutions for Your Pretzel Buns
Regarding flour, stick to all-purpose if you can. Bread flour might make them too tough, and we are aiming for soft here! If you absolutely must swap the butter, use a neutral oil instead, but you’ll lose some of that rich flavor. Keep the ratio the same. One thing you CANNOT substitute is the baking soda in the bath. Do not use baking powder—that’s a totally different chemical reaction, and you’ll end up with a pale, tangy bun, not a true pretzel bun.
For the salt on top, coarse sea salt is non-negotiable. The fine stuff dissolves too fast in the heat and can make the crust too salty. The coarse flakes give you that signature crunch and look.
Frequently Asked Questions About Homemade Pretzel Buns
It happens to everyone! Even after years of baking, sometimes the results aren’t exactly what you pictured. Don’t sweat it if your first batch of pretzel buns doesn’t look professional. Usually, the fix is simple, and the taste is still fantastic!
Why is my Pretzel Buns crust not dark enough?
If your crust is looking pale instead of that deep brown, it almost always comes down to the bath. You need a rolling, aggressive boil when you dip the dough. If the water isn’t hot enough, the baking soda doesn’t react properly with the dough surface. Also, make sure you’re hitting that full 30 seconds on each side. A quick dip just won’t cut it for that signature dark color we want on our soft pretzel buns.
How do I prevent my Pretzel Buns from spreading too much?
This is all about tension! When you shape those little dough portions into balls, you must work them aggressively under your cupped hand to create a tight skin on the outside. Think of stretching a rubber band around the dough. If the skin is loose, the dough relaxes in the heat and spreads out flat. Make sure those balls are firm and smooth before the final 20-minute rest!
Can I make the Pretzel Buns dough ahead of time?
Yes, you absolutely can! You can let the dough do its first rise in the fridge overnight instead of letting it sit on the counter for an hour. This slow, cold fermentation actually builds a deeper, more complex flavor. Just make sure that when you pull the dough out, you let it warm up on the counter for about 30 minutes before you punch it down and shape your pretzel buns. Cold dough is hard to shape!
Storing and Reheating Your Delicious Pretzel Buns
These homemade pretzel buns are so good, you might actually have leftovers—though I doubt it! The best way to keep them fresh depends on how soon you plan to eat them. They are definitely best the day they are baked, but they store surprisingly well if you wrap them correctly. Never put them in the fridge uncovered, because they’ll go stale fast! Just a quick reheat brings back that wonderful soft-on-the-inside texture.
If you know you won’t finish them right away, wrap them tightly in plastic wrap or tuck them into an airtight container. Here is my cheat sheet for how long they last in various spots.
Storage Table for Pretzel Buns
| Storage Location | Time Limit |
|---|---|
| Room Temperature (Airtight) | 2 Days |
| Refrigerator | Up to 4 Days |
| Freezer (Wrapped Tightly) | Up to 3 Months |
When you’re ready to eat a frozen bun, just microwave it for about 15 seconds, or wrap it in foil and pop it in a 350°F oven for 5 minutes until warmed through. That brings them right back to life!
Why You Will Love Making These Pretzel Buns
Honestly, the effort here is so worth the reward. You get that incredible deep pretzel flavor wrapped up in a bun shape that just screams “gourmet burger night.” Plus, there is something so satisfying about pulling these rich brown beauties out of your own oven. You’ll feel like a total baking rockstar!
Benefits List for Homemade Pretzel Buns
- Superior Flavor: You cannot beat the authentic, slightly salty taste of a true pretzel crust on a soft bun.
- Perfect Size: They are sturdy enough for thick patties but tender enough for easy biting—no floppy bottoms here!
- Achievable Results: While it seems fancy, the steps are straightforward, making this recipe great even for newer bakers.
- Versatile Use: Amazing for burgers, but also incredible dipped in cheese sauce or used for breakfast sandwiches.
Share Your Perfect Pretzel Buns Results
I truly hope you enjoyed making these! When you pull that tray of dark, salty, perfect pretzel buns out of the oven, I want to know all about it. Did you use them for smash burgers or maybe just slathered them with butter? Please drop a rating below and leave a comment telling me how your batch turned out. Happy baking! You can also follow along for more great recipes on Facebook.
Print
Master 8 Perfect Pretzel Buns Now
- Total Time: 2 hours 2 minutes
- Yield: 8 buns
- Diet: N/A
Description
Make homemade soft pretzel buns perfect for upgrading your burgers. These buns feature a classic dark crust and soft interior, offering the beloved pretzel flavor in a sandwich shape.
Ingredients
- 1 ¼ cups warm water
- 2 ¼ teaspoons active dry yeast
- 1 teaspoon granulated sugar
- 3 ½ cups all-purpose flour
- 2 teaspoons table salt
- ¼ cup salted butter, melted
- ½ tablespoon vegetable oil
- 6 cups water (for soda bath)
- ½ cup baking soda (for soda bath)
- 1 tablespoon coarse sea salt (for topping)
Instructions
- Stir the warm water, yeast, and sugar in a small bowl. Let stand 10 minutes until foamy.
- Combine the flour and table salt in a stand mixer bowl fitted with a dough hook.
- Pour the activated yeast mixture and melted butter into the flour. Mix on low speed until a shaggy dough forms.
- Increase speed to medium-low. Knead for 7 minutes until the dough is smooth and springs back when pressed.
- Grease a large clean bowl with vegetable oil. Place the dough inside and turn it once to coat.
- Cover the bowl with a clean towel. Let rise in a warm spot for 60 minutes until doubled.
- Punch down the dough gently. Divide it into 8 equal portions.
- Shape each portion into a tight ball by tucking edges underneath and rolling on the counter with a cupped hand to create tension.
- Arrange the shaped buns on a parchment-lined baking sheet. Let rest for 20 minutes.
- Preheat the oven to 425°F. Bring the 6 cups of water to a rolling boil in a large pot.
- Add the baking soda to the boiling water carefully.
- Boil the buns in batches for 30 seconds per side. Transfer them back to the baking sheet using a slotted spoon.
- Score an X into the top of each bun with a sharp knife. Sprinkle immediately with coarse sea salt.
- Bake for 20 to 22 minutes until the buns are a deep mahogany brown and fully set.
- Verify the internal temperature reaches 190°F.
Notes
- The baking soda bath creates the signature dark crust. Be careful when adding it to boiling water as it bubbles vigorously.
- Shaping the dough into tight balls creates the necessary tension for a good bun structure.
- The internal temperature check confirms the dough is cooked through.
- Prep Time: 20 minutes
- Cook Time: 22 minutes
- Category: Baking
- Method: Baking
- Cuisine: American