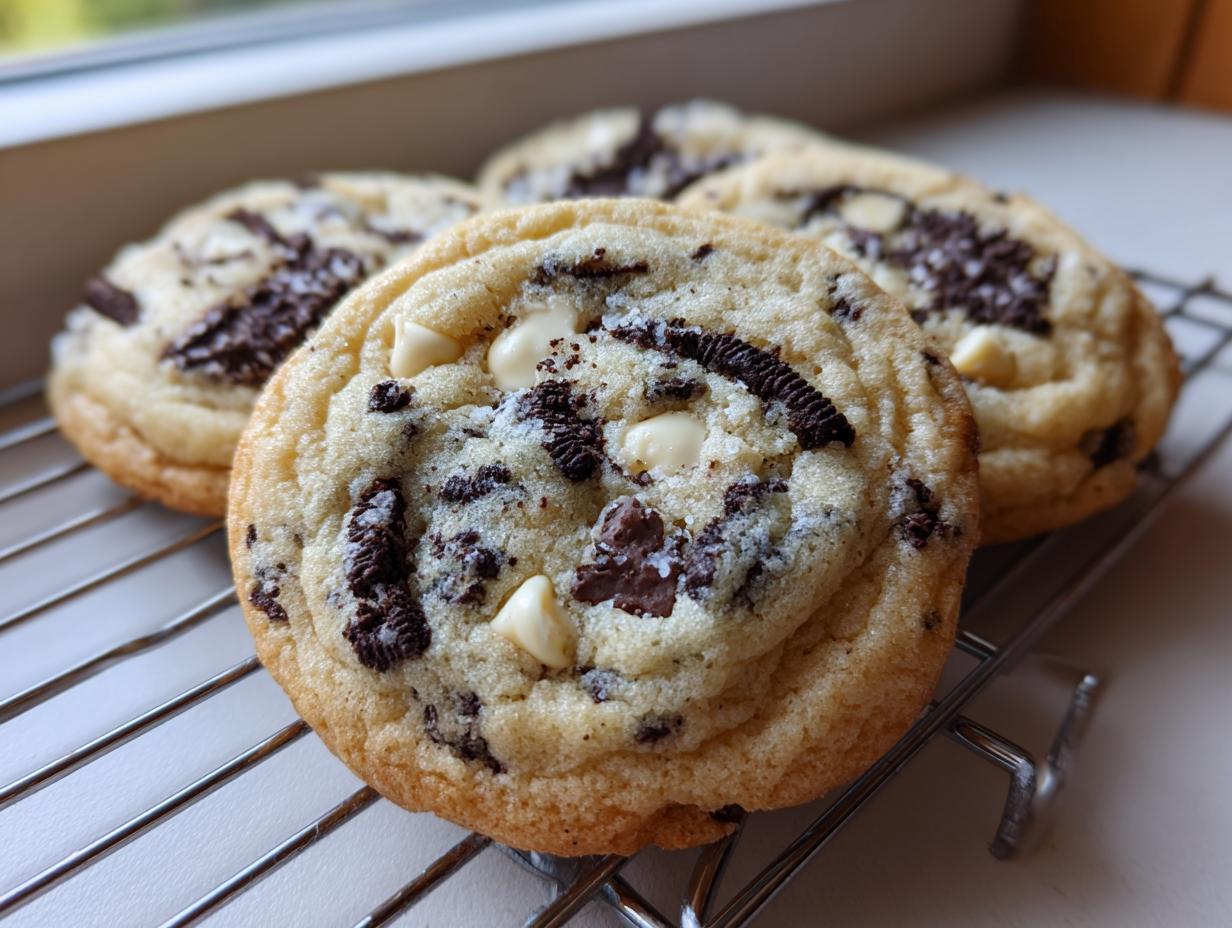
I’m going to let you in on a secret right now: these **Cookies and Cream Cookies** are my absolute go-to when I need a guaranteed win without spending all day in the kitchen. Seriously, these are the chewiest, softest cookies you will ever make, and the best part? There is absolutely no dough chilling required! I developed this recipe years ago when I was trying to teach my niece how to bake, and we needed something fast that wouldn’t turn into flat, sad puddles.
We followed the steps exactly, and WOW. The combination of buttery dough, crunchy, crushed chocolate sandwich cookies, and those sweet pockets of white chocolate chips is just magic. This recipe is built on a foundation of tried-and-true baking principles—using softened butter, the right leavening balance—so even if you’re new to cookies, I promise you’ll get that perfect, thick drop cookie every single time. They’re ready in under 30 minutes total. That’s why I trust this recipe implicitly, and now you can too!

Essential Ingredients for Perfect Cookies and Cream Cookies
Okay, let’s talk about what goes into these amazing **Cookies and Cream Cookies**. You don’t need any fancy, obscure ingredients here, which is another reason I love them so much! We’re using standard pantry staples, but how you handle them makes all the difference. Getting the measurements right—especially on things like flour—is key to that thick, chewy texture we’re aiming for. Don’t eyeball the flour; that’s where things go wrong fast!
We need a good balance of richness from the fats and structure from the dry ingredients before we get to the fun stuff. Stick exactly to what I’ve listed here, and I guarantee these turn out perfectly every time. Trust me, these specific ratios are what keep the dough from spreading too much while baking.
Measuring Wet Ingredients for Cookies and Cream Cookies
For the wet ingredients, the butter has to be softened, not melted! If it’s too soft or greasy, your **Cookies and Cream Cookies** will spread out into thin pancakes. You should be able to press a finger into the stick easily, but it shouldn’t look oily. We use both granulated sugar and light brown sugar here—that brown sugar is essential because it brings molasses, which adds moisture and that slight chewiness you want. Don’t skip it!
Also, a quick note on vanilla: I specify alcohol-free vanilla flavoring because sometimes the alcohol in standard extract can affect the texture slightly in no-chill doughs, though honestly, regular vanilla is usually fine if that’s all you have. Make sure you measure it precisely!
The Dry Base and Mix-Ins
For the dry base, we use all-purpose flour and a mix of baking soda and baking powder. They work together to give us just the right lift. Now for the stars of the show in these **Cookies and Cream Cookies**! You need 12 chocolate sandwich cookies, and you should chop them coarsely—I mean, don’t turn them into dust! We want nice chunks of cookie throughout. The white chocolate chips are non-negotiable for me; they melt just enough to add creamy pockets that balance the dark chocolate cookie pieces.
Equipment Needed for Your Baking Project
You don’t need a fancy stand mixer for these, though if you have one, use it! But truly, you can make these fantastic **Cookies and Cream Cookies** with just a couple of good bowls and sturdy spoons. Since the dough doesn’t chill, speed is the name of the game, so having your tools ready helps a lot.
Here’s the short list of what you’ll need handy before you even start measuring:
- Large mixing bowl for the wet ingredients.
- Medium bowl for whisking the dry ingredients.
- Electric hand mixer or a strong arm and a wooden spoon for creaming.
- A rubber spatula—you’ll use this a ton for scraping down the sides!
- A sharp knife or cutting board for chopping those sandwich cookies.
- Baking sheets (you’ll need two).
- Parchment paper or silicone mats—don’t skip the parchment, trust me.
- A cookie scoop or two tablespoons for portioning.
- Wire cooling rack.
Having everything lined up means you can go from mixing to baking in about 15 minutes flat. It’s so satisfying when you have all your little bowls ready to go!
Step-by-Step Instructions to Make Cookies and Cream Cookies
This is the fun part! Since we aren’t chilling the dough, we move quickly here. Get your oven preheated to 350\u00b0F right now, and make sure you have two baking sheets lined with parchment paper. If you skip the parchment, cleanup is a nightmare, and the bottoms might stick! Remember, we want perfect, chewy **Cookies and Cream Cookies**, not a fight with burnt edges.
We are going to build this dough in stages. Don’t rush the creaming step, even though we are moving fast overall. That initial creaming is what sets the stage for the final texture.
Creaming the Fats and Sugars
In your big bowl, dump in that softened butter, the granulated sugar, and the packed light brown sugar. Now, you need to beat this mixture until it looks light and fluffy. I mean, really beat it! This takes about two full minutes on medium speed. What you’re looking for is a texture that resembles pale, whipped honey—it should look noticeably lighter in color than when you started. This process is trapping air, which is crucial for making sure your **Cookies and Cream Cookies** don’t bake up flat and dense.
Once that’s done, add your egg and the alcohol-free vanilla flavoring. Mix it just until it’s smooth and everything looks incorporated. Make sure you scrape down the sides of the bowl halfway through so you don’t end up with pockets of unmixed sugar stuck to the bottom.
Combining Wet and Dry Mixtures
While that’s mixing, whisk your flour, baking soda, baking powder, and salt together in that separate medium bowl. Whisking them ensures the leavening agents are evenly distributed—you don’t want one cookie blowing up huge while the one next to it stays flat!
Now, turn your mixer down to low speed. This is important! Add the dry flour mixture into your wet ingredients. Mix only until you see no more white streaks of flour remaining. Stop the mixer! If you overmix here, you develop gluten, and suddenly your chewy **Cookies and Cream Cookies** become tough and cakey. We want to stop mixing *just* before it looks perfectly uniform.
Folding in the Good Stuff
Time for the best part! Grab your spatula. Gently fold in those coarsely chopped chocolate sandwich cookies and the white chocolate chips. Use a gentle, sweeping motion. You are just trying to distribute them evenly throughout the dough. Don’t stir aggressively; we want chunks of cookie, not powder!
Scoop out balls of dough using about two tablespoons worth—a standard cookie scoop works perfectly for consistency. Roll them loosely into balls and place them on your prepared baking sheets. Make sure you leave about two inches between each ball because these cookies spread a little bit when they bake.
Baking and Initial Cooling
Slide those sheets into your 350\u00b0F oven. Bake them for 10 to 12 minutes. How do you know they are done? The edges should look set and just barely turning a light golden brown. They might still look a little soft in the very center, and that’s okay! That’s how you guarantee chewiness in your **Cookies and Cream Cookies**.
When the timer goes off, pull them out, but here is the crucial step: Let them cool right there on the hot baking sheet for five minutes. This resting period allows the centers to firm up so they don’t fall apart when you move them. After five minutes, carefully transfer the cookies to a wire rack to cool completely. If you try to move them sooner, they might collapse!

Tips for Success When Baking Cookies and Cream Cookies
Even though these **Cookies and Cream Cookies** are super simple, a few tiny tricks can elevate them from good to absolutely unforgettable. Since there’s no chilling time, we need to be smart about texture management while mixing and baking. My biggest piece of advice revolves around the mix-ins.
First, don’t chop your sandwich cookies too finely! If you use a food processor, pulse it just a few times. You want shards and chunks, not fine crumbs. Those larger pieces give you that satisfying textural contrast against the soft dough. If you turn them into dust, you just get a brown cookie instead of a true Cookies and Cream experience.
Second, watch your edges, not the clock! The 10-to-12-minute window is a guideline. If your oven runs hot, they might be done at 10 minutes. Pull them when the edges are set but the center still looks slightly underdone. They finish cooking on the hot tray, which locks in the chewiness. If you wait until the center looks baked through, you’ll end up with a crispier cookie, and we want soft!
Finally, if you want really dramatic looking **Cookies and Cream Cookies**, take a few extra chopped cookie pieces and gently press them onto the tops of the dough balls *right* before they go into the oven. They look gorgeous and signal exactly what deliciousness is inside!
Ingredient Notes and Simple Substitutions
I get asked about ingredient swaps all the time, especially since these **Cookies and Cream Cookies** rely on specific textures. If you absolutely must substitute the white chocolate chips, semi-sweet is the next best thing, but be warned—the cookie will be less sweet and the color contrast won’t be as striking. You might want to add an extra tablespoon of sugar if you go that route.
What about the sandwich cookies? You need that dark chocolate cookie base for the classic flavor profile. While Oreos are the standard, any similar chocolate wafer cookie works just fine. The key is that they must be the cream-filled kind because that cream melts slightly during baking, adding a little extra richness to the dough. If you use a plain chocolate wafer, you might want to add an extra half teaspoon of vanilla or a tiny bit more brown sugar to compensate for that lost richness in your **Cookies and Cream Cookies**.
Frequently Asked Questions About Your Cookies and Cream Cookies
It’s natural to have questions when trying a new recipe, especially when you want that perfect texture! These **Cookies and Cream Cookies** are designed to be fast, but sometimes our baking instincts tell us we need to chill dough. Here are the answers to the questions I get asked the most about making these chewy drop cookies.
I want you to feel confident knowing that this recipe is reliable. The measurements for the flour and the ratio of fats are specifically balanced so you get great results even without setting the dough aside in the fridge. They are truly designed to be quick cookies!
Can I chill the dough for these Cookies and Cream Cookies?
That’s the beauty of this recipe—you absolutely do not have to chill the dough! This is what makes them such fantastic quick cookies for last-minute cravings. If you *did* decide to chill the dough for an hour or two, your cookies will spread less, meaning they will be thicker and puffier right out of the oven. If you chill them, you might need to add a minute or two onto the baking time, so keep an eye on those edges.
What kind of cookies work best in this recipe?
For the absolute best flavor and texture in your **Cookies and Cream Cookies**, you need that specific chocolate sandwich cookie that has the white cream filling. The flavor profile relies on that dark chocolate wafer mixed with the sweet melting cream. If you use a plain chocolate wafer cookie, the overall richness of the cookie will drop. Also, remember to coarsely chop them yourself rather than buying pre-crushed crumbs!
Q: Why are my cookies spreading too much?
A: This almost always means your butter was too warm or melted when you started creaming it. Next time, make sure your butter is only softened, not greasy. Also, ensure you didn’t over-measure the flour!
Q: Can I use milk chocolate chips instead of white chocolate?
A: You can, but you lose that classic Cookies and Cream look! Milk chocolate works fine from a baking perspective, but the white chocolate chips really pop against the dark cookie pieces.
Storing and Reheating Your Baked Goods
The best part about these **Cookies and Cream Cookies** is that they stay wonderfully soft and chewy for days, provided you store them correctly. Because they are such moist drop cookies, humidity is the enemy! You want to make sure they are completely cool before you put them away, otherwise, condensation builds up and makes them gummy.
If you have leftovers—which I rarely do—just stack them in a good airtight container. You can even slip a slice of plain white bread into the container with them; the cookies will absorb the bread’s moisture and stay soft longer. It’s an old trick, but it works like a charm for keeping that fresh-baked texture! If you want more great baking tips, check out our Medium page.
Table of Storage and Reheating Guidelines
| Storage Method | Temperature | Duration |
|---|---|---|
| Airtight Container (Room Temp) | Countertop | Up to 5 days |
| Airtight Container (Fridge) | Refrigerator | Up to 1 week (texture may firm slightly) |
| Freezing (Unbaked Dough Balls) | Freezer | Up to 3 months |
If you’ve stored them for a few days and they seem a little firm, I have the perfect fix. Just pop one or two **Cookies and Cream Cookies** in the microwave for about 8 to 10 seconds. They come out warm, gooey, and tasting like they just came out of the oven. It’s the quickest way to refresh them! For more quick dessert ideas, see our edible cookie dough bites recipe.
Sharing Your Delicious Cookies and Cream Cookies Experience
I truly hope you loved making these quick, chewy **Cookies and Cream Cookies** as much as I love baking them for my family! They are a real crowd-pleaser. If you followed along and ended up with a perfect batch, I’d love to hear all about it. Let me know how they turned out for you! You can share your creations on Facebook or save this recipe on Pinterest.
Print
Amazing 2-Minute Cookies and Cream Cookies
- Total Time: 27 minutes
- Yield: 18 cookies
- Diet: Omnivore
Description
Chewy Cookies and Cream Cookies with White Chocolate. These soft, buttery drop cookies contain crushed chocolate sandwich cookies and white chocolate chips. They bake quickly with no dough chilling required.
Ingredients
- 1 cup unsalted butter, softened
- 3/4 cup granulated sugar
- 1/4 cup light brown sugar, packed
- 1 large egg
- 1 1/2 teaspoons alcohol-free vanilla flavoring
- 2 1/4 cups all-purpose flour
- 1/2 teaspoon baking soda
- 1/2 teaspoon baking powder
- 1/2 teaspoon salt
- 12 chocolate sandwich cookies, coarsely chopped
- 1/2 cup white chocolate chips
Instructions
- Preheat oven to 350°F and line two large baking sheets with parchment paper.
- Beat softened butter, granulated sugar, and brown sugar in a large bowl on medium speed for about 2 minutes until creamy and combined.
- Add the egg and alcohol-free vanilla flavoring, mixing until smooth and scraping down the sides of the bowl.
- Whisk flour, baking soda, baking powder, and salt together in a separate medium bowl.
- Add the dry flour mixture to the wet ingredients and mix on low speed just until no white streaks remain.
- Fold in the chopped chocolate sandwich cookies and white chocolate chips by hand with a spatula.
- Scoop dough into 2-tablespoon portions and roll them into balls.
- Arrange dough balls on prepared baking sheets spaced 2 inches apart.
- Bake for 10 to 12 minutes until the edges are set and lightly golden.
- Cool cookies on the baking sheet for 5 minutes to allow them to firm up.
- Transfer cookies to a wire rack to cool completely before serving.
Notes
- Bake time may vary slightly; watch edges for a light golden color.
- Use a spatula to ensure all dry ingredients are incorporated when folding.
- Prep Time: 15 minutes
- Cook Time: 12 minutes
- Category: Dessert
- Method: Baking
- Cuisine: American