Forget those complicated rotisseries and long marinating times you see online! If you thought making real, street-style chicken shawarma at home was a huge headache, I’m here to tell you you’re wrong. This recipe is my absolute go-to for when I want huge flavor but only have about an hour to get dinner on the table. We’re using chicken thighs because they are so forgiving, and we’re skipping the oven entirely!
The magic here is all about the spice blend—it’s warm, earthy, and seriously vibrant. My method is super simple: we toss everything together, give it a quick rest, and then sear it hard in a hot skillet. This high-heat sear is what gives you those gorgeous crispy edges that taste just like you bought it from a vendor, but you know exactly what went into it. That’s what cooking is all about, right? Trust me, once you try this pan-seared approach, you won’t look back.
And we can’t talk about shawarma without mentioning that creamy garlic sauce. It’s zesty, it’s cooling, and it ties the whole plate together perfectly. It’s so good, you’ll probably want to double the sauce recipe. Let’s get cooking!

Gather Your Ingredients for Perfect Chicken Shawarma
Okay, gathering your ingredients is step one, and it’s surprisingly simple for this flavor bomb of a meal. I always lay everything out on the counter before I even touch the chicken. Seeing what you have makes the process feel so much calmer, which is key when you’re aiming for amazing weeknight chicken shawarma.
This recipe breaks down into two main parts: the seasoned chicken that gets that beautiful sear, and the cooling, bright garlic sauce that cuts through all those warm spices. Don’t let the list scare you; most of these spices are probably already hanging out in your pantry!
Spiced Chicken Shawarma Components
For the chicken itself, you need boneless, skinless thighs—don’t substitute those! They hold up so much better to the high heat. When you look at the spices, pay attention to how the garlic is prepped. We need four cloves minced for the marinade itself, which is different from the garlic we use later for the sauce. Also, make sure your turmeric is fresh; it gives the chicken that gorgeous, signature golden color.
Creamy Garlic Sauce Ingredients
The sauce relies on simplicity and freshness. We’re using Greek yogurt and mayo for the creamy base, which keeps it light but rich. The most important thing here is the garlic—it needs to be finely grated or crushed so it disappears into the sauce, not left in big chunks. A little extra lemon juice brightens everything up. It’s just a whisk job, honestly!
| For the Chicken | Quantity | For the Sauce | Quantity |
|---|---|---|---|
| Boneless Skinless Chicken Thighs | 2 pounds | Mayonnaise | 1 cup |
| Olive Oil | 3 tablespoons | Plain Greek Yogurt | 1/2 cup |
| Fresh Lemon Juice | 2 tablespoons | Garlic, finely grated | 3 cloves |
| Ground Cumin | 1 tablespoon | Fresh Lemon Juice | 1 tablespoon |
| Ground Coriander | 2 teaspoons | Kosher Salt | 1/4 teaspoon |
| Paprika | 2 teaspoons | ||
| Ground Turmeric | 1 teaspoon | ||
| Ground Cinnamon | 1/2 teaspoon | ||
| Cayenne Pepper | 1/4 teaspoon | ||
| Garlic Cloves, minced (for marinade) | 4 cloves | ||
| Kosher Salt (for marinade) | 1 teaspoon | ||
| Black Pepper (for marinade) | 1/2 teaspoon | ||
| For Serving: | For Serving: | ||
| Pita Bread, warmed | 4 pieces | Sliced Cucumber | 1 cup |
| Cherry Tomatoes, halved | 1 cup | Sliced Red Onion | 1/4 cup |
| Fresh Parsley Leaves | 1/4 cup |
Expert Tips for Preparing Your Chicken Shawarma Marinade
Before we even think about turning on the stove, we need to talk about the chicken prep. This is where a lot of people rush, and trust me, rushing this step means you lose out on serious flavor! First things first: pat your chicken thighs bone dry with paper towels. If the chicken is wet, the spices and oil just slide off, and you end up steaming the meat instead of getting that gorgeous sear later. We want dry chicken for maximum flavor development!
Next, dump everything into that bowl—the oil, the lemon, all those wonderful spices. Make sure every single piece of chicken is totally coated. I always use my clean hands to massage the marinade right into the meat. It feels silly, but it really helps the flavors adhere. This quick step shows you’re building a solid foundation for your chicken shawarma.
Achieving Maximum Flavor Penetration
The recipe says 30 minutes, and that’s fine if you are in a huge rush, but please, if you can manage it, let that chicken hang out in the fridge for at least two hours. Honestly, overnight is when the magic happens! The acids in the lemon juice and the oils in the spices slowly start to penetrate the meat fibers. The longer it sits, the more tender and deeply flavored your final dish will be. Don’t worry about the chicken getting mushy; chicken thighs are tough enough to handle a full 24 hours in that spice bath.
Simple Steps to Cook Flavorful Chicken Shawarma
Alright, the marinade is done, and your kitchen probably smells amazing already—that’s the turmeric and cumin working their magic! Now comes the part that separates good weeknight meals from truly fantastic ones: the sear. We are using a large cast-iron skillet, and I mean *large*. If you crowd the pan, the temperature drops instantly, and the chicken will steam in its own juices. Nobody wants steamed shawarma; we want crispy, browned edges!
Get that skillet screaming hot over medium-high heat. Seriously, wait until you see the faintest wisp of smoke before you drop the first piece of chicken in. This high heat is non-negotiable for achieving that authentic texture in your chicken shawarma. Add the chicken in a single layer. If you have to do it in two or three rounds, please do! It’s worth the extra minute or two to get this right.
Cook each side for about six to eight minutes. You are looking for deep, dark brown crusts—that’s where all the flavor is locked in. Always use a meat thermometer to check for doneness, especially when cooking poultry for your family; we want that safe 165 degrees Fahrenheit internal temperature. Don’t poke the chicken constantly while it cooks; let it sit undisturbed so that crust can form!
The Crucial Step of Searing the Chicken
I cannot stress this enough: work in batches! If you pile the chicken in there, the temperature dips, the spices burn instead of toast, and you end up with grayish, sad-looking meat. We need that sizzle sound when the chicken hits the pan. If it’s silent, the pan isn’t hot enough. Cook until you see the color you want, flip it, and let the other side brown up nicely. That’s all there is to the cooking part!
Resting and Slicing for Juiciness
Once the chicken is cooked through and gorgeous, take it out immediately and put it on a clean cutting board. Now, you must let it rest for five minutes. If you slice it right away, all those beautiful juices you worked so hard to keep inside the meat will rush right out onto the board. Resting lets the muscle fibers relax and reabsorb that moisture. After resting, slice the chicken against the grain into nice thin strips. This technique ensures every single bite of your finished plate is tender.

Making the Zesty Creamy Garlic Sauce
While the chicken is resting—which is crucial, remember?—you can whip up the garlic sauce. This sauce is honestly half the reason I crave this meal so often! It’s so bright and cooling against the warm spices of the meat.
Seriously, this is the easiest part of the whole process. Grab a small bowl and just whisk everything together. We’re combining the mayonnaise and the Greek yogurt first until they look smooth and pale. Then, we add those three cloves of finely grated garlic, the extra bit of lemon juice, and just a pinch of salt.
Make sure you mix until there are absolutely no streaks of plain yogurt left. Taste it before you chill it! If it tastes a little flat, add another tiny squeeze of lemon. If it needs a little more punch, maybe grate in half a clove more garlic. Cover it up and stick it in the fridge while you slice the chicken. It chills beautifully and gets even better after about 20 minutes.
Assembling Your Delicious Chicken Shawarma Plates
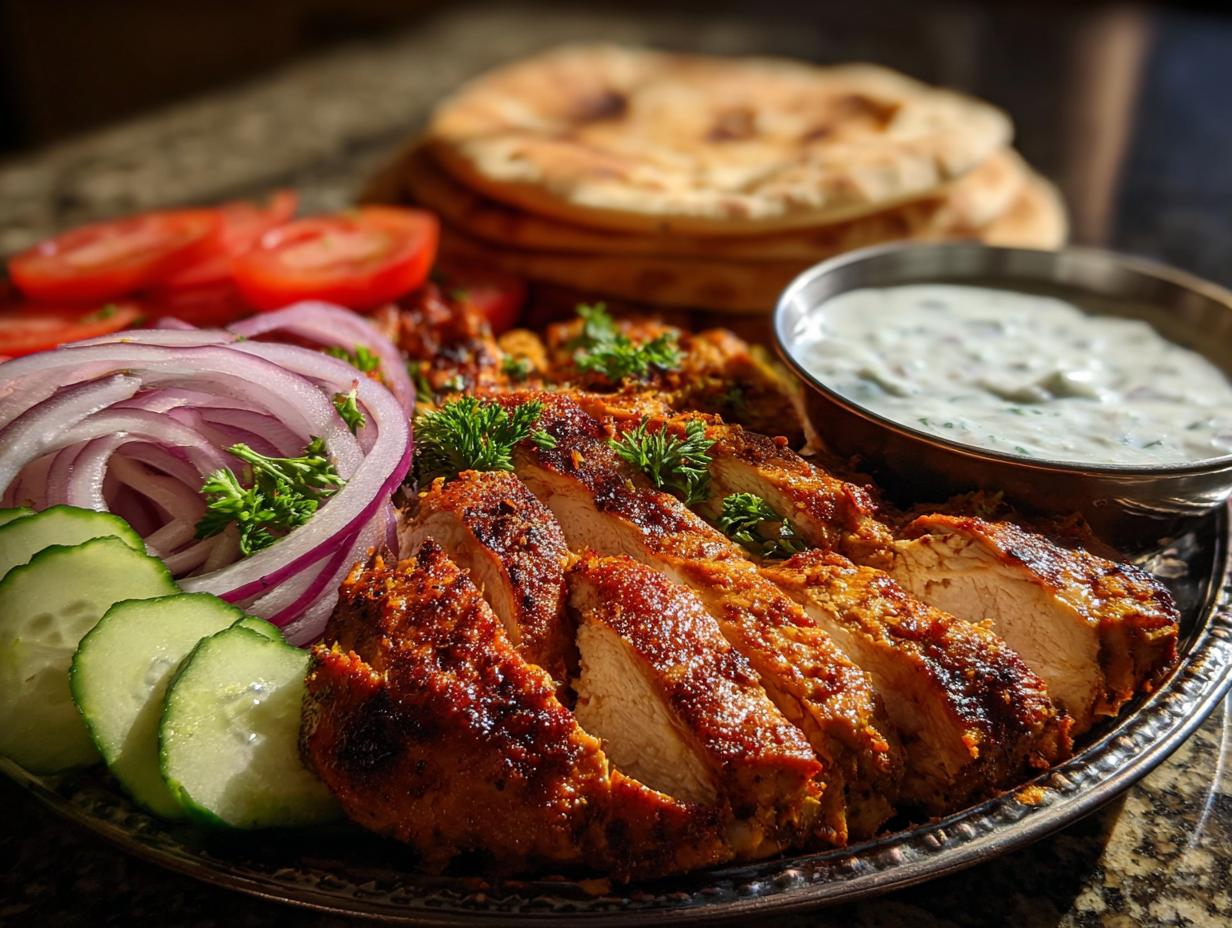
The final moment! You have your perfectly seared, rested, and sliced chicken, and that cool, zesty garlic sauce is waiting in the fridge. Now we bring it all together for the ultimate presentation of homemade chicken shawarma. Don’t forget to warm those pitas! I usually pop mine right over an open gas flame for about 15 seconds per side, or you can wrap them in foil and toss them in a warm oven for five minutes. Soft, warm pita is essential for the experience.
On a big platter, lay out your warmed bread. Then, pile the sliced chicken right in the middle. Sprinkle those fresh toppings around the edges—the bright red tomatoes, the crisp cucumber slices, and that sharp red onion. The freshness of the vegetables is what balances the richness of the chicken and the sauce.
Drizzle that creamy garlic sauce generously over the meat. Seriously, don’t be shy with the sauce! Then, finish it all off with a scattering of fresh parsley leaves for that final pop of green color and fresh herbaceous flavor. It looks incredible, and the smell is just heavenly.
Serving Suggestions for Your Chicken Shawarma
The classic way, of course, is to stuff everything into that warm pita bread. You make a little pocket, load it up with chicken, veggies, and sauce, and roll it tight. It’s perfect for eating standing up, just like at a street stall! If you want more ideas on easy dinner rolls to serve alongside, check out this guide on 30 Minute Dinner Rolls.
If you’re feeling less messy, you can totally serve this deconstructed style. Lay out the sliced chicken on a platter, and serve the toppings and sauce on the side so everyone can build their own plate or bowl. It’s great served over rice or just with a big side salad if you’re trying to keep it lighter. Whatever you choose, make sure you eat it right away while the chicken is still warm! You might also enjoy these Chicken Taco Rice Bowls for another quick meal idea.
Frequently Asked Questions About Chicken Shawarma
I get so many questions about this recipe because everyone is shocked at how easy it is to get that incredible flavor! Here are a few things I hear all the time when people are getting ready to make their first batch of savory, seasoned chicken. For more cooking inspiration, follow us on Pinterest!
Can I use chicken breasts instead of thighs for this chicken shawarma?
You absolutely can, but you need to be extra careful! Chicken thighs have more fat, which means they stay juicy even when cooked quickly over high heat. Chicken breasts are leaner and dry out much faster. If you use breasts, make sure you slice them thinner before marinating and watch that cook time like a hawk. They might only need 4 or 5 minutes per side. You won’t get the same deep color, but the flavor from the marinade will still be amazing!
How long can I marinate the chicken?
I mentioned this before, but it bears repeating because it makes such a difference! The recipe calls for 30 minutes minimum, which is enough to get flavor on the surface. But if you want that deep, complex taste that really defines great chicken shawarma, let it go for at least 4 hours. I’ve marinated mine for up to 24 hours, and it’s fantastic! Just make sure your container is sealed tight and kept very cold in the fridge. For more tips on building flavor foundations, see our Best Chicken Marinade guide.
What if I don’t have ground turmeric?
Oh, that bright yellow color is all thanks to the turmeric! It adds a subtle earthy note, but it’s not strictly essential for the recipe’s structure. If you don’t have it, you can leave it out, though the chicken won’t look quite as authentic. You could substitute it with a little extra paprika for color, but you’ll miss that specific earthy background flavor. It’s worth picking up some turmeric, though; it’s great in rice, too! You can find more of our cooking insights on Medium.
Storing and Reheating Leftover Chicken Shawarma
I always make extra because leftovers are the best lunch the next day! The key to successful leftovers when dealing with chicken shawarma is keeping the sauce separate from the meat and the fresh vegetables. If you mix the sauce in with the chicken while it’s chilling, the chicken can get a little soggy, and the sauce might separate.
Store the sliced chicken in an airtight container in the fridge for up to three days. Keep the creamy garlic sauce in its own small, sealed container. The fresh veggies—onions, tomatoes, cucumber—are best kept separate or discarded after the first day, because they lose their crunch quickly.
When you’re ready to eat the leftovers, reheat the chicken gently. I think the best way is back in a dry, hot skillet for just a minute or two until warmed through. You don’t want to cook it again, just warm it up. Then, pile it on a fresh pita or some rice, and add a dollop of the cold garlic sauce right on top. Perfection all over again! If you are looking for other quick dinner ideas, consider this 5 Ingredient Protein Packed Chicken Skillet.
| Component | Storage Duration (Refrigerated) | Reheating Method |
|---|---|---|
| Spiced Chicken | 3 Days | Dry skillet over medium heat or microwave briefly |
| Creamy Garlic Sauce | 5 Days | Keep chilled, do not heat |
| Warmed Pita/Veggies | Best eaten fresh | Discard or use fresh replacements |
Sharing Your Homemade Chicken Shawarma Success
I truly hope this recipe brings that vibrant, smoky flavor right into your kitchen. It makes me so happy when I know you’re enjoying a simple, delicious meal that tastes like you spent all day on it! I always love hearing how it turned out for you. Feel free to share your results on Facebook!
If this easy weeknight meal became a new favorite, please let me know! A quick rating or a little note about your experience helps other home cooks feel confident trying it out next time. Happy cooking, friends!
Print
Amazing 30-Minute Chicken Shawarma Joy
- Total Time: 60 minutes
- Yield: 4 servings
- Diet: Omnivore
Description
Flavor-packed spiced chicken served with a zesty, creamy garlic sauce. This recipe brings street-style shawarma flavors to your kitchen using pan-seared chicken thighs.
Ingredients
- 2 pounds boneless skinless chicken thighs
- 3 tablespoons olive oil
- 2 tablespoons fresh lemon juice
- 1 tablespoon ground cumin
- 2 teaspoons ground coriander
- 2 teaspoons paprika
- 1 teaspoon ground turmeric
- 1/2 teaspoon ground cinnamon
- 1/4 teaspoon cayenne pepper
- 4 garlic cloves, minced (for marinade)
- 1 teaspoon kosher salt (for marinade)
- 1/2 teaspoon black pepper (for marinade)
- 1 cup mayonnaise
- 1/2 cup plain Greek yogurt
- 3 garlic cloves, finely grated (for sauce)
- 1 tablespoon fresh lemon juice (for sauce)
- 1/4 teaspoon kosher salt (for sauce)
- 4 pieces pita bread, warmed
- 1 cup sliced cucumber
- 1 cup cherry tomatoes, halved
- 1/4 cup sliced red onion
- 1/4 cup fresh parsley leaves
Instructions
- Pat the chicken thighs dry with paper towels.
- Combine the olive oil, lemon juice, cumin, coriander, paprika, turmeric, cinnamon, cayenne pepper, minced garlic, salt, and black pepper in a large bowl.
- Add the chicken thighs to the bowl and toss to coat thoroughly in the spice mixture.
- Cover the bowl and refrigerate for at least 30 minutes.
- Whisk together the mayonnaise, Greek yogurt, grated garlic, lemon juice, and salt in a small bowl until smooth for the garlic sauce.
- Cover the garlic sauce and refrigerate until ready to serve.
- Heat a large cast-iron skillet over medium-high heat.
- Add the chicken thighs to the hot skillet in a single layer, working in batches if needed.
- Cook the chicken for 6 to 8 minutes per side, until deeply browned and the internal temperature reaches 165°F.
- Transfer the cooked chicken to a cutting board and let it rest for 5 minutes.
- Slice the rested chicken against the grain into thin strips.
- Arrange the sliced chicken on a platter with the warm pita, cucumber, tomatoes, red onion, and parsley.
- Serve immediately with the chilled garlic sauce.
Notes
- Marinate the chicken for longer than 30 minutes for deeper flavor penetration.
- Ensure the skillet is hot before adding the chicken to achieve a good sear.
- Resting the chicken before slicing keeps the meat juicier.
- Prep Time: 40 minutes
- Cook Time: 20 minutes
- Category: Main Course
- Method: Pan-Searing
- Cuisine: Middle Eastern