No heading needs to be written for the introduction. Okay, listen up, because I have found the absolute savior for those nights when you crave sushi but refuse to spend an hour rolling tiny pieces of rice! We are talking about the Chicken Sushi Bake, and trust me, this deconstructed California roll casserole is going to change your weeknights forever. It’s ready in under 45 minutes, which is my personal sweet spot for a truly satisfying meal. Forget the complicated assembly; we are layering everything beautifully in one dish. This recipe is so comforting and easy, it’s practically foolproof, and I’ve perfected the creamy-to-rice ratio after many, many kitchen experiments. You are going to love how this tastes just like your favorite takeout roll!
Assembling Your Perfect Chicken Sushi Bake Ingredients
Getting ready for this Sushi Bake is half the fun! Since we’re building this flavor bomb in layers, having everything prepped and ready keeps the process moving smoothly. I always grab my ingredients the night before so I can just start assembling when I get home tired. Don’t substitute the good stuff here; the quality of your rice and the freshness of your toppings really make this casserole sing. It’s all about balancing that savory chicken with the cool, crisp veggies at the end. Here is what you need to gather up for this amazing deconstructed roll experience:

| Component | Quantity Needed |
|---|---|
| Sushi Rice & Seasoning | 2 cups rice, vinegar, sugar, salt, sesame seeds |
| Chicken Base | 1 lb chicken, teriyaki sauce, avocado oil, white parts of green onions |
| Creamy Topping | Cream cheese, mayonnaise, sriracha, garlic powder |
| Garnishes | Cucumber, avocado, furikake, nori |
Essential Components for the Sushi Bake
First up, you absolutely must use sushi rice—rinsing it until the water runs clear is non-negotiable, trust me! For the base flavor, we mix the rice with a sharp vinegar solution that you’ll heat up quickly, plus a little toasted sesame seed and oil for that nutty background note. Then for the chicken itself, we keep it simple: diced chicken breasts cooked until they are just golden, tossed with teriyaki sauce and the white ends of your green onions. That little bit of teriyaki really amps up the savory factor before it even hits the oven.
Creamy Topping Mixture Ingredients
This is what binds everything together and makes the topping rich! You need softened cream cheese—and I mean truly soft, or it won’t mix right—blended with mayonnaise. We add a punch of heat with sriracha sauce and just a hint of garlic powder. Mix this until it’s perfectly smooth; there should be no lumps of cream cheese remaining. Once you fold the slightly cooled chicken into this creamy mix, you get that gorgeous, thick layer that bakes up beautifully golden.
Fresh Toppings and Garnishes for Your Sushi Bake
Save these for *after* the baking, okay? The magic happens when you contrast that hot, bubbly casserole with cool, fresh ingredients. We need crisp diced English cucumber and perfectly ripe diced avocado—make sure your avocado isn’t too mushy! We sprinkle everything with furikake seasoning, which is essential for that authentic Japanese flavor pop, and fresh sliced green onions for color and bite. And don’t forget the nori squares; those are your little edible spoons!
Step-by-Step Guide to Making Sushi Bake
Alright, let’s get cooking! The beauty of this Sushi Bake is that while it looks fancy, the process is super straightforward. We’re dividing this into four easy phases. First things first: get your oven preheated to 425°F and make sure your 9×13 dish is greased up—I use a little sesame oil, it adds a nice depth.
Preparing the Seasoned Rice Base
Start your rice right away! Cook your sushi rice according to the package, but remember, don’t peek while it simmers! While that’s going, take your rice vinegar, sugar, and salt and heat it gently in a tiny saucepan until everything dissolves. Once the rice is done, transfer it to a big bowl. Now, pour that vinegar mixture over the hot rice and gently fold in your toasted sesame seeds. Folding is key here—we don’t want mushy rice! Just gently incorporate everything so the grains stay separate but coated. Spread this seasoned base evenly into your prepared dish and press it down firmly with a greased spatula. That firm base is crucial for holding everything up!

Cooking the Teriyaki Chicken Filling
Next, the flavorful middle layer. Heat the avocado oil in a large skillet over medium-high heat. Cook your small-diced chicken until it gets nice and golden brown all over—about 7 to 8 minutes. Don’t forget to drain off any excess liquid once it’s cooked through! Toss that hot chicken with the teriyaki sauce and the white parts of your green onions. Here’s an important tip: let this chicken cool for about five minutes before you mix it into the cream cheese blend. If it’s too hot, it’ll melt the cream cheese and make your topping runny! Once cooled slightly, fold the chicken mixture into the cream cheese, mayo, and sriracha blend until it’s perfectly uniform.
Layering and Baking the Sushi Bake
Time to build! Sprinkle half of your furikake seasoning right over that firm rice layer. Then, gently spread that rich, creamy chicken topping evenly over the furikake. Sprinkle the rest of the furikake right on top of the chicken. Pop the whole thing into that hot 425°F oven. You only need about 15 to 20 minutes. You’re looking for the edges to be bubbling happily and the top to have a gorgeous, light golden color. Keep an eye on it!
Final Touches and Serving Your Sushi Bake
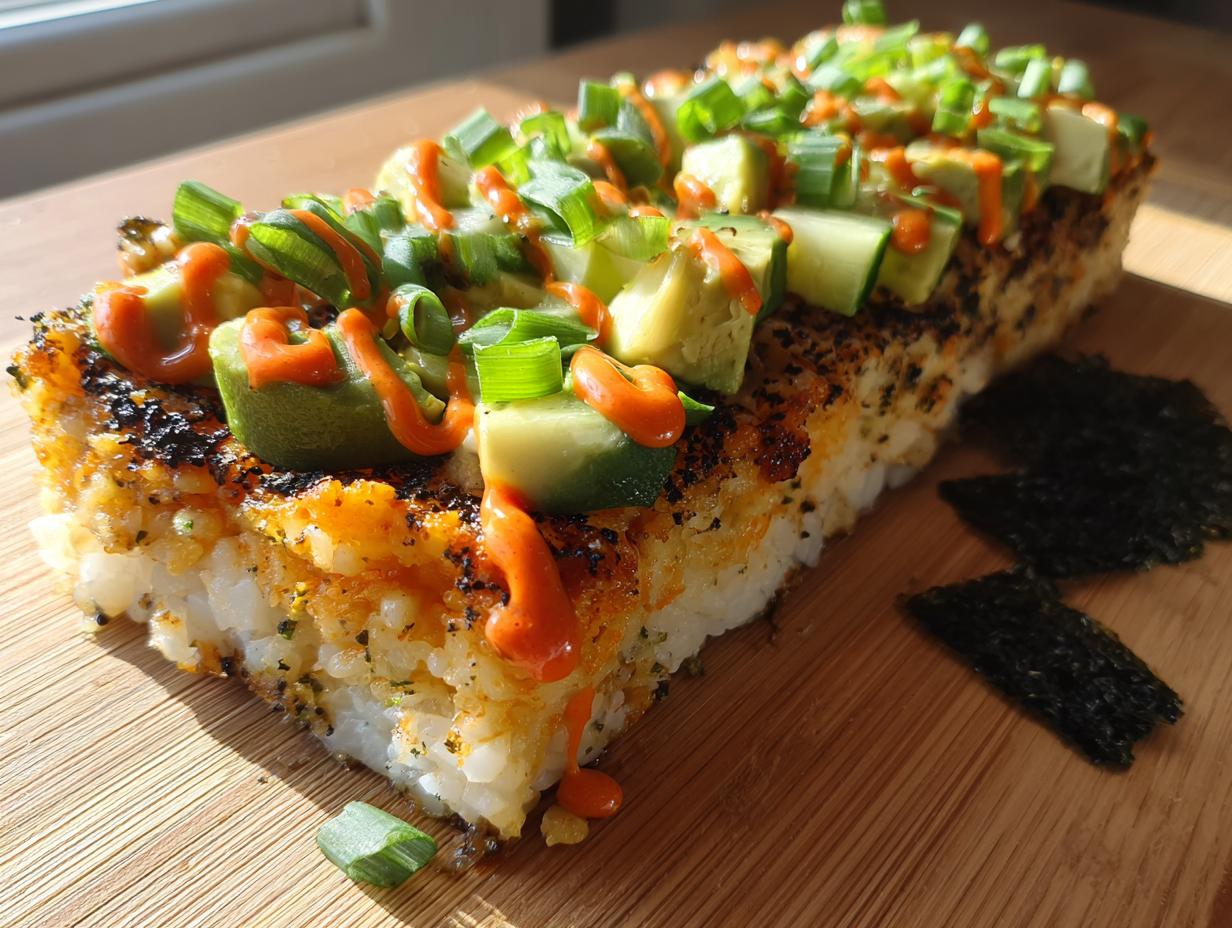
Once you pull that hot casserole out, let it rest for just a minute or two—it’s piping hot! Now we add the fresh, cool contrast. Scatter your diced cucumber, diced avocado, and the remaining fresh green onions across the top. Finish with a light sprinkle of extra sesame seeds. The best part? Drizzle it generously with spicy mayo for that final kick. Serve it immediately while it’s warm, and make sure everyone has those little squares of nori seaweed ready. They use those sheets like little edible scoops for the perfect bite!

Why This Chicken Sushi Bake Needs To Be Your Next Meal
Honestly, if you’re looking for a dinner that delivers big flavor without demanding hours of your evening, stop everything and make this Sushi Bake. It truly is the perfect weeknight solution because it requires almost no technical skill, yet the results taste like you spent way more time on it. It’s one of those recipes everyone loves!
- It’s unbelievably fast—ready from start to finish in under 45 minutes.
- The flavor profile is spot-on: creamy, spicy, savory, and fresh all in one scoop.
- Clean-up is a breeze since everything cooks together in a single 9×13 dish.
- It’s completely customizable with your favorite sushi toppings!
Tips for Achieving the Best Sushi Bake Texture and Flavor
I’ve made this Sushi Bake so many times that I’ve picked up a few tricks that take it from good to absolutely restaurant-worthy. Getting the texture right is really the difference between a standard casserole and a dish that tastes exactly like a deconstructed California roll. These little details matter, especially when dealing with rice!
Perfecting the Rice Consistency
Seriously, don’t skip rinsing the rice! If the water isn’t clear, you have too much surface starch, and your base will turn gummy instead of sticky and firm. Once you fold in that seasoned vinegar mixture, be gentle—I mean *really* gentle. Use a silicone spatula and use a cutting motion, not a stirring motion. We want every grain coated but still intact. If you mash it, the whole base gets dense, and that’s not the light foundation we need for this bake.
Keeping Your Creamy Chicken Topping Smooth
The biggest texture pitfall is a runny topping, and that happens if you mix hot chicken right into the cream cheese mixture. You need to let that cooked teriyaki chicken cool down until it’s just warm to the touch, maybe five minutes off the heat. When the chicken is slightly cooled, it won’t melt the cream cheese instantly, allowing you to fold everything together smoothly. If you find the mixture is still a tad stiff, add just a tiny splash of water or even a teaspoon of the mayonnaise you set aside. Slow and steady wins the race for that perfect creamy layer!
Frequently Asked Questions About Your Sushi Bake
I get so many questions about this recipe because everyone wants their Sushi Bake to turn out perfectly the first time. It’s a flexible recipe, but a few core techniques really help maximize the flavor and texture. Here are the things people ask me most often!
Can I Prepare Parts of the Sushi Bake Ahead of Time?
Oh yes, you absolutely can! This is why the Sushi Bake is such a great meal prep option. You can cook and season your sushi rice completely a day ahead and store it in the fridge. I also cook the teriyaki chicken mixture (Step 6 and 7 in the main recipe) and keep that covered in the fridge too. The next day, all you have to do is press the rice into the pan, spread the cold chicken mixture on top, sprinkle the furikake, and bake! Just add about 5 extra minutes to the baking time since everything is starting cold.
What Kind of Chicken Works Best for the Sushi Bake?
For this specific recipe, I stick strictly to boneless, skinless chicken breasts, diced small. They cook quickly and absorb the teriyaki sauce beautifully without adding too much extra fat to the creamy topping. You could swap it for shredded rotisserie chicken if you are really short on time, but you’ll need to skip the initial sautéing step. If you use rotisserie, just toss it with the teriyaki sauce and let it cool slightly before folding it into the cream cheese mixture. Don’t try using thighs; they tend to be too fatty for this creamy topping!
Storing and Reheating Leftover Sushi Bake
I always hope there are leftovers because this Sushi Bake tastes great the next day, but you have to store it right! The biggest issue is keeping those fresh toppings from getting soggy. Once it cools down, cover the baking dish tightly with plastic wrap or transfer the remaining portions to an airtight container. You can keep it refrigerated for up to three days. Remember, the cooked rice and chicken base are sturdy, but the avocado and cucumber really don’t hold up well after day one.
When you reheat, you want to focus on warming the base without turning the topping into liquid. I highly recommend reheating individual portions in the microwave for about 60 to 90 seconds. If you are reheating the whole dish, cover it tightly with foil and warm it in a 350°F oven for about 15 minutes. Always add fresh avocado and a new sprinkle of furikake right before serving leftovers!
| Storage/Reheat Method | Duration/Temp |
|---|---|
| Refrigeration (Covered) | Up to 3 days |
| Microwave (Single Serving) | 60-90 seconds |
| Oven (Whole Dish, Covered) | 15 minutes at 350°F |
Understanding the Nutrition in This Sushi Bake
I always get asked about the nutrition in this comforting casserole, and while I’m not a registered dietitian—I’m just a home cook who loves easy dinners—I can give you a rough idea of what you’re getting with a standard serving of this Sushi Bake. Remember, these numbers are estimates based on the ingredients listed, so they might shift a little depending on how heavy-handed you are with the spicy mayo drizzle! If you want to see more of my recipe insights, check out my Medium profile.
| Nutrient | Estimated Amount Per Serving |
|---|---|
| Calories | 445 |
| Fat | 18g |
| Carbohydrates | 48g |
| Protein | 24g |
It’s a really satisfying meal because it balances complex carbs from the rice with a solid hit of protein from the chicken. Enjoy it guilt-free! If you want to save this recipe for later, make sure you follow me on Pinterest.
Share Your Homemade Sushi Bake Creations
I truly hope you enjoyed making this simple, delicious Sushi Bake! It makes my whole week when I hear how much you loved it. When you pull that golden, bubbly casserole out of the oven, snap a picture! I’d love to see your flavor combinations and your fresh toppings. You can also share your photos with me on Facebook.
Tell me down below in the comments how it turned out for your family or what little twist you added to your chicken base. Happy baking!
Print
OMG 45-Minute Chicken Sushi Bake Triumph
- Total Time: 45 minutes
- Yield: 6 servings
- Diet: Omnivore
Description
This easy sushi bake layers seasoned rice, creamy chicken, and fresh toppings in one casserole. It is a deconstructed California roll ready in 45 minutes for busy weeknights.
Ingredients
- 2 cups sushi rice, rinsed well
- 3 cups water
- 1/4 cup rice vinegar
- 2 tablespoons granulated sugar
- 1 teaspoon salt
- 2 tablespoons toasted sesame seeds
- 1 teaspoon sesame oil
- 1 pound boneless, skinless chicken breasts, diced small
- 3 tablespoons teriyaki sauce
- 1 tablespoon avocado oil
- 1/2 cup cream cheese, softened
- 1/3 cup mayonnaise
- 2 tablespoons sriracha sauce
- 1/2 teaspoon garlic powder
- 3 green onions, sliced, whites and greens separated
- 4 tablespoons furikake seasoning, divided
- 1 English cucumber, diced
- 2 ripe avocados, diced
- 4 green onions, sliced (for topping)
- 2 tablespoons sesame seeds (for topping)
- Nori seaweed sheets, cut into squares
- Spicy mayo for drizzling
- Low-sodium soy sauce for serving
Instructions
- Preheat oven to 425°F and grease a 9×13-inch baking dish with sesame oil or cooking spray.
- Cook sushi rice according to package directions or combine rinsed rice with water in a pot, bring to a boil, reduce heat to low, cover, and simmer for 20 minutes without lifting the lid.
- Heat rice vinegar, sugar, and salt in a small saucepan over low heat, stirring until sugar and salt dissolve completely.
- Transfer cooked rice to a large bowl and gently fold in the vinegar mixture and toasted sesame seeds, being careful not to mash the rice.
- Heat avocado oil in a large skillet over medium-high heat and cook diced chicken for 6 to 8 minutes, stirring occasionally, until golden brown and cooked to an internal temperature of 165°F or 74°C.
- Add teriyaki sauce and white parts of green onions to the cooked chicken, toss to coat, then remove from heat and let cool for 5 minutes.
- Mix softened cream cheese, mayonnaise, sriracha, and garlic powder in a bowl until smooth, then fold in the cooled chicken mixture.
- Spread seasoned rice evenly in the prepared baking dish and press down gently with a spatula to create a compact layer.
- Sprinkle 2 tablespoons of furikake seasoning over the rice layer.
- Spread the creamy chicken mixture evenly over the furikake-topped rice and sprinkle with remaining 2 tablespoons of furikake.
- Bake for 15 to 20 minutes until the top is golden brown and bubbling at the edges.
- Remove from oven and top with diced cucumber, avocado, sliced green onions, sesame seeds, and a drizzle of spicy mayo, then serve with nori squares for scooping.
Notes
- Rinse sushi rice thoroughly until water runs clear to remove excess starch.
- Allow chicken to cool slightly before mixing with cream cheese to prevent the mixture from becoming runny.
- Use a greased rice paddle or spoon to press the rice layer without sticking.
- Add fresh toppings like avocado and cucumber after baking.
- Serve warm immediately, using nori sheets as scoops.
- Store leftovers refrigerated for up to 3 days, keeping fresh toppings separate.
- Reheat portions quickly in the microwave or the whole dish covered in the oven at 350°F.
- Prep Time: 20 minutes
- Cook Time: 25 minutes
- Category: Casserole
- Method: Baking
- Cuisine: Japanese-inspired