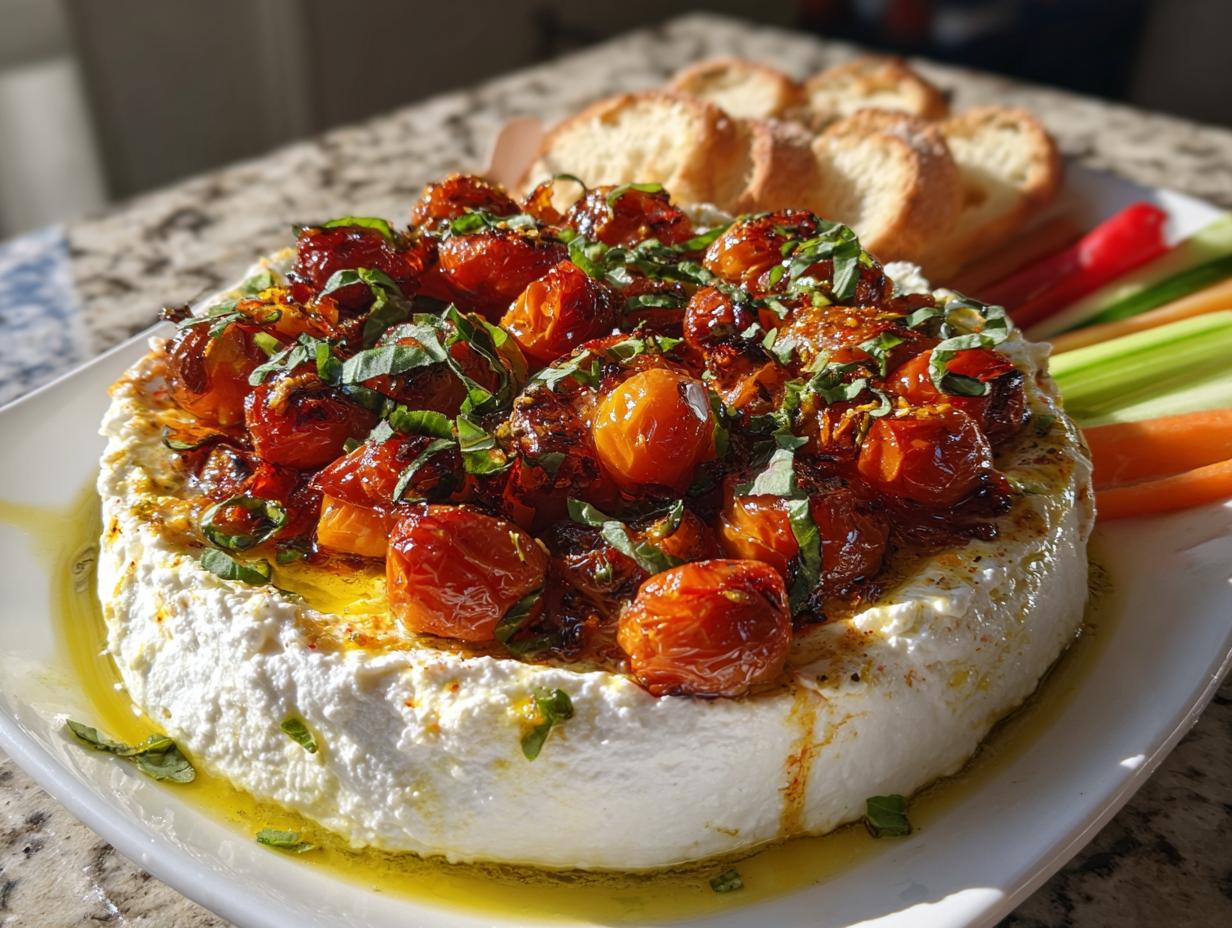
Okay, listen up! I used to think entertaining meant spending hours sweating over complicated canapés that nobody really wanted to eat. But that all changed the day I figured out this absolute showstopper. Forget fussy dips and complicated spreads; we are talking about the Whipped Ricotta Board with Roasted Cherry Tomatoes. Seriously, this board looks like it came straight from a fancy magazine spread, but I promise you, your Aunt Mildred who burns toast could nail this recipe on her first try. It’s elegant, it’s creamy, and the sweet, burst tomatoes make it taste like summer sunshine. Trust me, you need this in your hosting rotation right now!

Assembling Your Whipped Ricotta Board with Roasted Cherry Tomatoes
I know what you’re thinking: “A board? That sounds like too much work.” I used to feel that way! Whenever guests were coming over, I’d get totally intimidated by those gorgeous spreads you see online. I thought creating something that looked this beautiful meant I needed some kind of secret chef training. But this recipe changed everything for me. It’s the ultimate cheat code for looking like you spent all day prepping when really, you spent about 20 minutes!
The best part about the Whipped Ricotta Board with Roasted Cherry Tomatoes is that the oven does all the heavy lifting for the flavor. You just roast the tomatoes until they practically explode with sweetness. Then, you whip the cheese until it’s cloud-like. Anyone can do this! It’s practically impossible to mess up, which is why I always recommend it when someone tells me they are scared of hosting. It’s practically impossible to mess up, which is why I always recommend it when someone tells me they are scared of hosting.
My Journey to the Perfect Whipped Ricotta Board with Roasted Cherry Tomatoes
When my neighbor first invited me to a potluck, I panicked. I tried making tiny puff pastry bites, and they all deflated into sad little discs. I almost didn’t go! Then, I saw a version of this ricotta board online, and I thought, “Okay, I can spread cheese.” That first attempt at the Whipped Ricotta Board with Roasted Cherry Tomatoes was a huge success. People kept asking for the recipe! People kept asking for the recipe!
It turns out, the secret isn’t fancy technique; it’s using great ingredients and letting them shine. You don’t need to chop twenty different things or worry about perfect piping bags. You just need that creamy base, those garlicky, sweet tomatoes, and some good bread. It’s totally beginner-proof, and it instantly elevates whatever table you put it on. I felt like a hosting pro!
Essential Components for Your Whipped Ricotta Board with Roasted Cherry Tomatoes
You can’t build a masterpiece without the right supplies, right? Luckily, the ingredient list for the Whipped Ricotta Board with Roasted Cherry Tomatoes is short, which is why it comes together so fast. Don’t skimp on the whole milk ricotta here—it makes a huge difference in the final texture. I always tell people to use the best olive oil they can find, because you drizzle it right on top at the end, and you need that peppery flavor!
Ingredients List for the Whipped Ricotta Board
Here’s exactly what you need to gather up. And hey, if your ricotta seems a little watery when you open it, take my advice: put it in a fine-mesh strainer over a bowl in the fridge for about half an hour before you use it. That little step ensures the fluffiest base possible.
- Sixteen ounces of whole milk ricotta cheese (don’t forget to drain it if it looks wet!)
- Two tablespoons of heavy cream—this is what makes it truly luxurious.
- One tablespoon of fresh lemon juice, plus a little extra zest for sprinkling.
- Kosher salt and black pepper, just enough to season everything nicely.
- Three cups of cherry tomatoes; get the colorful ones if you can find them!
- Olive oil, a good amount for roasting and a little bit extra for that final drizzle.
- Four garlic cloves, just smash them up a bit—no need to chop them finely.
- A pinch of red pepper flakes for just a tiny bit of warmth.
- One teaspoon of dried oregano.
- Fresh basil leaves, torn up right before serving.
- Flaky sea salt for that perfect finishing crunch.
- One whole baguette, sliced and ready for toasting.
- Whatever fresh veggies you like—cucumbers, peppers, radishes—to fill out the board.
Equipment Needed for Whipped Ricotta Board with Roasted Cherry Tomatoes
You don’t need a ton of specialized gear, which is another win for us busy hosts! Make sure you have something to whip that cheese in, and the right surface to present it all on.
- A food processor or a sturdy hand mixer.
- A rimmed baking sheet lined with parchment paper for roasting the tomatoes.
- A large, beautiful serving platter or a rustic wooden board to build your masterpiece on.
- A small bowl for tossing the tomatoes with oil and spices.
- A sharp knife for slicing your toasted bread.
Step-by-Step Instructions for Whipped Ricotta Board with Roasted Cherry Tomatoes
This is where the magic happens, and honestly, it’s so straightforward you’ll feel like you’re cheating! We tackle this in three easy phases: roasting the tomatoes, whipping the cheese, and then bringing it all together on the board. Don’t rush the roasting part; those little tomatoes need time to get sweet and jammy for the perfect Whipped Ricotta Board with Roasted Cherry Tomatoes.
Preparing the Roasted Cherry Tomatoes
First things first, get that oven hot—450 degrees Fahrenheit is what we need. Line a baking sheet with parchment paper; this saves you a ton of scrubbing later, trust me. Now, grab those cherry tomatoes and toss them right onto that lined sheet. You want them coated in about two tablespoons of olive oil.
Here’s the flavor bomb part: add your smashed garlic cloves—don’t bother chopping them, smashing releases tons of flavor while they roast! Toss in the kosher salt, the red pepper flakes, and that dried oregano. Give it a good mix right there on the pan until everything looks coated. Slide that sheet into the hot oven for about 15 to 20 minutes. You are looking for them to burst open, get soft, and have those beautiful little charred spots around the edges. That caramelization is what gives the whole board its depth.
Creating the Smooth Whipped Ricotta Base
While the tomatoes are doing their thing, we make the cloud! Put your drained ricotta, the heavy cream, lemon juice, half of that lemon zest you have set aside, the salt, and pepper into your food processor. If you don’t have a processor, a stand mixer with the whisk attachment works great too, but you might need to whip it a little longer.
Turn that machine on high speed and let it go for a solid two or three minutes. You need to watch it transform! It starts out thick, but keep going until it’s genuinely light, airy, and incredibly smooth. It should look totally different than when you started—almost like a thick, pale frosting. That fluffy texture is the non-negotiable foundation of a great Whipped Ricotta Board with Roasted Cherry Tomatoes.
Final Assembly and Presentation
Once the tomatoes are roasted, let them cool down for about five minutes. If they are scalding hot, they will melt your beautiful whipped ricotta right into a puddle, and we want layers, not soup! Spread that airy ricotta in an even, generous layer across your serving platter or wooden board. I like to use the back of a spoon to create a shallow little swoosh or well right in the center where the tomatoes will sit.
Now, gently spoon those roasted cherry tomatoes—juices, garlic cloves, and all—right into that well you made. Let some of those sweet, savory juices run out onto the white cheese; that contrast is stunning! Finish it off with a final drizzle of that good olive oil, sprinkle on the torn fresh basil leaves and the rest of that bright lemon zest, and don’t forget a final dusting of flaky sea salt for texture. Serve it immediately with your toasted bread and veggies ready for dipping! Serve it immediately with your toasted bread and veggies ready for dipping!

Pro Tips for an Expert-Level Whipped Ricotta Board with Roasted Cherry Tomatoes
Even though this recipe is super easy, a few little tricks can take your Whipped Ricotta Board with Roasted Cherry Tomatoes from “pretty good” to “I need the recipe right now!” These are the small details I picked up that really make the difference between a standard dip and a truly restaurant-worthy appetizer. It’s all about texture and timing, which I’ve learned the hard way!
Achieving the Fluffiest Ricotta Texture
If you want that ricotta to be truly light—like a savory cloud—you absolutely must drain it first. I know, it feels like one extra step when you’re trying to rush, but trust me on this one. Whole milk ricotta, especially the good stuff, holds a lot of extra water. If you skip draining it in a fine-mesh strainer for 30 minutes, your whipped cheese will end up slightly soupy once it sits out.
When you drain it, the fat stays behind, and that’s what whips up beautifully when you add the cream. Don’t worry about the volume; the whipping process adds air back in, so you won’t lose much fluff. A well-drained base is the key to the best Whipped Ricotta Board with Roasted Cherry Tomatoes.
Temperature Control for Assembly
This might be the most crucial tip for presentation! When those tomatoes come out of the oven, they are piping hot, right? They smell amazing, and you want to put them on that smooth, cool cheese immediately. Resist that urge! If you spoon scorching hot tomatoes and all that hot oil onto the whipped ricotta, it melts the butterfat in the cheese instantly, and your gorgeous airy spread turns into a sad, flat puddle.
Wait about five minutes! Let the tomatoes cool down just slightly—warm is great, but not piping hot. This keeps the structure of your whipped ricotta intact for much longer. It ensures that when your guests dig in, they get that perfect textural contrast: the cool, airy cheese against the sweet, slightly warm, juicy tomatoes on your Whipped Ricotta Board with Roasted Cherry Tomatoes.
Serving Suggestions for Your Whipped Ricotta Board with Roasted Cherry Tomatoes
A beautiful spread like the Whipped Ricotta Board with Roasted Cherry Tomatoes is only as good as what you serve alongside it for dipping! You want a variety of textures here so people can scoop up that creamy base and the juicy tomatoes easily. Don’t just stick to one type of bread; offer a little something for everyone.
The key is providing sturdy vehicles for scooping. Think about what you’d want to dip into that savory, garlicky goodness. The combination of textures is what makes a board so appealing. Make sure your dippers are ready to go right when the board is assembled! Make sure your dippers are ready to go right when the board is assembled!
Dippers and Fresh Produce Pairings
The recipe already calls for a sliced and toasted baguette, which is my absolute favorite—the crunch holds up perfectly against the whipped ricotta. But you should definitely add some other options!
- Grab some sturdy, plain crackers. You don’t want anything too heavily seasoned competing with the tomatoes and basil.
- Slice up some crisp fresh vegetables. Cucumbers are amazing because they are cool and refreshing against the warm tomatoes.
- Bell peppers sliced into strips are great for scooping.
- Radishes add a nice peppery bite if you like that contrast with the sweetness of the roasted tomatoes on your Whipped Ricotta Board with Roasted Cherry Tomatoes.
Frequently Asked Questions About Whipped Ricotta Boards
I get so many questions about this appetizer board after parties! People always want to know how to streamline the prep or what to do if they are missing a specific tool. It’s great that so many of you are trying this out. Here are a few of the most common things I hear when people are getting ready to make their own creamy dip. Here are a few of the most common things I hear when people are getting ready to make their own creamy dip.
Can I Make the Whipped Ricotta Ahead of Time?
Yes, absolutely! This is a lifesaver when you’re hosting. You can definitely make the whipped ricotta part up to two hours ahead of time. Just mix it, put it in an airtight container, and pop it in the fridge. The important thing is to pull it out about 20 or 30 minutes before you plan to assemble the board. You want it slightly softened so it spreads nicely, but don’t let it get warm. The roasted tomatoes, however, should always be done right before serving so they are still slightly warm.
What if I Do Not Have a Food Processor?
Don’t worry if your counter space is limited or you don’t own a food processor! You can achieve almost the same light, airy texture using a standard hand mixer or even a sturdy whisk and some elbow grease. You might need to whip it for an extra minute or two, and make sure you are scraping down the sides of the bowl often. The heavy cream helps a lot with achieving that fluffiness, even without the powerful blades of a processor.
Storing and Keeping Your Whipped Ricotta Board Fresh
So, you made too much? That’s the best kind of problem to have! While this Whipped Ricotta Board with Roasted Cherry Tomatoes is best enjoyed immediately when the tomatoes are still warm and the cheese is perfectly airy, it does store well if you keep the components separate. The biggest mistake people make is mixing everything together and sticking the whole thing in the fridge. That makes the bread soggy and the cheese stiff!
If you have leftovers, you need to separate the components—the cheese, the tomatoes, and the dippers—otherwise, you’ll end up with a sad, wet mess the next day. The cheese is surprisingly resilient if stored correctly, and you can easily refresh it!
Storage Table for Whipped Ricotta Board Components
I always keep a little note about how to store the different parts of the Whipped Ricotta Board with Roasted Cherry Tomatoes. Here’s my quick guide for leftovers:
| Component | Storage Method | Reheating/Refreshing Tip |
|---|---|---|
| Whipped Ricotta | Airtight container in the refrigerator. | Bring to room temperature for 20 minutes before serving again for best texture. |
| Roasted Tomatoes & Juices | Airtight container in the refrigerator. | Serve cold or warm slightly in a pan—do not microwave the whole board! |
| Baguette/Crackers | Store in a paper bag on the counter (never plastic, or they get soft). | Toast again briefly in a 350°F oven until crisp. |
Understanding the Nutrition of Whipped Ricotta Board with Roasted Cherry Tomatoes
Now, I know some of you are tracking macros or watching your sugar intake, and that’s totally fair! We all eat differently, and while I focus way more on flavor than exact numbers when entertaining, I know you might need an idea of what you’re serving up with your Whipped Ricotta Board with Roasted Cherry Tomatoes.
Disclaimer on Nutritional Estimates
I want to be super honest here—I’m a cook, not a certified nutritionist! The nutritional information provided for this delicious appetizer is just an estimate based on the core ingredients listed. The actual calories, fat, and protein can change wildly depending on the brand of whole milk ricotta you buy, how much olive oil you drizzle on top, or if you decide to add extra cheese to your portion. Please use these numbers just as a general guide! Please use these numbers just as a general guide!
Share Your Whipped Ricotta Board with Roasted Cherry Tomatoes Creations
I absolutely love seeing how you all bring your boards to life! Once you’ve tried making the Whipped Ricotta Board with Roasted Cherry Tomatoes, please come back and tell me how it went. Did your tomatoes burst perfectly? What dippers did you choose? Drop a comment below or tag me in your photos online. I can’t wait to see your gorgeous spreads!
Print
Amazing 1-Minute Whipped Ricotta Board
- Total Time: 28 minutes
- Yield: 8 servings
- Diet: Vegetarian
Description
Creamy whipped ricotta topped with sweet roasted cherry tomatoes and fresh basil. This elegant appetizer board is perfect for entertaining.
Ingredients
- 16 ounces whole milk ricotta cheese
- 2 tablespoons heavy cream
- 1 tablespoon fresh lemon juice
- 1 tablespoon lemon zest, divided
- ½ teaspoon kosher salt
- ¼ teaspoon black pepper
- 3 cups cherry tomatoes
- 3 tablespoons extra-virgin olive oil, divided
- 4 garlic cloves, smashed
- ½ teaspoon kosher salt
- ¼ teaspoon red pepper flakes
- 1 teaspoon dried oregano
- ¼ cup fresh basil leaves, torn
- 2 tablespoons extra-virgin olive oil for drizzling
- Flaky sea salt for finishing
- 1 baguette, sliced and toasted
- Fresh vegetables such as cucumber, bell peppers, and radishes
Instructions
- Preheat your oven to 450°F and line a baking sheet with parchment paper.
- Toss the cherry tomatoes with 2 tablespoons olive oil, smashed garlic, kosher salt, red pepper flakes, and oregano on the prepared baking sheet.
- Roast the tomatoes for 15 to 20 minutes until they burst, caramelize, and develop charred spots.
- Place the ricotta, heavy cream, lemon juice, half the lemon zest, salt, and black pepper in a food processor or mixing bowl.
- Whip the ricotta using a food processor or hand mixer on high speed for 2 to 3 minutes until light, airy, and smooth.
- Spread the whipped ricotta in an even layer on a large serving platter or wooden board, creating a shallow well in the center.
- Spoon the roasted cherry tomatoes with their juices and garlic over the whipped ricotta, letting some of the tomato juices pool in the well.
- Drizzle with the remaining olive oil, sprinkle with torn basil leaves, remaining lemon zest, and flaky sea salt, then serve immediately with toasted baguette and fresh vegetables.
Notes
- Drain ricotta in a fine-mesh strainer for 30 minutes before whipping to remove excess moisture and achieve the fluffiest texture.
- Let the roasted tomatoes cool for 5 minutes before adding to the board so they do not melt the whipped ricotta.
- Use whole milk ricotta for the creamiest texture.
- Make the whipped ricotta up to 2 hours ahead and refrigerate; bring to room temperature before assembling.
- Store leftover components separately in the refrigerator.
- Prep Time: 10 minutes
- Cook Time: 18 minutes
- Category: Appetizer
- Method: Roasting and Whipping
- Cuisine: Mediterranean