No heading needs to be written for the introduction. If you think making candy apples from scratch is intimidating, I’m here to tell you to forget that worry right now! These peppermint bark candy apples are the ultimate showstopper for any winter gathering, and honestly, they come together faster than you might think. We start with a basic, foolproof hard candy shell—my secret weapon for making sure even first-timers get that perfect snap.
The real fun begins when we layer on rich dark chocolate, bright white chocolate zig-zags, and that glorious, minty crunch. It’s the perfect marriage of tart apple, sweet sugar, and cool peppermint. I’ve tweaked this method so many times to make sure it works reliably, even if you usually burn the sugar on the stove. Trust me, you are going to nail this festive dessert!

Essential Tools for Perfect Peppermint Bark Candy Apples
Before you even think about cracking those candy canes, we need to make sure your kitchen is set up for success. Candy making can be fussy if you aren’t prepared, but having the right gear makes this process smooth sailing. Don’t worry if you don’t have everything; I’ve tried to keep the list focused on what really matters for getting that hard, crackly shell.
Kitchen Gear You Need
- A medium, heavy-bottomed saucepan—this is key for even heating!
- A reliable candy thermometer; you absolutely cannot eyeball the hard-crack stage, trust me on this one.
- A large baking sheet ready to go.
- Parchment paper or a silicone mat to line that sheet so your apples don’t stick forever.
- A small bowl for melting chocolate and a piping bag (or a zip-top bag with a corner snipped) for the drizzling.
Gathering Ingredients for Your Peppermint Bark Candy Apples
Okay, let’s talk about what you need to buy! Since this recipe relies on getting the candy coating just right, the quality of a few items really matters. Don’t try to substitute the corn syrup, or you’ll end up with a gooey mess instead of that satisfying crunch. I’ve broken down the list so you can shop smart and get everything ready before you turn on the stove.
The Apple Base and Hard Candy Coating
You’ll need about 6 to 8 small, crisp apples—the tarter, the better, because they balance all that sweetness. Make sure you have your sturdy wooden sticks ready to go in! For the actual candy shell, you need 2 ½ cups of granulated sugar, 1 cup of light corn syrup (the clear kind!), 1 cup of water, and just a tiny pinch of cream of tartar to stop the sugar from crystallizing. Don’t forget the half teaspoon of vanilla extract for flavor once it comes off the heat.
Chocolate Layers and Peppermint Crunch
For the decorative layers, you’ll need 1 ½ cups of dark or semisweet chocolate chips, and 1 cup of white chocolate chips. The secret to getting these to melt smoothly without seizing up is the coconut oil—we use 2 teaspoons for each batch of chocolate. Finally, the star of the show: 1 cup of crushed candy canes. Make sure they are crushed into small pieces, but not powder!
Preparing Your Peppermint Bark Candy Apples Step-by-Step
This is where the magic happens, so pay close attention to the temperatures! If you follow these steps exactly, you’ll have gorgeous, shiny apples that snap when you bite into them. Remember, we are working with very hot sugar, so be careful and move deliberately once the syrup is cooking.
Apple Prep and Hard Candy Base
First things first: the apples must be spotless and bone dry. I mean bone dry! If they are even a little damp, that hard candy coating won’t stick, and you’ll end up with a soggy disaster. Wash them in warm water and really rub off any wax—then dry them thoroughly with paper towels. Take the stems out and push those sturdy sticks right into the center of each apple. Make sure they are secure!
Next, set up your baking sheet with parchment paper or a silicone mat. Now, let’s tackle the candy. In your heavy saucepan, mix the sugar, corn syrup, water, and cream of tartar. Stir it gently just until everything looks wet. Then, stop stirring! Seriously, don’t touch it again. Set the heat to medium-high and let it boil until your candy thermometer screams 300 degrees Fahrenheit. That’s the hard-crack stage, and it’s crucial for that brittle shell. Once it hits 300°F, yank it off the heat immediately and quickly stir in that vanilla extract.
Dipping and Setting the Hard Candy Layer
Work quickly here! Tilt your saucepan slightly so the candy pools on one side. Take one apple, dip it straight down into the syrup, and turn it around to coat it evenly. You want a thin, even layer. Lift it out and hold it over the pan for a few seconds so the excess drips back in—this prevents those big puddles at the bottom. Place the dipped apple on your prepared baking sheet. Repeat for all apples. Now, they need to sit undisturbed until that candy shell is totally cool and rock hard. Don’t rush this part!
Applying the Dark Chocolate Layer
While those shells are cooling, melt your dark chocolate. Put the dark chips and 2 teaspoons of coconut oil in a microwave-safe bowl. Heat it in 20-second bursts, stirring really well between each one until it’s smooth, glossy, and easy to pour. You want it runny, not thick. Once the candy shells are set, dip the bottom half of each apple into the melted dark chocolate, or just spoon it over the top, letting it run down the sides naturally. Put them back on the clean part of your baking sheet. The trick here is timing: Let the chocolate set until it loses its shine but is still slightly tacky—not fully hard, but not wet!
Drizzling White Chocolate and Crushed Candy Canes
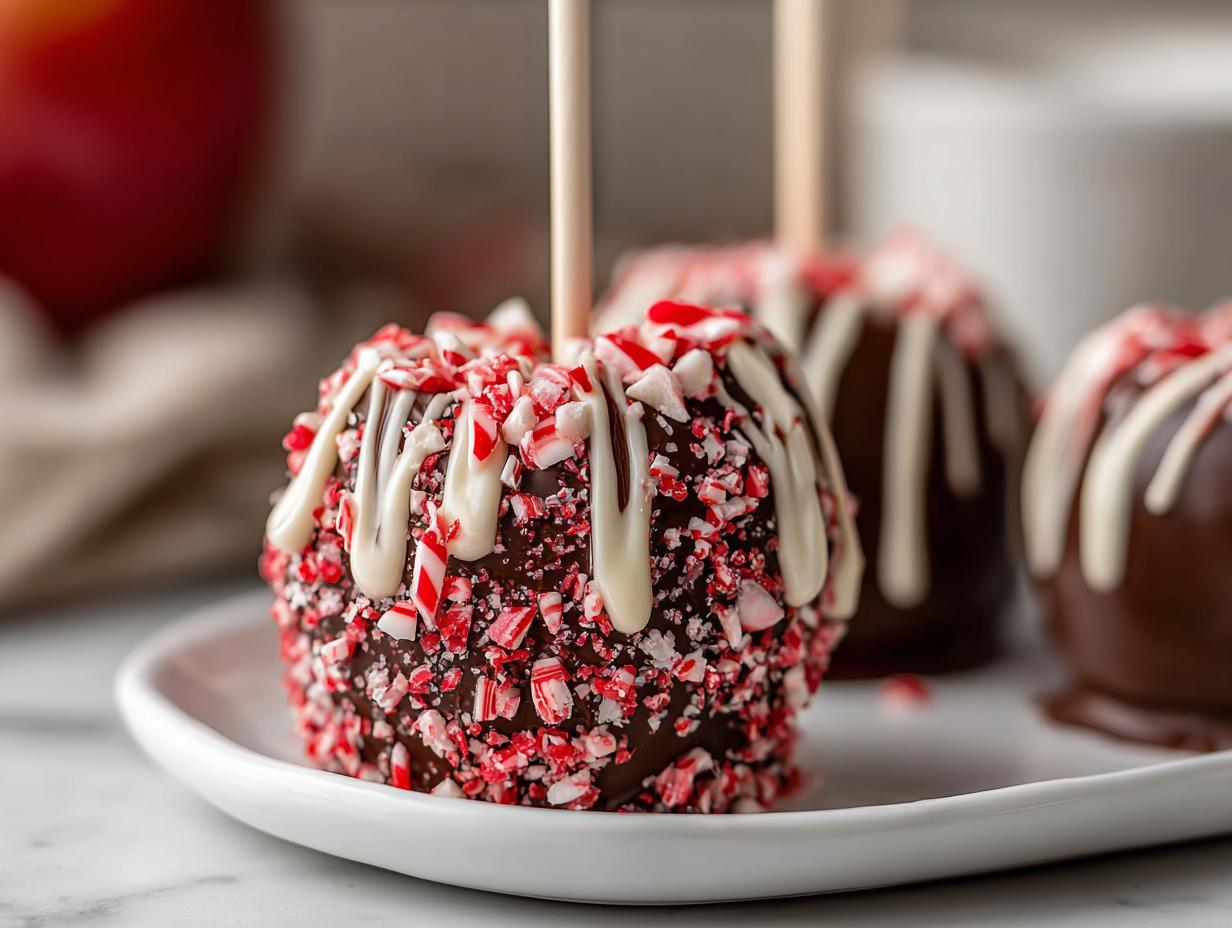
This is the fun, messy part! Melt your white chocolate with the remaining 2 teaspoons of coconut oil in a separate bowl until silky smooth. Transfer this white chocolate into your piping bag or a small zip-top bag with a tiny piece snipped off the corner. You need speed now! Drizzle that white chocolate over the tacky dark chocolate in fast, back-and-forth zig-zag lines all over the apple. The second you finish drizzling one apple, grab your crushed candy canes and immediately sprinkle them generously over the wet white chocolate. Gently pat them down so they stick right into the coating. Do this for every apple before the white chocolate sets up, or the peppermint won’t adhere. Let them rest at room temperature for about 30 minutes until everything is completely dry and non-sticky.
Why You Will Love These Peppermint Bark Candy Apples
Honestly, these beautiful peppermint bark candy apples are going to be your new favorite holiday dessert. They look incredibly fancy, but they are shockingly fast to put together once you have that hard candy base done. You don’t need to be a professional candy maker to get results like this!
- They come together quickly—perfect for last-minute party prep.
- The flavor combination of tart apple, rich dark chocolate, and cool peppermint is unbeatable.
- Dipping the chocolate layer is super easy; we aren’t trying to coat the whole apple perfectly!
- They make the most stunning, festive dessert centerpiece on any table.
Tips for Success with Peppermint Bark Candy Apples
Even with a straightforward recipe, a few little tricks can save you a headache! Candied apples are famous for being tricky, but most problems come down to temperature or moisture. If you are feeling nervous about the candy shell sticking, or if your chocolate gets too thick halfway through dipping, I’ve got the fixes right here from my own kitchen mishaps.
Mastering the Candy Shell Adhesion
The absolute biggest secret to getting that candy shell to stay put is making sure those apples are totally dry. I mean, wipe them down twice! If you are using store-bought apples, they often have a light wax coating, so you need to scrub them really well in warm water first. Also, do not pull the apples out of the syrup until the thermometer hits exactly 300°F. If you dip it too early, the candy won’t be hard enough and it’ll just peel off later!
Working with Chocolate Layers Quickly
Once you start dipping in the chocolate, you have to move! The goal is to get the dark chocolate on, and then let it set just until it’s not runny anymore but still feels a little sticky to the touch. That tacky surface is what grabs onto the white chocolate drizzle and the crushed candy canes. If you wait too long, the drizzle will just slide right off. If your chocolate starts looking thick and dull while you are working, don’t panic! Just pop the bowl back into the microwave for 10-second bursts, stirring each time, until it’s smooth and pourable again. It happens to the best of us!
Storing and Serving Your Peppermint Bark Candy Apples
Once you’ve made these gorgeous treats, you want to keep them perfect until it’s time to eat them! The way you store them depends a little on how warm your kitchen is. Since we used hard candy, they generally do best at cool room temperature, which keeps the chocolate firm but prevents the candy from getting sticky if the humidity is low.
Best Practices for Storage and Enjoyment
For the best texture, I really recommend storing these loosely wrapped at room temperature for up to two days. If your kitchen is super warm, or if you need them to last a bit longer, you can put them in the fridge for up to three days. Here’s the crucial part, though: If they’ve been chilled, you absolutely must let them sit out on the counter for about 20 minutes before serving. That little rest time lets the chocolate soften just enough so you get that perfect snap without cracking your tooth!
| Condition | Maximum Storage Time | Serving Note |
|---|---|---|
| Cool Room Temperature | Up to 2 Days | Serve immediately once chocolate is firm. |
| Refrigerated | Up to 3 Days | Bring to room temperature for 20 minutes before serving. |
Frequently Asked Questions About Peppermint Bark Candy Apples
I know you probably have a few questions swirling around, especially if this is your first time making candy apples that look this good! It’s totally normal. I gathered up the questions I always get asked when I bring these festive desserts to parties. Getting these details right ensures your chocolate apples look professional!
Can I Use Different Types of Apples for My Peppermint Bark Candy Apples
You really need crisp apples for this recipe to shine. The tartness cuts through all that sugar and chocolate beautifully. Granny Smith is my absolute favorite choice because they are firm and don’t break down when dipped in hot syrup. If you use a softer apple, like a Gala or Fuji, they might get mushy before the hard candy has a chance to set properly, and that’s just a waste of all your hard work!
How to Prevent the Candy Coating from Becoming Sticky
Sticky candy is almost always caused by not cooking the syrup long enough! You must get that candy mixture to a full 300°F. That temperature means you’ve hit the hard-crack stage, which is what gives you that perfect, brittle snap when you bite into it. If you pull it off the heat even a little early, say at 290°F, the candy will eventually absorb moisture from the air and turn into goo. Use that thermometer, and don’t be shy about letting it boil until it hits the mark!
What is the Best Way to Crush the Candy Canes
This is all about texture! We want visible shards, not just red dust floating around. The easiest way is to place the candy canes in a sturdy zip-top bag—double bag it if the plastic feels thin—and then wrap that bag in a clean kitchen towel. Use a rolling pin or the bottom of a heavy pan and tap them firmly. You want small, sharp pieces, but if you crush them into a fine powder, they won’t stick as well to the wet white chocolate drizzle. We want visual contrast!
Understanding the Nutrition in Peppermint Bark Candy Apples
It’s no secret that these decadent peppermint bark candy apples are a special occasion treat, not an everyday snack! Because we are using different brands of chocolate chips and varying sizes of apples, giving precise nutritional information is almost impossible for me to guarantee.
Estimated Nutritional Disclaimer
Please know that the nutrition facts provided here are just rough estimates based on standard ingredient measurements. The final calorie, fat, and sugar counts for your batch of chocolate apples will change depending on the specific brands of corn syrup, dark chocolate, and the size of the crisp apples you select. Always use this information as a general guide only.
Share Your Peppermint Bark Candy Apples Creations
Now that you’ve made your incredible, show-stopping peppermint bark candy apples, I truly want to see them! Did your white chocolate drizzle turn out perfectly straight? Did you manage to get all the candy cane bits to stick? Don’t keep those gorgeous, festive desserts to yourself!
Head down to the comments section below and tell me how it went. I love hearing about your successes (and any funny little mishaps!). Snap a picture and tag me if you share them online—I can’t wait to see your beautiful work! Follow along on Facebook for more fun updates.
Print
Amazing 3-Step Peppermint Bark Candy Apples
- Total Time: 50 minutes
- Yield: 6 to 8 candy apples
- Diet: Omnivore
Description
Peppermint bark candy apples combine crisp apples with layers of dark chocolate, white chocolate, and crushed candy cane for a fresh, wintry dessert that feels classic from December through early January. They come together quickly using candy- or caramel-dipped apples as a base, then get dressed up with simple zig-zag drizzles and a blizzard of peppermint crunch.
Ingredients
- 6 to 8 small crisp apples
- 6 to 8 sturdy wooden sticks or paper straws
- 2 ½ cups granulated sugar
- 1 cup light corn syrup
- 1 cup water
- ½ teaspoon cream of tartar
- ½ teaspoon vanilla extract
- 1 ½ cups dark or semisweet chocolate chips
- 2 teaspoons coconut oil
- 1 cup white chocolate chips
- 2 teaspoons coconut oil
- 1 cup crushed candy canes
Instructions
- Wash the apples in warm water and dry them very well. Remove the stems and push a wooden stick straight down into the center of each apple.
- Line a large baking sheet with parchment or a silicone mat. Lightly grease it so the apples release easily later.
- In a medium heavy saucepan, combine the sugar, corn syrup, water, and cream of tartar. Stir gently just until everything is evenly moistened.
- Bring the mixture to a boil over medium-high heat without stirring. Cook until it reaches 300°F, the hard-crack stage, using a candy thermometer. Remove from the heat and stir in the vanilla extract.
- Tilt the pan slightly. Carefully dip each apple into the hot candy syrup, turning to coat evenly. Let excess drip back into the pan before setting the apples on the prepared baking sheet to cool and harden completely.
- Place the dark or semisweet chocolate chips and 2 teaspoons coconut oil in a microwave-safe bowl. Heat in short bursts, stirring between each, until smooth and pourable.
- Dip each candy apple into the melted dark chocolate or spoon it generously over the top, letting it run down the sides in an even layer. Place the apples back on the baking sheet. Let the chocolate set just until it loses its shine but is still slightly tacky.
- In a separate bowl, melt the white chocolate chips with 2 teaspoons coconut oil in the microwave in short bursts, stirring until smooth. Transfer the white chocolate to a piping bag or zip-top bag with a tiny corner snipped off.
- Drizzle the white chocolate over each apple in zig-zag lines, turning the apples as you go so they are striped all over like classic peppermint bark.
- Immediately sprinkle the crushed candy canes over the wet white chocolate. Press lightly with your fingers so the pieces stick to the chocolate coating.
- Let the peppermint bark candy apples stand at room temperature for 20 to 30 minutes, or until all chocolate is fully set and dry to the touch before serving or wrapping.
Notes
- Crush the candy canes into small pieces but not dust for visible peppermint shards without sharp chunks.
- Work quickly when drizzling and sprinkling so the white chocolate does not set before the candy cane pieces go on.
- Rotate each apple over the chocolate bowl for a few seconds after dipping to avoid thick drips and big puddles at the base.
- If chocolate thickens, rewarm it in the microwave in very short bursts until smooth again.
- Use unwaxed apples if possible, or scrub waxed apples in warm water and dry thoroughly to help the candy and chocolate adhere.
- Store at cool room temperature, loosely wrapped, for up to 2 days. Refrigerate for up to 3 days in a warm kitchen and bring to room temperature 20 minutes before serving.
- Prep Time: 30 minutes
- Cook Time: 20 minutes
- Category: Dessert
- Method: Candy Making, Dipping
- Cuisine: American