Oh my gosh, you are going to absolutely adore making these! Every year, I try to come up with a new holiday treat that feels totally magical but doesn’t require you to be a professional sugar artist. And trust me, after years of wrestling with sticky caramel and burnt fudge, I’ve cracked the code for easy holiday candy. These tree sprinkle candy apples are the answer! They look like they took hours of delicate work, but I promise, they are so beginner-friendly.
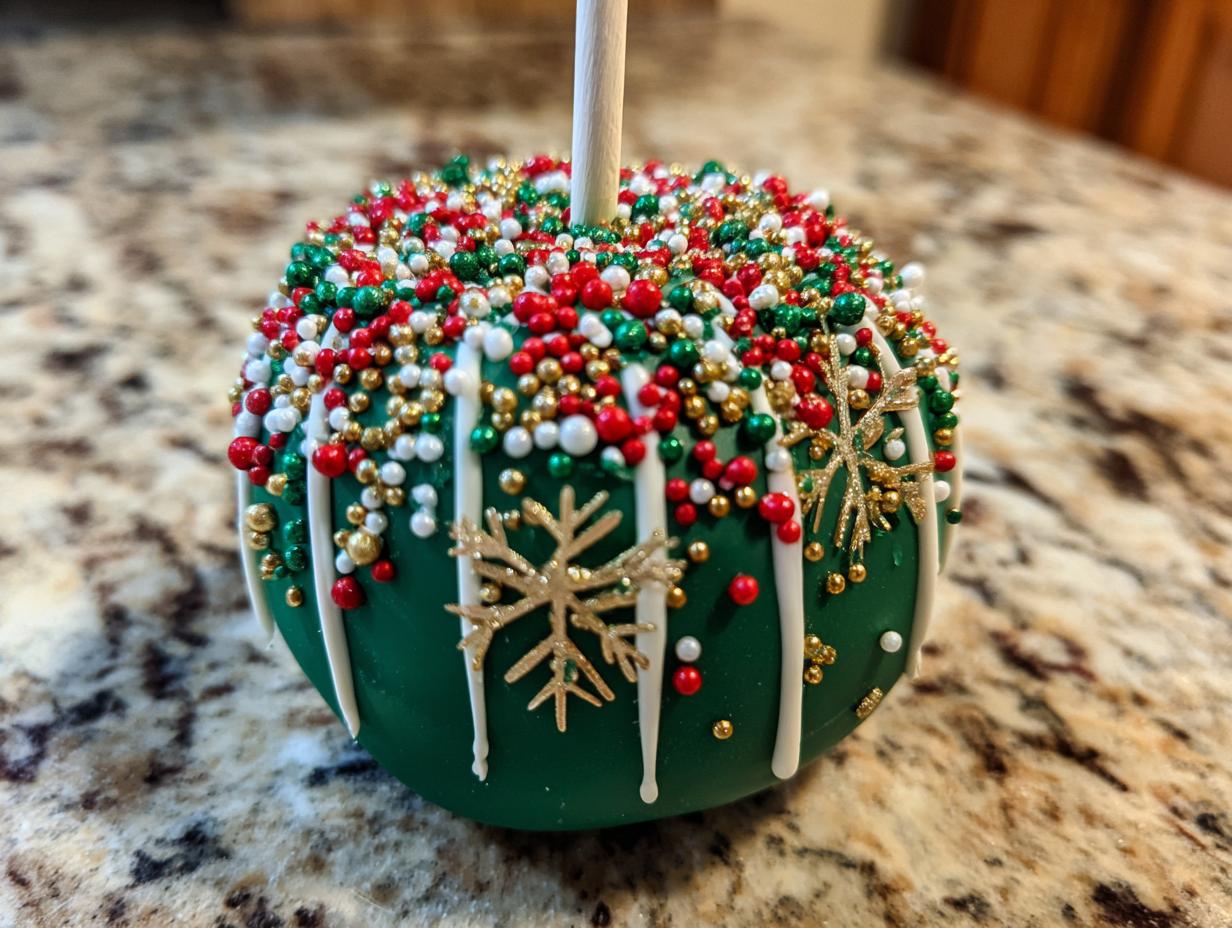
We’re taking simple crisp apples and transforming them into vibrant little edible Christmas trees using a perfect green candy coating. The beautiful white chocolate garlands and all those tiny, colorful sprinkles make them pop. If you’ve ever been intimidated by candy making, this recipe for tree sprinkle candy apples is your confidence booster. It’s all about hitting that temperature right, and I’ll walk you through it step-by-step so they set up perfectly smooth for you!

Why You Will Love These Tree Sprinkle Candy Apples
Honestly, these are the showstoppers of any holiday spread, but they don’t demand you spend the whole day stirring hot sugar. They are just pure, festive fun packed onto a stick! I developed this recipe specifically because I wanted something that felt incredibly special without the usual candy-making stress budget. You’re going to want to make these every single year.
- They look like they came from a fancy bakery, but you made them yourself!
- The crunch of the candy shell against that crisp apple is just heavenly.
- The decorating part is fantastic—kids absolutely love sprinkling on the “ornaments.”
Quick Prep for Festive Fun
The best part? Even with cooking the candy, the whole process takes under an hour total. That means less time hovering over the stove and more time hanging out with your family. You can have these ready for a last-minute party before you even know it!
Beginner-Approved Candy Coating
I know candy making sounds scary, but we are aiming for that hard-crack stage, and my instructions make hitting 300°F foolproof. Once you get that green shell set, everything else is just fun assembly. You won’t get sticky messes or grainy syrup if you follow the heat warnings—I promise!
Essential Equipment for Your Tree Sprinkle Candy Apples
When you’re dealing with boiling sugar, you need the right gear, not just for success, but for safety! Don’t try to wing it here, especially with the temperature. You absolutely must have a reliable candy thermometer. Seriously, it’s non-negotiable for getting that perfect hard-crack shell.
- A heavy-bottomed saucepan for even heating.
- A sturdy wooden spoon or heat-safe spatula for gentle stirring at the start.
- A reliable candy thermometer clipped securely to the side of the pan.
- A large baking sheet lined with parchment paper or a silicone mat.
- A small piping bag or zip-top bag for that white chocolate drizzle.
Gathering Your Ingredients for Tree Sprinkle Candy Apples
Getting everything ready beforehand is half the battle when making any candy, especially these beautiful tree sprinkle candy apples. You need everything staged because once that candy hits 300 degrees, things move fast! Let’s talk about what you need to pull together for this festive project.
Candy Coating Base Components
For the shell, we need the basics: granulated sugar, light corn syrup (this is crucial for preventing crystallization!), water, and just a tiny pinch of cream of tartar. That cream of tartar is our secret weapon against grainy sugar. Don’t forget the vanilla extract for flavor and the green gel food coloring—gel works best because it won’t thin out our hot syrup like liquid coloring sometimes does.
Apple Preparation and Coloring
You need small, crisp apples—Granny Smiths are usually my go-to for candy apples because they hold up well and have a nice tartness. After washing them *really* well (we’ll talk about waxing later!), make sure they are bone dry. Then, you need sturdy sticks—I prefer heavy-duty paper straws or wooden dowels—inserted right into the core.
Decorating Components for Tree Sprinkle Candy Apples
This is where the magic happens for our tree sprinkle candy apples! You’ll need white chocolate chips and a little coconut oil to make the drizzle smooth. Then you need your tree “ornaments”: red, gold, and green nonpareils, lots of those smaller star-shaped sprinkles, and one large star candy to sit right on top where the stick meets the apple. Have them all measured out in tiny bowls!
Step-by-Step Instructions for Perfect Tree Sprinkle Candy Apples
Okay, deep breath! This is the main event. Don’t let the hot sugar scare you; just move with purpose. We’re going to tackle this in stages so you can keep your focus where it needs to be—on that perfect temperature.
Preparing the Apples and Candy Syrup
First things first: we need clean, dry apples. I always wash mine in warm water, sometimes even scrubbing them with a little baking soda to get rid of that waxy coating grocery store apples have. If the coating isn’t off, your candy shell will slide right off later! Once they are washed, dry them until you think they are dry, and then dry them again. Seriously, moisture is the enemy here.
Next, pull those stems out and push your sturdy sticks right down the center. Don’t wiggle them around too much; you want them straight. Now, grab your baking sheet and line it with parchment or a silicone mat. A little bit of grease on the mat helps too, just to be safe.
In your heavy saucepan, combine the sugar, corn syrup, water, and cream of tartar. Stir this gently just until all the sugar looks wet. Once it’s wet, stop stirring! We don’t want sugar crystals splashing up the sides of the pan, or the whole batch can seize up on you later.
Cooking the Green Candy Coating to Hard-Crack
Turn the heat up to medium-high. Now, you must watch that thermometer! Do not stir the mixture while it boils. Let it bubble away until it hits exactly 300 degrees Fahrenheit—that’s the hard-crack stage. This is crucial for a shell that snaps instead of sticks to your teeth. It takes about 15 to 20 minutes usually.
The second it hits 300°F, yank that pan off the burner immediately. Carefully stir in your vanilla and that gorgeous green gel food coloring until the color is uniform. If it starts getting too thick while you’re coloring, you can put it back on the lowest heat for just a second, but be careful not to let it get any hotter or the color will turn brown.
Dipping and Setting the Base Candy
This is where speed matters. Tilt your saucepan slightly so the candy pools deeper on one side. Working quickly, dip one apple at a time, swirling it around to get a good, even coat. Let the excess drip back into the pan—you can gently rotate the apple over the pan to avoid a big candy puddle forming at the bottom.
Place the coated apple onto your prepared sheet. Let these sit for about five to eight minutes. They should be mostly firm but still have a tiny bit of tackiness left. This slight stickiness is what we need so the decorations actually hold on!
Decorating Your Tree Sprinkle Candy Apples
While the base is setting, melt your white chocolate chips with the coconut oil in short bursts in the microwave until it’s perfectly smooth. Pour this into your piping bag—snip that corner tip *very* small! Now, drizzle that white chocolate all over the green candy in swooping lines that look like snow-draped branches on your tree sprinkle candy apples.
While that white chocolate is still wet, press one of those big star candies right where the stick meets the top of the apple—that’s your tree topper! Immediately after, grab your bowls of red, gold, and green nonpareils and sprinkle them liberally all over the sides. Think of them as tiny, mismatched ornaments. Don’t forget to scatter some of those smaller star sprinkles in there too! Let them sit completely undisturbed for at least 30 minutes until that coating is totally hard.

Tips for Success with Your Tree Sprinkle Candy Apples
You might run into a couple of little snags, especially if this is your first time making candy apples, but don’t panic! I’ve learned a few tricks over the years that keep my tree sprinkle candy apples looking professional. Most issues come down to temperature or moisture, so keep an eye on those two things.
If your candy mixture starts to thicken up while you’re dipping, you can gently set the saucepan back on the burner over *very* low heat, just enough to make it pourable again. Never let it boil again, or you’ll burn the color. Keep moving!
Achieving Smooth Coating Adhesion
I mentioned scrubbing the apples, but let me stress this: those waxy supermarket apples are killers for candy coating! If you can’t find unwaxed varieties, you must scrub them well with warm water and a little baking soda. Rinse them thoroughly, and then dry them until you’re absolutely certain they are moisture-free. If you see any condensation when you dip, the candy won’t stick, and you’ll end up with a sad, sliding shell.
Timing the Decoration Phase
This is the most time-sensitive part of making your tree sprinkle candy apples. You have about a five-minute window after dipping the base coat before it gets too firm to accept decorations. That means all your white chocolate must be melted and ready to drizzle *before* the apples even come out of the hot candy! If your chocolate starts getting thick while you’re drizzling, just pop it back in the microwave for five seconds. Speed is key so those sprinkles stick!
Storing and Keeping Your Tree Sprinkle Candy Apples Fresh
Once you’ve put all that festive effort into your beautiful tree sprinkle candy apples, you want them to last! The biggest enemy here is humidity. If you try to wrap these up tightly or put them in the fridge, that candy coating is going to get sticky and weep, and all that hard work decorating will be ruined.
These are best enjoyed the day you make them, but they hold up quite well if you treat them right. Keep them safe from temperature swings so that gorgeous green shell stays crisp!
Best Practices for Dry Storage
You need a cool, dry spot, like a basement corner or a cool pantry shelf. Lay them out on a piece of parchment paper, but do not stack them or even let them touch each other initially. If you must store them for more than a day, place them in an airtight container, but put a paper towel on the bottom to absorb any stray moisture. Absolutely skip the refrigerator; the condensation will make your tree sprinkle candy apples melt right before your eyes!
Reheating Guidance
If you decide to make these a day ahead and notice the green candy coating got a little stiff while you were waiting to apply the white chocolate garnish, you can very carefully try to warm it. Just set the saucepan back on the stove over the lowest possible heat setting and stir constantly until it just loosens up again. This is only really for touch-ups, though; you don’t want to try and reheat a fully decorated apple!
Common Questions About Making Tree Sprinkle Candy Apples
I always get so many questions after sharing this recipe, usually right after people realize how easy they are to make! Candy making seems intimidating, but once you know the tricks, you’ll be whipping up batches of tree sprinkle candy apples for every holiday.
Candy Temperature and Consistency
Q: My candy hardened in the pot before I could dip all my apples! What did I do wrong?
A: That happens if you let the temperature sit too long after removing it from the heat, or if your kitchen is cold. The best fix is to put the pot back on the lowest heat setting you have and stir gently until it loosens up just enough to coat the apple. Remember, once it hits 300°F, it cools fast!
Alternative Green Coloring Options
Q: Can I use liquid food coloring instead of gel for my green candy apples?
A: You can, but I strongly suggest gel coloring. Liquid coloring adds too much water content to the sugar syrup, which can cause crystallization or make the coating thin and runny. Gel gives you that vibrant color without messing with the structure needed for a hard-crack shell.
Can I make tree sprinkle candy apples ahead of time?
Q: How far in advance can I prepare my tree sprinkle candy apples?
A: You can certainly make them a day ahead! The key is storage—keep them in a cool, dry place away from any humidity. If you plan on making a large batch for a party, aim to finish them no more than 24 hours before serving. If they sit for days, they might start to soften slightly, but they should still taste wonderful!
Share Your Holiday Creations
I truly hope you have as much fun making these as I did perfecting them for you. Seeing your festive results brings me so much joy! If these little edible Christmas trees made your holiday brighter, please come back and leave a rating. You can also follow along for more fun recipes on our Pinterest!
I always love seeing how everyone decorates their own batch of tree sprinkle candy apples. Drop a comment below and tell me which color nonpareils you chose for your ornaments! Feel free to share your creations on Facebook too!
Print
Amazing 8 tree sprinkle candy apples
- Total Time: 45 minutes
- Yield: 8 candy apples
- Diet: N/A
Description
Create playful, winter-themed tree sprinkle candy apples using green candy coating, white chocolate garlands, and star sprinkles. These treats are perfect for holiday parties or family fun.
Ingredients
- 2 ½ cups granulated sugar
- 1 cup light corn syrup
- 1 cup water
- ½ teaspoon cream of tartar
- ½ teaspoon vanilla extract
- ½ teaspoon green gel food coloring
- 8 small crisp apples
- 8 sturdy wooden sticks or paper straws
- 1 cup white chocolate chips
- 1 teaspoon coconut oil
- 3 tablespoons star-shaped sprinkles
- 8 larger star candies for toppers
- 3 tablespoons red nonpareils
- 3 tablespoons gold nonpareils
- 3 tablespoons green nonpareils
Instructions
- Wash the apples in warm water and dry them very well. Remove stems and insert a wooden stick straight down into the center of each apple.
- Line a large baking sheet with parchment or a silicone mat and lightly grease it.
- In a medium heavy saucepan, combine the sugar, corn syrup, water, and cream of tartar. Stir gently until everything is moistened.
- Bring the mixture to a boil over medium-high heat without stirring. Cook until it reaches 300°F, the hard-crack stage, using a candy thermometer.
- Remove the pan from the heat once at temperature. Carefully stir in the vanilla extract and green gel food coloring until the syrup is evenly tinted.
- Tilt the pan slightly. Dip each apple into the hot candy mixture, turning to coat. Let excess drip back into the pan, then place the apples onto the prepared baking sheet to set.
- Let the candy coating sit for 5 to 8 minutes until mostly firm but still slightly tacky.
- Place the white chocolate chips and coconut oil in a microwave-safe bowl. Heat in short bursts, stirring between each, until smooth and pourable.
- Spoon the melted white chocolate into a small piping bag or zip-top bag with a tiny corner snipped off. Drizzle it around each candy apple in loose swoops like garlands.
- While the white chocolate is soft, immediately press one large star candy at the very top of each apple where the stick meets the candy.
- Sprinkle the red, gold, and green nonpareils all over the sides of the apples as ornaments. Add smaller star sprinkles to complete the tree look.
- Allow the decorated candy apples to sit at room temperature for 30 minutes or until everything is completely set and dry before serving.
Notes
- Scrub waxed apples with warm water and baking soda, then dry well for smooth coating adhesion.
- Have all toppings measured and ready before you cook the candy for quick decorating.
- Rotate apples over the pan after dipping to avoid thick candy puddles at the bottom.
- Gently rewarm the candy mixture over low heat if it thickens, keeping it from darkening.
- Store finished apples in a cool, dry spot to maintain crispness.
- Prep Time: 25 minutes
- Cook Time: 20 minutes
- Category: Dessert
- Method: Stovetop candy making
- Cuisine: American