Caramelized Onion Whipped Goat Cheese Dip is about to become your new go-to party trick, even if you’re still scared of your own oven. I remember when I first started NoobRecipes, I thought anything involving “caramelized” anything was way too advanced for me. I always pictured hours spent weeping over a stove! But folks, this dip is proof that you can achieve maximum flavor with minimum fuss. Seriously, this creamy, tangy whip topped with sweet, jammy onions comes together faster than you think—we’re talking 25 minutes total, which is a lifesaver on game day.
When I first nailed this recipe, I served it to my very skeptical older brother, who usually rolls his eyes at my “beginner” creations. He took one bite, stopped talking mid-sentence, and asked for the recipe! That’s how you know you’ve hit gold. This Caramelized Onion Whipped Goat Cheese Dip is rich, it’s easy, and it proves you don’t need years of culinary experience to make something that tastes straight out of a fancy bistro.

Why You’ll Love This Caramelized Onion Whipped Goat Cheese Dip
I designed this recipe specifically for you guys—the home cooks who want to impress without spending all day hovering over the stove. This dip delivers huge flavor for almost zero effort, which is pretty much my motto here at NoobRecipes. You’re going to want to make this every single weekend.
- It’s Super Fast: Seriously, you can have this ready in under 30 minutes. That’s faster than ordering takeout, I promise!
- Beginner Proof: The caramelizing is slow, but it’s hands-off cooking. The whipping part is literally just pressing a button on the food processor.
- Flavor Explosion: Tangy goat cheese meets sweet, savory onions—it’s the perfect balance that makes everyone think you’re a kitchen wizard.
- Total Crowd-Pleaser: No matter who I serve this to, it vanishes first. It’s guaranteed party food success.
Quick Assembly and Flavor Impact
Look, you need appetizers that work hard for you, and this is it. You only spend about 20 minutes coaxing those onions into sweetness, and the rest is just blending. That 25-minute timeline means you can whip this up right before guests arrive without breaking a sweat. It looks gourmet, but it’s honestly one of the easiest things you’ll ever whip up.
Equipment Needed for Your Caramelized Onion Whipped Goat Cheese Dip
Don’t let this fancy flavor fool you; you don’t need a whole arsenal of gadgets for this! Since this is NoobRecipes, I kept the required tools simple and practical. If you’ve got the basics, you’re already halfway there. Having the right tools makes the job so much less stressful, trust me on this one.
Essential Kitchen Tools
- A good large skillet for cooking those onions down low and slow.
- Your food processor. This is key for getting that incredibly fluffy cheese texture, so don’t skip it!
- A sturdy spatula for stirring the onions and scraping down the cheese bowl.
Gathering Ingredients for Your Caramelized Onion Whipped Goat Cheese Dip
Gathering your ingredients is the easiest part of this whole process, I promise! Since we are moving fast, make sure you have everything out before you turn the heat on. I always tell my readers to do a little ‘mise en place’—that just means getting everything ready first—because it stops you from scrambling later when those onions start to really cook down. We are working with two main groups of ingredients here: the topping and the base. Both are simple, but the cheese base needs a little special attention regarding temperature.
Don’t worry if you don’t have fancy ingredients; this dip relies on simple pantry staples to shine. The quality of your onions matters, but the real trick is in how you treat the cheese!
Ingredients for the Rich Caramelized Onions
For the topping, you need your two medium yellow onions. The absolute secret here is slicing them thinly and evenly. If you have some thick chunks and some thin shreds, the thin ones will burn before the thick ones even get soft! I always use a sharp knife and take my time slicing them—it’s worth the extra minute of chopping. We use a tiny bit of butter along with the olive oil for flavor, plus a pinch of sugar to help kickstart that beautiful browning process. The balsamic vinegar at the end is non-negotiable; it adds that little acidic pop we need to cut through the richness.
Ingredients for the Fluffy Whipped Goat Cheese Base
Now for the star of the show, the cheese base. This is where technique trumps ingredients. You absolutely must have your goat cheese and cream cheese at room temperature. If they are cold, your food processor will struggle, and you’ll end up with lumpy cheese, not fluffy clouds! Seriously, pull them out an hour before you plan to start. The Greek yogurt is my little secret here; it lightens up the density you usually get from just goat cheese and cream cheese, making it much airier. A touch of honey and a tiny bit of grated garlic brings in that subtle sweetness and savory depth that balances the onions perfectly.
Step-by-Step Instructions for Caramelized Onion Whipped Goat Cheese Dip
Okay, let’s get cooking! Since this is a two-part recipe—the topping and the base—we tackle the onions first because they need that low, slow attention. Don’t rush this part; it’s where all the flavor magic happens. Remember, we’re aiming for sweet and jammy, not burnt and bitter. Once the onions are handled, the cheese comes together in a flash.
Part 1: Achieving Perfect Caramelized Onions
First up, grab that large skillet and set your heat to medium-low. We need gentle heat here, so don’t crank it up! Add your olive oil and butter. Once the butter melts and shimmers, toss in those thinly sliced onions, the sugar, salt, and pepper. Give everything a good stir to coat them nicely. Now, this is where patience comes in. You need to let these cook, stirring every few minutes, for about 18 to 22 minutes. You’ll notice them slowly softening and taking on a beautiful, deep golden color. If you see them starting to stick too much, just add a tiny splash of water to keep things moving.
When they look soft, sweet, and beautifully browned around the edges—that’s when you add the secret weapon: the balsamic vinegar. Stir that in quickly. The vinegar sizzles and lifts all those tasty brown bits stuck to the bottom of the pan. That’s called deglazing, and it adds so much depth! Let that cook for just one or two more minutes until the mixture looks glossy. Pull the pan off the heat and let the onions cool down a bit while we whip the cheese.
Part 2: Creating the Ultra-Smooth Whipped Goat Cheese
Time for the food processor! This machine is your best friend for getting that restaurant-quality texture. Toss in your room-temperature goat cheese, cream cheese, Greek yogurt, olive oil, honey, grated garlic, and your salt and pepper.
Turn it on and let it run. You’ll want to process this for a good 30 to 60 seconds. Keep checking it! You are looking for something that’s completely smooth—no chunks of cheese allowed! If it seems a little stiff after that minute, add water one teaspoon at a time. Blend after each addition until it’s light and spreadable. I stop when it looks like fluffy clouds but still holds a soft peak when I lift the blade. That texture is everything!
Part 3: Assembly and Presentation
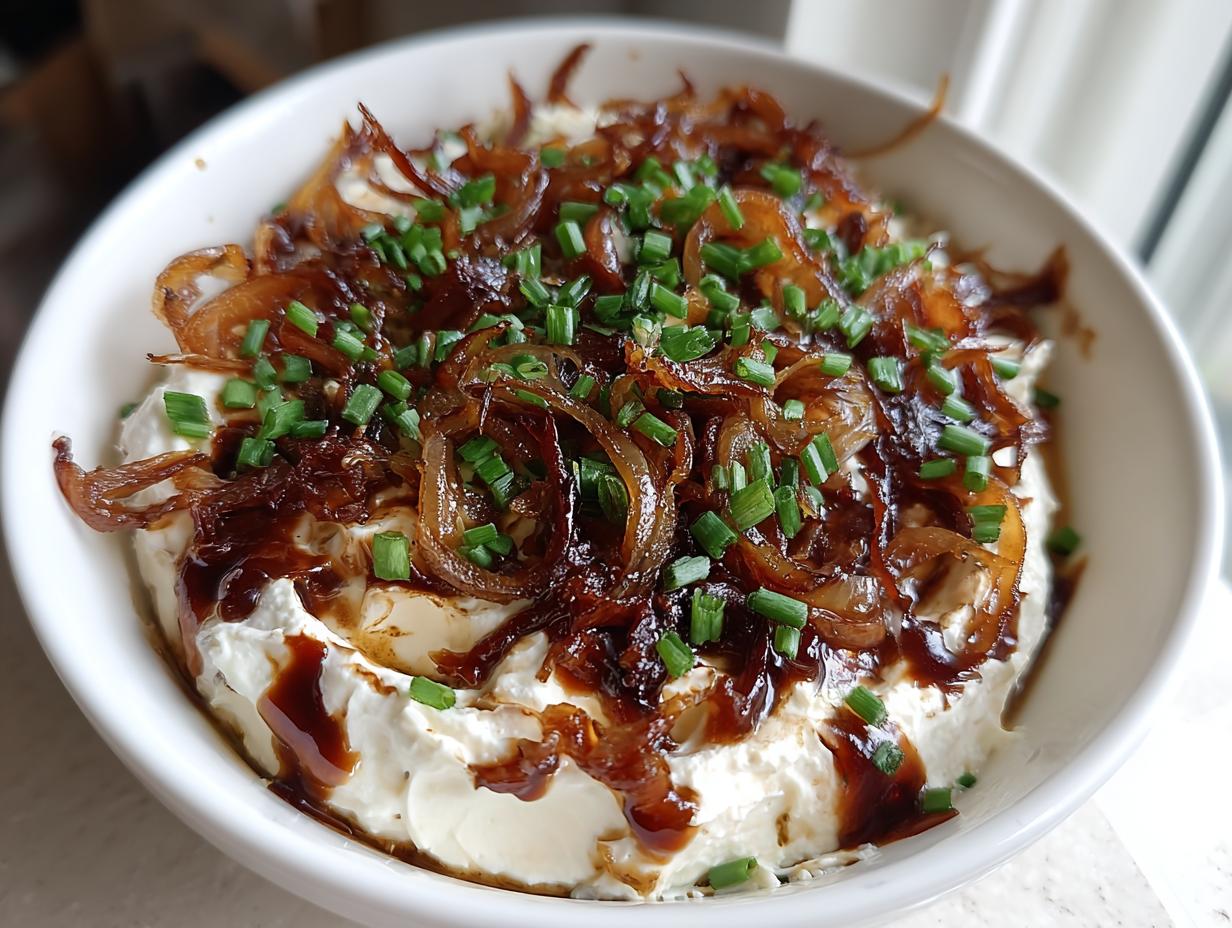
Now we put it all together for maximum visual impact! Spoon that glorious whipped cheese into a shallow serving bowl. I like to use the back of a spoon or a small offset spatula to create these beautiful swoops and swirls across the top. Think of it like making little valleys for the onions to rest in.
Next, spoon those slightly warm (but not hot!) caramelized onions right over the top, making sure to cover most of that creamy surface. Don’t just dump them in the middle; spread them out! Finally, sprinkle generously with fresh, chopped chives for a little color and freshness. A tiny drizzle of good olive oil over the top seals the deal. Serve it right away while the onions are still warm—that contrast with the cool cheese is just divine!

Tips for Success Making Caramelized Onion Whipped Goat Cheese Dip
Even though this is an easy dip, there are two spots where beginners often stumble, but don’t worry, I’ve learned these lessons the hard way so you don’t have to! Getting these two steps right guarantees you an appetizer that looks and tastes professional.
Controlling the Heat for Onions
I cannot stress this enough: keep that heat at medium-low. If you try to speed up the caramelization process by turning the heat up high, you will burn the sugars in the onions before they get soft. Burnt onions taste bitter, and that ruins the whole sweet-and-savory profile of this dip. If you notice the bottom of your pan getting too dry or starting to scorch while the onions are still pale, just add a tablespoon of water or stock to create steam and lift those browned bits. That’s a pro trick for keeping things moving without adding more fat.
Getting the Right Whip Consistency
When you are whipping the cheese base, you need to trust your food processor. Process it longer than you think you should! Aim for that smooth, silky texture that feels like velvet. If you stop too early, you’ll get little goat cheese pebbles in your otherwise creamy dip. When adding water to thin it out, go slow—one teaspoon at a time. It’s very easy to add too much water, and once the cheese base gets too thin, it becomes runny, not fluffy. We want soft peaks, not soup!
Serving Suggestions for Your Caramelized Onion Whipped Goat Cheese Dip
This dip is so versatile, but the key to making it truly shine is pairing it with things that offer a great textural contrast to that creamy whip. You want something crunchy or sturdy to scoop up all that tangy goodness and sweet onion topping. Don’t just settle for any old chip; think about what will stand up to the weight of the dip!
Pairing Recommendations
- Warm, crusty baguette slices are my number one choice—toasting them lightly makes them perfect vehicles.
- Sturdy, seeded crackers offer a nice nutty crunch against the smooth cheese.
- For a healthier option, crisp celery sticks or bright red bell pepper strips are fantastic dippers.
- Try serving it alongside thinly sliced grilled pears for an extra layer of sweetness!
Storing Leftovers of Caramelized Onion Whipped Goat Cheese Dip
I hope you have leftovers because this dip tastes amazing the next day too! Since the onions and the cheese whip are different textures, they really like to be stored separately if you can manage it. You can keep everything airtight in the fridge for up to three days. Don’t worry if you’ve already assembled it, though; it will still be fine!
Best Practices for Refrigeration
If you stored the components separately, just let the cheese sit on the counter for about 15 minutes before serving again to soften up a bit. If you stored the whole thing assembled, you might want to just give the onions a quick stir before serving. The texture might change slightly, but the flavor stays incredible!
Frequently Asked Questions About This Dip
I get so many questions after people try this recipe for the first time, usually asking how they can simplify it even further! It’s honestly one of the most adaptable recipes, so don’t stress if you need to make changes. Here are the top things I hear!
Can I make the onions ahead of time?
Yes, absolutely! This is a great tip for party prep. You can caramelize the onions completely up to two days ahead of time. Just store them in an airtight container in the fridge. When you’re ready to serve, let them come to room temperature or warm them slightly in a pan before topping the cheese. This makes serving this easy dip even faster!
What if I don’t have a food processor?
No food processor? No problem, but be prepared to work! You can use a stand mixer with the paddle attachment, but you’ll need to beat the cheeses for longer—maybe 3 to 4 minutes—and scrape the bowl down constantly. A hand mixer will work too, but it takes more elbow grease and you might not get quite the same silky, cloud-like texture. Just keep mixing until it looks as smooth as you can possibly get it!
Is this suitable for a vegetarian party?
Great question! Yes, this is a totally vegetarian-friendly party food. There is no meat product in the dip whatsoever. Just double-check your balsamic vinegar to ensure it doesn’t have any hidden non-vegetarian additives, though that’s rare. Enjoy!
Share Your Experience with This Caramelized Onion Whipped Goat Cheese Dip
Well, that’s it! You’ve officially mastered a dish that looks way more complicated than it actually is. I really hope this becomes a staple at your table, just like it is at mine. Did you serve it for game day or a fancy dinner party? Let me know how it went! If you want to see more easy appetizer ideas, check out our Festive Caprese Wreath Appetizer.
Drop a rating below and tell me what you paired it with. Seeing your success stories helps the whole NoobRecipes community feel more confident in the kitchen! You can also follow our latest recipe updates on Facebook.
Print
Amazing 25-Minute Caramelized Onion Whipped Goat Cheese Dip
- Total Time: 30 minutes
- Yield: 8 servings
- Diet: Vegetarian
Description
Creamy whipped goat cheese topped with golden caramelized onions. This quick, crowd-pleasing appetizer is ready in 25 minutes using simple pantry ingredients.
Ingredients
- Caramelized Onions:
- 2 tablespoons extra-virgin olive oil
- 1 tablespoon unsalted butter
- 2 medium yellow onions, thinly sliced
- 1 teaspoon granulated sugar
- 1 teaspoon balsamic vinegar
- 1/2 teaspoon fine sea salt
- 1/4 teaspoon black pepper
- Whipped Goat Cheese:
- 10 ounces soft goat cheese, room temperature
- 4 ounces cream cheese, room temperature
- 2 tablespoons plain Greek yogurt
- 1 tablespoon extra-virgin olive oil
- 2 teaspoons honey
- 1 small garlic clove, grated
- 1/4 teaspoon fine sea salt
- 1/8 teaspoon black pepper
- 1–2 teaspoons water, as needed for texture
- To Serve:
- 2 tablespoons chopped fresh chives
- Warm toasted baguette slices, seeded crackers, or vegetable sticks
Instructions
- Heat a large skillet over medium-low heat. Add olive oil and butter, then the sliced onions, sugar, salt, and pepper. Stir to coat the onions.
- Cook low and slow, stirring every few minutes until the onions are deeply golden and jammy, about 18–22 minutes. The onions should become soft with browned edges and a sweet aroma.
- Stir in the balsamic vinegar to deglaze the pan and lift any browned bits. Cook for 1–2 minutes until the mixture is glossy. Remove the onions from the heat and let them cool slightly.
- In a food processor, combine the goat cheese, cream cheese, Greek yogurt, olive oil, honey, grated garlic, salt, and pepper. Process until the mixture is ultra-smooth and fluffy, which takes 30–60 seconds.
- If the mixture is too thick, add water 1 teaspoon at a time and blend until you reach a spreadable, cloud-like consistency that holds soft peaks.
- Spoon the whipped goat cheese into a shallow serving bowl. Use the back of a spoon to create decorative swoops on the surface. Top the cheese evenly with the warm caramelized onions.
- Finish the dip with chopped fresh chives and a light drizzle of olive oil. Serve immediately with your choice of toasted baguette, crackers, or fresh vegetables.
Notes
- Use shallots instead of onions for a sweeter, milder topping.
- Swap cream cheese with ricotta for a lighter, fluffier whip.
- Add chopped dates or dried figs to the onions for a sweet accent.
- Stir in 1 teaspoon fresh thyme or rosemary into the onions for herbal depth.
- Top with toasted walnuts, almonds, or pistachios for added crunch.
- For a spicy kick, finish with a pinch of red pepper flakes or a drizzle of hot honey.
- Slice onions evenly so they caramelize at the same rate.
- Keep the heat medium-low to prevent scorching; add a splash of water if the pan looks dry.
- Use room temperature cheeses for the smoothest, fastest whip.
- Process the cheese mixture longer than you think necessary for an ultra-silky texture.
- Plate in a shallow dish so every scoop gets both onions and cheese.
- Refrigerate leftovers in an airtight container for up to 3 days. Store onions and whipped cheese separately for the best texture; assemble just before serving.
- Prep Time: 10 minutes
- Cook Time: 20 minutes
- Category: Appetizer
- Method: Whip/No-Bake (Onions cooked separately)
- Cuisine: American