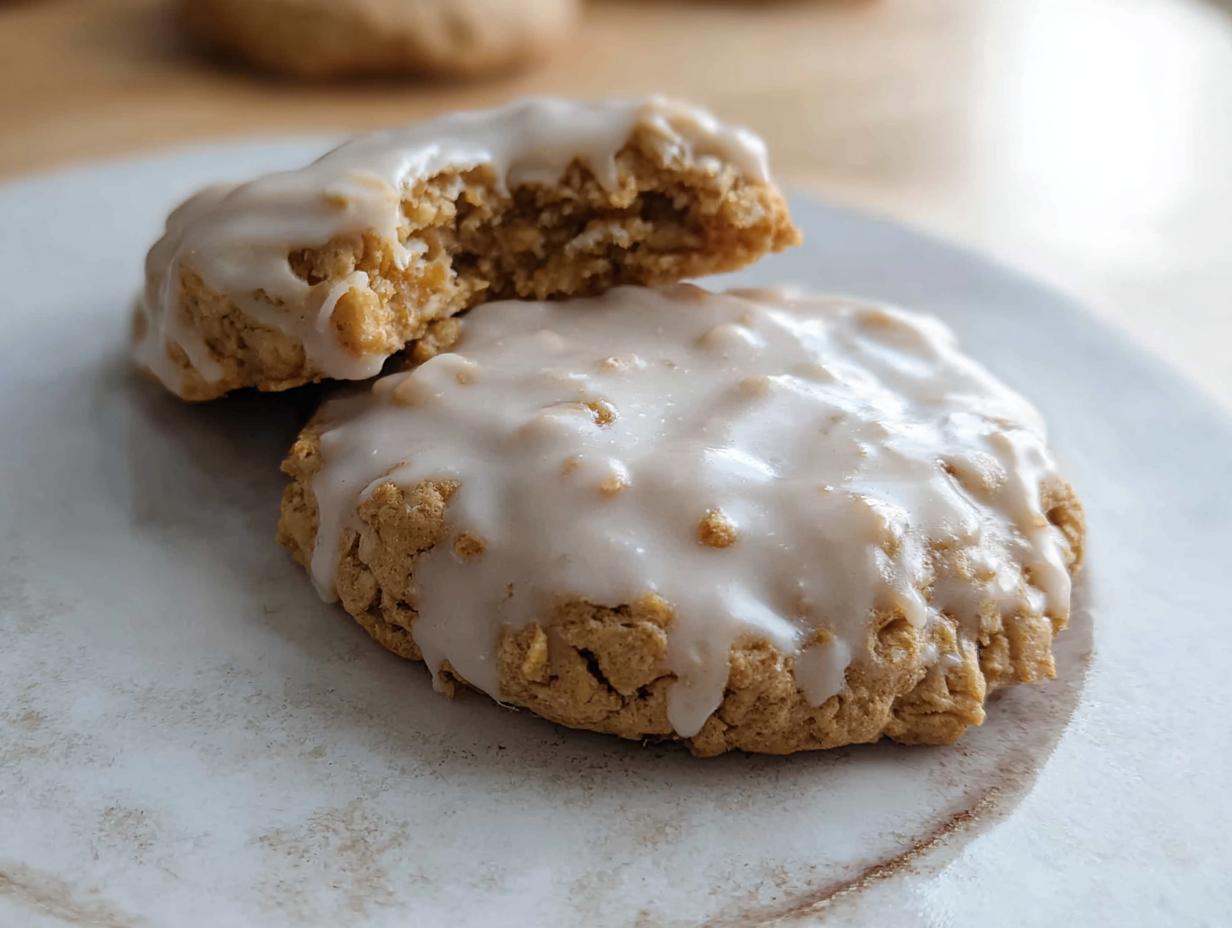
Iced oatmeal cookies. Say that ten times fast! I remember when I first tried to tackle a copycat cookie recipe for my blog, NoobRecipes. I thought, “How hard can a soft cookie with icing be?” Well, I ended up with hockey pucks that shattered when I tried to ice them. Total failure, right? But that failure taught me something important: simple recipes need simple, clear steps, especially when you’re new to baking.
That’s why I’m so thrilled to share this version of iced oatmeal cookies. This isn’t some fancy, intimidating baking project. This is soft, chewy oatmeal cookie perfection topped with a sweet vanilla blanket, and I promise you can nail it on your very first try. We’re keeping the ingredient list short and the technique straightforward. If you’ve only ever managed toast, you can master these cookies. They are incredibly forgiving, but we’re going to pay attention to just two small details—soft butter and not overbaking—to ensure they stay gloriously gooey inside.

Essential Ingredients for Perfect Iced oatmeal cookies
Okay, let’s talk about what you need. Since we’re aiming for that super soft, chewy texture—the kind that makes you want to hide the batch—the quality and state of your ingredients really matter. Don’t worry, you probably have most of these things already! For these iced oatmeal cookies to turn out right, especially not turning into hard little disks, we need to be precise about the butter and the oats.
I’ve broken down everything you need below. Pay close attention to that butter note—it’s the difference between fluffy dough and sad, greasy batter!
Cookie Base Components
These are the building blocks for the actual cookie part. The most crucial thing here is the butter; it has to be softened. That means you can press a finger into it easily, but it shouldn’t look shiny or melted. Melted butter means flat, crispy cookies, and we absolutely do not want that here!
- Softened Butter (room temperature is key!)
- Brown Sugar (I prefer dark brown for extra chewiness)
- Granulated Sugar
- One large Egg (also room temperature, please!)
- Vanilla Extract
- Old Fashioned Whole Rolled Oats (don’t use instant, they break down too much)
- All-Purpose Flour
- Cinnamon and Nutmeg (these spices make the difference!)
- Baking Soda and Salt
The Simple Vanilla Glaze
This icing is ridiculously easy, but it sets up beautifully on top of the cooled cookies. We only need three things, and the milk measurement is intentionally small because we want a thick coating, not a watery drizzle. Remember, we are dipping, so it needs some body!
| Glaze Ingredient | Amount |
|---|---|
| Powdered Sugar | 3/4 cup |
| Milk | 1.5 tablespoons |
| Vanilla Extract | 1/4 teaspoon |
If you find your glaze is too stiff after mixing, just add another tiny splash of milk—seriously, just a few drops at a time until it reluctantly drizzles off your whisk.
Step-by-Step Instructions for Your Iced oatmeal cookies
Alright, time to get our hands dirty! Making these cookies is incredibly satisfying because you see the results so fast. We’re going to move quickly through the mixing, but we have to be patient when it comes to cooling. That’s where the magic happens for that soft texture we love.
Mixing the Dough
First thing’s first: get that oven preheated to 350F and line a baking sheet with parchment paper. Trust me, parchment is your best friend; it keeps cleanup a breeze and helps the bottoms bake evenly. Now, grab your stand mixer or your trusty hand mixer.
We start by creaming the softened butter with both the brown and white sugars. You need to beat this until it looks noticeably lighter in color and fluffy—this step whips air in, which keeps the cookies from being dense bricks! After that, drop in your room-temperature egg and the vanilla. Mix just until it’s incorporated. Don’t overdo it here once the egg is in.
Next, we handle the dry stuff. In a separate bowl, quickly whisk together your flour, oats, cinnamon, nutmeg, baking soda, and salt. Now, add these dry ingredients to your wet mixture, but do it gradually. I like to add about half, mix on low until just combined, then scrape down the bowl, add the rest, and mix until you see no more flour streaks. Stop the mixer immediately! Overmixing the flour activates the gluten, and that kills the chewiness we’re aiming for.
Baking and Cooling for Optimal Texture
For perfectly sized iced oatmeal cookies, use a large cookie scoop—we only get 8 cookies total, so they need to be substantial! Drop the dough balls onto your prepared sheet, leaving plenty of space between them. Then, gently press each one down with your fingers until it’s about an inch thick. They won’t spread a ton, so you need to help them out a little.
Bake them for exactly 10 minutes at 350F. I mean it—10 minutes! If you bake them until they look golden brown, they will be hard later. You want the edges set, but the centers should look totally soft, maybe even a little underdone. This is crucial. When you pull them out, leave them right there on the hot baking sheet for a full 20 minutes. This resting period allows them to finish baking gently without drying out. After 20 minutes, move them carefully to a wire rack to cool completely. Don’t even *think* about icing them warm!

Mastering the Iced oatmeal cookies Glaze Application
While the cookies are cooling (and patience is key here!), whip up your glaze. Whisk the powdered sugar, vanilla, and the initial 1.5 tablespoons of milk. You’re looking for a thick, smooth consistency that coats the back of a spoon but still dips easily. If it looks like glue, add milk one teaspoon at a time until it flows nicely. If it’s too thin, pop the bowl in the fridge for 10 minutes and whisk again.
Once the cookies are totally cool—and I mean rock solid cool—it’s time to dip. Hold the cookie by the bottom edge, dip the top surface straight down into the glaze, lift it out, let the excess drip off for just a second, and place it back on the cooling rack. Let them sit undisturbed until that vanilla glaze hardens up before you stack them or move them around too much. That’s it; you’ve made bakery-quality iced oatmeal cookies!
Why You’ll Love This Iced oatmeal cookies Recipe
I designed this recipe specifically for my NoobRecipes readers, meaning it’s built for success, even if you’ve only used an oven to heat up leftovers. You’re going to love how these turn out because they deliver massive flavor with minimal fuss. Forget those dry, crumbly oatmeal cookies of the past!
- Beginner Proof: The steps are simple, and the dough doesn’t require chilling. If you can cream butter, you can make these cookies.
- Incredible Texture: They stay wonderfully soft and chewy on the inside, thanks to careful baking and the oats.
- Bakery Flavor at Home: That simple vanilla glaze makes them taste just like the expensive ones you see advertised everywhere.
- Fast Satisfaction: From start to finish, you’re looking at less than an hour for a batch of 8 truly amazing cookies!
Tips for Success with Soft Iced oatmeal cookies
Listen, even I mess up sometimes, and usually, it comes down to temperature control. For these iced oatmeal cookies to be soft and chewy, the butter temperature is non-negotiable. I learned this the hard way when I rushed things one winter morning. My butter was too cold, so I tried to microwave it for five seconds. Big mistake! It ended up greasy, the sugars didn’t cream right, and I ended up with cookies that tasted like crunchy oatmeal crackers. So, please, make sure your butter is just softened, not melted.
The second area where people run into trouble is the glaze consistency. Remember that note about the milk? If your glaze is too thin, it just runs right off the cookie and pools messily on your cooling rack. I usually end up adding way too much milk because I’m impatient! If that happens, don’t panic and don’t add more sugar.
Just chill that bowl of glaze in the refrigerator for about 10 to 15 minutes, then give it a good, hard whisk again. Chilling allows the powdered sugar to firm up slightly, and you’ll see it thicken right back up to that perfect, dip-able state for your iced oatmeal cookies.
Equipment Required for Making Iced oatmeal cookies
You don’t need a whole professional kitchen setup to make these cookies, which is great for us beginners! I try to keep my required tools list as short as possible. If you have these basics, you are good to go for baking up a batch of these soft iced oatmeal cookies.
- Baking Sheets
- Parchment Paper (a must for easy cleanup!)
- Mixing Bowls (one large, one medium for the glaze)
- Hand Mixer or Stand Mixer
- Rubber Spatula (for scraping the bowl sides)
- Large Cookie Scoop (for uniform size)
- Wire Cooling Rack
- Whisk (for the icing)
Frequently Asked Questions About Iced oatmeal cookies
It’s totally normal to have a few questions when trying a new recipe, especially when you’re aiming for that perfect soft texture. I’ve gathered the most common questions I get about these iced oatmeal cookies so you can bake with confidence!
Can I make these Iced oatmeal cookies ahead of time?
Yes, you absolutely can prep ahead, which is great if you’re serving them at a party! You can bake the oatmeal cookies and let them cool completely. Store them in an airtight container at room temperature for up to three days. However, I strongly recommend only glazing them right before you plan to serve them, or at most, the morning of. The vanilla glaze can get sticky or slightly weepy if stored for too long, especially if your kitchen is humid. For the best iced oatmeal cookies look, glaze fresh!
What if my cookie dough seems too dry or too wet?
This usually comes down to how packed your flour or oats were when measuring. If your dough seems dry and won’t quite come together when you try to scoop it, add milk one teaspoon at a time while mixing on low speed until it just holds its shape. If it’s too wet—meaning it spreads instantly on the baking sheet—pop the whole bowl into the fridge for about 15 minutes. That little chill time lets the oats absorb some moisture and firms up the butter just enough so you can scoop those nice, tall balls.
What is the best way to store leftover Iced oatmeal cookies?
Once the glaze is fully set, these cookies do best stored at room temperature. Keep them in a single layer or separated by parchment paper in an airtight container. Don’t store them in the fridge! Cold air tends to dry out the cookie part quickly. If you stack them, the glaze might stick together, so parchment paper between the layers is the pro move for keeping your beautiful iced oatmeal cookies pristine.
Storing and Keeping Your Iced oatmeal cookies Fresh
Now that you’ve successfully made these amazing, soft iced oatmeal cookies, we need to make sure they stay that way! The key is keeping them away from open air and avoiding the refrigerator if you can help it. Once the glaze is totally hard—give it at least an hour—you can put them away. I never reheat cookies, honestly, because the texture changes weirdly, but keeping them at room temperature is easy to manage.
The biggest enemy of a glazed cookie is moisture transfer. If you stack them without protection, that lovely vanilla icing will fuse to the cookie underneath. For 8 cookies, you might just eat them all today, but if you have leftovers, here’s the simple rundown:
| Storage Method | Duration | Notes |
|---|---|---|
| Airtight Container (Room Temp) | Up to 4 days | Use parchment paper between layers to protect the glaze. |
| Freezing (Unglazed cookies only) | Up to 2 months | Wrap tight, then glaze after thawing. |
Keep them on the counter in a relatively cool spot, and they should stay perfectly soft until they’re all gone. Seriously, they rarely last more than two days in my house!
Share Your Homemade Iced oatmeal cookies Experience
Well, that’s it! You’ve made it through the easiest, softest, most delicious batch of iced oatmeal cookies you’ll ever whip up at home. I really hope you loved the process as much as I do when I make them for myself after a long day of recipe testing. If you want to see more of my baking adventures, follow along on Facebook!
I put so much effort into making sure this recipe worked perfectly for beginners like us, so I am dying to know how yours turned out! Did the glaze set just right? Are they staying soft in your kitchen? Don’t be shy! You can also save this recipe for later on Pinterest.
Head down to the comment section below and tell me all about your baking adventure. Seriously, leave a rating for the recipe—it helps other new bakers see that they can trust this process. I read every single note you leave, and I love seeing pictures if you share them on social media. Happy baking, and enjoy every single bite of those perfect iced oatmeal cookies!
Print
Shocking 8 Iced oatmeal cookies Success
- Total Time: 45 minutes
- Yield: 8 cookies
- Diet: Vegetarian
Description
These Iced Oatmeal Cookies are a copycat of the popular Crumbl version. They feature soft, chewy oatmeal cookies topped with a simple vanilla glaze. This recipe is easy for any beginner baker to make.
Ingredients
- 1/2 cup butter softened
- 1/3 cup brown sugar
- 1/4 cup granulated sugar
- 1 tbsp vanilla extract
- 1 egg at room temperature
- 1 & 1/4 cup old fashioned whole rolled oats
- 1 cup AP flour
- 1/4 tsp cinnamon
- pinch of nutmeg
- 1/2 tsp baking soda
- 1/4 tsp salt
- Icing: 3/4 cup powdered sugar
- 1.5 tbsp milk
- 1/4 tsp vanilla
Instructions
- Preheat your oven to 350F. Line a baking sheet with parchment paper and set it aside.
- Cream the butter, brown sugar, and granulated sugar together until combined. Add the egg and vanilla. Mix until the mixture looks light and fluffy.
- Mix in the flour, oats, cinnamon, nutmeg, baking soda, and salt. Scrape the sides of the bowl to make sure everything combines well.
- Use a large cookie scooper to drop 8 equally sized dough balls onto the prepared baking sheet. Gently press each dough ball down to about 1 inch thick.
- Bake the cookies in the preheated oven for 10 minutes. Do not overbake; you want them to stay soft and gooey.
- Let the cookies cool on the baking sheet for 20 minutes. Then, move them to a cooling rack to cool completely.
- Prepare the glaze: In a medium bowl, whisk the powdered sugar, 1 tbsp milk, and vanilla until combined. The mixture should be thick but thin enough to dip the cookies. Add milk 1 tsp at a time if the mixture is too thick.
- Dip the top of each cooled cookie into the vanilla sugar glaze. Place them back on the cooling rack. Let the glaze set fully before you eat them.
Notes
- The butter must be softened, not melted. If the butter is too soft, your frosting will be runny.
- If your frosting turns out too liquidy, chill the bowl in the fridge for 10–15 minutes, then beat it again until it becomes fluffy.
- Prep Time: 15 minutes
- Cook Time: 10 minutes
- Category: Dessert
- Method: Baking
- Cuisine: American