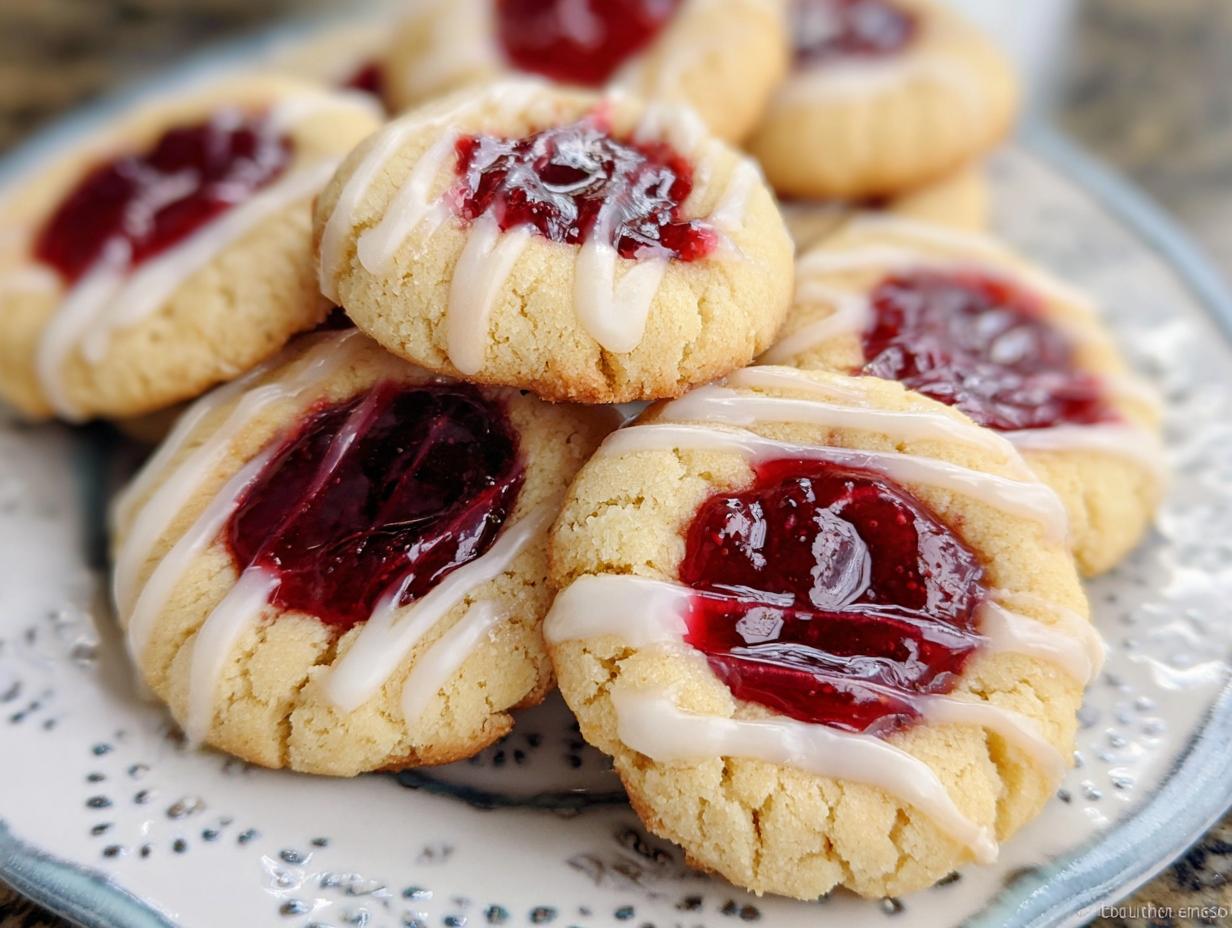
Raspberry Thumbprint Cookies are the definition of a cookie that looks fancy but is secretly foolproof—perfect for us beginners over at NoobRecipes! I remember the first time I tried making these. I was trying to impress my partner, and honestly, I thought the little indentation part was going to be a total disaster. I’d baked maybe three things successfully before this, and my kitchen looked like a flour bomb went off every time. But seriously, these buttery cookies are so forgiving.
The beauty of this recipe is that it guides you right through the tricky parts, like getting that tender, melt-in-your-mouth texture. We use simple creaming methods, and the chilling time does half the work for you. By the time you’re pressing your thumb into the dough, you’ll realize you’re not a beginner anymore; you’re a cookie baker! Trust me, the bright pop of jam topped with that sweet vanilla glaze is going to make you look like a seasoned pro at your next gathering. You absolutely have to try this batch.

Assembling Your Raspberry Thumbprint Cookies Ingredients
Alright, let’s get our workspace ready! Before we even think about mixing, lay everything out. This is my golden rule for successful baking, especially when tackling something classic like these Raspberry Thumbprint Cookies. Having everything measured and ready to go means you won’t panic when the recipe says cream the butter quickly. We need three main groups of items here: the dry stuff, the wet foundation, and the gorgeous jam and glaze components that make these cookies special.
| Component | Amount |
|---|---|
| Butter (softened) | 1 cup |
| Sugar (divided) | 3/4 cup |
| Egg | 1 |
| Vanilla Extract | 1 teaspoon (plus more for icing) |
| Flour | 2 cups |
| Baking Powder | 1 teaspoon |
| Salt | 1/4 teaspoon |
| Raspberry Jam (seedless) | 2/3 cup |
| Confectioners’ Sugar | 1/2 cup |
| Water | 1 1/2 teaspoons |
Dry Components for Tender Raspberry Thumbprint Cookies
In a medium bowl—don’t use your big mixing bowl yet—we’re going to whisk together our flour, baking powder, and salt. This takes about thirty seconds, but it’s crucial. Whisking makes sure that baking powder is evenly distributed so your cookies rise nicely and don’t end up with weird salty spots. Set this bowl aside; we’ll introduce it to the wet ingredients later.
Wet Base and Sweeteners for Raspberry Thumbprint Cookies
This is where the buttery magic starts! You need a full cup of softened butter—and I mean *softened*, not melted! We’ll be creaming that with half a cup of the sugar until it’s light and fluffy. Then comes the single egg and that teaspoon of vanilla. This mixture needs to look pale and airy before we add the flour mixture, so don’t rush the mixer here!
The Filling and Finishing Touches for Raspberry Thumbprint Cookies
For the filling, you need that lovely seedless raspberry jam. I usually melt mine just a little bit in the microwave because it spoons into those little thumbprint wells so much cleaner. For the final touch, we need confectioners’ sugar, a tiny splash more vanilla, and just enough water to make a thick, drizzle-able icing. Remember, we only ice these after they are totally cool!
Step-by-Step Instructions for Perfect Raspberry Thumbprint Cookies
Okay, time to roll up our sleeves! Don’t let the multiple steps scare you; we’re just building layers of flavor here. The key to these amazing Raspberry Thumbprint Cookies is taking your time during the mixing and chilling phases. If you rush the dough, you’ll end up with flat, crispy discs instead of tender treats, and nobody wants that!
Mixing the Dough for Your Raspberry Thumbprint Cookies
Grab that big bowl and your electric mixer. We need to cream the softened butter with the 1/2 cup of sugar and the first teaspoon of vanilla. Beat this on medium speed for a good two or three minutes until it gets pale and fluffy—it should look lighter than when you started. Then, crack in that egg and beat it until it’s fully incorporated. Now, slow your mixer down to low! Gradually add in that dry flour mixture we made earlier. Mix just until you stop seeing streaks of flour. Stop right there! Overmixing develops gluten, and we want tender cookies, not tough ones.
Here comes the most important (and hardest) part: chilling. Wrap that soft dough up tightly in plastic wrap and stick it in the fridge for a full hour. Seriously, don’t skip this. Chilling firms up the butter, which prevents the cookies from spreading too much when they hit the heat.
Shaping and Preparing to Bake Raspberry Thumbprint Cookies
When the hour is up, preheat your oven to 350°F. Get those baking sheets ready—I always use parchment paper because cleanup is a dream! Take that remaining 1/4 cup of sugar and spread it out on a small plate. Now, scoop your chilled dough into little one-inch balls. Roll each ball gently between your palms, making sure it’s nice and round, and then roll it completely in the sugar coating. Place them about two inches apart on your sheet.
For the indentation, you have options! I use the end of a wooden spoon handle because it gives me a perfect, consistent divot. Press down firmly—but not all the way through the dough—to create a nice little cup for the jam. If you press too gently, the jam sinks right out!

Baking and Filling Your Raspberry Thumbprint Cookies
Bake these babies for about 13 to 16 minutes. You’re looking for the edges to just barely start turning golden brown. When they come out, they will look a little pale, which is perfect for a buttery cookie! Let them sit on the pan for about five minutes before moving them carefully to a wire rack to cool completely. While they cool, take your seedless raspberry jam and microwave it for about 20 seconds until it’s nice and runny. Once the cookies are fully cooled—and I mean totally cool—spoon a little bit of that warm jam into each thumbprint well. If you try filling them warm, the jam just melts everywhere!
Applying the Final Vanilla Glaze to Raspberry Thumbprint Cookies
This glaze is simple but adds that professional touch. Whisk together your confectioners’ sugar, the remaining vanilla, and just a splash of water. You want this icing to be thick enough that it drizzles slowly, holding its shape when it hits the cookie, not running off the sides like milk. Use a fork or a small spoon to drizzle the icing back and forth over the tops of your filled Raspberry Thumbprint Cookies. Let that glaze set up for about 30 minutes before you stack them!
Why You Will Bake These Raspberry Thumbprint Cookies Often
Seriously, these cookies are addictive, but the best part is how simple they are to master. I promise that once you nail this recipe, you’ll be making batches all the time, especially around the holidays or when you just need a quick, satisfying bake. They look impressive, taste like pure butter and fruit, and they are built for beginner success!
- The dough is incredibly forgiving, which reduces baking stress.
- The classic flavor profile—buttery cookie meets tart raspberry—is a guaranteed crowd-pleaser.
- These Raspberry Thumbprint Cookies stack beautifully and are easy to transport.
- The chilling step does the hard work of preventing spread for you!
Tips for Mastering Raspberry Thumbprint Cookies
Even with a foolproof recipe, a couple of little tricks can take your Raspberry Thumbprint Cookies from good to absolutely unbelievable. My biggest piece of advice is about dough temperature. If your dough is too warm when you roll it, those cookies will spread out into sad, flat pancakes while baking. That one hour chill time isn’t just a suggestion; it’s gospel for maintaining that perfect, thick shape.
Also, let’s talk about that jam filling. If you’re planning on stacking these cookies, you absolutely must melt your raspberry jam slightly first, like I mentioned. If you use cold jam straight from the jar, it’s too stiff, and you end up forcing it into the well, which can crack your cookie. Microwaving it for just 20 seconds makes it spoonable. Finally, when creating the thumbprint, press down firmly enough to create a deep pocket, but don’t press so hard that you hit the bottom baking sheet. That deep well is what holds all that gorgeous melted jam!
Storage and Reheating Instructions for Raspberry Thumbprint Cookies
One of the best parts about these buttery cookies is that they are fantastic for making ahead! Nobody wants to spend all day baking right before a party, right? Luckily, these Raspberry Thumbprint Cookies store beautifully. The main thing to remember is that the glaze and the jam are sticky, so layering them correctly is key to keeping them looking perfect.
You should store them in an airtight container at room temperature—no need for the fridge unless your kitchen is super hot. If you stack them, you absolutely must put down a layer of parchment paper between each layer of cookies. This stops the vanilla glaze from sticking to the jam of the cookie above it. If you skip this step, you’ll end up with one giant, sweet cookie brick the next day! If you want to see more of our baking tips, check out our page on thumbprint cookies easy jam recipe.
Reheating isn’t really necessary since these are best enjoyed at room temperature, but if you want to soften the cookie just a tiny bit on a cold day, you can pop one or two on a microwave-safe plate for about 5 to 7 seconds. Don’t go too long, or the cookie will get tough!
| Storage Method | Duration | Notes |
|---|---|---|
| Airtight Container (Room Temp) | Up to 5 days | Use parchment paper between layers to prevent sticking. |
| Freezing (Un-glazed) | Up to 2 months | Roll dough balls, sugar them, and freeze them flat on a tray first. |
| Freezing (Baked) | Up to 1 month | Store cooled, filled cookies with parchment separators. |
Frequently Asked Questions About Raspberry Thumbprint Cookies
I know you might have a few questions before diving in, especially if you’re new to baking cookies with jam centers! That’s why I put together this quick FAQ section. We want your first batch of Raspberry Thumbprint Cookies to be a total success story for your beginner baking journey. Don’t hesitate to experiment once you master the base recipe! You can also follow us on Pinterest for more visual inspiration.
Can I Substitute the Jam in These Raspberry Thumbprint Cookies
Absolutely! While the raspberry jam gives you that classic, vibrant look, these cookies are versatile. You can use almost any thick fruit preserve you have on hand. Apricot or strawberry preserves work wonderfully and offer a slightly different flavor profile. The main thing is making sure the jam isn’t too runny. If your jam seems thin, you can try stirring in just a tiny bit of cornstarch before microwaving it, which helps it set up nicely in the well of your buttery cookie.
How Long Does It Take to Make Raspberry Thumbprint Cookies From Start to Finish
The active work time for these Raspberry Thumbprint Cookies is actually quite short—prep is only about 15 minutes, and baking takes about 16 minutes. However, the recipe requires a mandatory one-hour chill time for the dough. So, if you see the total time listed as over an hour and a half, don’t panic! Most of that time is hands-off while the dough rests in the fridge, ensuring you get those perfect, non-spreading cookies.
Nutritional Estimate for Raspberry Thumbprint Cookies
Just a quick heads-up, folks! Since we are making these delicious, buttery treats at home, the exact nutrition can change based on the brand of butter or the amount of glaze you use. This information below is just a good estimate per cookie, based on the recipe amounts provided. Don’t stress too much over the numbers; just enjoy the fact that you baked these amazing Raspberry Thumbprint Cookies yourself! If you want to see more of our easy dessert recipes, check out our guide on snacks.
| Nutrient | Amount (Approx.) |
|---|---|
| Calories | 120 |
| Sugar | 10g |
| Fat | 7g |
| Protein | 1g |

Amazing 120 Calorie Raspberry Thumbprint Cookies
- Total Time: 1 hour 31 minutes (includes 1 hour chilling time)
- Yield: About 3 dozen
- Diet: Vegetarian
Description
Raspberry Thumbprint Cookies are classic, buttery cookies perfect for any occasion. This recipe guides you through making tender, melt-in-your-mouth cookies filled with bright raspberry jam and finished with a simple vanilla glaze.
Ingredients
- 1 cup butter softened
- 3/4 cup sugar divided
- 1 egg
- 1 teaspoon vanilla extract
- 2 cups flour
- 1 teaspoon baking powder
- 1/4 teaspoon salt
- 2/3 cup seedless raspberry jam
- 1/2 cup confectioners’ sugar (for icing)
- 1/2 teaspoon vanilla extract (for icing)
- 1 1/2 teaspoons water (for icing)
Instructions
- Stir together flour, baking powder, and salt in a medium bowl.
- Cream butter, 1/2 cup granulated sugar, and 1 teaspoon vanilla extract in a large bowl for 2 to 3 minutes on speed 3.
- Add the egg and beat well.
- Gradually beat in the flour mixture.
- Chill the dough for one hour.
- Preheat your oven to 350°F. Line baking sheets with parchment paper or silicone baking sheets, or grease them.
- Place the remaining 1/4 cup of sugar in a small dish.
- Roll the dough into 1-inch balls. Roll the balls in the sugar and place them 2 inches apart on the prepared baking sheets.
- Use your thumb, a rounded 1/2 teaspoon measuring spoon, or the end of a wooden spoon handle to make an indentation in the center of each ball.
- Bake for 13-16 minutes, or until the edges are slightly browned. Remove the cookies to wire racks.
- Place the jam in a small bowl and melt it in the microwave. Spoon the melted jam into the baked cookies.
- Cool the cookies completely.
- To make the glaze, combine the confectioners’ sugar, 1/2 teaspoon vanilla extract, and water until well mixed. The icing should be fairly thick. Drizzle the glaze over the cooled cookies.
- Store the cookies in an airtight container in a cool place, placing parchment paper between layers.
Notes
- You can add the jam before baking or after baking without melting it, based on your preference. Melted jam provides a nicer look and stacks easier.
- The white icing may take on a tint from the jam over time.
- Prep Time: 15 minutes
- Cook Time: 16 minutes
- Category: Dessert
- Method: Baking
- Cuisine: American