Chocolate Thumbprint Cookies are the absolute best way to trick people into thinking you spent hours in the kitchen, trust me! When I first started NoobRecipes, I wanted a truly decadent chocolate cookie that didn’t require fancy techniques. I was tired of recipes that called for melted chocolate or tricky folding. So, I spent weeks perfecting this cocoa base until it was rich, tender, and forgiving enough for absolute beginners. This recipe is proof that you don’t need years of experience to bake something that tastes like it came from a high-end bakery. We use simple pantry staples, but the resulting deep cocoa flavor and that luscious, smooth ganache filling make these cookies feel like a real treat. If you’re looking for that perfect, easy-bake holiday cookie or just a serious chocolate fix, you’ve found your new go-to recipe. You won’t mess this one up, I promise!

Why You Will Love These Chocolate Thumbprint Cookies
Honestly, these cookies are built for the home cook who hasn’t spent years perfecting their technique. They come together fast, they look impressive, and they deliver a flavor punch that’s pure chocolate heaven. Forget complicated steps; we keep this process straightforward so you can get them into the oven quickly. They truly are the perfect gateway cookie for anyone new to baking! If you enjoy easy desserts, you might also love our easy bake churro cheesecake bars.
Speed and Simplicity for New Bakers
The dough mixes up in about ten minutes flat—seriously! Once it’s mixed, the shaping is just scoop, press, chill, and bake. There’s no rolling out or cutting shapes, which is where most beginners get stuck. Even creating that little thumbprint indentation is easy; I give you a foolproof way to make every cookie look perfectly uniform, even if your hands aren’t steady yet. It’s all about simple actions leading to a beautiful result.
Deep, Decadent Chocolate Flavor
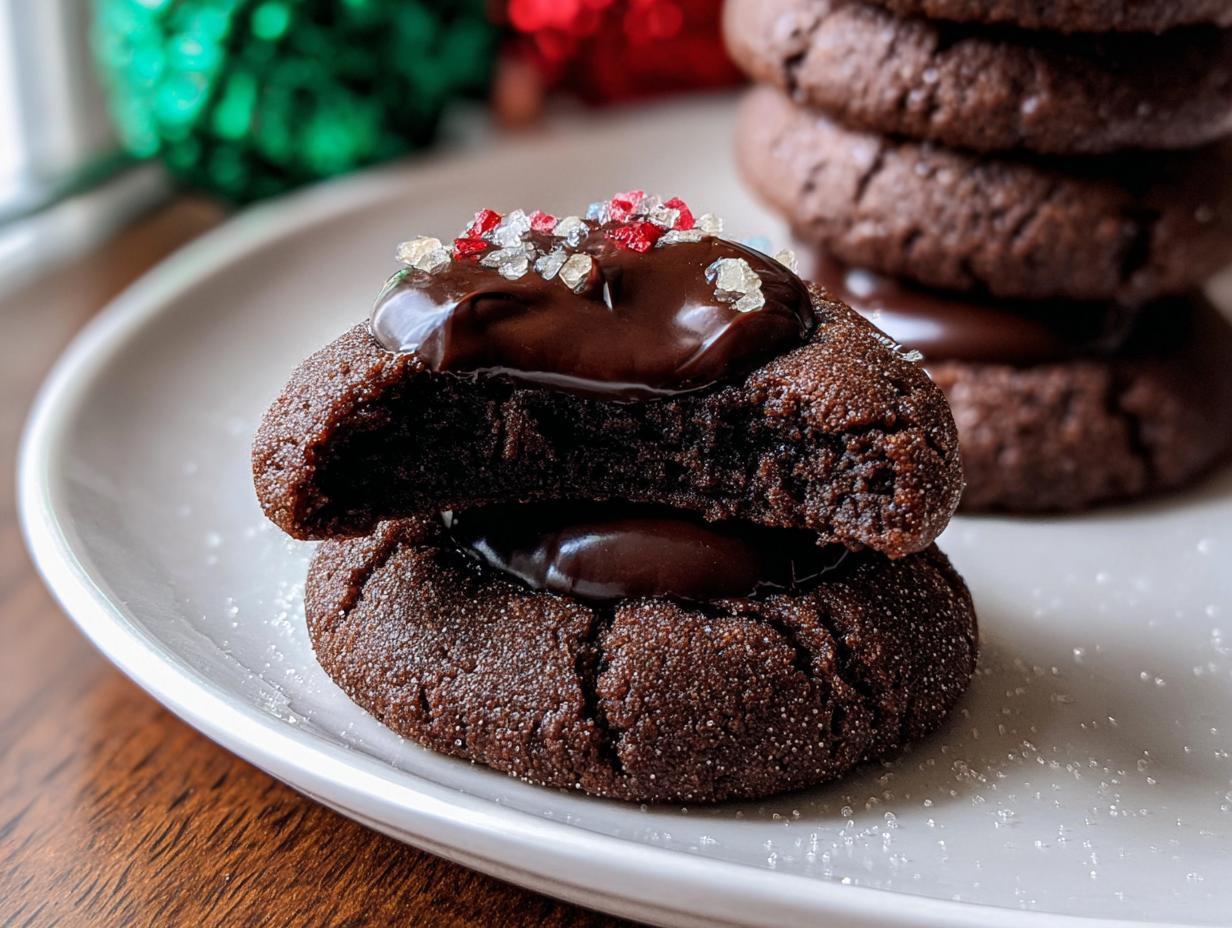
We aren’t messing around with weak cocoa here. The base uses Dutch process cocoa for a deep, almost black color and a smooth, non-bitter chocolate foundation. But the real star is that ganache center. It’s just two ingredients—heavy cream and good chocolate chips—heated up and stirred until glossy. It melts in your mouth, and the contrast between the slightly crisp cookie edge and the soft, gooey filling is just unbelievable. Wow, it smells amazing while it bakes, too!
Gathering Your Ingredients for Chocolate Thumbprint Cookies
Before we dive into the fun part—the mixing—let’s talk ingredients. Getting these right is crucial, especially for that tender texture we’re aiming for in our Chocolate Thumbprint Cookies. Don’t worry, you likely have most of this stuff already! Precision matters here, so make sure you’re spooning your flour into the measuring cup rather than scooping it directly, or better yet, weigh it if you can. For the creaming step, your butter absolutely must be softened—not melted! It should give just a little when you press it. Also, make sure those two egg yolks are at room temperature; this helps them incorporate smoothly without deflating all the air we beat into the butter.
Dry Components for the Chocolate Thumbprint Cookies
In one bowl, we’re combining the dry stuff. You’ll need 1 1/2 cups of all-purpose flour, leveled off perfectly. The key here is the cocoa powder—I specify 1/2 cup of Dutch process cocoa because it gives us that deep, rich color and a smoother, less acidic chocolate flavor than natural cocoa. Mix that in with 1/2 teaspoon of salt and 1/2 teaspoon of baking powder. Just whisk it together until everything looks uniform, and set it aside.
Wet Components and Binding Agents
In your main mixing bowl, we’re going to cream together 3/4 cup of softened unsalted butter with 3/4 cup of light brown sugar (make sure you pack that brown sugar down firmly!) and 1/4 cup of white sugar. Beat that until it’s fluffy. Then, mix in the two room-temperature egg yolks and 1 1/2 teaspoons of vanilla bean paste—that paste really adds a nice visual speckle, I love it. This butter-sugar-yolk stage is where the cookie gets its foundational structure, so don’t rush this part! If you are interested in other baking staples, check out our recipe for all butter buttermilk biscuits.
Crafting the Silky Chocolate Ganache Filling
For the filling, keep it simple: 1 cup of semi-sweet chocolate chips and 1/2 cup of heavy whipping cream. That’s it! We don’t want bittersweet chips here; we want that comforting sweetness to balance the dark cocoa cookie. Once the cookies are baked and cooled, this filling comes together in about two minutes flat. It’s so much easier than trying to melt bars of chocolate, which always seems to burn when I try it!
Step-by-Step Instructions for Perfect Chocolate Thumbprint Cookies
Alright, let’s get these amazing Chocolate Thumbprint Cookies into the oven! I’ve broken this down into super manageable chunks so you can feel confident at every stage. Remember, the chilling time is mandatory—don’t skip it, or you’ll end up with chocolate puddles instead of cookies! If you want to see more of my baking adventures, follow along on Pinterest.
Mixing the Rich Cocoa Cookie Dough
First things first, get those baking sheets lined with parchment paper. Now, grab your mixer for the wet ingredients. Cream the softened butter, brown sugar, and white sugar together until they look pale and fluffy—this takes about two minutes, and it’s important for texture! Next, beat in those two egg yolks and the vanilla until everything is smooth. Now, switch your mixer to low speed and add the dry flour/cocoa mixture in two parts. You only want to mix until you just see the flour disappear. Seriously, stop mixing right there! Overmixing develops gluten, and we want tender cookies, not hockey pucks.
Shaping and Chilling the Dough
Use a tablespoon measure to scoop out the dough, and roll those portions into smooth balls. Place them on the prepared sheets, making sure they have about an inch and a half between them because they will spread a little. Now, use a small measuring spoon, like a 1/4 teaspoon measure, to press firmly into the center of each ball to create that signature dip. This dip is what holds our filling later! Once they are all indented, cover the trays and chill them. You absolutely must chill the dough balls for at least one hour. This solidifies the butter, which stops them from flattening out completely when they hit the heat.
Baking and Setting the Cookie Base
Once that hour is up, go ahead and preheat your oven to 350°F. Arrange the chilled dough balls on the sheets, leaving space between them. Bake for only 9 to 11 minutes. You want them set, but still looking slightly soft in the middle. Here’s a pro tip: As soon as you pull them out, while they are still warm, gently press down on the centers again with that same 1/4 teaspoon measure. This redefines the indent because the cookie base puffs up a bit while baking. Let them cool on the baking sheet for five minutes before carefully transferring them to a wire rack to finish cooling completely. The filling goes on *after* they are cool!
Preparing and Filling the Ganache
While the cookies cool down, make the filling. Place your semi-sweet chocolate chips in a heat-safe bowl. Heat the heavy cream on the stove or in the microwave until it’s steaming hot and just starting to bubble around the edges—don’t let it boil over! Pour that hot cream right over the chips and just let it sit, untouched, for one full minute. Then, stir slowly until the mixture is completely smooth and glossy—that’s your ganache! Once the cookies are cool, fill each indentation with about 1 teaspoon of the ganache. If you want them extra festive, sprinkle on some nonpareils right away. Pop the finished cookies in the fridge for about 15 minutes so that beautiful ganache sets firm before you devour them!

Tips for Success Making Chocolate Thumbprint Cookies
Even though these are beginner-friendly, a couple of little tricks will take your Chocolate Thumbprint Cookies from great to absolutely show-stopping. I learned these little hacks the hard way after a few batches spread too much! Remember, baking is just chemistry that smells good, and a little control over the temperature and measuring makes all the difference in the final texture.
Mastering the Dough Consistency
If you live somewhere really hot, or maybe forgot to soften your butter perfectly and it got a little melty while mixing, your dough might feel too soft before it even hits the fridge. If you think it’s too sticky to handle at the scooping stage, don’t panic! Just pop the whole mixing bowl into the refrigerator for about 20 minutes. That quick chill firms up the butter just enough so you can roll those balls without them sticking to your hands like glue. It’s a lifesaver!
Achieving the Perfect Indent Shape
Consistency is key for presentation, right? That’s why I rely on my 1/4 teaspoon measure for making the indent. It gives you a perfect, uniform divot every single time, which means every cookie holds just the right amount of ganache. Make sure you press firmly enough to create a decent well, but stop before you tear through the bottom of the dough ball. And don’t forget that second gentle press after baking—it keeps your thumbprints looking sharp even after they puff up in the oven!
Frequently Asked Questions About Chocolate Thumbprint Cookies
I get so many questions about these cookies because everyone wants them to turn out perfectly! Don’t worry about messing up; that’s why I’m here. Most concerns usually boil down to timing or ingredient substitutions, but I promise these Chocolate Thumbprint Cookies are pretty resilient if you follow the main rules about chilling the dough.
Can I make the Chocolate Thumbprint Cookies dough ahead of time?
Yes, you absolutely can! This is one of my favorite make-ahead tricks, especially around the holidays. You can mix the dough, roll it into balls, make the indents, and place them on a parchment-lined baking sheet. Cover the whole tray tightly with plastic wrap and put it in the fridge for up to two days. If you want to freeze them unbaked, that works too! Just freeze them solid, then transfer the dough balls to a freezer bag. When you’re ready to bake, let them sit on the counter for about 15 minutes just to take the deep chill off, then bake them as directed—you might need to add an extra minute or two to the baking time.
What is the best way to store finished Chocolate Thumbprint Cookies?
Because these have a soft ganache filling, you have to be a little mindful of storage. They are best stored in an airtight container at room temperature for up to three days. If your kitchen is really warm, or if you made them a day or two ahead of time, you can keep them in the fridge, but let them sit out for about 15 minutes before serving so the cookie softens up again. You don’t want a rock-hard cookie!
Can I substitute the heavy cream in the ganache?
This is a tricky one. For the ganache, the heavy whipping cream is essential because its high fat content emulsifies perfectly with the chocolate chips to create that smooth, stable filling. If you try to use milk, it’s too watery, and you’ll just end up with runny chocolate. If you absolutely must have a dairy-free version, you can sometimes get away with using a full-fat canned coconut cream (the thick part from the top of the can), but you need to test that cream first to make sure it’s rich enough to hold the chocolate together. For best results on these cookies, stick to the cream! If you are looking for other easy dessert ideas, check out our decadent chocolate lava pudding cake.
Storing and Serving Your Chocolate Thumbprint Cookies
Now that you’ve made a dozen or more of these incredible Chocolate Thumbprint Cookies, we need to make sure they last! Since they have that soft, luscious ganache center, they are a little different from your standard drop cookie. But don’t worry, keeping them fresh is simple if you follow a couple of basic rules I learned the hard way when I tried to hide a batch from my family!
Best Practices for Storing Leftovers
For the best texture—where the cookie is still soft and the ganache is set but creamy—room temperature is usually the winner. Keep them in a single layer, if you can, inside a really good airtight container. If you stack them, try putting down a small piece of parchment paper between the layers so the ganache doesn’t stick to the cookie above it. If your kitchen is super hot, or you just want them to last a tiny bit longer, the fridge works, but remember to let them sit out for about 15 minutes before serving so they lose that chilly hardness.
Reheating Tips for Enjoyment
Honestly, these cookies usually disappear before they ever need reheating, but if you’ve had them tucked away for a day or two, you might want to revive that cookie base. Skip the microwave! The microwave will make the ganache too soft or even melt it entirely. Instead, just set them out on a plate for about 20 minutes before you plan to eat them. That gentle warming allows the butter in the cookie base to soften up beautifully, giving you that just-baked texture again. If you’re serving them slightly warm, use a tiny amount of ganache in the center so it stays perfectly gooey!
| Storage Method | Duration | Notes |
|---|---|---|
| Airtight Container (Room Temp) | Up to 3 Days | Keep away from heat. |
| Freezer (Unfilled Dough) | Up to 3 Months | Bake directly from frozen, adding 2 minutes to bake time. |
Sharing Your Chocolate Thumbprint Cookies Creations
Whew! That’s it—you’ve done it! I’m so excited for you to try these Chocolate Thumbprint Cookies. Baking should always be fun, and when you nail a recipe on your first try, it just builds that confidence we all need in the kitchen. I really hope this recipe becomes a staple at your house, just like it is at mine.
When you finally take that first bite, I want to know what you think! Did you stick to the simple powdered sugar dusting, or did you go all out with the sprinkles? Drop a comment below and tell me how they turned out. If you have any tweaks or additions you loved, share those too, because we are all learning together here at NoobRecipes. You can also share your results on our Facebook page!
And if you snapped a picture—which you totally should have—tag me on social media! Seriously, seeing your beautiful, beginner-made cookies makes my day. Don’t forget to rate the recipe at the top of the page if you loved how easy and rich these turned out. Happy baking, friends!
Print
Stunning Chocolate Thumbprint Cookies: 1 Foolproof Way
- Total Time: 1 hour 36 minutes (includes mandatory chilling time)
- Yield: 34 cookies
- Diet: Omnivore
Description
Chocolate Thumbprint Cookies feature a rich, cocoa-based cookie base with a smooth, decadent chocolate ganache filling. These cookies are simple for beginners to make and deliver deep chocolate flavor.
Ingredients
- 1 1/2 cups (188 g) all-purpose flour, spooned and leveled
- 1/2 cup (40 g) cocoa powder, Dutch process
- 1/2 tsp salt
- 1/2 tsp baking powder
- 3/4 cup (168 g) unsalted butter, softened
- 3/4 cup (165 g) light brown sugar, packed
- 1/4 cup (50 g) granulated white sugar
- 2 egg yolks, at room temperature
- 1 1/2 tsp vanilla bean paste or extract
- For the Chocolate Ganache:
- 1 cup (200 g) semi-sweet chocolate chips
- 1/2 cup (120 ml) heavy whipping cream
- nonpareils for sprinkling on top, optional
Instructions
- Line two baking sheets with parchment paper.
- In a medium bowl, whisk together flour, cocoa powder, salt, and baking powder. Set aside.
- In a large bowl, cream together softened butter, brown sugar, and granulated sugar for two minutes using an electric mixer.
- Mix in egg yolks and vanilla until the mixture is pale and fluffy, about 1–2 minutes.
- Add the dry ingredients to the wet mixture and mix just until combined. Do not overmix.
- Scoop the dough into 34 portions (about 1 tablespoon each) and roll into balls.
- Place dough balls onto the prepared baking sheets. Use a 1/4 tsp measure to press down and create an indent in the center of each ball.
- Chill the indented dough balls for at least one hour.
- Preheat your oven to 350°F.
- Arrange the chilled dough balls on the baking sheets, spacing them 1 1/2 inches apart.
- Bake for 9–11 minutes.
- While the cookies are still warm, gently press down on the centers again with a 1/4 tsp to keep the shape defined.
- Let the cookies cool on the baking sheet for 5 minutes before moving them to a cooling rack.
- For the ganache, place chocolate chips in a small bowl.
- Heat the heavy cream until it is just about to boil, then pour it over the chocolate chips. Let it sit undisturbed for 1 minute.
- Stir the cream and chocolate until the mixture is smooth and completely combined.
- Fill each cookie indent with about 1 teaspoon of the prepared ganache.
- If desired, sprinkle the tops with nonpareils.
- Chill the assembled cookies for 10–15 minutes to let the ganache set firm.
- Store leftovers in an airtight container for up to three days.
Notes
- Measure flour correctly for best results. Spoon flour into the measuring cup and level off with a knife, or weigh it (1 cup equals 125 grams).
- Chilling the dough for the full hour helps the cookies keep their shape during baking.
- Prep Time: 25 minutes
- Cook Time: 11 minutes
- Category: Dessert
- Method: Baking
- Cuisine: American