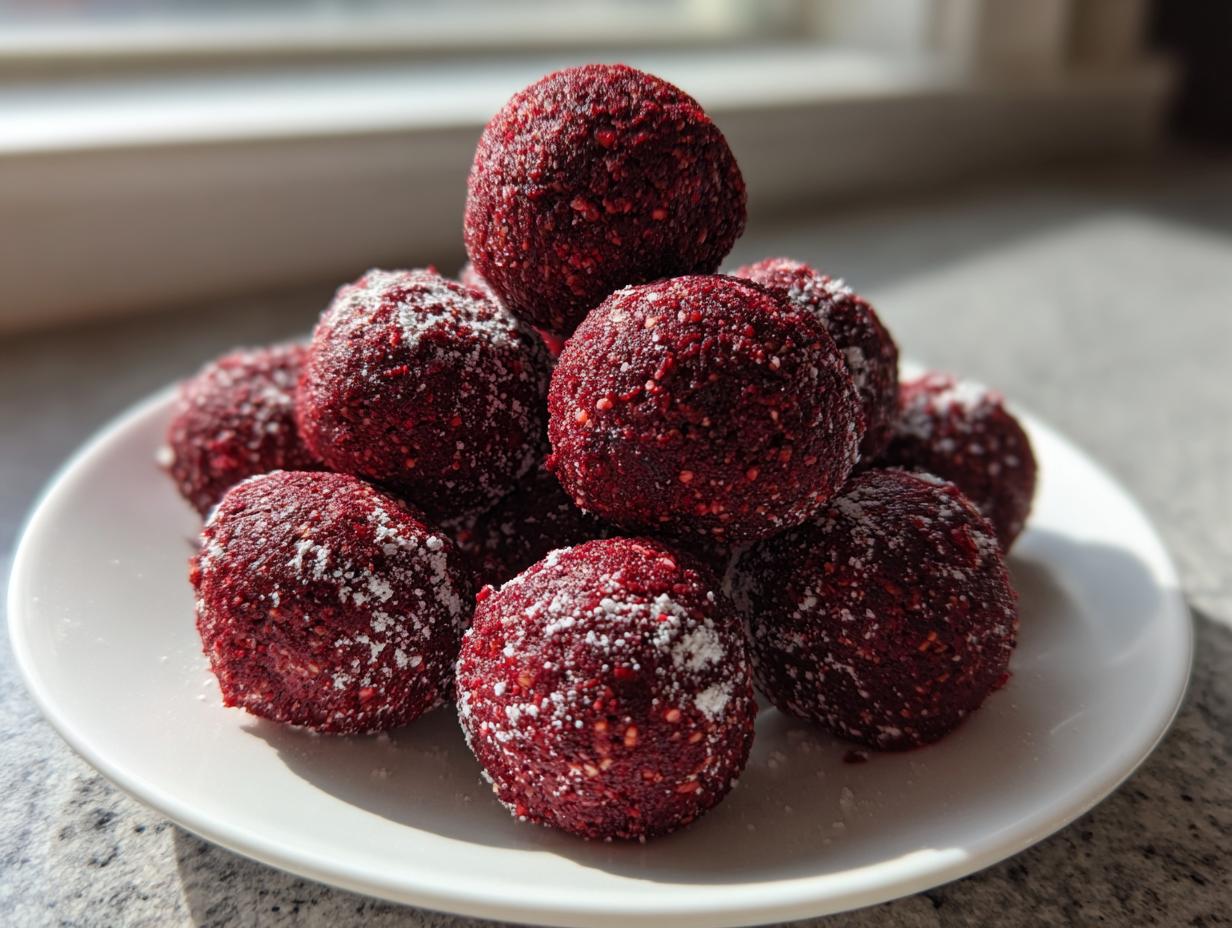
Festive Red Velvet Protein Balls are here to save your holiday snack game! When the Christmas season hits, my kitchen usually turns into a disaster zone—flour everywhere, sugar crusting the counters—because I try making complicated cookies. So, when I decided I needed something festive but also something that wouldn’t derail my fitness goals (or my beginner kitchen confidence), I came up with these. Seriously, these aren’t just pretty little red bites; they are packed with protein, require zero baking, and taste exactly like that decadent red velvet cake you crave this time of year.
As someone who nearly burned water last year, I promise you, if you can stir things in a bowl, you can nail these. They come together in maybe fifteen minutes, which is way faster than any traditional holiday dessert. I wanted a snack that felt totally indulgent for the holidays but was actually good fuel for running around getting gifts. This recipe is my absolute favorite beginner win for December because it’s almost impossible to mess up!

Why You Will Love These Festive Red Velvet Protein Balls
I know you’re busy during the holidays, and you don’t need another recipe that requires a stand mixer and three hours of chilling time. That’s why I designed these Festive Red Velvet Protein Balls to be the ultimate easy win. They look fancy, they taste like a dream, and they keep you feeling good while you’re grabbing treats at parties.
They are genuinely the simplest no-bake snack I’ve ever developed for the blog. You just mix, roll, and chill! No oven required, which is a huge bonus when your kitchen is already overcrowded with cookie sheets.
Key Benefits of This Festive Red Velvet Protein Balls Recipe
- Zero Baking Necessary: Mix everything in one bowl and roll! Perfect for new cooks or when the oven is already full.
- Holiday Flavor, Health Boost: You get that rich, slightly tangy red velvet taste but with added protein and fiber to keep you satisfied.
- Quick Assembly: Seriously, prep time is under twenty minutes. You can make a batch while the kettle boils.
- Perfectly Portable: These little guys travel beautifully to office parties or friend gatherings without melting or crumbling.
Gathering Your Ingredients for Festive Red Velvet Protein Balls
Okay, let’s get organized. The beauty of these Festive Red Velvet Protein Balls is that the ingredient list is short and mostly pantry staples—plus whatever protein powder you have lying around! Since these are no-bake, the quality of what you put in really shines through. Don’t worry if you don’t have everything exactly as listed; we’ll talk substitutions in a bit. But for the first run, stick to the list so you get that perfect texture we’re aiming for.
I put everything into a simple table below. Trust me, having everything measured out before you start mixing is half the battle won when you’re new to recipes like this. You want to make sure you have your oats ready to go, because once the wet stuff hits, things move fast!
| Quantity | Ingredient |
|---|---|
| 1 cup | Rolled Oats |
| 1 scoop | Vanilla or Unflavored Protein Powder |
| 1/4 cup | Cocoa Powder |
| 1/4 cup | Powdered Erythritol (or preferred sweetener) |
| 1/2 cup | Almond Butter or Peanut Butter |
| 1/4 cup | Unsweetened Almond Milk (approximate) |
| 1 tsp | Vanilla Extract |
| 1 tsp | Apple Cider Vinegar |
| As needed | Red Food Coloring or Beet Powder |
| 1/4 cup | White Chocolate Chips or Chopped Nuts (Optional) |
Ingredient Clarity and Preparation Notes
A couple of quick notes here to make sure you don’t get any unwelcome surprises. For the oats, you absolutely need rolled oats, not the instant or quick-cooking kind. The quick oats will dissolve too much and make your balls gummy. Also, if you’re using a granular sweetener, make sure you swap it for the powdered version (like powdered erythritol or powdered sugar). Granules won’t dissolve properly in this cool mixture, leaving you with a gritty texture.
For the color, I love using a few drops of natural red food coloring, but if you want to keep it super clean, beet powder works great, though it might add a hint of earthiness. Don’t skip the apple cider vinegar—it reacts with the cocoa and protein powder to give that classic, slightly tangy red velvet flavor!
Essential Equipment for Your Recipe
Since this is a no-bake recipe, we keep the tools simple, which is great for beginners! You’ll need one large mixing bowl—the bigger, the better, trust me, things get messy when stirring in the nut butter. Make sure you have your measuring cups and spoons ready for accuracy.
Also, grab a baking sheet or plate that you can easily fit into your fridge later. And this is mandatory: line that sheet with parchment paper! It saves you a huge headache when you go to roll the balls, and they won’t stick to the tray when they firm up.
Step-by-Step Instructions for Festive Red Velvet Protein Balls
This is where the magic happens, and I swear, even if you’ve never made anything like this before, you’re going to nail these Festive Red Velvet Protein Balls. The key here is patience during the mixing stage—we want a thick, uniform dough, not a runny mess. Remember, we’re aiming for that perfect balance of moisture so they hold their shape later.
Get your big mixing bowl ready. We’re going to tackle the dry stuff first, then bring in the wet ingredients. Don’t rush this part; good mixing sets you up for success!
Mixing the Dry and Wet Components
First up, Step 1: In that large bowl, dump in all your dry ingredients—the rolled oats, the protein powder, the cocoa powder, and your powdered sweetener. Give that a quick whisk or stir just to make sure everything is evenly distributed. You don’t want a pocket of pure cocoa powder hiding somewhere, right?
Next, Step 2, it’s time for the wet stuff. Add in your almond butter, the vanilla extract, that teaspoon of apple cider vinegar (that’s your secret red velvet tang!), and your red coloring or beet powder. Start mixing this gently. It will look crumbly at first, but keep working it. Now, slowly drizzle in the almond milk, about a tablespoon at a time. You’re looking for a thick, uniform dough that pulls away from the sides of the bowl. Stop adding milk the second it comes together. This usually takes me about five minutes of firm stirring by hand.

Forming and Chilling Your Festive Red Velvet Protein Balls
Once you have that thick dough, move on to Step 3. If you decided to use white chocolate chips or chopped nuts for that extra crunch, fold them in now. Make sure they are evenly scattered throughout the dough. Don’t overmix once the chips are in, or you’ll just crush them!
Now for Step 4: Time to roll! Scoop out portions—I usually aim for about one tablespoon each—and roll them gently between your palms into smooth, one-inch balls. Place these beauties onto your parchment-lined baking sheet. This whole rolling process should take you about five minutes.
Finally, Step 5, and this is critical for texture: Chilling! Pop that tray right into the refrigerator for a minimum of one full hour. I know it’s hard to wait, but this chilling time allows the oats to absorb the remaining moisture and firms up the nut butter so your Festive Red Velvet Protein Balls don’t turn into sticky blobs when you try to grab one. Once they are firm, they are ready to eat!
Tips for Perfect Festive Red Velvet Protein Balls Every Time
Even with a recipe this easy, sometimes things go a little sideways, especially when dealing with different brands of protein powder, which can vary wildly in how much liquid they absorb. Don’t panic if your batch of Festive Red Velvet Protein Balls seems off! That’s why I always emphasize tasting the dough before you roll, because you can fix almost anything at this stage.
Remember, this is a no-bake recipe, so the texture is entirely dependent on the ratio of wet to dry ingredients. These little tips will help you get that perfect, firm, rollable dough consistency every single time you make them.
Troubleshooting Dough Consistency
If your dough is too dry and crumbly—meaning it won’t stick together when you squeeze a handful—you just need a tiny splash more liquid. Add almond milk just a teaspoon at a time, mixing well after each addition, until it holds together. If you accidentally go too far and the dough is too sticky or wet (it feels greasy or won’t form a tight ball), just toss in another tablespoon of rolled oats or protein powder. That will soak up the excess moisture right away. Trust me, adjusting liquid is the number one fix for any no-bake ball recipe!
Creative Variations for Your Protein Balls
Once you master the basic texture, you can totally play around with these Festive Red Velvet Protein Balls! If you hate almond butter, peanut butter works great, or even sunflower seed butter if you need a nut-free option. They will change the flavor slightly, but the texture should hold up.
For extra holiday flare, try rolling the finished balls in something fun before the final chill. Shredded, unsweetened coconut makes them look snowy and festive. Or, crush up some freeze-dried raspberries—that gives you a beautiful deep red coating and an extra tart punch that complements the cocoa really nicely. It’s all about making them feel special!
Storing and Reheating Your Protein Snacks
The best part about making a big batch of these is that you don’t have to worry about eating them all right away! Since these are no-bake and rely on nut butter for structure, they need to stay cool to keep their shape. I always tell my readers that these aren’t like cookies you can leave on the counter for days; they need the fridge.
You want to transfer your finished, chilled protein balls into an airtight container. I usually use a glass container because plastic can sometimes absorb the subtle cocoa flavor. They stay perfectly good for up to a week, which is fantastic for quick grab-and-go breakfasts or afternoon energy boosts. Since they are already chilled, you don’t need to reheat them at all!
| Storage Type | Duration | Notes |
|---|---|---|
| Airtight Container (Refrigerator) | Up to 7 days | Keeps them firm and fresh. |
| Freezer (Airtight Bag) | Up to 1 month | Great for making ahead for the holidays! |
Frequently Asked Questions About This Festive Red Velvet Protein Balls Recipe
I get so many messages from beginners asking for clarification on these little guys, so I wanted to pull the most common questions right here. Don’t feel silly asking; that’s why NoobRecipes exists! Getting these details right makes all the difference between perfectly firm balls and a sticky mess. These tips should help you master your batch of Festive Red Velvet Protein Balls.
Can I substitute the protein powder in these Festive Red Velvet Protein Balls?
Yes, you absolutely can swap the protein powder, but you need to watch the liquid! Whey protein tends to absorb moisture differently than plant-based powders like pea or soy. If you switch to a plant-based powder, you might need to add an extra splash of almond milk because those tend to create a drier dough. Always start with less liquid than the recipe calls for, no matter what powder you use, and add more slowly until it clumps up.
How long do these protein balls last?
Since these are no-bake and contain nut butter, they need to stay cool. Stored properly in an airtight container in the refrigerator, your Festive Red Velvet Protein Balls will stay fresh and firm for about one full week. If you make a huge batch for future snacking, they freeze really well too—just pop them into a freezer bag and they’ll last easily for a month. Just let them sit on the counter for 10 minutes before eating if they come straight from the freezer.
What is the best way to achieve the red color naturally?
If you want to avoid artificial dye entirely when making your Festive Red Velvet Protein Balls, beet powder is your best friend! It gives a beautiful, deep red hue. The only warning is that beet powder has a slightly earthy taste, so you might need an extra sprinkle of your sweetener to balance it out. If you use liquid food coloring, just start with a few drops, mix, and add more until you hit that perfect holiday red.
Share Your Homemade Festive Red Velvet Protein Balls
I really hope you loved making these super easy snacks! Seriously, if you nailed these, you can conquer any recipe. Once you’ve chilled them and given them a taste test, snap a picture! I love seeing your versions of my beginner recipes on social media. Don’t forget to leave a rating right here on the recipe card so other new cooks know these Festive Red Velvet Protein Balls are a guaranteed hit!
If you enjoyed this recipe, be sure to follow along for more easy wins! You can find more great content on our Facebook page or save this recipe for later on Pinterest.
Print
5 Amazing Festive Red Velvet Protein Balls
- Total Time: 1 hour 15 minutes
- Yield: About 12-15 balls
- Diet: Vegetarian
Description
These Festive Red Velvet Protein Balls combine holiday flavor and nutrition into a convenient, bite-sized snack perfect for easy festive treating.
Ingredients
- 1 cup rolled oats
- 1 scoop vanilla or unflavored protein powder
- 1/4 cup cocoa powder
- 1/4 cup powdered erythritol or preferred sweetener
- 1/2 cup almond butter or peanut butter
- 1/4 cup unsweetened almond milk (adjust as needed)
- 1 tsp vanilla extract
- 1 tsp apple cider vinegar
- Red food coloring or beet powder
- 1/4 cup white chocolate chips or chopped nuts (optional)
Instructions
- Combine oats, protein powder, cocoa powder, and sweetener in a large bowl.
- Add almond butter, almond milk, vanilla extract, apple cider vinegar, and red coloring or beet powder. Mix until a thick dough forms.
- Stir in white chocolate chips or nuts if you choose to use them.
- Roll the mixture into 1-inch balls. Place these balls on a tray lined with parchment paper.
- Refrigerate for a minimum of 1 hour to let them firm up.
- Store the finished balls in an airtight container in the refrigerator for up to one week.
Notes
- Adjust the liquid amount if your dough seems too dry or too sticky.
- You can use natural beet powder for a healthy red color alternative.
- For extra holiday appeal, roll the finished balls in shredded coconut or crushed freeze-dried raspberries.
- Prep Time: 15 minutes
- Cook Time: 0 minutes
- Category: Snack
- Method: No-Bake
- Cuisine: American